 | |||
 |
 |  | |
 |  | ||
 |  | ||
 |  | ||
 |  | ||

| |||
|
|
| | |
| | ||
| | ||
| | ||
| | ||

 Letters to the Editor, 2008
The Letters to the Editor page has gotten so long that I have decided to break it up. This page contains only letters I answered in 2008, and the index to them. For the "master list" of questions, go to the Letters to the Editor main page.
If you have a question that isn't answered on this page or in the articles, send it in - chances are twelve other people are wondering the same thing. And your questions are what keep the site growing.
As always, we hope that you will please contact us with any questions, corrections, or follow-ups to our answers.
Dave,
If I read you right, you're looking at "multi-train" operations, 2 or more trains doing independent operations on the same right of way at the same time. There is discussion of "multi-train" operations in the article "Large Scale Power and Control."
To "hit the high points," you will probably want some kind of "Command control," that's where each locomotive has a receiver of some kind and you send control signals to the receiver to control each locomotive separately. (This is different from "standard" systems in which the power supply controls the track segment and all locomotives on the same track segment travel the same direction and approximately the same speed - if they're wired correctly, that is).
DCC (Digital Command Control) is an example of a "command control" system in which the locomotive still draws power from the track. In DCC, the signals are usually send through the track also. A DCC-decoder card in each locomotive recognizes which signals are meant for it and controls the locomotive accordingly. The DCC decoder cards for the locomotives are fairly inexpensive (and getting easier to install as more and more locos are "DCC-ready"). But the "distributor" piece, which sends the signal through the track is fairly expensive. On very large railroads you may need multiple "Distributors," each feeding a different track segment. These aren't "Blocks," technically, since each segment is receiving the same signal from the Distributors. Another quirk is that you also have to be careful not to let two adjacent track sections be powered by the same power supply (you CAN go every-other-one in most cases).
DCC is a favorite of Large Scale Indoor users, a little less popular out of doors; don't really know why. It is VERY similar (and in some cases compatible) with the LGB multi-train controlling system that was released a few years ago.
AristoCraft/Crest Train Engineer has a similar solution, except that the "receiver" card in the locomotive receives radio signals instead of signals through the track. This way, you can start off with all track-powered locomotives, then convert them one at a time to batteries if you want, without disturbing your setup too much. Or you can go straight to battery-only operation.
RCS, an Australian manufacturer whose systems are simpler to use, has a solution that's good for battery-only. It has fewer features and options than the Train Engineer family but users appreciate its relative simplicity.
If you go with MTH trains, they have a version of DCC that is actually closer to Lionel's command control system (TMCC). The MTH version is called DCS. For a while some MTH engines came with DCS installed, which made it very attractive and beginner-friendly. The last contact I had with MTH, though, it seemed to be a add-on now. It is NOT compatible with DCC or LGB's MTS.
So your options for multi-train operation are:
Command control with track power:
You CAN mix and match to some extent. For example, if you've properly wired a battery-powered locomotive, you should be able to run it on track that is powered and carrying a DCC signal with no problem. So you might want to have your huge freight train track powered and have a few trolleys or switchers battery powered. No problem.
Conversely, most DCC-equipped locomotives will run as "ordinary" track powered locomotives if no signal is present. So if you fix up a locomotive to work on your railroad but you take it to a friends who doesn't run DCC, it should work.
Another consideration is that a radio controller and a battery-powered locomotive create a "closed" system. If you convert one locomotive to radio/battery (and you wired it properly), you can run THAT locomotive anywhere, too, no matter what power and control systems your friends or regional display railroads are using. RCS users tend to be people who like this kind of "freedom."
Are there potential glitches in all of these systems? Of course. But the fact that they're all so widely used means that you can probably find someone who is already familiar with the technology to help you.
Personally, I kind of like the Aristo/Crest TE and the fact that you can start with track power and go gradually to battery without having to convert all of your locomotives to battery power at the same time. A few friends who think the TE receiver is "wimpy" have actually taken the case off of the huge trackside TE receiver and installed it into their diesel locomotives (which usually have some room).
As always, each garden railroader makes their own adaptations as they adopt these various technologies. For LOTS of information about DCC and some information about TE, check out George Shreyer's "Technical Tips Page:"
Best of luck with your projects, please let me know if you have any more questions - Paul
I am trying to add lighting to my g-scale caboose & luggage car-- "Tootsie"
Kent,
I'm not familiar with the specific car you mention. I notice you have AristoCraft trains. If you're talking about the AristoCraft Sierra combine car, the following notes will be especially helpful.
Aristo's Parts department sells trucks that have the power pickup wheels and everything installed, they also sell parts for retrofitting Aristo trucks with power pickup.
Look at the Brush, Brush assembly, Metal wheels, and Brush Springs (numbers I, J, K, and L) on the Combine blueprint:
These might get you where you need to be.
On the other hand lots of folks get a little 2-AA or AAA battery compartment and stick a couple of nicads in with a light bulb going up into the coarch.
Whatever you figure out, if you want to take photos as you go and submit them with your notes as an article, we'd love to post it, since several other folks have had the same question.
Best of luck with your projects, and Merry Christmas - Paul
My dad and I are thinking about doing a ground level O gauge soon. How should we connect power to it, for conventional engines? the sight is about 50 ft away from the house at closest and 140 ft at the farthest point - Ryan
Ryan,
Unlike folks who use Large Scale trains, designed for garden railroads, you NEED AC power coming to the trackside. The safest way to route AC to your railroad would be to bury UV-resistant "romex-type" cable a foot deep, protected by GFI (ground fault interrupt) circuits. At the railroad end, they should emerge into outdoor AC outlets.
Then consider building a "transformer cart" or some other way to easily schlep your Lionel power supplies in and out, so you don't risk leaving them exposed to bad weather. Check out the following article for one suggestion:
If you do wind up using outdoor extension cords on a temporary basis, try to get a 14 gauge or bigger, and make certain it is GFI-protected.EVERYBODY doing O gauge outside is pioneering right now, since there's no one good way to solve all of the challenges yet. You may come up with some alternative that works better for you. If you do, send it our way.
In the meantime, please keep in touch, and keep us informed of your progress - Paul
. . . I have a question to which I cannot seem to find the answer. I recently purchased a Aristocraft (Crest) 55470 (Train Engineer Walk Around Control System). I have separated my G-scale garden railroad into blocks. I wanted to use common rail wiring but cannot figure out how to wire the Train Engineer into it. I checked out all of the links you provided in your website but cannot seem to find the answer. Any information is appreciated. Thank you - Chuck
Chuck,
Thanks for getting in touch. You've stumbled on one of the "culture" gaps between indoor and outdoor railroading.
You could write a book on this subject, but let me try to summarize - please forgive an eggregious oversimplifications. . .
Inside, folks use blocks so they can control different trains on different parts of the railroad. They are never far from a bank of switches with at least one and sometimes three switches per block to control on/off/direction, and maybe which power supply is serving that block at the moment. If you want to do "serious" operations on two different parts of the mainline at a time, you have to have two "rheostats" (controllers) that you can switch in and out of particular blocks, usually by flipping a physical DPDT switch somewhere.
Outside, where you may be sixty feet - instead of six feet - from the control board, folks tend to use other technologies. You COULD use the same kind of blocking you do indoors, but you'll be stuck at the control panel flipping hardwired DPDT switches instead of following your trains around.
The Train Engineer system you have "controls" the train by controlling the segment of track it is on. If you don't mind wiring up a bunch of DPDT switches (like you would indoors), you COULD switch which blocks it controlled at any given time. If you wanted multiple trains running using the same kind of "Block" approach you might take inside, you would also need another "receiver unit" (5471) on the other set of blocks. If you wanted two people operating trains at once, you'd want a separate transmitter (5473), too.
Here's an example. On my mainline loop, I have a long passing track, so I can swap out between a long freight train and a long passenger train. Both "paths" the trains could take are electrically separated from the rest of the railroad by plastic rail joiners on one rail. Then I have a DPDT switch that I can throw to power EITHER of the paths but not both. This works whether I'm using a "normal" power supply or a TE trackside receiver (5471) and power supply. I have to walk over to the switch to throw it, although if I bought an accessory or switch controller unit (CRE55474 or CRE55475), I could probably remotely trigger a relay or something that would switch the power on or off on those paths instead. (Nobody I know uses these for that purpose, in case you wondered, but you could.)
In other words, it gets REAL complex real fast.
MOST garden railroaders who want to run two or three trains on the same track use a Command Control system, such as "onboard TE" that controls the locomotive itself, not the track, per se. You still need a power supply feeding the track (or batteries in the locomotive). But your transmitter (55473) can control several locomotives at once if each is equipped with the onboard TE unit.
If you are running really big trains with multiple large locomotives per train, you might need to break your ROW into separate "blocks" so you don't overpower a single power supply. However, each "block" will just have a power supply hooked directly up to it - all controlling would be done by the onboard receivers in the locomotives. AristoCraft locomotives today are built especially to accommodate installing onboard controllers, so this isn't as onerous as it might sound.
Another possibility might be to have your "mainline" powered and controlled by the trackside TE controller, then have any other locomotives powered by batteries and controlled by remote control.
I know that may all sound very complicated. If you gave me a more specific example of what you're trying to accomplish I could probbly be more specific and more helpful.
Have a great Christmas season - Paul
I am researching my power supply requirements and need answers.
Robert,
Here's a stab at an answer to your question. A one-amp power supply that goes up to 18 volts DC will run most small locomotives (0-4-0s, etc.) and most Bachmanns period on small railroads.
I have run small Aristo and Bachmann locos on less, like .6 amps on very small display RRs.
Aristo likes to recommend 1.8-2 amps for their smaller locomotives. Those will even run most larger locomotives on small railroads, such as test tracks. I've had trouble with my 1.8 amp power supply, though, so I don't know if I would recommend buying one outright. They used to come with the starter sets.
For "everyday" use on my outdoor railroad, I use something larger: an older three-amp Aristo power transformer/rectifier unit that feeds a separate control unit (#55401). The three-amp transformer/rectifier unit has been replaced by the five-amp (#55466) unit. However the three amp unit with this controller runs big locomotives (4-6-2s, 2-8-2s) on my 150 or so RR (with lots of jumper lines). If I wanted to run REALLY big locomotives like the 2-8-8-2, I'd probably upgrade to the 10-amp power supply. Also, if I wanted to "MU" locomotives (run two or three on the same train), I would upgrade.
Aristo has announced 15-amp power supplies and controllers for folks who want to do things like run multiple 2-8-8-2s with long trains on very large RRs.
I use AristoCraft products as examples, because that is the line I'm most familiar with. Their controllers have "pulse width control" and "momentum" for more realistic and reliable operation. However, I have also used a 2-amp MRC power supply built for indoor trains (when I was having trouble with one of my AristoCraft 1.8 amp controllers), and the power curve seems to be about the same.
Note: If you happen to have any Lionel Large scale locomotives, those draw more power - their 0-4-0T and their 0-6-0Ts run better with 2 amps in situations where their Bachmann and Aristo Counterparts could get by with one.
Hope this helps - Paul
Costa writes:
Hi, I'm interested in the Bachmann G North Pole Special, and I would just like to know the relative size of the locomotive. Can you also provide me with the size of the Bachmann G Night Before Christmas and Bachmann Jingle Bell Express (how long and how high of just the locomotive). thank you for your time.
Costa,
All of the current Bachmann Large Scale (G) train sets use basically the same locomotive, the "Bachmann Big Hauler Ten-Wheeler (4-6-0)."
Although they have been reengineered several times since they were introduced in the 1980s, their overall dimensions have stayed the same. So if you've every seen ONE Bachmann 4-6-0, you know the size. If you've seen an LGB mogul, the Bachmann is longer, and I think a tad taller.
Now here's the embarrasing part: I have three or four of these buried somewhere, but I don't have time tonight to dig one out. The measurements below come from a supplier, and are probably accurate.
Scale: G 1/22.5
Steam Locomotive Size
Tender Size:
In other words, this is about as big a locomotive as you want to see around your Christmas tree - that's why I call it a "jaw-dropper" in that application. They also look very nice in the yard or garden railroad. They're WAY too big to use with Christmas villages. Does that help?
Have a great holiday season - Paul
I apologize that I could not find the answer on other parts of your web site. I have close to 200 feet of G-Scale track in an indoor layout. It is two separate track systems powered by a single MRC 6200 transformer. I seem to have quite a few spots where the engines slow down and then speed up. I would guess that this means poor electrical conductivity. Most all of my track is Aristo with the screws in the joiners. Replacing track would be VERY difficult since my entire system is elevated at 7ft and 8ft. Do I need a bigger transformer? Do I need to figure a way to have multiple contact points for power from the transformer? I am open to suggestions. Thanks in advance for your help - Bob
Bob,
Thanks for getting in touch. First of all, you should know that people with winters think it's just WRONG to have an INDOOR large scale railroad in Florida. :-)
Just kidding.
Also never apologize for asking questions - that's how we get 90% of the ideas for our articles, and it also shows us where we need to improve.
You have obviously dreamed up the answer to your "conundrum" - jumper wires. On the bottom of AristoCraft track are tiny screws that hold the tie strips to the rail.
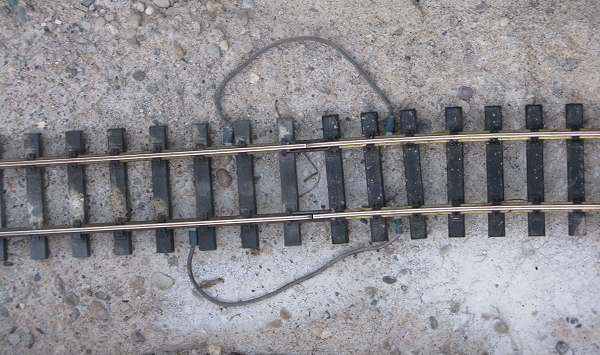 I get little u-shaped solderless connectors and crimp them onto pieces of lamp cord or
similar wire. The photo to the right shows two pieces of track with jumper wires running
between them on my railroad (before I buried the jumpers with ballast).
I get little u-shaped solderless connectors and crimp them onto pieces of lamp cord or
similar wire. The photo to the right shows two pieces of track with jumper wires running
between them on my railroad (before I buried the jumpers with ballast).
If your eyesight is good and your fingers are nimble, you can use a very small phillips-head screwdriver to back the screw out of the tie strip a little, slide the U-shaped connectors under the screw, and tighten the screw back down without having to raise the track more than a few inches. If you're like me it will be a little more complicated than that. I don't usually connect every piece of track - the one in the photo is a special case because of where my turnouts on that side of the track are located. Although if I was starting a new RR, I might consider running jumpers between ever piece.
Remember, that the cross-section of the rail is larger than your wire, so it really is a good conductor, especially if you've used the AristoCraft screw-on rail joiners. So the purpose of jumpers is just to provied a "backup" for that system (the best in the market, by the way). I would recommend perhaps running your jumper wires to connect, say, the fist piece to the third piece, the third piece to the sixth piece and so on. That way the jumper system and track system share enough contact points that a noticeable loss of power at any section of track is almost impossible. Consider at lease 16 gauge wire if you can get it easily. If you use plain brown lamp cord like I used in the photo, you'll notice that it has a "bead" or ridge running down one side of the wire. In my case, I make it a rule that the beaded wire always goes on the "outside" rail, so I don't accidentally wire a dead short into the right-of-way.
If you want to try running jumpers JUST to the "trouble spots" you may, but by being aggressive about it, you'll reduce the number of trouble spots in the future as well.
Sounds like on your system, your locomotive never gets more than 70' from your power supply. If that's the case, and your locmotives run find near the power supply, they SHOULD run well 70' from the power supply too, once you run jumper cables.
Hope this helps - Paul
I had a layout that I started several years ago with 500' of track, a mixture of LGB and aluminum. . . .
I am planning on doing another layout in the spring of 2009. But I only have a long narrow area. I would also like to lay track IN the lawn down to the lake for a town, but I'm not sure about running over the track with my riding lawn mowere. Any ideas on that problem would be helpful. . . .- Wayne
Wayne,
Your new plan like a great idea.
Regarding track and riding mowers: If LGB (or AristoCraft) track is properly installed (say on concrete poured into a trench, and low enough not to be in danger from the blades), you CAN go over it with a riding mower. People have gone over it with elephants. :-)
Aluminum track is another story. Here's an old trick from Jack Verducci that he uses for things like traction (streetcar) tracks. You completely embed the track in concrete, up to but not over the railhead. Then before it hardens, cut out a tiny trench on the inside edge of each rail, so you're sure the wheel flanges have clearance, both depth-wise and back-to-back. Some folks have attempted to carve out the trench for the flange by pushing a truck up and down the concrete, but I'm not sure that would give you quite enough safety margin.
At any rate, when you were done, when you rode over it with the riding mower, the concrete would be taking the weight, not the rails themselves. This MIGHT do for the aluminum, unless your riding mower is really a farm tractor with a mowing deck. :-)
I've never tried this myself, but I have friends who have and it seems doable. Of course you'll want to keep a shop vac on hand to suck the pine needles, maple seeds, and pebbles out of the little trenches. . . .
I would definitely experiment with a small version of either solution before I laid 200' of track and THEN decided you wish you'd done it another way. . .
Just a thought. If I come across any other potential solutions, I'll let you know. In the meantime, welcome aboard - Paul
I'm working with my community to establish a garden railroad layout and wanted to know the following:
If we were to build a half-acre layout, with a series of bridges, tunnels and water features, three engines and up to three dozen rolling stock, what investment range (exclusive of the landscaping) might we be looking at?
Also, to maintain a garden railway, how labor intensive is it on a weekly basis?
Thanks for your help - Todd,
Todd,
As you may realize, you gave me very little information to go on. You've also specified a half-acre garden railroad, which is pretty big by most people's standards. So I'll do my judgement based on the average half-acre RR I've observed.
Because brass prices just exploded (through no fault of garden train manufacturers), one of your big initial investments will be track. You haven't described what kind of railroad you wanted, but a 500' loop of track will pretty well "fill in" a half-acre. With track retailing at upwards of $7 a foot, assuming, say, 500 feet of track, you can do that math and add, say $200 for turnouts (switches) if you want to have any sidings. If you want multiple trains running at the same time on different loops and levels, add $$ for, say an 80' loop and a 120' loop. That puts you in the $5K range for track if I did my math right. If you go with stainless steel, it will cost more, but it will require less maintenance (and be more vandal-resistant, too, although you should still consider security an issue). By the way, I always recommend AristoCraft track as it makes the best mechanical and electrical connections, is very sturdy, and has very good customer support. Of course there's no compelling reason you can't go with, say a 200' railroad at first and work your way up from there. . .
For trains I'd recommend starting with a few AristoCraft starter sets to get a reliable core of products you can run. Lets just say a steam passenger set, a steam freight set, and a diesel freight set for starters, and another several freight cars. Depending on what you buy and where, AristoCraft starter sets average between $350-450, and cars average around $70. Plus I'd buy metal wheels for each car, which seriously reduces mantenance; add another $20 pewr car - $220. So figure 1700 or so for trains starting out. This is always something you can supplement next year and the year after, so there's not a huge point in buying $5K worth of trains starting out. Each set would also give you a little 4'-diameter loop of track you COULD use outside if you wanted to, but trains look better and run much better on wider curves, so I wouldn't count on that track as an "offset" of the track cost above. (I use mine for special display railroads, etc., where room is at a premium.)
Some of the Aristo starter sets are shown on the following page: http://familygardentrains.com/special_offers/begin/ls_starters.htm
You may notice that Bachmann Large Scale trains are a good value. I recommend them for homes and backyard garden railroads, but not for public or display use - they're not as sturdy as AristoCraft. Plus the couplers are incompatible (and less reliable), so if you DO get some Bachmann, you'll want to get some AristoCraft couplers to put on them.
You should also consider getting more powerful power supplies than the ones that come with the starter sets, at least for any loop over 80'. Figure another $200-400, depending on how elaborate you want to go.
For buildings, stations, etc., if you want to start out fast, consider the AristoCraft pre-built structures. They are sturdy and attractive, and cost about the same as many kits. Figure an average of $80-110 per structure. Of course you can start with one or two buildings and work your way up if that's an issue. The AristoCraft 7200 and 7201 built-up station and freight station are among the best values in Large Scale. These are shown on my page at: http://familygardentrains.com/special_offers/begin/structure_sale.htm
If you have a bunch of real craftspersons, you may want to build your own structures or use the inexpensive (but a little more complicated to assemble) kits from Colorado Model Structures.
You may be suffering sticker shock by now, but YOU'RE the one who specified a half acre RR. If you cut the RR in half, you can cut the track price in half.
If you build your railroad properly, use good track and use all metal wheels on your trains, maintenance of the track and RR itself is very low, maybe an hour a week. I recommend a raised RR on 2x6" pressure treated roadbed, set on posts that go below the frost line, such as that described in my article on "simple raised roadbed."
If you want the train to look like it's on ground level, build the RR first, respecting the REAL frost line (before landscaping), and then build your retaining walls and haul in the dirt.
When you build a "roadbed" with 2"x6", there is fairly little waste. To calculate the cost, figure out how many feet of track you have. Add about 1/3 for "waste" and "plates" (which you'll probably cut out of 1"x6"s), and figure a post for every 2-3 feet (3' for wider curves, 2' for narrower curves). Post height will depend on your frost level.
I've found that the most cost-effective retaining walls are built with 2x6" "walls" on posts sunk below the frost line, such as this kind shown in my retaining wall article. You can always add a stacked stone veneer or other camouflage to make it look more natural later.
That said, if you really do nice landscaping, with raised "terraces," a waterfall and pond, and appropriate trees and groundcover, the cost of materials will usually approximately equal the cost of trains and track put together. If you pay to have it done, the rule of thumb is to multiply the cost of trains and track by four. FREQUENTLY people see a garden railroad and ask "How much would it cost for me to have one of these?" If you tell them, say, $1000 for trains and track (for a small RR), they'll think that's crazy, then they'll buy the cheapest trains and track they can buy and put three to six grand into landscaping and not think anything of it. Go figure.
You'll also need to consider storage, and a way to keep the power supplies out of the rain. Obviously, if you build a typical $1200 storage shed, it will be easy to break into and steal everying unless you also have a nice high fence, and that's another issue. . . . Most public garden railways are unfenced and store their trains in a preexisting structure, if that's any help, but you need to take that into account as well.
I am copying a friend, Dave Watts, of WattsTrainShop.com on my reply because Dave has good prices and great service, and can give you specific answers about every train and track question you might have. Also "TATE" (an AristoCraft spokesperson) is one of my best links to the inner workings of AristoCraft, and may be able to fill in any blanks if I've left anything out.
This may be more than you wanted to know, but I wanted to answer your question as completely as I could with the scant information you gave me.
Please let me know if you have any follow-up questions. Or if you think you have a pretty good idea of any trains and track you want to buy, give Dave Watts a call at 1-800-542-7652 and he'll walk you through specifics.
Hope this helps - Paul
 Need help and info on roadbed and best way to get started!!
Carl,
When you sent this, I was actually dealing with roadbed issues myself and wanted to get my August/September project "behind me" before I wrote you back.
There are five basic approaches to roadbed:
Both of the above techniques are described somewhat in my 1-Day Railroad" article.
 HDPE flexible roadbed. This is recommended for extensive raised railroads. It looks
great over long sweeping trestles, etc. If it is used on the ground, you need to make
certain it is resting on a gravel bed with plenty of drainage, otherwise frost heave will
affect it. It also doesn't block weeds to speak of. But the look can be "stunning."
That approach is addressed in the HDPE Flexible Roadbed articles.
HDPE flexible roadbed. This is recommended for extensive raised railroads. It looks
great over long sweeping trestles, etc. If it is used on the ground, you need to make
certain it is resting on a gravel bed with plenty of drainage, otherwise frost heave will
affect it. It also doesn't block weeds to speak of. But the look can be "stunning."
That approach is addressed in the HDPE Flexible Roadbed articles.
I always recommend that beginners try a small patch somewhere and grow with the railroad. Do you have a corner where you can try #1 or #2 just to get the "feel" of the hobby, and figure out what parts of the hobby appeal to you the most?
You CAN convert #1 or #2 to #3 or #4 if you decide to later.
If you want a more permanent railroad from the start, I might recommend the 2x6 method - it's not as permanent as concrete, but it is low maintenance. On the other hand, if you have your heart set on a big dramatic railroad, with lots of trestles and sweeping curves, HDPE is probably the way to go. . . .
I have a question which I couldn't find the answer to anywere on your site. I am going
to begin counstruction on my own garden railway this fall and wanted to know If I do
the ground work now (filling in the sub ballast and mulch) and wait until spring to lay
my track and other details? I was told that I should let my ballast go through a
freeze/thaw cycle this winter and lay the track in the spring. When is the best time
to do that? - Caleb
Caleb,
On the other hand, Fred Mills, in Ottowa (sp?), has a right of way that's amost all 2x6"
boards laying right on the ground. They're all fastened to each other very solidly (like
the roadbed in the "easy raised roadbed" article, except they're not raised. They rise
and fall all winter long, but they stay in the same relative position, so usually the
railroad is pretty well ready to go in the spring.
Don't worry about the mulch - it will blown away, get raked away with leaves, and/or
deteriorate between now and spring anyway.
Also, your ballast will shift and get eaten by birds, etc., over the winter, so if you
don't have the track down now, and don't plan to run trains this winter, consider leaving
the track and ballast uninstalled until spring as well.
That's just my opinion, of course, based on experiences of myself and other folks who
don't live where you do . . . .
Keep me posted, please - Paul
Hi,I want to begin to build my garden railroad but I am very confused,firstI
don't know difference of scales and gauges of railroads,I would like to know how many
types of railroads can I install,what scale of trains can I run on what type of
railroad,what is the diference of scale 0,scale G and large scale,could you give me
sizes about theses diferences? Thanks a lot - Salvador
Salvador,
If you don't have any trains yet and you have room for at least a 6'-diameter circle of
track, consider Large Scale trains (sometimes called G scale).
Large Scale trains by Bachmann (Big Hauler), AristoCraft, LGB, and USA trains all run on
the same track. They are models of different kinds of trains, though, so they don't
always look right together. If you like "old-timey"-looking trains, consider Bachmann.
If you like modern-looking trains, consider AristoCraft or USA trains.
One other thing about Bachmann - you can't use Bachmann track outside. But most people
save the track that comes in train sets to use inside around the Christmas tree anyway.
It's only 4' in diameter, and trains look better on wider curves.
You'll see a good selection of trains on our
Large Scale Starter Set page.
I run about 90% AristoCraft, if that helps. It costs more, but it's built better, and you
CAN use their track outside. Plus most AristoCraft sets come with a remote control that
will control ANY train you put on the same track. The AristoCraft Christmas starter set
is an especially good buy. Here's a vendor who still has some listed.
To answer the other part of your question, O gauge trains from companies like Lionel are
not made for running outside. Many folks who have O gauge collections are considering
starting a O gauge outside railroad so they CAN run their Lionel trains outside when the
weather is appropriate. But O gauge trains are pretty much a distinct hobby from Garden
Railroading. (Plus you can't use Lionel track outside either) If you buy an O gauge train
set and try to start a garden railroad with it, you're really going to have to learn two
different hobbies at the same time.
Very few outdoor railroads in the U.S. use anything smaller than O gauge trains; the
rigors of running outdoors make that very difficult. Bigger really is better when you're
dealing with the elements.
Hope this answers your questions - please let me know if you have any more - Paul
Bill,
Clearance depends on what kind of trains you're running. If you're
running long pieces like AristoCraft Heavyweights, which are about 34"
long with couplers, they will require more clearance than if you're
running shorter pieces like most Large Scale freight cars or
streamliners. Conversely, the wider the radius, the closer the
right-of-ways can be together.
Back in the early days of garden railroading, LGB introduced
5'-diameter track to complement its 4'-diameter curves. As long as you
That gives rise to the "common knowledge" that 6" on center for
concentric curves is fine, as long as you're running equipment that
looks good on the curves. Those AristoCraft Heavyweights will run on
10'-diameter curves, but they don't really start to look right until
you're up to about 15' diameter.
If I was going to run big equipment like that on BOTH lines, I'd
consider 10" on center for a 10' curve or 8" on center for a 15-foot
curve reasonably safe. If you DON'T plan to run may pieces longer
than 20" (most boxcars are 15"-17") you might be safe with 2" less on
both measurements.
Once you get out to, say, 20'-diameter curves, you're probably safe
with 6" on center even for very long pieces.
But, then again, you never know when someone might bring over a Big
Boy and ask to run it on your railroad. . .
Sorry to be vague. Lots of folks will just tell you 6" on center is
the "standard," which it was in 1983. . . .
Hope this helps - Paul
In 2000, I bought a starter set made by AristoCraft. It's the little Southern
0-4-0 Freight set, ordered through a large mailorder company (can't remember name). I would like to continue collecting Southern Railroad cars and a locomotive, in
G-scale. My favorite would be a G-scale of the famous Crescent Limited passenger train
of the mid-20th century. . . . I'm retired and have a large enough yard to set something up - Thanks.
Joseph,
Thanks for getting in touch. AristoCraft HAS made G-scale models of the Crescent
Limited.
I don't know how close it is to the Southern prototype, but the paint jobs on the
equipment are incredible. If you want a whole train of the things, be prepared to run on
wide radius track, and spend some money. :-)
I've done that on PRR, but I'm an addict, what can I say? I also have the Mikado PRR
version, which pulls even better, although it's not technically a passenger engine.
Have you gotten in contact with a local garden railroading club yet? I'm sorry I don't
know where Santa Maria is. But the Calif. clubs I am aware of are here:
Most clubs are full of helpful people. Please keep in touch, and let me know what your plans are, perhaps I can shoot you some
examples to think about - Paul
I live in northwestern Wisconsin and am worried about frost heave. How do I
compensate for this using the method that you have described using HDPE? I read in one
section about not driving the posts below the frost line. Won't leaving them above the
frost line cause the track to heave? I'll be starting construction within the next
few weeks and don't want to have to redo something that I messed up. HELP!
Helen,
The reason not to drive the hdpe posts below the frost line is that they won't
support the RR longterm anyway - they're just there to keep it on an even keel until you
get the backfill, etc., in place to hold the track steady.
If you want to keep the HDPE RR elevated for long sections, I'd recommend using PVC pipe
driven below your frost line, perhaps with rebar in the center of every other one for
extra strength. (The rebar wouldn't have to come all the way to the top, in fact it is
easier if it doesn't). It's a lot cheaper than trying to get enough hdpe to go 4' into
the ground or whatever. A fellow with NO frost line who used PVC "posts" is Bob Canfield.
He only buried his post 8" or so into the ground, but the principle would be the same.
http://familygardentrains.com/primer/o_gauge_outside/bob_canfield/canfield2.htm
On the other hand, if you really want your rr to be on the ground (even if the ground is
raised), just use short risers temporarily until you get the backfill in place. But be
sure to backfill with gravel instead of dirt under the tracks all the way around. Then
the whole RR should rise and fall about the same rate and just need some re-graveling
each spring. A friend in Toronto uses 2x6" roadbed this way and swears by it.
It might be a good idea to try something small this year, just to figure out what works
for you, before you order 300 board feet of HDPE and decide it's too much trouble or
something.
Please keep in touch - I have WAY too few readers in your part of the world and want to
be able to answer the NEXT question from someone in your climate. Thanks and have a great summer - Paul
. . . I'm finding that the space we have (a corner approx. 20 feet by 20 feet
and about 7-8 feet of depth) is just not giving me enough space in G
scale to put in some of the details and options I would prefer.
I've read your articles about O scale outside, but as you noted before
to me, there are few narrow gauge train options available in O scale
(and we want to do a mining/mountain scene). But I've seen on the web
that some people are now trying On30 scale outside (which is of course
only narrow gauge trains).
Do you have any input into On30 outside? My biggest concern is the
smaller size of the HO scale track used, although Peco does offer
On30/HO track that is UV protected, and the track will be within a
raised area protected from foot traffic (and we have not pets -- other
than 4 young boys!). And with our Arizona desert climate we don't have
to worry about frost or much rain (just heat and sun!).
I would think that with some of the same HDPE roadbed work that you
describe with O scale track, On30/HO track "could" work (cross my
fingers). And I would prefer to go with R/C and batteries, and I see
that O scale is handling that now (and On30 scale trains are basically
O scale-size trains, so the electronics and batteries should have
room), so electrical connections wouldn't be a concern.
I also REALLY like the lower prices: Bachmann Shay's for less than
$200, compared to the cost of G scale Shays for example.
Thanks in advance for any response! - Greg
Greg,
Two considerations generally keep folks from using O scale outside.
First, the HO track and relatively tiny flanges don't handle things like pine needles,
ant trails, bird poop, etc. at all. Folks who have tried running O scale trains
(standard gauge on O-gauge track) have generally said it can't be done, a shame since
true O scale is 2/3 the size (lengthwise) of many Large Scale trains. But THOSE
flanges (which are much smaller than O "tinplate" trains like Lionel) can't handle outdoor operation,
much less the smaller flanges and rail heights of On30 (which are basically HO).
I DON'T think that's an insurmountable obstacle, but you
would want to have every inch of your right-of-way within easy reach and be able to check
the rails before every operationg session (I'd consider taking a superfine sanding pad
all the way around quickly, feeling for anyting that fells out of the ordinary. A small
railroad might be doable this way, but something with loops and figure eights or whatever
might require more of this sort of maintenance than you would want to try.
If you wanted to get some idea, you COULD pick up a used cheap HO train somewhere and try setting the track outside for a week in
the shade (so the UV isn't a problem), and see what it takes to get the train running each evening.
The other consideration is size. It's one thing to say that 1:48 is less than half the
size of than 1:22.5 (the scale of LGB), and even smaller compared to 1:20.3 (the scale of
the Bachmann Shay). It's something else to realize that an On30 mogul is about 1/9th the
BULK of the LGB mogul, and an On30 Shay is about 1/13th the bulk of a Bachmann Large
Scale Shay. Again, if you had a patio railroad, this might not be a problem. But if you
want a complex railroad with the trains getting up to, say 19 feet away, they really will
seem to disappear in the yard.
Let's back up a little. What kind of modeling do you want to do? Logging? (That's what
95% of Shays were used for). But RRs that were built for logging seldom hauled
passengers (with exceptions in New Hampshire, Vermont, and Tennessee). The Little River
RR in Tennessee was built as a logging railroad, but it was actually standard gauge, and
it hauled passengers and other freight just like any other mountain RR. Maybe you want a
more general-purpose RR with Logging as one aspect. You MIGHT consider 1:24. It doesn't
cost less than 1:20.3, but it might take less room if you plan right. The Hartford
Locomotive Works "Big John" is a sort of "caricature" of a geared logging locomotive, but
it's a good runner. Other HLW pieces and pieces from the AristoCraft Classics line would
give you many other options in the 1:24 universe.
Or if a Standard gauge logging/rr operation would suit, you might investigate O gauge
trains with "hi-rail" wheel/track options. Lionel's West Side Lumber shay (Lionel
6-28022) is ridiculously expensive and just about unavailable, but the Lionel old west
trains are available for a reasonable amount and could be painted and detailed to go well
with the Shay, if you wanted.
Or start with the Lionel Cascade logging train as an example. . .
That said, I still think you can fit a lot of Large Scale RR in a 20' x 20' space if you plan well,
especially if you're interested in modeling a short line, narrow gauge, or old-timey
railroad.
The best thing might be to get your hands on some On30 stuff then handle the Large Scale
equivalent and decide which one will look better and operate better 10, 15, or 20' away.
Hope I haven't discouraged you, but rather given you food for thought. Whatever you
decide, please let me know, and if you do try On30 outside, keep detailed notes (like our
O gauge outsiders are doing), so we can pass on what you learn to the next generation of
"pioneers."
Best of luck, please keep asking questions (even if I don't answer them well).
Paul
www.FamilyGardenTrains.com
I'm hoping to create a true 1/24 layout so that I can use my Barclay/Manoil
figures (all three inches).
[Note: 1:24 refers to a scale in which one half-inch on the model represents one foot on the real thing. It is a popular dollhouse scale, and was a popular garden railroading scale in the early 1980s. - ed]
Alton,
Trains currently available in 1:24 include AristoCraft's "Classic" line and Hartland Locomotive Works. In fact Aristo and HLW both purchases assets of the Delton Locomotive Works when they closed up shop, keeping items from Delton's excellent 1:24 product lines going for a long time.
1:24 on 45mm track relates to 40" narrow gauge lines. There weren't many, but they did
exist (36" was more popular). That said, many buildings are made in 1:24, including the
very economical Colorado Model Structures and most of AristoCraft's prebuilt structures.
Lionel also had a set of six rubber RR workers in 1:24, a very nice set for the cost,
although they haven't been made for years.
Hope this gives you some ideas - Paul Race
Cameron, you'd have a tad more luck if you had a 1:22.5 or 1:20.3 Delorean.
I'm not sure if the Back to the Future train is the same train used in
Petticoat Junction (and before that, "Ticket to Tomahawk"). That was
a Schenectady 4-6-0 that was built for the three-foot Narrow Gauge
railroad the Rio Grande Southern. Look up RGS #20 and you'll find a
wealth of information. The last I heard, that locomotive was in
Strasburg, PA, being refurbished.
According to a Back to the Future site, the engine used in Back to the Future 3 was Sierra RR #3.
They are similar locomotives, but I couldn't easily track down specs
on either engine. I'd work from the Sierra angle, though.
I couldn't track down any spec's on this engine, but it's very similar
to the Baldwin ten-wheelers modeled in 1:22.5 by Bachmann (the one
included in all of their starter sets). It MAY be possible to use a
Bachmann ten-wheeler frame and replace the boiler and cab with smaller
ones to approximate the same scale as your Delorean.
Hope this helps. Let me know if you make any progress - Paul
Paul, Have you wriiten any type of followup to your excellent article in
the Summer, 2005 edition Of Family Garden Trains" regarding "Which
Scale Should I Choose?"
Have any significant developments occurred in any of the scales
since that article? I am getting ready to launch a significant
Garden Railway and am struggling with the scale issue.
Thanks so much - Richard Smith
Richard,
Thanks for getting in touch. The BIG issues are still, do you want to
model narrow gauge (which gives you many choices of old-timey, quaint,
and relatively small prototypes that are modeled in larger scales like
1:20.3 and 1:22.5) or standard gauge (which gives you many choices of
20th and 21st-century trains in all shapes and sizes, including some
very large pieces, modeled in smaller scales like 1:29 and 1:32)?
Regarding narrow gauge: LGB (~1:22.5) is having a rough time of it -
they were just bought out by Maerklin, so only a percentage of their
line will be available in the near future, but Bachmann is still
making most of their 1:22.5 stuff, and many companies (including
Bachmann) are making 1:20.3 stuff that generally has dynamite quality.
If you want to model Narrow Gauge, you can always start with a couple
inexpensive Bachmann starter sets (which are all 1:22.5), and migrate
toward 1:20.3 if you decide you like that look later - If you run
1:22.5 and 1:20.3 stuff in the same train, people may notice, but your
track, buildings, and accessories will all be okay with either. Get
some larger raidius track to use outside, though, as A: you can't use
Bachmann track outside, and B: your trains will look and run much
better on larger curves.
Standard gauge is continuing to increase in popularity. AristoCraft,
USA Trains, and several custom companies make trains in 1:29, which is
about 10% too "large" for the track they're running on, but NOBODY can
tell that just by looking at the trains on the tracks, and 1:29 users
like to be able to see their trains a little better from a distance.
MTH makes standard gauge trains in 1:32 that are very reasonable in
price; a few custom manufacturers do, too, although some custom pieces
that are advertized as 1:32 are really closer to 1:30. At any rate,
the rising number of pieces available and new (though small) companies
jumping into 1:29 AND 1:32 is promising for standard gauge modelers.
Again if you run 1:29 and 1:32 stuff in the same train, people may
notice, but track buildings and accessories you choose for 1:29 will
be OK with 1:32 and vice versa. If you want to start with Standard
gauge, consider starting with an AristoCraft starter set and a circle
of larger-radius track.
In other words, nothing has changed except that 1:22.5 is relatively
stable and 1:20.3, 1:29, and 1:32 continue to grow.
Accessory-wise, I'm afraid that most building kits are suitable either
for 1:22.5 or 1:24 - if you want a REALLY realistic 1:20.3 or
1:29/1:32 railroad, you should consider building some or most of your
own buildings.
Finally, many regions have clubs
whose members will let you come over and see what they have - nothing
like seeing the stuff really running and knowing what you're looking
at to help you make this kind of decision.
Hope this helps, let me know if you have any other questions - Paul
[Richard got back in touch with me to tell me he was near Nashville so I attempted to get him together with some hobbyists in western Tennessee. Also, he asked if I knew anyone down there he could contract to do the basic build and design, so I found him some names. Richard, if you see this, good luck, and keep in touch - Paul]
Hi Paul,
One of our members forwarded to me your recent communication to him regarding
train club listings. I thought I'd take a moment to address the dilemma you've raised.
For a club listing to be truly effective, it needs to be compiled AND overseen by an
entity that (1) stands a good chance of being in business for a long time, and (2) is
willing to expend the time and effort in active pursuit of making sure it is kept up to
date. There is only one such organization that I'm aware of that is doing this at the
moment -- and that is "Garden Railways" magazine. They send out inquiries annually to
each club on their list, requesting an acknowledgment or an update -- if a club fails
to respond, that club is removed from the list. So while their list may not tabulate
all G-gauge clubs that exist around the country, what it DOES provide is certain to be
accurate.
I understand that sometime this year, they are going to cease their club listing in
the monthly paper magazine, and begin posting it on their web site. You might want to
contact them to see exactly when that change is going to take place, and then start
referring your readers to their web site. Contact Rene Schweitzer at
rschweitzer@kalmbach.com (Now, as far as a club "contact" NOT being conscientious
enought to respond to an inquiry on a timely basis, I see no effective way to guard
against that -- that gets into the vagaries of the human spirit, which isn't always
pretty!)
But the truth of the matter is, most of your readers can probably find most of the
clubs by simply google-ing 'G-gauge' web sites in their area, which is another
recommendation you might offer your readers.
If you would like to list our club in YOUR listing, let me know and I'll supply the
necessary data . . .
In any case, you have my kindest regards . . .
Dear _____,
First of all, thanks for getting in touch, and congratulations for belonging to a club
that seems to keep its web site up to date. If everyone was as careful as your club,
nobody would need a "club search" or similar page, because Google would be all that was
necessary. In fact, I have recently blogged on why every club should have a good, updated
web site.
If you've taken a look at my page on finding a garden railroad club, you'll notice that I
currently include the Kalmbach (trains.com) resource as a link for futher searches. When
and if that comes under the control of the Garden Railways staff, I'll update the link,
unless it's in a "subscribers-only" part of the site, in which case I'll leave the old link
up as long as it's functional.
Also, you'll notice that for most clubs which have a functioning web site, I don't
provide any contact information besides "see web site". So if you don't have any
objection to having your club added to the list, I would like to add it.
The rest of your expressed concerns are very valid, which is why I've put this project
off for nearly eleven years. But eleven years of not-so-great experiences sending
clueless newbies to other resources have convinced me that having a resource that I have some control over will be better for my
readers in the long run.
I'm also hoping to establish a dialogue with the clubs in which I don't know anybody yet,
to learn about their strengths and needs, and to determine if we can provide or develop
resources they would find helpful in fulfilling their local "mission." Through this
project, I've already "met" several helpful and encouraging members in parts of the
country where I seldom travel, as well as some highly opinionated folks who think
everything we do for the hobby is a waste of time. I value and weigh everyone's input,
just as I appreciate yours.
Hope this makes sense, please let me know if I've said anything that confuses or concerns
you, or if you'd like to comment on the site in any way.
Have a great spring - Paul
Thank you for the excellent dictionary. I think I saw something about rail
height but I could not find it again. So do all these manufacturers have the same
height rails so we can mix them?
Frank,
Rails are measured in Codes that translate to thousandths of an inch.
So Code 332 rail is about a third of an inch high, Code 250 is a quarter of an inch high,
and so on.
LGB, AristoCraft, and USA Trains all make track using Code 332 rail that is virtually
identical. Code 332 rail is really too big for most garden trains, but people like it
because it's so solid and it stands up to things like foot traffic that you don't have to
deal with indoors.
Other brands like Llagas Creek use Code 250 or even smaller rail. It looks a little more
realistic, but the trade-off is that you have to build a more solid base for it, since
it's not quite as sturdy.
The other consideration is that more kinds of ready-built turnouts are available in code
332 track than other types, so if you want a switchyard, you might have that part of your
RR in code 332, even if you transition to code 250 or something for the rest of it.
Hope this helps - Paul
Hi!
I had a lot of fun gathering up structures at the 2nd-hand store last year. Most of them
got left outside all (Utah) winter and did fine. One ceramic cookie jar, sealed shut and
with a coat or two of clear protectant, did not do so well, though. It completely
disintegrated! I'm just laughing, because it only cost $1.50 in the first place, but I
thought you'd enjoy this photo.
Lee Ann,
Ouch. Thanks for the photo. Maybe it needed a weep hole? - Paul
Robert,
If you don't have room for a turnaround loop at each end of the RR, you might consider a
"back-and-forth" circuit.
On a tight budget, I might consider starting with this and an aristo starter set and
another 25' or so of track. If you buy an Aristo Starter set, you can use the track
outside, and most of them come with a remote control that controls any train you put on
the track. Later you can add turnouts and industries.
Starter sets are shown on this link. If you get a Bachmann starter set, you CAN'T use the track outside, but they're good
values otherwise.
Another possibility might be just to buy the track and a power supply separately and buy
a Trolley or Trolley-like car.
Bachmann Or you could start very small, say in one corner, and work your way out. . .
Hope this gives you some ideas. However you build, I would consider raising the railroad so you can see the train running even when there are plants growing in the garden.
The
Canfields have O gauge trains, but they have a state-of-the-art raised railroad
solution that looks like it will hold up in AZ.
Let me know if I can help with any of these ideas or if you have any other questions - Paul
Hi; I am looking for a model steam train for the garden. My father in law has
an idea he wants one for his garden as a little feature. Nothing megga expensive. Could you make any suggestions? Kind regards, Claire
Claire,
Look at the "Starter Set" page. The TRAINS on the page are all designed to work outside.
The AristoCraft sets include a simple remote control and track you can use outside. Plus
they're a tad sturdier than the Bachmann. That said the Bachmann is always a good value
if you're going to be buying a larger circle of track anyway.
I'd also consider buying a bigger loop of track. Brass track has jumped in price; if
you're going to be buying extra track anyway, I'd look into AristoCraft's new Aluminum
track, it's much less expensive and works almost as well for most purposes. I don't have
any links to that yet, as it's still a fairly new product, and none of my suppliers has a
great connection.
I don't usually recommend the really cheap sets by New Bright or whoever, because they're
not made to hold up outside (or for very long inside, really), and people inevitably wind
up being disappointed and deciding that Large Scale trains are a "con." That said, I
have some contributors who use the really cheap stuff with the knowledge that when it
breaks they can replace it cheap. Personally I like stuff that has a warranty and that I
feel I can count on to run when visitors come over (and impress the heck out of them).
Hope this helps - Paul
Just getting started and have a lot to learn. Not sure what to model but
centering on a B&O and D&RGW
Mark,
Both railroads have a lot of models available. If you decide to go with B&O consider an
AristoCraft starter set. If you decide to go with D&RGW, consider a Bachmann starter set
and a bit of outdoor-worthy track (although Bachmann trains are a good value, you can't
use Bachmann track outside).
The DOWN side of this is that B&O models tend to be 1:29 or 1:32, and D&RGW models tend
to be 1:22.5 or 1:20.3. The difference is because D&RGW trains ran on 36" track and B&O
trains ran on 56.5" track. But both sets of models run on 45mm track (about 1.775"). So
the D&RGW models pretend that 1.775" track represents 36" (if you do the math, you'll get
1:20.3), and the B&O models pretend that the 1.775" track represents 56.5" (if you do the
math you'll get 1:32). The in-between scales 1:22.5 and 1:29 are actually compromises,
but most starter sets are in one of those scales.
Not to worry. I have PRR and D&RGW. Sometimes I have an all-D&RGW day, and sometimes I
have an all-PRR day, and sometimes I just put them on different tracks where they won't
look funny next to each other.
My buildings and accessories go mostly between 1:22.5 and 1:24, but I put the bigger
buildings in front and the smaller buildings in back, and nobody seems to mind.
Hope this helps. Please let me know if you have any questions you can't find the answer
to in my articles - Paul
Paul, Have you wriiten any type of followup to your excellent article in the Summer, 2005
edition Of Family Garden Trains" regarding "Which Scale Should I Model?"
Have any significant developments occurred in any of the scales since that article? I
am getting ready to launch a significant Garden Railway and am struggling with the
scale issue. Thanks so much.
Richard,
Thanks for getting in touch. The BIG issues are still, do you want to model narrow gauge
(which gives you many choices of old-timey, quaint, and relatively small prototypes that
are modeled in larger scales like 1:20.3 and 1:22.5) or standard gauge (which gives you
many choices of 20th and 21st-century trains in all shapes and sizes, including some very
large pieces, modeled in smaller scales like 1:29 and 1:32)?
Regarding narrow gauge: LGB (~1:22.5) has had a rough time of it - they were just
bought out by Maerklin, so not all of their line will be available in the near
future, but Bachmann is still making most of their 1:22.5 stuff, and many companies
(including Bachmann) are making 1:20.3 stuff that generally has dynamite quality. If you
want to model Narrow Gauge, you can always start with a couple inexpensive Bachmann
starter sets (which are all 1:22.5), and migrate toward 1:20.3 if you decide you like
that look later - If you run 1:22.5 and 1:20.3 stuff in the same train, people may
notice, but your track, buildings, and accessories will all be okay with either. Get some
larger radius track to use outside, though, as A: you can't use Bachmann track outside,
and B: your trains will look and run much better on larger curves.
Standard gauge is continuing to increase in popularity. AristoCraft, USA Trains, and
several custom companies make trains in 1:29, which is about 10% too "large" for the
track they're running on, but NOBODY can tell that just by looking at the trains on the
tracks, and 1:29 users like to be able to see their trains a little better from a
distance. MTH makes standard gauge trains in 1:32 that are very reasonable in price; a
few custom manufacturers do, too, although some custom pieces that are advertized as 1:32
are really closer to 1:30. At any rate, the rising number of pieces available and new
(though small) companies jumping into 1:29 AND 1:32 is promising for standard gauge
modelers. Again if you run 1:29 and 1:32 stuff in the same train, people may notice, but
track buildings and accessories you choose for 1:29 will be OK with 1:32 and vice versa.
If you want to start with Standard gauge, consider starting with an AristoCraft starter
set and a circle of larger-radius track.
In other words, nothing has changed except that 1:22.5 is relatively stable and 1:20.3,
1:29, and 1:32 continue to grow.
Accessory-wise, I'm afraid that most building kits are suitable either for 1:22.5 or 1:24
- if you want a REALLY realistic 1:20.3 or 1:29/1:32 railroad, you should consider
building some or most of your own buildings.
Finally, what part of the world are you in? Many regions have clubs whose members will
let you come over and see what they have - nothing like seeing the stuff really running
and knowing what you're looking at to help you make this kind of decision.
Hope this helps, let me know if you have any other questions - Paul
Hi, I am wanting to model in a particular year rang such as the late 1940's.
How can I be sure that any locomotives and rolling stock that I use are of the correct
time frame? The reason I plan to model in the late 40's period, is because both steam
and diesel were used at that time.
Kevin,
Do you have a particular railroad or part of the country in
mind? That would help you narrow things down. For example, the Rio
Grande & Western used steam as its primary motive power long after
most roads were mostly dependent on diesel. Some roads that were
mostly dependent on diesels by the late 1950s kept a fleet of
medium-sized steam locomotives around for "excursions" into the 1960s.
Some coal-haulers kept their BIG steam freighters around just for
that during times when RRs that handled mostly "mixed" freight were
doing just fine with diesels.
Also, RR consolidations during WWII caused some funny combinations of
equipment on railroads that had been more consistent before the war;
for example Pennsy kept getting "stuck" with USRA-design Mikados
(2-8-2s) which they inherited from other railroads during the war. The
Mikados that PRR had designed for themselves were superior in
capabilities and easier to maintain, so a USRA Mikado might be
repainted for PRR until the first time it needed serious work, and
then it was as likely to be scrapped as not. That said, nobody makes a
PRR-style Mikado I can afford, so I use the AristoCraft USRA-style
Mikado on my PRR-inspired RR (and only a PRR fan would know the difference anyway).
As you can see, narrowing down to a single railroad or part of the
country would give you a better idea of what might work or not, but
there was a 35-year span in most parts of the country where you might
see a combination of steam and diesel on the same railroad, depending
on the railroad's circumstances, etc.
Early diesels that would not look amiss on RRs that still used steam
include the FA-1 streamlined diesels that started being made in large
numbers right after WWII, and the Alco RS-3, both of which are modeled
by AristoCraft.
Many GP-7 freight diesels were made in the early 1950s. Nobody is
making a GP-7 in Large Scale at the moment, though. . . .
Many steamers that had been built in the 1910s-1930s were still used
on most major railroads until the late 1940s and some well beyond for
special trains, etc. So your overall plan is possible, you just need to look into specifics as far as region and line are concerned.
Hope this helps - Paul
I've invested in LGB for my grandson; he now wants a mining train and a
military train. We are members of Houston Area G Gauge Club.
Ms Alkas,
Glad to have you onboard. When I saw your message, I started checking around, because a
VERY small number of camo'd military-style train sets were produced about 2005 by K-line
right before they went out of business and Lionel bought them up. Haven't been able to
find them, though, and they're not being made now. Still if you see one, know that A:
they're no where near LGB's quality, or even Bachmann's, but they did exist at one time.
Mining trains should be easier. If nothing else, you can buy a little Bachmann Porter
locomotive and a few little 4-wheeled gondolas like Aristo makes. I have a bunch of the
gondolas myself, and they look fine with Bachmann and LGB.
Please let me know if you have any questions you can't find the answers to in my web
pages - that's how we get most ideas for new articles - Paul
I need some help. I want to run my o/27 and o scale trains outside and i want
to use my o/27 and o scale track. I will lay concrete for my roadbed and it will be at
ground level. I plan to bring my track and trains back in i just cant afford to buy new
track and may not be able to ever i am on a fixed income, i guess i just wanted to
know if anyone has done this before and if it worked or should i not do it or can i
make my own track if they make the rails. Not to sure of what i am doing. Thank you
Bobby,
Are you in touch with any garden railroading club members in the area? Almost all
of them use Large Scale, but they may be able to help with with other logistics.
The biggest club I know in your area is at http://svgrs.org
Have you seen Fred Young's railroad in our Outdoor O Gauge section. Fred uses ground-level on concrete
(well actually in concrete,). He also uses Gargraves, but it might give you some idea.
Now to specifics. The first "garden railways" were all tinplate, and people took everything
in and out every time they wanted to run trains, so this HAS been done before. It's
especially possible in dry climates like yours.
Almost nobody leaves their Lionel trains outside when they're not running, so there are a
lot of ways people have figured out to "schlep" trains in and out. I have some of those
56-quart clear containers, and I roll the cars and locomotives up in old hand towels or
small-gauge bubble wrap and put them inside. I can carry 4-6 Large Scale cars in a
container this way, I bet you could carry more like 16 O-gauge cars in a single container.
Once you have a solid concrete roadbed that you can put your track on and know it will
provide a smooth and reliable base for your trains, there's no reason you can't take your
track up and down, too. The down side is the hassle of "shlepping" your track. I might
consider making a "carrier" for the track like they use for firewood, basically a
doubled, reinforced bathtowel-sized piece of denim or other heavy-duty fabric with
handles at both ends, so you can lay the track in it and carry it inside easily. I'd
probably keep "quarter-circles" together so setting it back up the next time goes faster.
I have done that with a portable Large Scale railroad, in fact.
The other thing to keep in mind is that if you have a good roadbed in a common Lionel
track radius, you CAN convert to outdoor-ready track if you decide to later. (Maybe you
could put it on your Christmas list or something.)
Hope this gives you some ideas. Please let me know if you have any more questions or
concerns - Paul
Just starting to Add some buildings. I have two built but not sure how to put
them down outside. Do I have to glue them onto some base or just put them on the ground
Any info you can give will be helpful. Thanks - Tom
Tom,
Thanks for getting in touch.
Regarding buildings, I find that being able to set them on something solid reduces
maintenance. More often than not, I use cheap concrete stepping stones from the garden
supply place. The 8"x16"x2" ones are very reasonable. I try to dig out underneath them a
little and set them in gravel to make them level.
Marc Horowitz, the editor of Garden Railways goes a tad farther, he pours concrete
foundations, often using hardware cloth or some such inside to keep them from cracking
easily. That way he can put a station on a curved section of track and have the
"platform" curve with the track.
Jack Verducci, who writes many Garden Railways articles, goes even further, creating
elaborate settings for each building, complete with terraces, steps, and driveways.
Verducci's book "How to design and Build Your Garden Railroad" went out of print almost
as soon as it was published in 2006, but if you can track one down, it gives you an idea
of his process.
Hope this helps. Back to the stepping stones, one advantage of these is that it gives you
a place to stand or kneel when you're working on the railroad, but when you're done and
you put the building back, it "hides" the path so visitors don't try to walk where they
shouldn't. The only downside is if you use bright inner illumination, you'll see a line
of light at the building's foundation.
Keep me apprised of how it's going. Photos are appreciated - Paul
Hello! You seem to know so much about pruning I'd like to ask this question: I
have a right yellow threadleaf chamaecyparis that was so small and cute when I planted
it; now it is 6 feet tall and I'd like to lop off about three feet of height. How do I
do this without destroying its mounding shape? Does this mean I have to trim around
the whole outside so it's proportionate to the height? Also, I've heard when you cut
branches off this plant it will remain "dead" on the top. (So should I leave it alone?
Any advice would be most helpful!
Ellen, Last year at the Biltmore House's gardens, I saw one of these that was over twenty
feet tall, so yes they CAN get big. Something they don't tell you when you bring home a cute
little pot.
The problem is that if you cut back BEYOND where there are live needles, you will kill
that branch and the tree will take years to recover its shapee. The other problem with
these is that you can't tell without digging into the plant how far back that can be.
One thing is for sure, every year you let it go, you've let another six inches or so of
internal growth die out and further limited the amount you can cut it back. Wish you had
written last fall, because it's best to do this before winter, not right before Spring.
That said, you'll need to do some explorative surgery if you really want to know the
verdict. I'm guessing you can get it back to about 4 feet in height if you're careful,
and you can keep it there as long as you're careful to trim it twice a year. The first
trim is the worst, so don't get discouraged.
You really have to work from the outside in. Go to the side of the tree that people see
the least and start at a comfortable height (shoulder-height?). Grab a branch that is
sticking way out and follow it into the first major junction. Chances are two branches
are coming from that junction. Cut off the one that is the longest. Cut right along the
edge of the branch so the scar will heal. Cut the branch that remains back a bit, too,
being sure to leave several inches of healthy growth at the end. After you do several
branches this way in the same area, you are starting to see into the tree a little. You
are also allowing light and air into the heart of the tree which is a good thing. You
will not BELIEVE how much foliage can come off the tree in this way without the tree's
appearance even changing notably. Oh, I forgot to tell you, wear gloves, you could be
here a while.
Remember, these trees don't occur in the wild, they're mutations that were cultivated
specifically because they grow more branches than they need, and they shoot the branches
out into all sorts of goofy directions. So it's entirely possible that under the riot of
branches going in thirty different directions and competing for the same air and space,
there are a few branches that could provide growth and continuity once some of the
confusion is trimmed out.
Once you can see into the heart of the tree, look at the branches coming out of the top.
If you trimmed those the way you've been trimming from the side, leaving, say six inches
worth of live needles above the last cut, how far down can you cut? Again, I'm guessing
that if you JUDICIOUSLY remove the longest branches, or at least the longest offshoot of
the longest branches, you can remove 18 inches of height without affecting the health of
the tree. Maybe more, but I can't say without seeing it.
Some of your friends' cautions may be based on experiences with shrubs like Taxus, which
forms a "shell" of needles on the outside edge. If you cut off that shell, say trimming
the shrub as little as six inches down, you can kill the top of the shrub, and it will
never grow right again. But your chamaecyparis has ANYTHING but a shell. So removing
some of the chaotic outer growth to allow inner growth to remain healthy can be very
effective, and actually healthier for the tree over the long haul.
Once you have decided whether proceding further is worth it, you have to continue the
process over the whole plant. You'll know you're done when no part of the plant has more
than 6 inches of healty growth showing and you can just about see THROUGH the tree. Don't
feel bad, as long as you don't get another drought, it will be healthier and fuller than
ever (though not necessarily as tall) by fall.
Here's one OTHER consideration. What if you work your way to the core of the tree and it
is apparent that the growth on the top part of the tree stops five feet from the ground?
You still have the choice of finding a branch or three that are growing mostly out but
could be trained to grow UP. If you go that way, use a wire or stake to encourage one of
the other branches to grow upward, just remember to remove the wire or stake after a year
to keep it from choking the branch.
Whatever you do, I would like to have photos of before, during, after, and six months
after to add to my web site for the next person.
Hope this helps, best of luck - Paul
I just purchased the Bachman ET&WNC Passenger Set with the 4-6-0 steam
locomotive at an estate sale. It didn't come with an ilustrated instruction manual or
DVD. Do you know where I can get one? I checked the Bachman website and they don't have
them either.
Jack,
if you've ever put a train set together you know everything that's in that
instruction manual. Did you get the power pack with the train? The one thing you have
to be careful of is to hook the track to the DC screws on the power pack.
Your passenger cars may be battery powered or track powered. If they are battery powered
there is a little box for AA cells on the underside of the cars. The box has a little
on-off switch next to it, be sure to turn the batteries off when you're not running
trains. Chances are, the cars' lighting runs on track power, though, most of them do.
You can't use bachmann track outside. If you want to go outside with your trains consider
AristoCraft track which is pricey because brass prices just went up, but it's still a
relatively good value.
You have a very nice starter set. Make an oval of track and let-er-rip. :-)
Best of luck, let me know if you have any more questions - Paul
I have O gauge indoor rr. I would like to take it outdoors here in No Cal.
Is there a way to convert the engines (Lionel TMCC) to battery like the newer G scale
stuff?
If not, are there wiring tips to insure operational quality operation for O
gauge track power? has anyone built small sheds to house loco's from the weather?
It appears that gargraves ss track is the recommended... any other bullet proof track
recommendations? - Al
Al,
Thanks for getting in touch. I'll take your questions in order of importance, if you
don't mind.
Gargraves ISN'T recommended. It's just what some of my readers were used to indoors and
when they moved outdoors, they kept using it. Atlas now advertises their Nickle Silver
track as having UV-protected ties. They have solid rails, too, which look better and
probably conduct electricity better.
That said, the article on using TMCC outside has some ideas about using AC Lionel-style
power supplies on an outdoor railroad. I'm not a TMCC user, but the idea of running
jumper cables, etc., is great for any railroad.
If you have MTH DCS trains, the principles are about the same.
The real problem with remote control O gauge is turnouts - nobody makes a TMCC or
DCS-compatible turnout machine that is weather resistant. The Blessings have tried every
brand and have tried protecting them from the weather every way they could and still not
come up with a solution worth recommending to other folks. But if you're not interested
in remote switching and you don't mind installing your turnouts where you can throw them
by hand (I do, by the way, on my Large Scale railroad), that may not be a problem for you.
If you don't want to bother with TMCC or DCS remote control, just use a big enough power
supply and lots of jumpers. A "conductive grease" and screw-on rail joiners helps, too,
but in my experience, a good system of jumpers "covereth a multitude of sins."
Oh, finally, I don't know ANYBODY who has converted TMCC locomotives to batteries. It
may be possible, but the TMCC signal comes through the track, so you'd have to do an
interesting series of experiments.
Also, almost nobody stores Lionel trains outside. I would invest in a couple cheap beginner sets
to run on damp days, and just run your good trains on dry days. Even leaving them out for longer perieds of time in
direct sunlight is a problem unless you spray them with UV resistant acrylic or something
(which you can't do if you want to protect the collectors' value).
Not to discourage you - the folks who HAVE taken their Lionel trains outside really enjoy
running there. But O Gauge Outside is sort of in its infancy, so you'll be "breaking new
ground" to some extent no matter how you decide to go. If you want to keep us appraised
of your project, and send plenty of photos, I would love to share your progress (and
setbacks) with the "next generation" of hobbyists - Paul
I am researching possible holiday decor ideas for our holiday program. I work
for an association to promote central Seattle, WA and I am looking for some
information about a holiday train display, a company or individual who does these
displays and any general info you can give me.
Thank you so much for your help! I
don't know anything about model trains so anything you can give me would be much
appreciated.
Tiffany,
At least you're thinking ahead.
Are you thinking of a railroad outdoors or in a very large space? Then Garden Trains are
probably what you need.
Most of the folks I know who set up garden trains either for permanent or temporary
railroads either live east of the Mississippi or only take on really big jobs or both.
It would help if I had some idea of the scope of the thing you're looking for. As an
example, Paul Busse's seasonal displays in NY and Philly are very large with 7 or more
trains running at the same time, and thousands of people coming through every day to see
them. The following link gives you an idea of the scale of Paul's projects (although
this was a summer project).
http://familygardentrains.com/special_features/busse_railroad_at_holden/holden_express01.htm
If you're looking for something smaller, there may be somebody in your region who can
help you. If you're looking for something much smaller, say a few trains around a big
Christmas tree or something in a temporary railroad, the local Garden Railroading club
may be able to help.
The biggest club in your region seems to be the Puget Sound Garden Railway Society:
http://psgrs.org/index.html
I've had contact with the current Joe Sommers in the past, and he seemed like a decent
fellow. He and or the club who should be able either to help you or to point you in the
right direction.
Whatever happens, please use me as a sounding board if you feel like you need a 2nd
opinion, or if you have any followup questions - Paul
Been thinking about this for 5-6 years. I have large area but lots of pine
needles. No snow but lots of debris so may not be good idea.
I understand your concern. Many Garden Railroaders confront sap, twigs, leaves, needles, etc. The most effective garden railroads I've seen in wooded areas are raised off the
ground, usually 20-28" (24" being the average). That way the stuff can't exactly bury
the track, and you don't have to bend over backwards to sweep off the needles or wipe off
the tree sap.
If you use the HDPE Flexible roadbed technique that builds a sort of ladder under the
track, a certain percentage of the needles may even go through to the ground beneath, and
the rest may be easier to sweep out.
MOST people have to wipe off their track or at least check it for obstacles before every
running session, so this isn't a "deal-breaker."
Even more important, heavy evergreen cover can be a benefit. If your pines dump so much
stuff that it essentially "mulches" the soil and keeps anything from taking root below,
that actually reduces your work load. The UPSIDE of having such a wooded area is that
you don't have to landscape anything if you don't want too. Or plant zero-maintenance
deep shade plants and let them go.
Trains look great running through the woods, period. When you visit garden railroads
that are built in non-wooded areas, you're often looking at gardens or landscaped areas
that were just as much work to install and are just as much work to maintain as the
railroad itself.
Wish I had more conifers on my property. I have a "wooded" area of my lot, but it's just
scrub timber that dumps leaves and doesn't even provide shade. A bulldozer may be the
appropriate tool for THAT job.
Best of luck, please let me know if you have any questions at all, especially if none of
our articles seem to have the answer - Paul
I want to build a figure 8 where the track goes over top of the other on a
bridge like to know what is the rate of climb for the track and is it possible to use
four foot circle?
thanks please let me know what you think
Kevin,
Excellent question. Lots of folks have done exactly what you're considering, but if this is going to be a permanent or semi-permanent railroad, I'd like you to think about your longterm satisfaction with your railroad.
Most model railroaders try to keep their railroads from having more than a 2% grade -
that means that in 100" linear inches, the track rises 2". A 3% or even a 4% grade is
"doable" if you don't mind relatively short trains and the train struggling to get up the
hill and careening down the other side.
Worse, tight curves are relatively hard on trains - there's a lot more friction when the
cars are going around a curve and the flanges are getting forced against the rails than
when the cars are on a straight path or broad curve, and only one edge of the wheel
surface is hitting the rail. Tight curves on grades are worse, tight curves on steep
grades are even worse. So the combination of, say 4' circles and, say 4% grade is
doable, but may wind up making your railroad look a little toy-like, at least. If this
IS for a toy-like railroad (say a Christmas-window display), that's fine.
Okay, time to do the math. Most Large Scale trains need about 8" clearance (some of the
1:20.3 trains like the Bachmann Shay and larger narrow gauge locomotives need 9" or
more). If you use a "bridge" that doesn't take up any vertical space to speak of (like
the LGB 50600 girder bridge), you only have to take the height of the track, about 3/8",
into account. If you are using 2x6 or HDPE roadbed, you'll need to add about 1.7" to
that, just over 2" altogether, so your track will need to rise 10" between the lowest and
highest point. If you want to make certain ANYTHING your friends bring over runs, you'll
need to add another inch or two.
So let's say, on the average, you need 9" of rise between the low track and the high
track on your crossover. Using R1 track (the kind that makes a 48" circle) to make a
figure 8, the nine curves and handful of straight pieces you need on each side of the
crossover add up to about 13.5', or 162 inches. Divide 9" by 162" and you get about a
5.6% grade. Again, this IS doable, but wil result in running very short trains (like
your starter set), and a toy-like action as it comes off the high point.
Of course, if you have the lateral space, you CAN add straight pieces to get more length.
Let's say you add eight straights to the plan, four on each end, you now have 210".
Divide 9" by 210" and you get about a 4% grade, which is better.
That said, one problem with 48" curves in a figure 8 is that when your locomotive comes
careening down the hill, it is thrown right into the tightest curve it was made to
handle, causing the train to lurch in a toylike manner. So even if you have 48" curves
on the outside edges, consider replacing the curves closest to the straightaways with
60"-diameter curve pieces, or even 10'-diameter curve pieces. They will make your
railroad longer but not necessarily deeper, and your train will not lurch so badly going
into the curves.
Now consider using R2 track (the kind that makes a 60" curve). A "straight" figure eight
with 60" curves is about 220" long on each end. If you don't add any extra straights you
still have a 4% grade, but your train WILL strain less than it would on the tighter
curves. Add 8 1'- straight pieces (four per end) and you get to 268" between lowest and
highest points, a 3.3% grade, still better. You get the idea.
If your railroad is really constrained for size, another option to consider is a "folded
figure eight." This actually looks better if you do it right, because it's not as
obvious to visitors, and gives you the whole length and width of your railroad space to
get the grade in.
Check out the following link for ideas regarding folded figure eights.
Best of luck, please let me know what you figure out - Paul
A while back I bought some LGB track and trains from a store that was going
out of business.My grandson and I have had a lot of fun running the trains through the
house. I promised him that we'd put some trains in the back yard this year (2008). Is
there any other way to set the track on the groud besides crushed rock.That is all
that the internet talks about. Also, I have one wireless remote for LGB trains.Is there
another wireless (less expensive) remote that will work with LGB trains.
Thanks for your time - Lee
Lee,
Thanks for getting in touch.
You will probably like the answer to your first question better than the answer to your
second question.
First of all, crushed gravel has two uses. Some folks use it to provide the base for the
trains. Nearly everyone uses fine crushed gravel to go between the ties and imitate
ballast, the stuff that holds real ties in place. You can use one, both, or neither and
still have a garden railroad.
An example of a building method using crushed gravel is our
"One-Day-Railroad" method.
An example of a railroad that doesn't need crushed gravel to support the track is our
"Simple, Raised Railroad" method. MOST people who use this method eventually
raise the soil around most of the track and
sprinkle fine crushed gravel between the ties to make it look more like a "real" railroad
(and hide the 2x6s). This takes very little ballast - most folks who do this buy "chicken
grit" or something a few bags at a time.
Finally, some folks who use raised
HDPE Flexible Roadbed simply leave the dirt where it
is and build extensive trestle systems to camouflage the construction method. This is actually a very attractive, but more time-consuming method. Folks who use HDPE raised roadbed and who raise the dirt to the level of the track
usually use crushed gravel to imitate ballast.
Now for your LGB remote control question. I have a WHOLE article about remote control methodologies called Large Scale Power and Control. But the short answer is that LGB uses a method called MTS that is not supported by other
brands. And it's usually only available on LGB trains that have it built in from the
factory. It's closely related to DCC, an "open standard" used by several manufacturers,
but it would probably take some fiddling to get the two to work together satisfactorily
on your railroad.
When your plans get a little more concrete, send them to me along with a description of
what you already have locomotive-wise, and I'll ask some experts if they would recommend
sticking with MTS, going to something else, or combining MTS with some other kind of
control system.
Hope this helps - Paul
Watch this space: I am getting e-mailed questions constantly, and I try to post the ones that would be most helpful as soon as I can.
Note: Family Garden Trains?, Garden Train Store?, Big Christmas Trains?, BIG Indoor Trains?, and BIG Train Store? are trademarks of Breakthrough Communications (www.btcomm.com). All information, data, text, and illustrations on this web site are Copyright (c) 1999, 2000, 2001, 2002, 2003, 2004, 2005, 2006, 2007, 2008, 2009, 2010, 2011, 2012 by Paul D. Race. Reuse or republication without prior written permission is specifically
forbidden.
For more information, please contact
us
 Hope this isn't too confusing. There are more variations of each of these
approaches than I could possibly document, but this should give you a general idea. Please let me know if you have any more questions, and keep me apprised of your progress - Paul
Hope this isn't too confusing. There are more variations of each of these
approaches than I could possibly document, but this should give you a general idea. Please let me know if you have any more questions, and keep me apprised of your progress - Paul
Starting a Maine Garden Railroad in Autumn? - October, 2008
Caleb, in Maine, writes
 I would strongly consider doing the "ground work" for your roadbed now.
If you're going to put your right-of-way right on the ground without using lumber
or some such, you might consider using trench filled with concrete or some such. What do
folks around you use? - there's no one-size-fits-all, especially in climates with extreme
freeze-thaw cycles. That said, if you are planning to just use gravel, having it tamped
down before winter will be a big help.
I would strongly consider doing the "ground work" for your roadbed now.
If you're going to put your right-of-way right on the ground without using lumber
or some such, you might consider using trench filled with concrete or some such. What do
folks around you use? - there's no one-size-fits-all, especially in climates with extreme
freeze-thaw cycles. That said, if you are planning to just use gravel, having it tamped
down before winter will be a big help.
Different Scales for Garden Railroads? - September, 2008
Salvador Salcedo, of Calexico, California, writes:
Clearance On Wide Curves - July, 008
Bill Manley, of Hernando, Florida, writes:
 I am planning a garden RR on a 50 X 70 lot and would like
to have dual track if space allows. My minimum radius will be 6'.
What radius should I use for the outer track in the turn to allow
for proper clearance of rolling stock? Thank you.
Bill, sorry I took so long to get back to you - I'm about a month
behind on everything right now, including my newsletter.
ran "shorty" equipment (like their Stanz and 4-wheel coaches) you did
fine. If you had eight-wheel cars on the inner track, it could get
interesting, though, especially if you had eight-wheel cars on the
outer track.
I am planning a garden RR on a 50 X 70 lot and would like
to have dual track if space allows. My minimum radius will be 6'.
What radius should I use for the outer track in the turn to allow
for proper clearance of rolling stock? Thank you.
Bill, sorry I took so long to get back to you - I'm about a month
behind on everything right now, including my newsletter.
ran "shorty" equipment (like their Stanz and 4-wheel coaches) you did
fine. If you had eight-wheel cars on the inner track, it could get
interesting, though, especially if you had eight-wheel cars on the
outer track.
Large Scale Southern Crescent Trains - July, 008
Joseph Rose, of Santa Maria, California, writes:
It's just a circular track that goes around our Christmas tree.
HDPE Roadbed Support in Wisconsin - July, 2008
Helen, in Wisconsin writes:
Using On30 Trains Outside? - July, 2008
Greg Askins, of Chandler, AZ, writes:
Resources for a 1:24 Railroad - June, 2008
Alton Bryant, from Louisiana, writes:
Narrow Gauge Locomotives Used in Movies - May, 2008
Cameron Dingler, of Las Vegas, Nevada writes:
I want to build a replica of the 4-6-0 Sierra Railway No.
3, which was the "Hooterville Cannonball" that also pushed the
Delorean Time Machine In back to the Future. I own a Delorean and
have always loved that train now I have a 1/32 rail version of the
Delorean that needs a train to push it. so any help finding the
parts to build the train would be of help - Cameron
 According the Railtown museum site, they are raising money to restore
that locomotive for safe operation, too.
According the Railtown museum site, they are raising money to restore
that locomotive for safe operation, too.
Revisiting Scale and Gauge Questions - May, 2008
Richard Smith writes:
Does the World Really Need ONE MORE Garden Railroading Club List? - April, 2008
A concerned member of an active club e-mailed the following comments (I've included this without club or individual names because the concerns expressed are valid concerns expressed by more than one respondent):
Rail Codes and Heights? - April, 2008
Frank Mojzesz writes:
Trashbashing Disaster - April, 2008
 Lee Ann, in Utah, writes:
Ideas for a Skinny Railroad in Arizona - April, 2008
Robert asks
I live in Arizona and I have about 50 square feet, but it is spread out in long narrow
garden, and because of that, I've been thinking that a point to point is the best way
to go. I would prefer a circuit of some sort so I wouldn't have to sit and change the
direct of the train every 15 seconds though. The garden already very well established,
so i need help on the train part.
 This set could be added to about any other track system to create something that would
allow you to let the train go back and forth on the days that you didn't want to manually
operate it. You COULD put turnouts and sidings etc in between to practice swapping cars
around, etc. on the days you wanted to operate. But on the days you wanted to let the
train run while you were barbecuing or something, the reversing unit could help.
The whole set is available from several vendors at:
this link
This set could be added to about any other track system to create something that would
allow you to let the train go back and forth on the days that you didn't want to manually
operate it. You COULD put turnouts and sidings etc in between to practice swapping cars
around, etc. on the days you wanted to operate. But on the days you wanted to let the
train run while you were barbecuing or something, the reversing unit could help.
The whole set is available from several vendors at:
this link
makes a nice one.
The AristoCraft Eggliner is an interesting cutesy choice, too.
Suggestions for an Inexpensive Steam Garden Train - April, 2008
Claire writes:
Modeling Two Scales at Once? - April, 2008
Mark Pritchett writes:
"Which Scale" Revisited - April, 2008
Richard Smith writes:
Mixing Steam and Diesel? - March, 2008
Kevin Stack, of Charlotte, North Carolina writes:
Mining and Military Trains for a Grandson - March, 2008
Glendolyn, of San Antonio, Texas, writes:
Using Lionel Track and Trains Outside - March, 2008
Bobby Perkins, of Sacramento, California, writes:
Bases or Foundations for my Buildings? - February, 2008
Tom Seigler writes:
Taming a Wild Threadleaf Chamaecyparis - February, 2008
Ellen, of Atlanta, Georgia, writes:Have Bachmann Train, Missing Manual - January, 2008
Jack Palin says:
Can You use O Gauge with Batteries Outside? - January, 2008
Al Foley, in northern California, writes:
Holiday Display Railroad in Seattle - January, 2008
Tiffany, in Seattle, Washington, writes:
Can You Build a Garden Railroad Under Big Pine Trees? - January, 2008
G. A. Heyn writes:
Is a Figure 8 with 48"-diameter curves possible? - January, 2008
Kevin Irving, from Toronto, writes:
Is Crushed Gravel Necessary, and what does LGB Remote Control Work With? - January, 2008
Lee Edwards writes:


Family Garden Trains is a participant in the Amazon Services LLC Associates Program, an affiliate advertising program designed to provide a means for sites to earn advertising fees by advertising and linking to amazon.com.


