| |||
 |
 |  | |
 |
 | ||
 |  | ||
 |  | ||
 |  | ||
| |||
|
|
| | |
|
|
| ||
| | ||
| | ||
| | ||


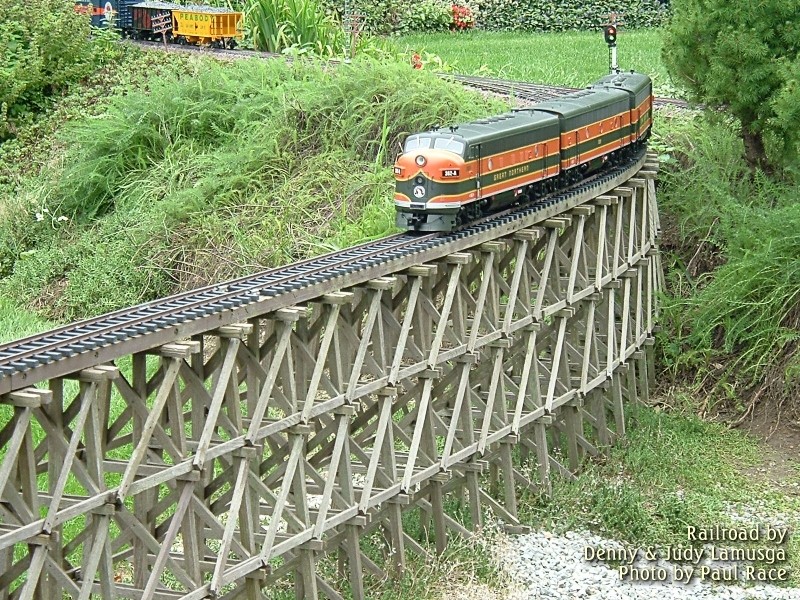
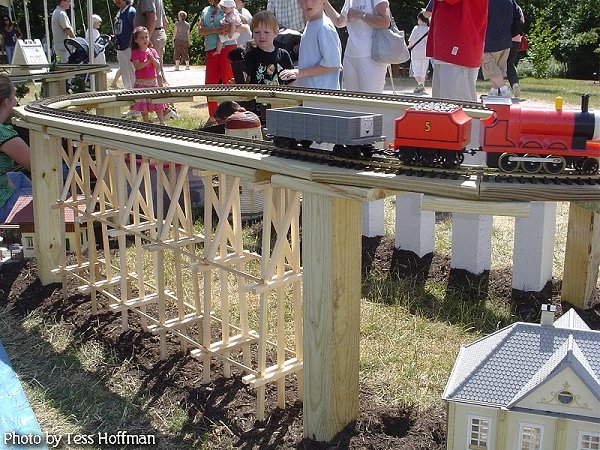
| Trestles 101One of the most common characteristics of garden railroads is the timber trestle, a sight common in hilly terrain a century ago and still visible today in some out-of-the-way places. The complex lattice-work inevitably draws attention, no matter how big the trestle is. But it is neither as difficult nor as time-consuming to build a trestle as you might think. In fact, if you are going to have a raised railroad anyway, a trestle is one of the fastest and least expensive ways to fill the gap between the track and the terrain. A trestle is made up of relatively simple components that are repeated over and over again. To build a trestle, you create a "jig," that is a carefully measured framework that helps you assemble the most important components quickly. You will need:
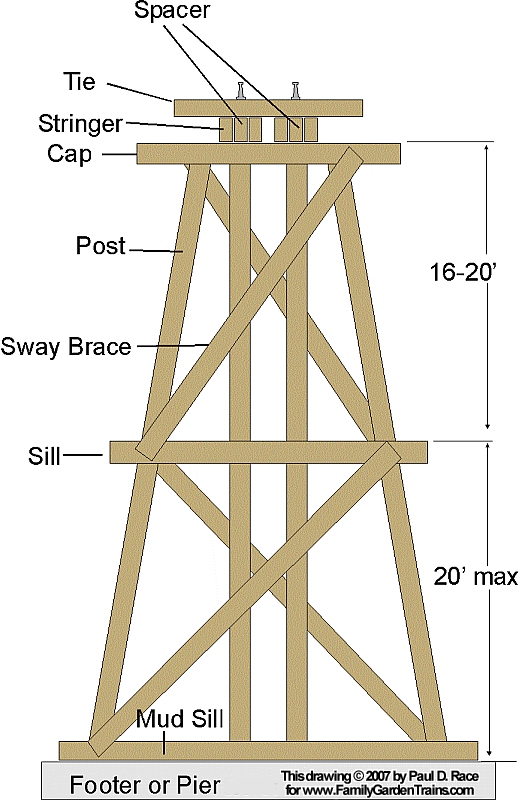
What is a Bent?The key component of any trestle is called a "bent." It is the vertical component you would see if you could look at the "cross-section" of a trestle. Generally a "bent" consists of 4-6 long vertical posts that spread out as they go from "top" to "bottom" and two or more horizontal "sills." Most garden railroaders build the trestle bents in their workshop, then assemble them in their garden once the rest of the track and roadbed has been laid. Note on Staining Trestles: In August, 2007, a reader asked how to stain the trestle, and I got input from several people, whose responses are in the appendix of the article. Some folks stain the wood before they build anything, some folks stain the bents after they're assembled, and some folks stain the whole thing at a time after it's assembled. And the chemicals folks use are "all over the map." But if you read that section before you start building bents in earnest, you may find a method that appeals to you. I put this note here in case you decide to stain your wood before you assemble your bents, so you can plan ahead. Back to Building Trestle Bents - Trestle bent construction has been described in Garden Railways a few times, and there is a brief description in Jack Verducci's book How to Design and Build a Garden Railway. But I thought it might be worth spelling out a detailed step-by-step procedure that could be used even by people with relatively little skill and no tool more complicated than a table saw. (In a way this is a throwback to the earliest days of my site, when my New Boston and Donnels Creek pages had the central theme of "If even I can do this, anybody can.") The most prominent parts of a trestle bent are the:
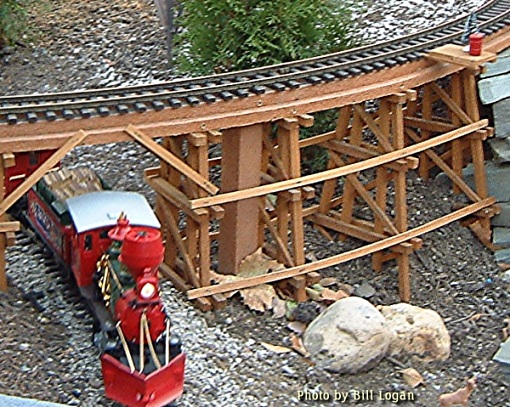
Plan How You Will Use the BentsMost garden railroaders use their trestles in a largely cosmetic fashion. That is to say, the track is already being supported by something, not by the trestle itself. When the trestle is installed it may camouflage or partially replace the "real" support, but trestle bents by themselves will not support track unless you engineer a solution.As an example, many railroads today are being built with Bill Logan's HDPE ladder-style roadbed. The result is a clean, open framework that both supports the track and looks good on top of a trestle or other bridge construction. You could "toenail" (angle) screws or nails through that roadbed Some folks do build trestles that fully and independently support their track. To do that properly is outside the scope of this article, but you should know that it requires addition of "stringers" that run parallel to the rails and support the ties underneath. If you try this, you may want to add diagonal bracing between the bents to provide a more rigid overal structure. Folks who follow this approach typically build and assemble the whole trestle in the "shop" before the track is even installed; then they install the trestle in one piece and install the track on top of it. Many beautiful garden railroad trestles have been built this way. In addition, you should think about what happens where the bottom of your trestle reaches the ground. The best case is not to have it touch soil at all; more than one garden railroader has had to replace part of a trestle that started rotting out from the ground up. My friend Wil Davis uses concrete bricks as "footers" for the bottom edge of his trestle. If you want to use a poured concrete base or those 8"x16" concrete blocks, disguised with gravel, that would work, too. Find out what folks in your area are doing successfully if you can. However you decide to attach your trestle to your roadbed or to deal with the bottom edges, it's better to think this through now than later. Plan How You Will Connect Your BentsYou'll also need to think about how you will provide cross-connections between bents once the bents are in place between your roadbed and your footer. In the title photo, they've obviously used long strips of wood that are thinner than the members that make up the trestles. A more diligent modeler may wish to follow prototype practices, having many cross-connectors that are only long enough to reach from one trestle bent to the next. While you're experimenting with the first few bents you've put together, get some scrap pieces and visualize how you will fasten the trestle bents together once they are installed.
Many options for connecting bents have been tried by the "real" railroads.
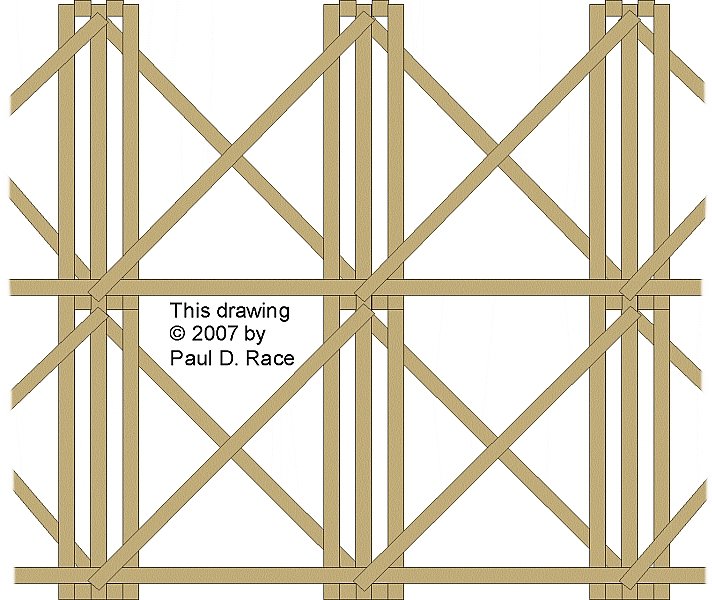
Denny's outside sway braces mechanically make the trestle more stable. It also camouflages the fact that the crossbars are all one piece. A diagram showing how the pieces interact is shown below to the right.
On most Denver and Rio Grand trestles, which are often used as models, the posts and most of the sills were 12"x12" timbers. Most garden railroaders use posts that are half-inch square. This is about "right" for LGB trains and Bachmann starter sets, although if you are running other scales, you may choose another size. For sake of space, I've specified the different possible sizes depending on what kinds of train you plan to run most often:
|
| Kind of train you run most often: | Recommended Post Width: |
| Bachmann Shay or other 1:20.3 trains | Consider .6" square. (19/32"> |
| LGB trains, Bachmann starter sets, or other 1:22.5 trains | Consider .53" (17/32")square. |
| AristoCraft, USA Trains, or other 1:29 trains | Consider .4" square (13/32") |
| MTH trains or other 1:32 trains | Consider .375" square (3/8") |
It's not hard to tell from looking at the table above why most garden railroaders choose 1/2". Still I would encourage anyone using 1:29 or 1:32 trains to consider 3/8" as long as it is mechanically feasible with the materials and tools at hand. Oversize timbers give a false impression of the relative size of Standard Gauge trains, making them look as much as 25% smaller than they should in relationship to their surroundings.
On D&RGW trestles, the sills (horizontal members) also tended to be 12" square, so the same cut pieces will do for those as for the posts. The top sill, also called a "cap," was usually 12" wide by 14" deep, but most modelers use the same dimensions as they use for the posts and other sills.
On the other hand, you sometimes have to work the the materials that are easily available to you. For my yet-unfinished project, I tried using some "Western" cedar fence boards, the kind you use if you're making a "dog-ear" fence from scratch, because I liked the color and the grain. When I started using them, I realized that they varied between 9/16" and 5/8" in depth. So if I do use these in "production mode" I will have to run each piece through the saw twice - once to cut it to width, and once to even out the depth. Then I realized why so many folks doing this just start with 2"x4" boards anyway.
Conversely, you may have come across a bunch of "tomato stakes" or something that are a little smaller than they "should be" to meet with D&RGW standards. Don't feel bad. D&RGW is a "best case" for narrow gauge railroad construction. Many narrow gauge railroads' trestles used smaller dimensions, and some of them used much smaller dimensions for the sills and sway braces. (2"x12" sway braces were common on some lines.)
The same applies to any odd widths left over when you cut your posts. If you realize that you'll have enough of a particular width to use for all of your sway braces or for all of the crosspieces that hold the bents together, that's fine as long as you're consistent.
What If I Don't Have a Mill or Even a Table Saw? Of course, many of you can mill wood in your shop; you're ahead of me already. On the other hand, some of you are, frankly, in no danger of ever owning or learning to operate a table saw. There's no real reason you can't buy the lumber, ask a friend who's handy with this sort of thing to slice up a bunch of boards for you to the necessary dimension and do the rest of the project yourself.
Note for O-Gauge-Outsiders: Technically, trestles for your trains should use 1/4" posts and sills, which may require you to be pickier about your source of materials and tools than Large Scalers. Consider that most three-rail O-gauge trains are a little undersized anyway, and if you use trestle components that are too large, you will be reducing the apparent size of your trains even more.
If you are an O-Gauge-Outsider who has had success building trestles for your trains, or if you just want to be kept appraised of any more developments in this area, please contact us so we can keep sharing information.
 Setting Your Cap
Once you decide what width of lumber you will be using, you're in a position to start planning your jig. When you begin planning, all the most critical decisions are made in the top six or so inches of the trestle bent. This starts with the "cap," the highest horizontal member of each trestle bent. Your cap will probably be somewhere between 6" and 8", depending largely on what kind of trains you plan to run. A typical D&RGW trestle cap was 14' long (although I've seen some diagrams in which the caps seem to measure about 11'8"). Again, the measurement of your model cap depends on the kinds of trains you're running:
| Kind of train you run most often: | Recommended Cap Length: |
| Bachmann Shay or other 1:20.3 trains | Between 7" and 8.25" |
| LGB mogul, Bachmann starter set, or other 1:22.5 trains | Between 6.5" and 7.5". | AristoCraft, USA, or MTH trains | 6", especially if you're using 3/8" posts. Once your caps get below 5.5", though, it gets harder to assemble the trestle together in the "field." |
Once I thought I knew what dimensions I wanted for my cap and posts, I started assembling the materials for my jig. In my too-cluttered garage, I found a piece of 3/8" plywood that was left over from a previous project, cut nice and square to about 18" x32". I also brought out several long strips of wood from my fence-board slicing experiment, so I could lay them out on my "jig-in-progress" and get an idea of how they would work. Every time I thought I had the measurements right on my jig, I laid some pieces of wood on the plywood to see if what I was designing was mechanically feasible and or attractive. All of this "hands-on" fiddling would be unnecessary for someone with greater confidence at this sort of thing, but it helped me visualize things and tweak my final measurements.
 Spacing Your Posts on the Cap
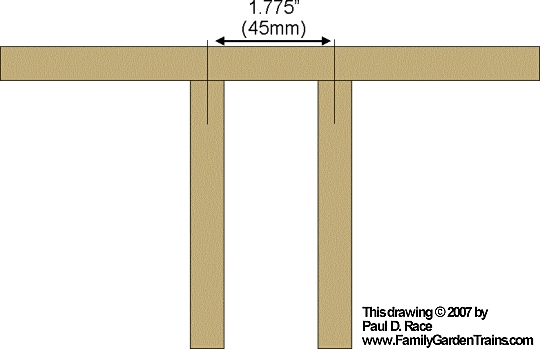
On a D&RGW-style bent, the distance between the inside two posts is easy to figure - each inside post should be centered under a rail, 45mm apart (1.775"). On this example, the angle of the center posts is also easy to figure - they're vertical. So you can easily use a square to draw their path on your jig.
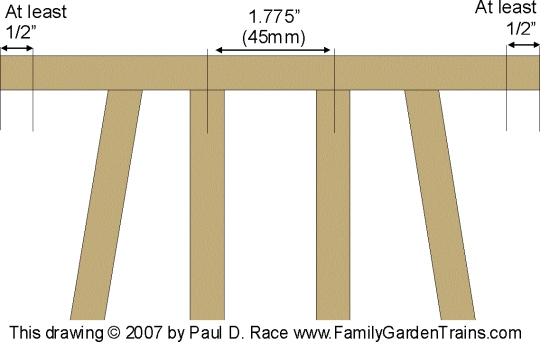 Now you need to figure out where your outside posts start, and how much they slope. You want the cap to poke out beyond each post at least one post's width. So if you are using 1/2" posts, you need to leave 1/2" clearance or more at each end of the cap. The illustration of the cap and posts above is based on a 7.5" cap. You can tell that this gives you plenty of room to work with. If you haven't already sliced up some wood to try things out with, download the the full-sized picture, set it to print at 7.5" wide on your printer, then cut out four long 1/2" wide strips of paper to work with as you try to visualize your future setup.
As I worked with the D&RGW drawing, I realized that certain things were a little "off," including the slope of the outside legs, which is slightly exaggerated. For an 18" trestle, this wouldn't be so bad, I suppose. But if you built a 3' trestle that used this slope, the base could easily get wide enough to be unmanageable.
In my experimentation with my posts, I found that I was most satisfied when my outside posts angled away from the center posts between 3/4" - 1" per foot. Whatever slope you settle on, you have to stick with that throughout any single trestle on your railroad - you can't change slopes within a trestle.
By now you should have all the information you need to start outlining things on your "jig." Once you have a good outline, screwing little blocks of wood on to keep those pieces aligned while you zap them with your brad gun is the next step.
On a real trestle, the bottom ("mud") still comes first. On a garden railroad, though, we work from the top down. The D&RGW plan says that the sill closest to the cap should be between 16' and 20' below it, and other sills should be 20' apart. That said, most folks go on the closer side, not the maximum, because more sills makes for more apparent detail on the trestle. Before you decide exactly where these things should be, you should dummy up a bent or two and experiment to see what looks right to you. Here are the D&RGW guidelines, transferred to various scales and rounded off to the nearest 1/4".
| Kind of train you run most often: | Distance From Cap to First Sill: | Other Sill Distance Maximum: |
| Bachmann Shay or other 1:20.3 trains | 9.5" to 12" | 12" |
| LGB trains, Bachmann starter sets, or other 1:22.5 trains | 8.5" to 10.5" | 10.5" |
| AristoCraft, USA Trains, or other 1:29 trains | 6.5" to 8.25" | 8.25" |
| MTH trains or other 1:32 trains | 6" to 7.5" | 7.5" |
How many sills you use depends on how long your trestle will be. Most garden railroaders don't put bottom sills 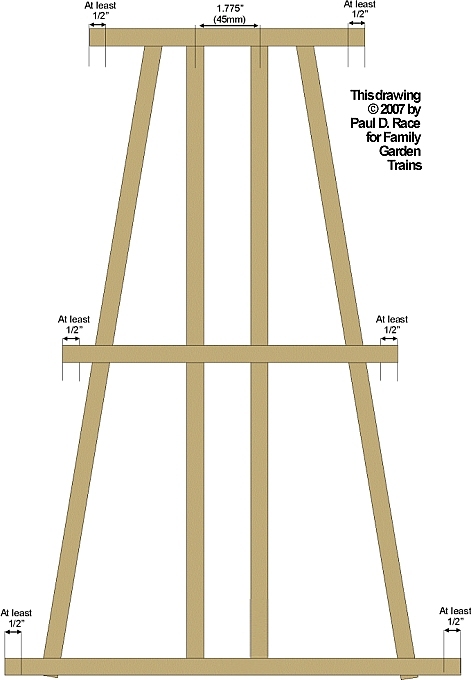 on most bents, since they are most interested in the bents aligning at the top (where they meet the roadbed), and the way things align down below is secondary.
You don't need to plan the length of your sills - that will be dictated by their location on the bent. However, you will want to extend the ends of each sill at least one post width (I'd recommend 2) beyond the vertical post, so you have room for the cross-pieces that tie the trestle bents together once they are in place.
Also, you won't need to plan the length of the diagonal "sway braces" - that will be dictated by everything else, and will vary depending on what part of the trestle bent you're working on. The only other thing you need to know about the braces right now is that many trestle plans show them extending too far. When you actually add them, don't let them extend much, if at all beyond the posts. Again, you need to leave room on the sill for the cross-pieces to go on. On the title photograph, the builders have gone one step farther - they have attached the diagonals only to the posts, which saves a little bit of wood and makes the bents easier to handle for moving and setup (a big issue when you're installing hundreds, as they did at that site). 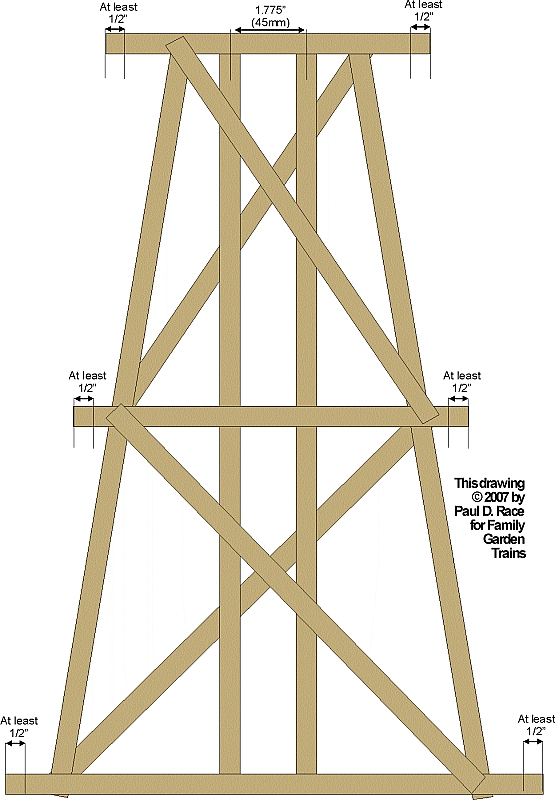 I think it creates a nice appearance but some purists would probably cringe.
Once you create an outline for what the bents will look like, then you create your "jig." Transfer your measurements onto a wide board or a piece of plywood. Some folks just draw the bent on the board, then tap in a bunch of finishing nails so the components have to go the right places. This is good for an experiment or trial run, but the pressure from the brad gun will loosen things up before long. For long-term use, most folks screw blocks onto the board for a more "foolproof" guide.
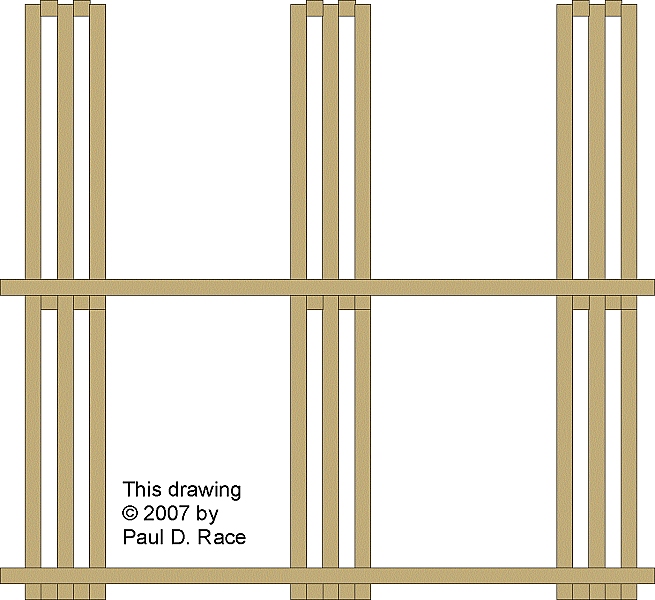
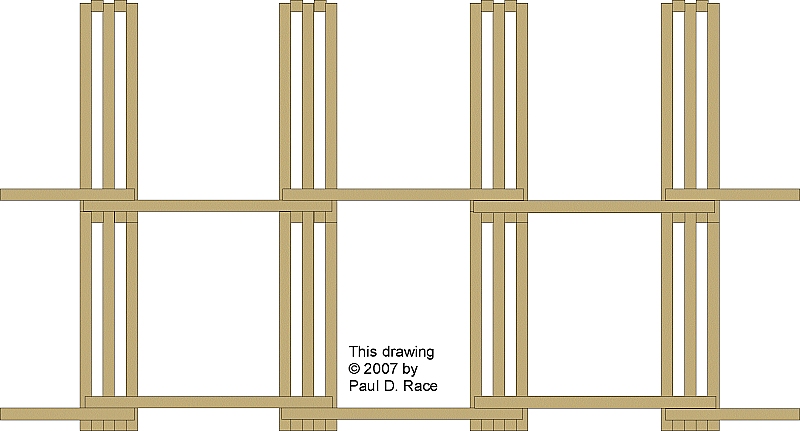
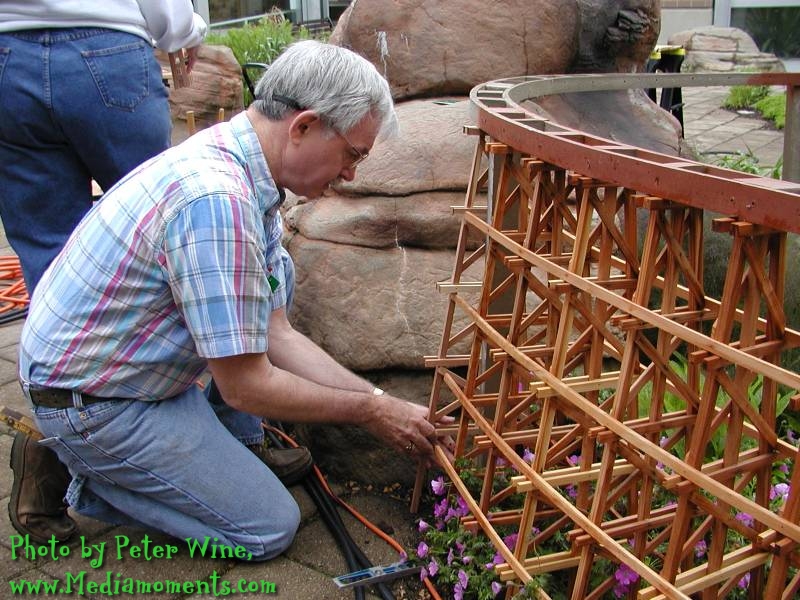
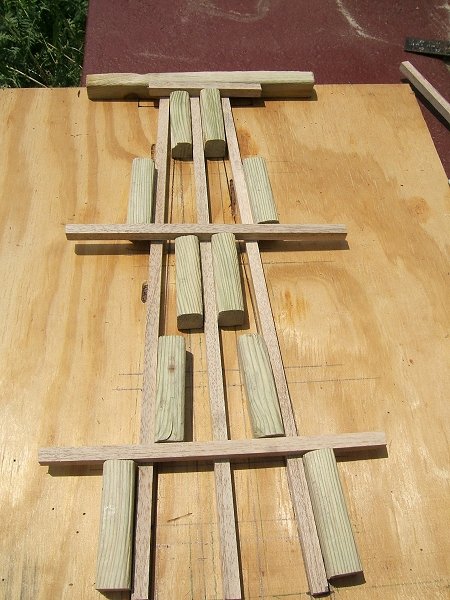 The photo to the right shows a jig that started out as a 4-post-jig (see the line drawings) but was converted to a three-post jig for the trestle on a children's railroad. The oversized sills are just there to help me locate the blocks properly before I refasten them.
Generally you won't need to show your sway braces on your jig - it's pretty obvious where they go once you have the posts and sills installed. But if you do want to show them for some reason, be sure to show only half of them - the ones you install from "this side." That way you have less chance of having some bents where the sway braces go one way and some where they go the other.
Make a few bents and line them up (detailed steps are below). Make certain they're symmetrical so it doesn't matter which way you have them turned when you line them up. Take them out into your garden railroad and make certain they will fit where you want to use them and that they will support your track or fasten to your roadbed the way you think they will.
When you think you're ready to go, it's time to start "ripping" cedar in earnest. While you're at it, cut a bunch of "posts" to a length that is a couple inches inch longer than you think you will need them to be. This will give you extra "room to work with" if things have shifted around since you started this project. Garden railroaders who are doing a really big project where the final measurements are unknown often leave 6"-12" extra. It's a lot easier to cut off extra material once you are on the "job site" than it is to add.
Try to cut the shorter pieces, such as caps and sills, from any scraps, although you may need to sacrifice a long piece to get started.
Also, depending on how you decided to represent the cross pieces that hold the bents together once they're installed, you may need to cut some other lengths of wood.
 When you have more bents than you can possibly use on the first bit of trestle you plan to build, stop.
Ordinarily you will build your final trestle on site, but there may be times when it makes sense to build it all at once, such as the trestle for the "demo" railroad shown to the right. This one used the unprototypical three-posted version of the jig shown above. We screwed the caps to a 5/4"x6" piece of wood to make the whole thing stable enough to haul over a thousand miles and set up multiple times.
When you take your trestle bents outside, you'll probably want to take:
Put on long pants or figure out some other way to protect your knees. Take your bents, other pieces, and tools to wherever you're going to install your trestle. Some folks like to start in the middle and work their way in both directions. Wherever you start:
On the other hand, if you're using long pieces of wood to represent crossbars, you should try temporarily laying the pieces where they will need to go every so often, even though you can't really attach them until you've got a lot of the trestle run. This gives you another way to check the vertical alignment of your trestles - if the sills seem to be going up and down underneath your crossbar, you may have a problem.
If you haven't taken steps to protect the base of your trestle from moisture and frost heave, please make a note to do so between now and bad weather.
 Hopefully, I will have more information about building onsite and more photographs before TOO much longer. But I wanted to get the basic instructions out there now for folks who are wondering what it takes to produce a nice big trestle for their garden railroad. The answer is, it takes a few simple steps and pieces, repeated over and over and over again.
Again, if you have questions we haven't addressed, or tips or photos you'd like to share with our readers, please get in touch.
One reader asked how to stain trestles. There are almost as many answers as there are garden railroaders. Here is my answer, followed by the answers of several friends I consulted on the reader's behalf.
Paul's Answer - Most folks in our area (SW Ohio) use cedar and let it weather naturally. I have a trestle I acquired from someone else that was already stained, and then sustained damage from a falling tree. I wanted the new pieces to match the old pieces. So I mixed some water-based walnut-colored stain with some water-based Thomson's Wood Treatment, put the combination into a spray bottle and let her rip (someplace where staining the bushes behind the trestle wouldn't be a problem). I don't see why you couldn't do the same thing with a commercial outdoor wood stain. I've asked some friends and if they come up with anything else that sounds especially useful. Their comments are below.
Dave Smith, of Long Island, says: I put the trestle parts into one of those pump up garden sprayers, dump Thompson's Water Seal in and then "pump it up". The pressure causes the Thompson to REALLY penetrate the wood and tunnel portals and trestles I've had out for years, although weathered, haven't rotted!
This is how they creosote real RR ties!
Dan Stenger, of Richwood, Kentucky, says: Jasco's Copper Brown Wood Preservative gives redwood the look of Creosote. You can purchase it at Lowes.
Fred Mills of Ottowa, says: You can get just about any colour you want in an oil based stain, these days. The paint suppliers will tint the base to any colour you want.
The colour of creosote, is the colour I'd aim for. Don't get fooled into a latex based stain for out of doors. Use the oil based one. It will help preserve the fragile strip wood of your structure, and give you the colour you want at the same time.
I have even used a clear oil based wood preservative, and mixed it with a dark stain. This works great too.
Kevin Strong, a frequent contributor to Garden Railways magazine says: When we did the trestle on dad's railroad, we used a mixture of Minwax "walnut" and Thompson's waterseal. We actually soaked each bent in the mixture for a few hours prior to assembly. Nearly 20 years later, it's still holding up quite well, having weathered quite well. A few of the stringers have had to be replaced, but that's about it. From photos I've seen recently, the stringers aren't treated in any way, they're just plain redwood. That'll weather to a nice grey over the winter.
I've also heard of people spraying used motor oil on the trestles and their wood ties to help preserve them. I'm not vouching for the ecological friendliness of such a practice, just mentioning that it has been done.
Me personally? [Kevin speaking] I've used an iron acetate solution (steel wool dissolved in vinegar) to weather the wood in the past. This works to differing degrees on different woods. Cedar turns a nice, dark brown. Basswood turns kind of orangish tan. My bridges, I've just left to weather naturally. The redwood has turned a nice grey rather quickly. The cedar trestle and Howe Truss bridge still haven't darkened or changed too much, but they should over the winter, especially if buried under the snow like the other bridges were last year. The fence is a nice grey, and it's the same wood.
I've also been known just to brush a dilute mix of black/brown acrylics on the wood to give it a darker look. This seems to have held up well in the short term, but ask me in a few more years about long-term.
Wil Davis, of Dayton, Ohio, says: My bents are made of Cypress which is quite light in color so I stained them. I wanted to represent a creosoted trestle so I used Minwax dark walnut stain and dipped the completed bent in it before it was installed. I strung a rope across my green house and let the bents "drip dry." I improvised a "tank" from four pieces of 1 x 4 that I nailed together in a box and draped a double layer of clear vinyl over it. When I was done I poured the excess back in the can and discarded the plastic. I wouldn't use the remaining stain for fine furniture, but it was fine for the rest of the trestle pieces. I stained the strips for the stringers and braces the traditional way, with a brush.
So far it's doing well after five years.
 John Blessing, a O Gauge Outsider in Tucson, AZ, writes
A nice article on TRESTLES 101. You mention comments/suggestions and additions welcome or something like that. Anozira RR has an 8' long trestle I constructed with the HDPE material. I took several shortcuts as compared to your excellent TRESTLES 101 article mainly because I have discovered that there is NO glue for outdoor use that will last more than a year. If you know of one I would like to know the brand. If I use a glue-like substance it is either Liquid Nails, Silicone caulking, or J B Weld. The Silicone only has about a year life in many applications. J B Weld is very good, but takes a long time to set.
Anyway, my point here is that to join pieces of anything I have resorted to the old fashioned method of nails and screws. Nails and screws require a substantial more material than the 1/4th inch = one foot scale of O scale.  Consequently, I forgo the scale and use bigger stuff.
With the trestle for Anozira RR I essentially used the same dimensions for the bents as I used for the HDPE ladder cross "ties". Thus the bents fit up to the underside of the ladder ties with the ladder ties becoming the cap. Essentially, the HDPE ladder is the trestle stringer.
The bents are held together with small finishing nails and a small dab of GE Silicone II (just for good measure).
The bottom mud sill is eliminated by using a bottom cross bar, in my case to make sure the bents stay in line and don't sink into the mud.
I haven't finished placing all the sway braces from bent to bent as this is cosmetic anyway for this scale. Will get to that someday.
I have attached several pictures files for your edification and visual clarity.
Keep up the great work on a great on-line magazine. Cheers - John
[Note: For other great photos of John's O Gauge Outside Railroad construction, check out the O Gauge Outside articles on our Primer pages. - ed]
Fred Mills, who lives near Ottowa, Ontario writes:
Paul,
One small item you might want to add to your Bridge/Trestle article, is the application of "Guard Rails"
Too often great bridges and trestles are built, but the application of
guard rails is neglected. 
In spite of the fact that the guard rails give that finished appearance, they can serve a purpose, just like the prototype, and prevent locos and rolling stock from falling off the structures.
I recommend using lighter rail as the guard rail. Fore example if the running rails are code 332, then use code 250 for the guard rails. Code 215 could go with the code 250 running rails.
Aluminum rail is easily worked when the bending is done at the ends where typically the ends are bent to meet in the centre of the track.
Another tip is; when using the Garden Metal catwalk/bridge ties; guard rails can be spiked to the plastic ties using RailCraft/Micro Engineering short spikes in predrilled holes (The holes should be predrilled with a drill size slightly under the spike size for a tight fit).
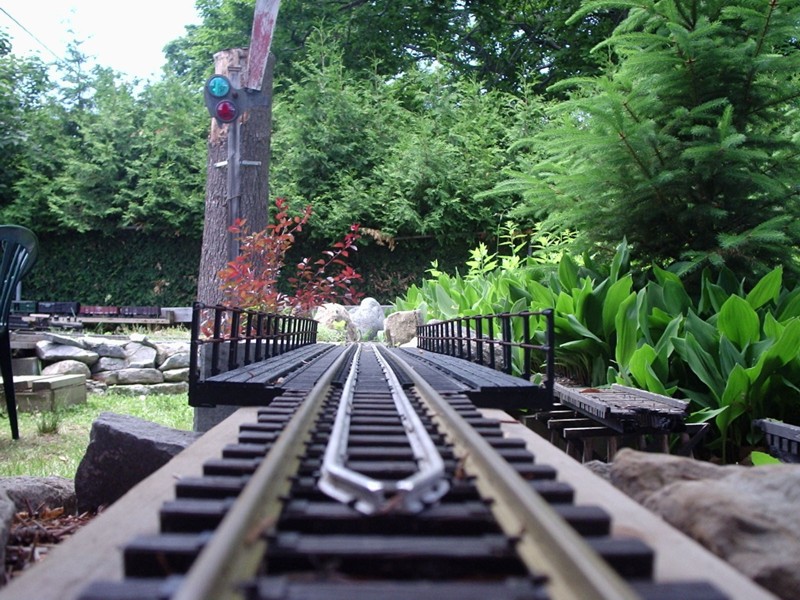 The guard rails should extend at least 6 actual inches past the ends of
the bridge/trestle structures.
The guard rails should extend at least 6 actual inches past the ends of
the bridge/trestle structures.
More information can be found in a number of "Bridge/trestle" information books put out by the major model railroad publishers.
It might be wise to point out to the newcomers in the LS group; that model railroad magazines, primarily directed at the smaller scales can be very useful as sources of information for LS projects. All you have to do is use the proper scale for the model you are building.
In Model Railroader, for example; there was an article on building jigs for trestle building (A while back, mind you). They have had plans for all sorts of trestles too.
Matt Jackson, of San Bernardino, California, writes:
Great article on trestle construction. We have two at our club, Angels Gate Hi-Railers. One is a short trestle about 4 inches (16 scale feet) high and about four feet (192 scale feet) long. This was constructed from basswood. The center posts of the bents extend through the benchwork to keep them aligned while the other posts and pin-nailed sway braces provided support on top of the benchwork. "Water" was then poured to cover the top of the benchwork.
The other trestle is curved on a 48" centerline radius and is approximately two feet high (96 scale feet) and about seven feet (336 scale feet) long. It is constructed from a wood called Gelutan, which is used for making mold masters. It's a pretty hard wood and dimensionally stable even in the small dimensions we required. The trestle is a load-bearing trestle and the bents are held together with pin-nails glued in. The bents themselves are also pin-nailed and glued to the stringers. The heads of the nails were then cut off. The bents rest on solid footers on benchwork which is being hidden by scenery/ground cover. BTW, many O scale steam engines actually weigh more than their large-scale counterparts since they're die cast instead of polycarbonate.
I think the construction techniques used in the trestles are applicable to outdoor use. I'm still in "negotiations" with my wife about the outdoor layout, but I plan to include a trestle. Alternate materials could be used. For the larger trestle, instead of paint to protect it from insects, soaking the finished bents for a couple of days in used motor oil might do the trick (not the most environmentally friendly thing at first blush, but the oil actually stays put on/in the wood.)
For some photos, check out "Member Projects" on the club's site at http://home.earthlink.net/~mcjackson/angelsgate.htm
Keep the newsletters coming. They're very informative. - Matt
Wil Davis, of Dayton, Ohio, writes:
Looks good. Something I did was to make a plywood template of the path of the trestle. I used some old paneling. I laid this on the floor of my garage and attached spacer blocks at 10" or so intervals down the center line. I made my continuous stringers out of thin, 1/8" strips, that I bent around one side of the blocks. I stacked and glued three or four of these together and clamped them to the blocks. When the glue dried I did the same on the other side of the blocks.
In the meantime I measured the length of bents needed for each location and set the concrete bricks for the footers. I used a laser level to establish the level of the top of the trestle. After the stringers had dried I removed the clamps and attached the bents to the stringers. I attached them upside down to the stringers by nailing the top caps to the stringers with my trusty brad nailer. I attached some temporary lateral stringers to hold the bents in alignment. I carefully pulled the plywood off of the completed trestle assembly.
With help, I took the whole assembly to the railroad and finished the installation. I left the stringers extra long and actually attached them to the 2x6 wood I used for subroadbed on each end. The continuous, laminated stringers are not prototypical, but they are not noticeable and add a lot of strength. As you know the railroads used short tangents that stretched from bent to bent spanned two bents at most.
John C. Andrews, of Raleigh, N.C., writes about brad guns:
I have switched over to a 23 gauge PIN nailer from Harbor Freight.
Brads were splitting my bents. By shooting 2 pins in at opposing angles they lock the lumber better than a straight-in brad. There are PIN nailers out there for close to $200, but the Harbor Freight gun has served me well for almost 2 years now. $25 -$30 depending on sale price.
Oh, yes, glue all joints as well!!!!
PS I still use my combo-brad/stapler for building construction. The 1/4" crown staples *never* come out..... Also under $20 at HF.
Not working for HF! Just using a teacher's small coin to support them and my trains. - John C Andrews
Richard Friedman, who lives near Sacramento, California, writes:
For where the trestle meets the dirt, I've got a suggestion. I have used 8 or 9 inch sections of Trex brand artificial wood. I cut it into a taped and bury it about 1/3 way into the dirt. After the dirt gets wet, it stays in place pretty good. (It doesn't rot!) Then I place the bent on top (so far I haven't had to make the connection permanent. The bent then is screwed to the track from above to hold it on the base. If I ever get to tieing the bents together, this should be very solid.
Dave Smith, of Long Island, New York, writes:
Very good article! Many of the members of the Long Island GRS have built trestle jigs and to look at them they are very simple (the jigs not the members LOL). However, similar to what you wrote, when I tried to build my own, all sorts of questions arose as to length, angles and such. Therefore, I think your article clears up most, if not all, my questions and problems.
My only other "problem" is actually cutting the same dimension of wood over and over again. The end results seem to change every time I make a cut! Luckily one of the LIGRS members, Tom Rizzo, wrote an article for Garden Railways on making a guide for use with a table saw and has told me he'd help me build one if I needed it.
|
| 
|
 |
 |
|
 |
 |
Note: Family Garden Trains?, Garden Train Store?, Big Christmas Trains?, BIG Indoor Trains?, and BIG Train Store? are trademarks of Breakthrough Communications (www.btcomm.com). All information, data, text, and illustrations on this web site are Copyright (c) 1999, 2000, 2001, 2002, 2003, 2004, 2005, 2006, 2007, 2008, 2009, 2010, 2011, 2012, 2013 by Paul D. Race. Reuse or republication without prior written permission is specifically
forbidden.
Family Garden Trains is a participant in the Amazon Services LLC Associates Program, an affiliate advertising program designed to provide a means for sites to earn advertising fees by advertising and linking to amazon.com.
For more information, please contact us

 |  |