|
Editor's Note: Wil Davis has been a very active member of both the Large Scale and HO Scale communities of Southwest Ohio as long as I've known him. His "Buckeye Falls" garden railroad inspired many of the approaches we adopted (often less successfully) on our "New Boston and Donnels Creek." Wil originally published this article in the newsletter he edits for the Miami Valley Garden Railway Society. I am publishing this article online with the club's and Wil's permission.
Alert readers will note that several approaches in this article overlap some of the content in the Family Garden Trains article "12 Volt Street Lamps from Specialty Light Strands," which I researched and wrote before I stumbled across Wil's article. But Wil actually wrote his article several years ago. Wil also spends less time reporting stupid things he tried that didn't work, so either he tries fewer stupid things or he has the sense not to report them.
Thanks, Wil, for letting us republish these great ideas for a wider audience. - Paul
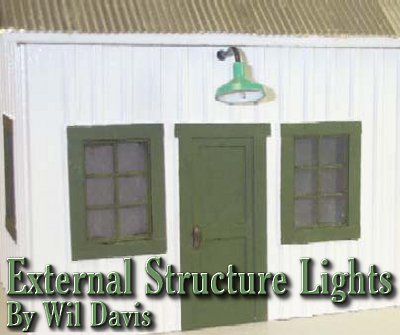
External Structure Lights
Outdoor garden railway structures always look neat when they are lighted at night. I have tried to light as many of my structures as possible, both inside and outside, but I was not able to find anything that I felt was suitable for exterior lighting so I decided to make my own. The materials are readily available and not very expensive.
I wanted to replicate the �goose neck� style of outdoor lights that are typically mounted high on an exterior wall, often over a door. You can also find examples of these that were mounted on poles. They held a large incandescent bulb and were very common before the advent of the modern sodium lights and other types of sealed lights that are popular today.
 Materials Materials
You will need:
- Lengths of 3/32�
outside diameter and 1/8� outside
diameter brass tubing
- A piece of
plastic tubing that is approximately
3/32� inside diameter (available at
most hobby shops)
- Some .040
styrene
- A micro miniature bulb of a suitable voltage
for your planned power supply. The price varies, but Minitronics makes
both 1.5 and 12 volt versions in packages of 10 for about $12.00.
- PlastructTM light shades. Plastruct makes a large variety of ABS and styrene plastic shapes for architectural models, many of which are adaptable to model railroading. The item we are interested in is their #95904 15/16� outside diameter light shades.
They come five to a package. Although most hobby shops don't stock them, they should be able to order them for you.
A package runs around $3.50, so the
cost is nominal.
- An optional item is Plastruct #5803 pipe flanges, as they
save the effort of making flanges and fit the 3/32� brass tubing perfectly.
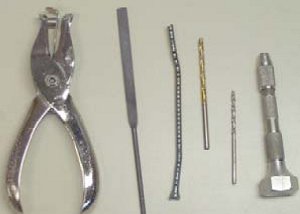 Tools Tools
For this project, I used a paper punch, a spring bender for bending brass tubes, a few small drill bits, a pin vise (to help with drilling the holes in the styrene) and a small file (for smoothing the cut end of the tubing).
You may have different tools on hand that you find useful on this project. The spring bender is available in sets of various sizes at most large hardware stores. [You may also use a "lever type tube bender," although they're too expensive to buy just for this project and they don't make very tight curves -ed.]
-ed.]
Prepping the Shade
I start by painting the inside of the lamp shade a gloss white. You can brush or spray it. Make sure the paint is plastic compatible or at least go lightly so it doesn�t attack the lampshade.
The shades come from the factory in a light green that was a common color for these lamp shades. But you can paint the outside
black or any color to your liking. The prototype for these was an enameled steel affair that was white on the inside and often green on the outside.
Bending the Brass
The next step is to bend the �goose neck� in the 3/32� brass tubing. I use a spring tubing bender as it helps keep the tubing from collapsing when you bend it. It should remain round over its length and not flatten. Otherwise you won�t be able to get the wires through the tubing, and it will not look right either. You want to make as tight of a bend as possible without collapsing the tubing. You can try using aluminum tubing if you wish, as it is a lot softer (and therefore not as sturdy) and easier to bend by hand. Because it is nearly impossible to put a smooth bend right at the end of a brass tube, I make the bend near the end and then cut it to its final size.
Your finished bend should approximate the shape in the photo to the right below.
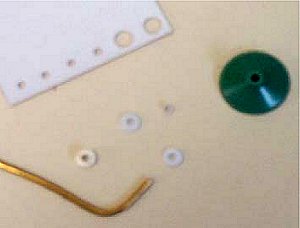 Making the Mounting Flange Making the Mounting Flange
This is not absolutely necessary, but I think it looks better and helps disguise a less than perfect mounting
hole.
It is made of two pieces of styrene. The first piece is the Plastruct flange. For the backing to that, I drill a 3/32� hole in a piece of .040 styrene, then center a paper punch over the hole and punch it out. It may take a couple of tries to get one that is centered exactly, but it�s not hard after you try a few times. I usually drill a number of holes, punch all of them out, then select the best ones to use.
Next, cut a short (1/8�) piece of the plastic tubing. Slip this over the end of the brass tubing that goes into the building followed by the flange. When you are satisfied with the position of these, run a bead of Super Glue around the joint to make a fillet.
Or you could save yourself some trouble and substitute the optional #5803 pipe flange for this fillet.
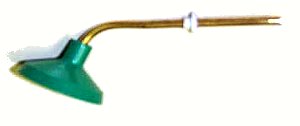 We�re almost done now, and the hard part is over. Mount the lampshade on the other end, securing it with a drop of super glue. Your completed shade assembly should look like the photo to the right. We�re almost done now, and the hard part is over. Mount the lampshade on the other end, securing it with a drop of super glue. Your completed shade assembly should look like the photo to the right.
At this time you can paint the tubing and flange. First, wipe the plastic and brass carefully to remove the oils left by your fingerprints. For color, I have used silver or black. I suspect most were galvanized conduit originally so a light gray would also be appropriate. Or you can paint it to match your building.
Inserting the Electronics
Last but not least is the bulb. I use the micro miniature bulbs made by Minitronics, but GRS makes similar bulbs. The bulb is not critical, but one that is too large doesn�t look right. Many of the micro miniature bulbs are 1.5 volts, but you can add a resistor (listed in the catalog) that will permit you to operate them on 12 or 16 volts, commonly used for garden railway lighting. Or you might be able to find 12 volt bulbs you like.
You can get the bulbs at most hobby shops. If they don�t carry them they should be able to order them for you.
I install the bulb by twisting the leads together and threading them up through the lamp fixture and tubing. I use a dab of silicone to hold the bulb in place so I can remove it if it burns out.
Mounting Your Fixture
You now have an exterior fixture ready to mount on your building or pole. If your building is a hard plastic like the Piko or Pola buildings you can drill a 3/32� hole in the proper place and insert the end of the tubing up to the flange. (It is a good idea to glue a block of wood to the back of the wall to better support the tubing.)
I like to let the tubing protrude into the building a short distance and secure it with a dab of silicone. Here again it makes for easy removal if repairs are needed.
Some of my buildings are made of the extruded blue insulating foam and are soft so I use an outer tube as a sleeve to hold the light fixture. This is what the optional 1/8� diameter tubing is for. I cut a piece slightly longer than the thickness of the building and glue it in place where I want the light fixture. I then slip the lamp fixture through the tubing and secure it to the building as mentioned above.
Last but not least, you need to hook up the wires to a suitable power supply. Now you have an operating exterior structure light. It�s a lot easier to do than it sounds, particularly if you make 3 or 4 at a time.
Conclusion
 When you try your own version of this project, please let us know what works and what doesn't work for you. Photos are especially appreciated. When you try your own version of this project, please let us know what works and what doesn't work for you. Photos are especially appreciated.
If you like the idea of supporting and learning from regional garden railway resources, consider joining the Miami Valley Railway Society. You don't have to live nearby to join, you help support a bunch of outreach efforts, and you get access to some pretty helpful information.
Above all, enjoy your trains, and any time you have with your family in the coming months.
|