| |||
 |
 |  | |
 |  | ||
 |  | ||
 |  | ||
 |  | ||
| |||
|
| | |
| | ||
| | ||
| | ||
| | ||
| Written by Jim Satterfield for the Miami Valley Garden Railway Society | |
|
|
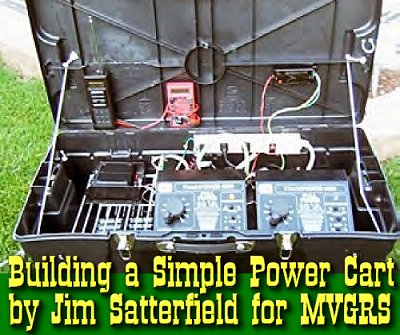
Building a Simple Power Cart - by Jim Satterfield As our layout (The Viking Valley Railroad) has grown over the years, so has the need for more power supplies, wiring, etc. Before now, I would carry out all of the engines and cars, place them on the track, and then bring out the power packs to run them. This meant always wiring/unwiring from the power packs. As our layout (The Viking Valley Railroad) has grown over the years, so has the need for more power supplies, wiring, etc. Before now, I would carry out all of the engines and cars, place them on the track, and then bring out the power packs to run them. This meant always wiring/unwiring from the power packs.
So based on an idea from our own Gordon Havens, and looking at the control cart the club owns, I set out to make my own control cabinet. I originally wanted to find a cart similar to the one we have, but they are no longer being made, and the industrial type are way too expensive. (I am trying to do this as practical as possible!) I was able to find a plastic (ABS) foot locker container at Lowe�s for $20.00. But it had no inside shelf to set the power packs on, nor did it have any wheels.
For shelving, I decided to use a piece of wire shelving. My thought was that the open area of the wire shelving would allow for air flow around the power packs, and prevent overheating of any power packs placed in the bottom of the cart. Both the top and bottom shelving are attached to the cabinet with cable ties, run thru holes drilled in the cabinet. This allows me to disassemble it if I need to access any of the lower level power supplies, or modify it in the future for new equipment.
That solved the top shelf, but what do I do with the Aristo-Craft power supply? Easy, I sat it on the bottom shelf (see picture below). I installed a power strip behind the transformers and plugged in all of the power packs. I drilled a hole in the back, and the power strip plug easily slides in and out. The AristoCraft power supply switch is always in the �on" position, so I don�t have to reach my hand inside past the top shelf to turn it on. All other power switches are easily accessible from the top. Since we run a point-to-point, I needed a spot to locate the reversing unit, which is connected to the right side power supply. A bit of double sided foam tape allowed me to position the control on the inside lid of the cabinet. I tried to do the same with the T.E. transmitter, but it is much safer sitting on the shelf. So the problem had been solved of putting everything in one cabinet, and making it mobile. But my biggest problem was still how to quickly and easily connect all of the power to the track (I�m using track power). After several failed attempts, the best idea literally fell out of my "stuff" cabinet in the garage. What fell out was an extra 4-wire trailer light connector that I used for towing my brother-in-law�s utility trailer. The next stop was to Wal-Mart to buy 2 sets of trailer wiring.
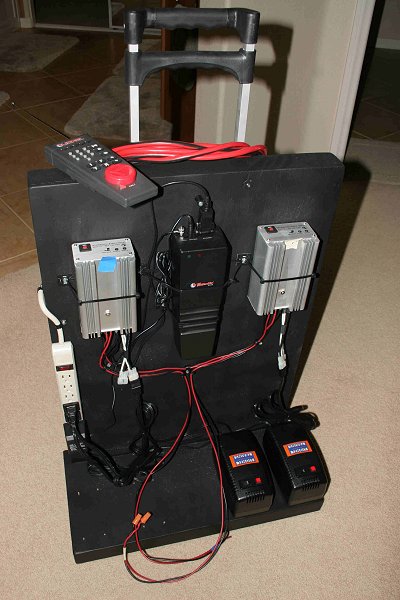
ConclusionThe cabinet is still a work in progress, but it has made running the layout much easier. If bad weather rolls in, I can quickly disconnect, and roll the cabinet into the garage, as the holes I have drilled into it makes it no longer waterproof. I have probably a total investment of about $50.00 in making the control cabinet�money well spent.We'd be delighted to hear anything you've tried to simplify getting power to your railroad quickly, while safeguarding your electronics from bad weather. Please contact us with suggestions, corrections, photos, etc. And, above all, enjoy your trains. Other VersionsWe have photos of two other power carts, to give you more ideas for solving your own power distribution questions.On the lower left is one that was alluded to earlier in this article - the MVGRS cart that is used for temporary displays. This was built from a portable serving table meant to be used outdoors. As you can see, there's plenty of room for storage, and its doors give great access to the equipment. On the lower right is the power cart from Bob Canfield's O Gauge Outside railroad. Yes, the Lionel equipment is a little different from most garden train equipment, but it gives you an idea of how easily you can build something like this up from a simple dolly or dolly-shaped portable file.
|


|

| 
|
 |
 |
|
 |
 |
Note: Family Garden TrainsTM, Garden Train StoreTM, Big Christmas TrainsTM, BIG Indoor TrainsTM, and BIG Train StoreTM are trademarks of Breakthrough Communications (www.btcomm.com). All information, data, text, and illustrations on this web site are Copyright (c) 1999, 2000, 2001, 2002, 2003, 2004, 2005, 2006, 2007, 2008, 2009, 2010, 2011, 2012, 2013 by Paul D. Race. Reuse or republication without prior written permission is specifically
forbidden.
Family Garden Trains is a participant in the Amazon Services LLC Associates Program, an affiliate advertising program designed to provide a means for sites to earn advertising fees by advertising and linking to amazon.com.
For more information, please contact us

 |  |