| |||
 |
 |
 | |
 |
 | ||
 |  | ||
 |  | ||
 |  | ||
| |||
|
|
|
| |
|
|
| ||
|
| | ||
| | ||
| | ||
| Written by John Blessing and edited by Paul Race for Family Garden Trains |  |

|
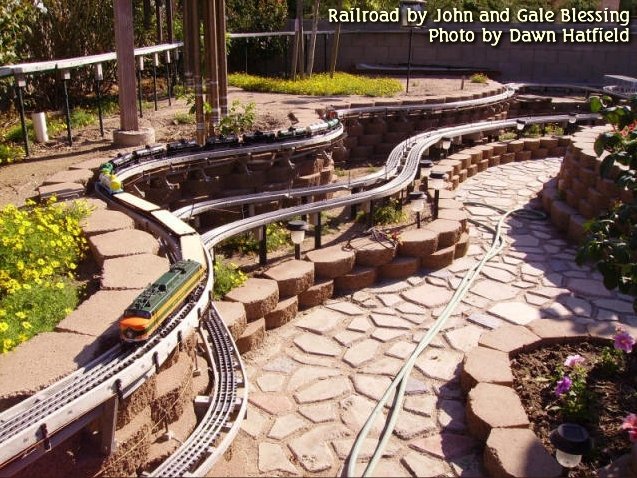
Note from Editor: John and Gale Blessing's Anozira Rail Road is a good example of taking Lionel trains outdoors to run. This article accompanies the article Planning an O Gauge Outside Railroad, which uses John and Gale's extensive Anozira Rail Road for many examples. This article focuses on John's "lessons learned" using Gargraves track outside. Unlike Atlas, who uses solid rails for their O-gauge track, Gargraves uses hollow rails connected by track pins, similar to the rails used by Lionel and American Flyer trains fifty years ago. It is available with stainless steel rails (don't buy anything else) and with your choise of basswood or UV-resistant plastic ties. In addition, it is available pre-bent, in radii that match Lionel's traditional track choices. Now for John's story, with a bit of reorganizing to make it easier to follow:
Using O Gauge Gargraves Track (Outside)We've been O-gauge railroaders for years, but for this project we decided to move our trains outside. We chose a track system we already had some experience with, but that didn't keep us from running into snags. This article is based on our "lessons learned" in our attempts to use Gargraves on an outside O-gauge railroad.Roadbed Construction As we mentioned in our earlier articles, the Anzira Rail Road (ARR) uses HDPE roadbed similar to that described in Paul Race and Bill Logan's "HDPE Flexible Roadbed" article. Though what we learned about using Gargraves outside applies to most kinds of roadbed, we'll give a quick review of our system so the rest of the article will hopefully be less confusing. As we mentioned in our earlier articles, the Anzira Rail Road (ARR) uses HDPE roadbed similar to that described in Paul Race and Bill Logan's "HDPE Flexible Roadbed" article. Though what we learned about using Gargraves outside applies to most kinds of roadbed, we'll give a quick review of our system so the rest of the article will hopefully be less confusing.
Our adaptations to the HDPE flexible roadbed design. - 95% of our track is supported by an open ladder system based on Logan's design.
I also cut 3"x2" "support" blocks to make the connection between the fence post and the "ladder." My 2x6 HDPE came from the factory with a slight groove in the center that was just right for stabilizing the fence posts. [Several suppliers have "fixed" this since John ordered his HDPE, so this may not apply to your lumber.- ed]
Track ChoiceGargraves is a longtime favorite with indoor O gaugers. All track and switches are Gargraves, 3-rails, Stainless Steel w/combination of plastic and wood ties. True, most outside Gargraves users choose stainless steel track with plastic ties, since Gargraves' basswood ties won't hold up anywhere with significant rainfall. However we discovered we needed a mix of the two:
Other Options - Since we began this project, Atlas has begun using UV-resistant plastic ties on their O-gauge, nickel-silver track, which makes them a viable option, although their track will still probably require ventilation in our setting. But except for a couple Atlas turnouts, we used Gargraves, so that's what we're writing about. By the time you plan your railroad, you may have even more options. Track Planning For a Gargraves-Built Outside Railroad
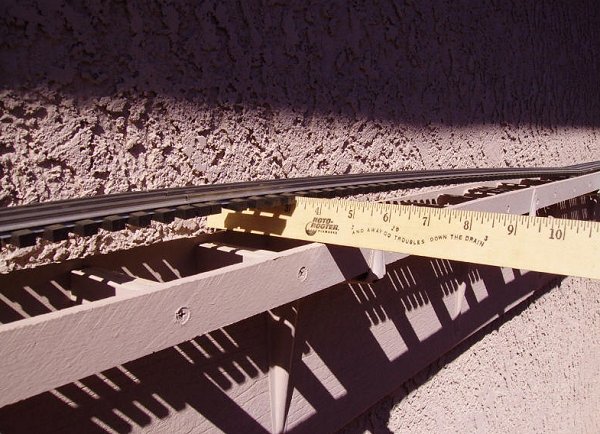
An old timer O-Gauge Outsider told me "curves and curves and curves." Curves allow the rails to convert the expansion and contraction into lateral movement. The middle part of curved pieces can not be fastened down. It must float on the roadbed. Yet each track section can be secured at its connection to adjacent sections (so the track doesn't go completely awol over time or in high winds). So, typically, I have a screw in one end of each curved section. That allows about 30" of track in the middle of each curve that can move "out and in" with temperature changes.
When I have a short straight piece separating an "S" curve, I fasten it down with one screw in the middle. That way, the piece can pivot a little as the curves move in and out with temperature changes, and it doesn't lift off the track in high winds. The curves really help. However, the new sections where I have laid sectional track have not yet been exposed to all day, open sun, so I may have to update this section if the results are different.
Preformed Curves or "Flex Track"?Gargraves makes preformed curves in nearly every radius Lionel has ever supplied. On the other hand, their marketing brochures call their big straight pieces "flex track." So why bother buying curves, if you can just bend the track where you need it to go? Because bending three-rail Gargraves curves accurately into small radii is a lot more difficult than they let on. If you plan on using curves with less than 60" radii, consider planning your railroad out and ordering the curve pieces you need already curved. More on that below.Use Accurate Templates for Precise Real-World MeasurementsHere's a BIG "lesson learned." Initially I made assumptions about how much room the curves would really need and how easy it would be to tweak things if they didn't quite go as planned, based on the marketing brochures and my experience with some, but not all, of Gargraves' products.I designed the initial installation of my railroad down to the last detail ON PAPER. Then I when I built my railroad, I tried laying the system from my blueprint. Oh my gosh -- triangulation, off-set measurements, angles, finding circle centers. . . . and on and on . . . And when the track pieces came in, nothing fit my roadbed the way I thought it would. Of course that shouldn't be a problem, right? Gargraves is advertised as "flex track," after all. Wrong. Trying to accurately bend (or rebend) Gargraves sections into radii less than 53" is not for the fainthearted, especially when you have a very large railroad's worth of track to bend. Doing that one job almost took me back to flying radio control airplanes -- forget the railroad. But because I can't see them little aeroplanes out there at 100 yards, I had to stay with pounding steel on the RR. John Henry and I became real close. For the next expansion, I used templates to lay out where the track should go before I staked the roadbed. I have a band saw so making the templates was easy -- what is important with the templates is that the curve is laid exactly and the ends are cut exactly, or else your "plan" in place will still be far, far off from the real track. The next time I do this (not likely in my lifetime), I will order one piece of each curve I expect to use and make templates to guide my roadbed construction. The hassle of making and placing exact templates of curves is nothing compared to bending O-54 curves. Once you've figured everything out with your templates, you can make your "real" track order. Use "Flex Track" to Connect Curved SessionsI do use "flex track" (the kind that comes straight) in between the sectional curves. If I need to bend it a little, I can. Bending WIDE radius curves is relatively easy. Plus, it makes beautiful transitions into fixed radius curves of 113/106 -- not that you need much transition with curves that wide.No matter how careful you are when laying the templates, you are going to be off when it comes to placing your ladder roadbed and track. So the flex comes in very handy to make adjustments EXCEPT, JUST DO IT RIGHT THE FIRST TIME. How I Would Do It NowNo, I haven't started another railroad, and don't plan to, but, based on our experiences, this process should work for the next person trying this.
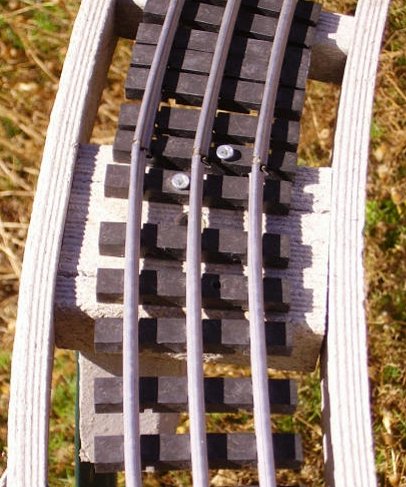
Installing the Track ItselfOnce you have your roadbed where it needs to be, it's time to pay attention to details of installing Gargraves for a "bulletproof" outdoor railroad.Connecting Gargraves Track Sections - Fifty percent of the track is joined, track section to track section, not by the standard track pins, but by the GarGraves Fit-Up track joiners. These joiners are over 2X longer than conventional track pins, thus they provide a larger surface area by which to make physical and electrical contact. Due to the constant rail movement caused by day/night rail expansion/contraction, the conventional track pins moved and several lost electrical contact. (Joints also lost conductivity through corrosion, which conductive grease - below - addresses.) Now that we are using Fit-Ups we are experiencing fewer and fewer lost connections. Also, we modify the Fit-up by placing at least one slight crimp/bend in each half; two bends are better like a zig-zag in each half. This seems to make a more positive rail contact. As we get more and more miles of train running, we are using more and more Fit-Ups, including replacing many track pins in track we have already installed. Applying Conductive Grease - We have found that an application of conductive grease or electrical anti-corrosion grease is an absolute necessity to protect conductivity on joint-to-joint connection devices such as track pins and Fit-Ups (our preference). [I got John to tell me that he usually uses GB (Gardner Bender) Ox-Gard TM, OX-400, Anti-oxidant Compound, but he's used other conductive greases with succes - ed.] Our procedure is:
Running Power to the TrackWe have never mastered soldering to stainless steel rails, so, all power drops to tracks are to GarGraves terminal track sections at 10 to 15' intervals. All electrical wire is underground to the point where I must go up to the track. I use 12 gauge, landscape wire, with soldered joints at connections and underground, irrigation grade wire nuts for insulation of the splices. I've only had one joint go to ground. All wire bundles larger than 2 wires are protected with landscape plastic edging over the top prior the refilling the wire trench to protect the wires from future spading or shovel nicks.
The Anozira Rail Road has 700' of track that is divided into 8 equal sections for use with Lionel's TrainMaster Command Control (TMCC) system. Each section is isolated and powered by one, 180 watt, Lionel brick through a Lionel TMCC Direct Lockon 73-4120-250 or newer. For more information on using Lionel TMCC outside, please see the article Using Lionel's TrainMaster Command Control Outside Wipe The Track Often - The track MUST be wiped clean before running of trains; even if you just ran trains the day before. Track can get very dirty in a short time due to the stuff in the air. Troubleshooting Outside Gargraves Track Problems - Any time you have trouble with an engine not wanting to run along a section of track as it should, go through all the regular checks and then suspect loss of internal rail conductivity due to degraded track end connections. Since O Gauge Outside track is exposed to water, track connections degrade at what seems to be an alarming rate if you don't use Fit-Ups and conductive grease. Special Considerations for Turnouts (Switches)Turnouts are the "weak link" in most model railroads, for several reasons. Outdoors, they can be even more problematic than they are indoors, though.Mechanical and Conductivity Issues - Trains are more likely to derail on turnouts than anywhere else. Locomotives are more likely to experience a break in current on turnouts than anywhere else. And turnouts outside seem to be magnets for any bit of gravel or twig that can clog or jam it up. For those reasons alone, place all of your turnouts within easy reach. You will almost certainly need to make more visual inspections and more minor maintenance than you're used to. UV Issues - Even though Gargraves' plastic ties are supposed to be UV-resistant, I've had issues with their turnouts. Early on, I sent all of our GarGraves switches back to GarGraves for retro-fit to the new die-cast points. Factory inspection of the switches revealed that two of the turnouts that had been exposed to the sun without any protection had become so brittle that they couldn't be serviced - they had to be replaced. [If you see premature degradation of the plastic ties, you might consider taping over the rails, frogs, and points, and spraypainting the ties with UV-resistant paint - ed]. Control Issues - Here is the really big issue - if you want to use Lionel TrainMaster Command Control (TMCC) to control your turnouts, you'll discover that nobody makes the equipment you need to do this outdoors. We have mostly tried using GarGraves switches, though we have a couple of Atlas 7.5 degree, high speed turnouts.
After trying several options, we settled on Z-Stuff for Trains DLZ-2500 switch machines, because they respond to TMCC signals, the technology we use to control our trains. I've also looked into Del-Aire, which are impervious to moisture, dust or UV, because they're really just little pistons powered by air. Unfortunately, they don't respond to TMCC signals. I've looked all of the other switch machines that are TMCC-compatible; none seem likely to hold up to outdoor use even as well as the DLZ-2500s did. Still Trying New Things - When I first sent the content for this article to Paul, I thought I had the switch motor problems figured out. But things that worked for several months still didn't last forever. So all I can promise on this subject is that, when we do figure out or find out a TMCC-compatible, weather-resistant switch motor solution, I'll let you know. Stay tuned. [Note: Fred Young, another O Gauge Outsider has gone to all manual turnouts and built special covers to protect them when they are not in use. He says he has had no problem with the manual turnouts other than having to walk over to throw them. I'll get more info from Fred later if I get a chance - ed.] Update, 2009As a result of other turnout issues, in 2009, I began replacing the GarGraves switches with Ross switches. The Ross have been in place since Spring. They still work flawlessly. However, I did preparation on them prior to installation. First, address the rust factor since the rails are not stainless steel. I painted all switch rails with a rust barrier product with which I've always had satisfactory results. It is GREAT. Not only does it "eat" rust on application, but it forms an extremely hard coat and prevents rust from forming. Check out Rust Bullet at:http://rustbullet.com/?source=yahoo&OVRAW=rust%20bullet%20review&OVKEY=rust%20bullet%20review&OVMTC=standard&OVADID=30368684011&OVKWID=225641174511 Another Option: Factory-Painted Ties/Bases on Gargraves Turnouts - In addition, another sunbelt garden railroader, Bob Canfield reports that Gargraves has offered to paint the bases for their turnouts before they assembled them. Bob thinks a lighter color would help the Gargraves turnouts hold up better in his blistering back yard. So if you want to go with Gargraves turnouts, and your back yard resembles a pizza oven in the summer, consider this option when ordering your track. ConclusionPaul speaking: We should probably have thrown out all the stuff John tried that didn't work and just published a nice straightforward set of instructions that made everybody look good and made you feel brave about your next project. But I figured that, since O Gauge Outside is still in its infancy, it's worth sharing John's "snags" as well as his solutions. In the meantime, though you may have sensed some frustration in different parts of this article, you should know that the Blessings and their friends have had countless hours of relaxation and pleasure from their railroad.Recently, I learned that the Blessings have had further problems with their track; again the problems seem to be related to the extreme climate in which they are operating. I'll keep you posted on anything else you may find helpful. I'll also see if I can get more details from Fred Young, who seems to have found some good solutions for some common problems. And if you have any successes or failures that your fellow hobbyists can learn from, please drop me a line. If you have a question for the Blessings, just let me know and I'll pass it on. O Gauge Outside Links
|

|

| 
|
 |
 |
|
 |
 |
Note: Family Garden Trains?, Garden Train Store?, Big Christmas Trains?, BIG Indoor Trains?, and BIG Train Store? are trademarks of Breakthrough Communications (www.btcomm.com). All information, data, text, and illustrations on this web site are Copyright (c) 1999, 2000, 2001, 2002, 2003, 2004, 2005, 2006, 2007, 2008, 2009, 2010, 2011, 2012, 2013 by Paul D. Race. Reuse or republication without prior written permission is specifically
forbidden.
Family Garden Trains is a participant in the Amazon Services LLC Associates Program, an affiliate advertising program designed to provide a means for sites to earn advertising fees by advertising and linking to amazon.com.
For more information, please contact us

 |  |