| |||
 |
 |
 | |
 |
 | ||
 |
 | ||
 |  | ||
 |  | ||
| |||
|
|
|
| |
|
|
| ||
|
|
| ||
| | ||
| | ||
Written by Paul D. Race for Family Garden Trains(tm)
 |


|
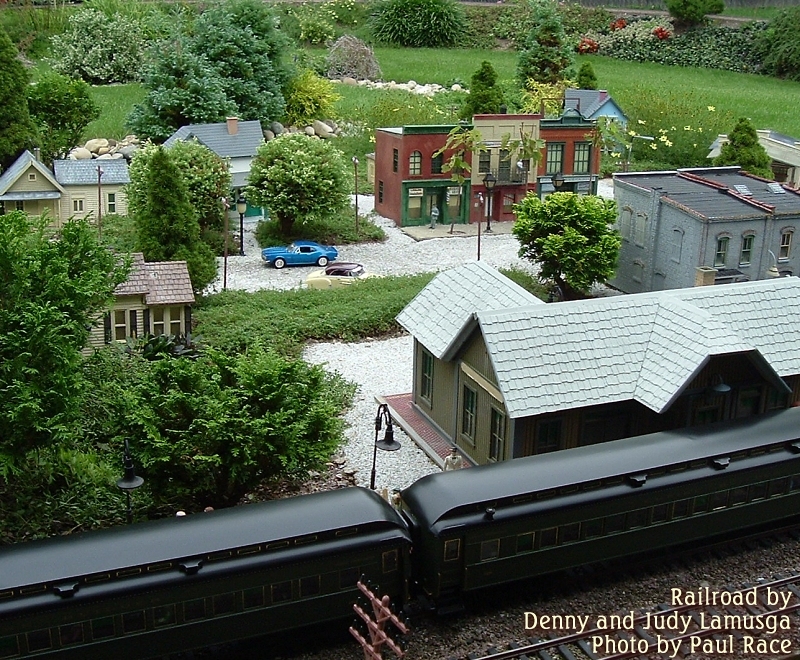
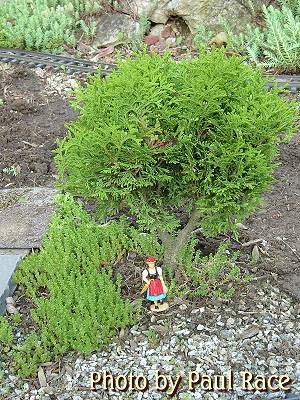
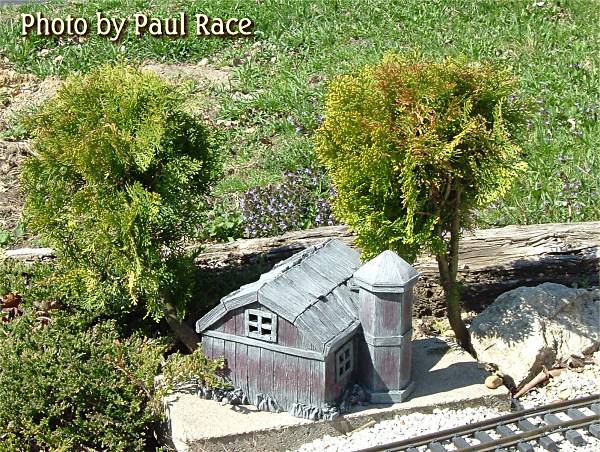
Trees for Your Trains - Choosing and Cultivating Dwarf ConifersOne of the most fun things about a garden railroad is choosing and cultivating plants that look like they belong with your trains and accessories. Slow-growing evergreens with very short needles can look like very realistic models of full-sized trees, and they offer the additional benefit of keeping your garden green even when everything else is dormant or frozen off to the ground. It's no wonder that Dwarf Alberta Spruce and a few similar species have been adopted in such huge numbers by garden railroaders. Still, there is an art to getting these plants to look like little trees, while keeping them healthy and small enough to look right with your trains and structures at the same time.Many garden railroading experts have spoken or written about this subject, most notably Jack Verducci, who wrote a series of articles on trimming dwarf conifers that Garden Railways published in the summer of 2002. (Unfortunately, they were not included in an otherwise excellent collection of Jack's articles called How to Design and Build Your Garden Railroad, an important volume otherwise.) In this article, I have tried to annotate the ideas that I got from Jack, as a "tribute" to his excellent work. But, on the other hand, 100% of the writing, observations, and experiences are mine. (My kids did help with some of the photos). My experience centers around so-called temperate climates. However most of the principles discussed in this article have some application in any garden railroad. If you have corrections, additions, or questions that aren't addressed in this article, please contact me, and I'll find out what I can and get back to you. Note: Technically speaking, a conifer is any cone-producing plant, which includes a few plants that are not actually evergreen. However, 99.9% of the conifers that grow in my part of the world are evergreen, so pardon me if I seem to be using the terms synonymously. Topics discussed in this article include:
Planning the Plantings A landscaper or designer might tell you to have every corner of your garden planned out before you go to the store and get one plant. I don't recommend that, because your life will be simpler, and your garden more rewarding in the long run if you A: learn as you go and B: space out the work over a period of time instead of trying to get everything done at once. That said, it would help to have some idea of what sort of plantings you want where - otherwise you might find yourself moving things later unnecessarily. A landscaper or designer might tell you to have every corner of your garden planned out before you go to the store and get one plant. I don't recommend that, because your life will be simpler, and your garden more rewarding in the long run if you A: learn as you go and B: space out the work over a period of time instead of trying to get everything done at once. That said, it would help to have some idea of what sort of plantings you want where - otherwise you might find yourself moving things later unnecessarily.
Most conifers you buy for your garden railroad will fall into one of the following categories:
Many experienced garden railroaders also dabble with smaller specimen trees and even "bonzai'd" trees that might represent backyard fruit trees or other unique plantings. This article will focus on the list above, however, since it applies to more people who are just getting started.
That said, a lot of eager beginners plant a "forest" of Dwarf Alberta Spruce only a few inches apart, and they look great for a year. But in a few years, they've merged into one green mass with a bunch of tips sticking out, or, worse yet, crowed each other enough to start causing lower branches to die off and parasites to move in. I would consider 12" apart is an absolute minimum, and I've learned that trees that are 18" apart are a lot easier to keep properly trimmed. So if you have a 6-square foot area you want to put into "forest," you may not really have to buy more than six plants (or eight at the most). In the planning stage, you may experiment with drawing a map or diagram of what you think you'd like where. Unless you're on a tight schedule to have a working, fully landscaped garden railroad by a certain date, though, don't buy everything on your diagram the first day you go to the store. In my experience, it takes about an hour to shape and plant your first tree and anywhere from 20 to 35 minutes per tree once you know what you're doing. So buying twenty trees your first trip to the store may be self-defeating. In addition, having a plan before you hit the store will keep you from buying stuff you really have no use for at all. Well, it will keep some people from that, anyway. Preparing (Or Not) The Planting SiteYou really don't need to do too much preparation or use too "good" a soil, unless you want to be digging up your trees and replacing them every few years. This is opposite the advice of conifer-lovers and most other landscapers and gardeners. But they all imagine you want things to get big fast, and you probably don't.Once, at a national Garden Railroading convention, an "expert" on conifers gave a seminar on how to encourage maximum growth out of young conifers. One attendee was the person giving the next seminar - Barb Abler, then gardening editor for Garden Railways magazine. When Barb got up to give her presentation, the first thing she said was "Now you need to forget everything he told you." That doesn't mean you need to be ignorant of the requirements for healthy conifers - you just don't have to be a slave to them. Here are some considerations:
In my case, the dirt on my railroad is mostly clay, although I had some cheap pasture soil (with more organic content) hauled in for part of it. I have used Mir-Acid on new, small plants until they got established, as well as occasional coffee grounds on trees that were a bit more mature. But other than that, I avoid anything that would fertilize for fertilization's sake. As a result, I've been able to keep most of my conifers from growing more than a few inches a year. The short version is: buy some potting soil and Mir-Acid if you want to help your new conifers "get started," but don't worry about massive changes to the chemistry of your soil. Once they have good roots, your trees are better off "underfed" than "overfed." Choosing Conifers for Your Garden RailroadAn experienced Bonzai grower or conifer expert can make use of nearly any kind of plant. However, for the best results, beginners should start out with appropriate species of plants, and with individuals that have appropriate growth patterns.Look for Dwarf and Other Slow-Growing PlantsFirst of all, look for plants with small needles and small growth habits. If you don't know what you're looking for, read the label carefully. The difference between a dwarf and a miniature conifer is often contained in the "height at ten years" figure on the label.
Some plants, like Dwarf Alberta Spruce and Dwarf Procumbens Juniper (a miniature version of Japanese Garden Juniper) have "dwarf" in the title. Just because plants don't have "dwarf," "miniature," or "nana" in their name doesn't mean they're unsuitable - you just have to read what the label says about their growth patterns. However:
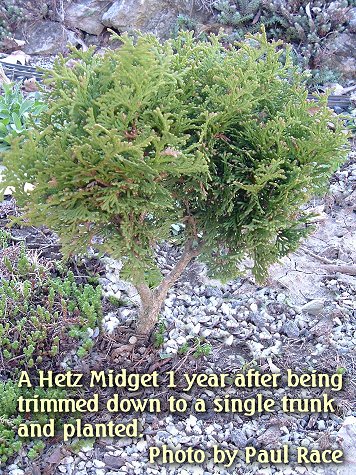
  As examples of the difference between a true dwarf, and a slow-growing conifer, I have planted two Hetz Midget Arborvitas. These are globe-shaped shrubs which, as their name implies, have a very slow growth pattern. I've also planted two Brekman's Golden Arborvitas, conehead-shaped shrubs that are rated to be 8 foot tall at the end of ten years (just outside the "dwarf" rating). I can go a year at a time without trimming the Hetz Midgets, but I really should trim the Brekman's Goldens twice a year. Not that they get huge, mind you, they just grow taller faster, and they revert to their conehead shape instead of the rounder shape I prefer. As examples of the difference between a true dwarf, and a slow-growing conifer, I have planted two Hetz Midget Arborvitas. These are globe-shaped shrubs which, as their name implies, have a very slow growth pattern. I've also planted two Brekman's Golden Arborvitas, conehead-shaped shrubs that are rated to be 8 foot tall at the end of ten years (just outside the "dwarf" rating). I can go a year at a time without trimming the Hetz Midgets, but I really should trim the Brekman's Goldens twice a year. Not that they get huge, mind you, they just grow taller faster, and they revert to their conehead shape instead of the rounder shape I prefer.
Species that have been used successfully in Temperate Zones include:
Friends in warmer climes have used cone-shaped false cypresses of the "Chamaecyparis Obtusa" family as a "forest tree" with good effect. Look especially for cultivars with "nana" in the name. (Frequent Garden Railways contributor Kevin Strong says that Chamaecyparis obtusa 'Aurea Nana' (Golden Dwarf Hinoki Cyprus) is a popular choice.) Again, find out what people in your area are using or buy locally if you can, because some Chamaecyparis are not suited to cold winters. Look for Individual Plants With Appropriate Growth PatternsWhen you head to a gardening or landscaping supply store with your plant list in hand, remember that your railroad doesn't need exactly the same kind of plants as your local landscapers use. For example, almost all Arborvitae are sold with multiple trunks. This is true from the largest landscaping plants (such as Emerald Green) to the smallest dwarfs (such as Hetz Midget). Landscapers want them to fill out quickly, and they really don't care what they look like in ten years. Using multiple-trunked shrubs in "full-sized" landscaping doesn't seem to be a problem until a heavy snowfall or rainfall causes an adult cluster to separate into thirds, each trunk pointing a different direction, something that would be much less likely to happen with a single tree. By then if you can remember who planted them, good luck getting them replaced. or landscaping supply store with your plant list in hand, remember that your railroad doesn't need exactly the same kind of plants as your local landscapers use. For example, almost all Arborvitae are sold with multiple trunks. This is true from the largest landscaping plants (such as Emerald Green) to the smallest dwarfs (such as Hetz Midget). Landscapers want them to fill out quickly, and they really don't care what they look like in ten years. Using multiple-trunked shrubs in "full-sized" landscaping doesn't seem to be a problem until a heavy snowfall or rainfall causes an adult cluster to separate into thirds, each trunk pointing a different direction, something that would be much less likely to happen with a single tree. By then if you can remember who planted them, good luck getting them replaced.
Other tips include:
Trimming Your ConifersOnce you get your plants home, the real work begins, unless you've been lucky enough to get some really young plants that you can pop into the ground and worry about later. More likely, you've got something that has already assumed a shape of some sort. In the case of Dwarf Alberta Spruce, it has almost certainly been trimmed at least twice (probably three or four times) to get that nice conical shape it had when you loaded it into your truck.If you have very low rainfall, very heavy shade, or a very short growing season, you can probably ignore at least some of my advice below. But if your trees will get more than 36" of rain a year, more than two hours of direct sunlight a day, and more than five months between killing frosts, you should take my recommendations a little more seriously. If you are like most garden railroaders, you will need to prune your trees to get the best appearance, vitality, and longtime service out of your plants. Won't I Hurt My Cute Little Trees?"
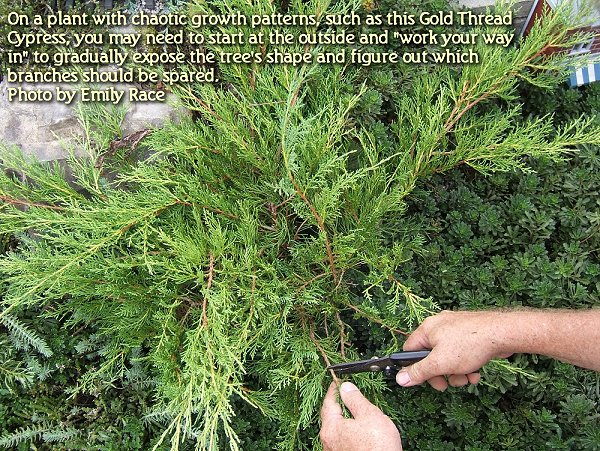
The other thing to remember is that most of these plants have become popular among landscapers and gardeners because they survive radical trimming pretty well. Like Taxus (Yew) and other hedge conifers, they look best and stay healthiest when they're properly trimmed. Again, Dwarf Alberta Spruce is an example of a tree that will be healthier if you "encourage" it to keep its shape. And the time to start that program is right before you put them into the ground. What Tools Do I Need?I have several small-nosed trimmers, the sort you can get at any garden supply store (or even Big Lots). I don't know that there's huge value in buying a $20 trimmer if you can buy a few $6 ones in different sizes - little ones for fine work, bigger ones for clipping off more significant branches. (Trying to whack branches with inadequate trimmers will result in damage to the plant and the tool, and possibly a blood blister or other damage to your hand when the branch finally gives way.)Whatever kind of trimmer you use, be certain that you make every cut snug up against the branch or trunk, so that the "wound" will heal smoothly. (This is one of Jack's biggest gripes - people who leave little "stumps" that almost never heal, and which risk the overall health of the tree from then on.) Frequently leaving a very smooth cut requires two cuts - one cut to remove a branch or twig that must be removed, then a second cut to "clean up" leftover material. Where Do I Start?While the plant is still in the pot, turn it around and "feel" through the branches to get a sense for its growth pattern. Picture what you would like it to look like eventually and what will have to change to get that look.Taming the Coneheads - Since most people start with Dwarf Alberta Spruce or similar species, I'll provide a detailed description of how to trim them, and add shorter sections for "globe" and "specimen" trees below. Take a close look at your tree. You've probably already observed that many cone-shaped conifers, such as spruce and pine, add a "ring" of branches around the trunk for every growth spurt. On Dwarf Alberta Spruce, the "rings" of branches may be only a couple of inches apart. Some people think that you achieve a more "windswept" look if you take out every other ring of branches. If you want to try this, I'll provide some tips about that in a moment, but I tend to leave most of the "rings" on my trees intact. Usually each ring includes four or five strong branches and two or three wimpy branches. You'll need to thin out each ring, whether or not you leave all the rings on the tree. Also, while you're examining the plant, think about whether it could be shorter and still meet your needs. After all, it's a lot easier to adjust a tree's height before you put it into the ground than it is to do so later. (And don't even think you can fix that problem by planting the tree much deeper into the soil - your trees must be planted so that the "crown," or soil line is as close as possible to what it was in the pot.) Work From the Outside In and From the Bottom Up - Now that you have a sense of your tree's structure and what you want to accomplish, take a good look at the bottom two rings of branches on the tree. It's likely that the bottom "ring" has only a couple of wimpy growths, nothing really worth salvaging. If that's the case, trim them off smoothly at the trunk and go to the next ring. On any full ring, you'll notice several strong branches and several "weak" branches. You'll also probably notice between one and four instances where adjacent branches are trying to grow in the exact same part of the tree, crowding each other out. Jack Verducci calls these "redundant" branches. Whatever else you do, you will need to thin out this "clutter." Now you're ready to start trimming. If your tree is way smaller than you really want it to be, you may thin out the wimpy branches and simply trim the strong ones back a little. However, you will probably find it easier to keep your tree's "tight" conical shape in the long run if you clip the strong branches off at the trunk and leave the weak ones. When you're done "thinning out" redundant branches, you should have about four (no more than six) branches growing out of that ring. Any "runts" that come out between rings should probably be taken out altogether as well.
When you're ready to move "up" to the next ring, you might think about whether you want to try for that "windswept" look or just give the tree a good overall trim for now. If you do decide to "take out" every other ring of branches, be absolutely certain that you've trimmed each branch as smoothly as possible back to the trunk. For a few months that part of the trunk may look like it's been replaced with a circle of "potato eyes," until the bark starts growing over it. If you've done it right, by two years there should be nothing left of the ring but a swelling under the bark. Once you've trimmed a few rings, you'll begin to get a "feel" for this. Remember there's no "right or wrong;" as long as you're thinning out the growth, letting light hit the "heart" of the tree, and controlling the tree's overall shape, the specifics are up to you. By the time you get to the top, you may have a sense for whether the tree is too tall (I've bought several at years' end that were at least six inches higher than I wanted them, so that's not impossible.) Here's where you can use one of Jack's tricks. Cut the tip down where you need it to be, select a branch that looks healthy, and bend it upward. Secure it in that position with fine wire (such as florist's wire) - just remember to remove the wire in a few months so you don't accidentally strangle the new "top." Now revisit the shape of the tree. You may have to do a little more "fine" trimming (as described above) to get the final cone shape you want. What Jack didn't report was that the tree has a certain amount of "memory" for its original shape. So the next time there's a growth spurt, the top quarter of the tree may "poof out" again to the horizontal dimension it had before you reduced the tree's overall height. Usually if you trim that "poofy growth" back carefully the first time or two it happens (removing the longer stems and leaving the shorter ones, rather than just giving all the branches a "buzz"), the tree "gives up" and conforms to the new shape you gave it. What About Globe-Heads? - Most gardeners who use globe-shaped shrubs try to shape them to represent deciduous trees such as maples and oaks. To achieve this effect, you will need to expose a "trunk," and, if possible, major "branches."
When you first cut all the extra trunks out of a pot containing a supposedly globe-shaped plant, you may find that the remaining shrub looks rather "flat" and has maybe 1/20th of the foilage of the original plant. Don't let that bother you - instead of having from 3 to 8 sickly plants clustered together and fighting each other for light and nutrients, you will now have one plant with a very good chance of becoming robust, attractive, and nicely three-dimensional, probably by next spring. You'll also notice that, unlike cone-shaped trees, most "globe-shaped" shrubs have few or no distinguishable "branch rings." The shrubs branch out in a manner that is more characteristic of deciduous trees, except that most of their branches don't spread "out" as much as you'd think. In most globe Arborvitas, for example, the branches come off the trunk at an acute angle, so that the heart of the tree may include four to six "branches" that are all within ten degrees of vertical. Because the flat "leaflike" foilage of these plants tends to align like the leaves of a book, you often wind up with a shrub whose internal shape is about as interesting as that of a deck of cards, and whose inner layers get about the same amount of light or air. In most cases, you wish to keep the branches that branch "outward" the most, and cut out the redundant vertical branches that are cramping up against each other in the middle. Once you've done that, the remaining tree may look even "flatter" than it did before. Again, don't worry - it will thicken up before you know it, once light and air are hitting the "sides" of the branches and not just the outside edges.
I admit, my Hetz Midgets and similar globe-shaped plants often look terrible when I am through with them at first. But most of them recover quickly, look great within a year, and require very little maintenance from that point on. By the way, when I plant a tree that has undergone this treatment, I do pay more attention to soil conditions, etc., and I am more circumspect about providing enough water for the first year. Once they have a growth spurt or two, I pretty much ignore them like the rest of my plants, and they do fine - much better, I believe, than they would have if I had left all those extra trunks and foilage intact.
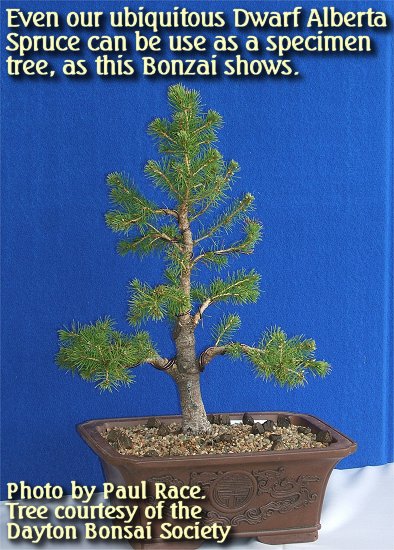
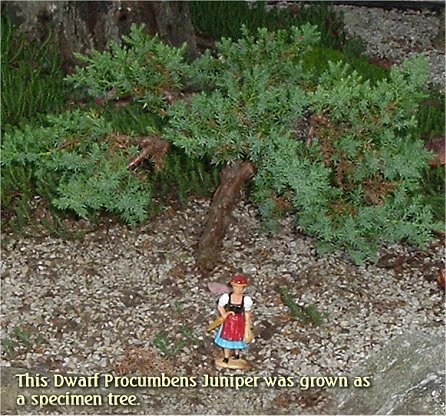
No dwarf conifer is off-limits for a specimen tree, if you like the foilage and want to give it appropriate attention. On my railroad, I have given that kind of attention to the mugo pine shown above, a couple of "Birds Nest" spruce (with uneven results, to say the least), a Tom Thumb Cottoneaster and a Japanese Laceleaf Maple (yes, I know that the last two are deciduous, but many of the same principles apply). The big "trick" with specimen trees is knowing what you want them to do and working hard to make certain they do it eventually. At the same time, making sure that light and air can reach the "heart" of the tree is pretty universal. The principles you learned while you were trimming your "cone" and "globe" trees will help you decide on the best approach for your specimen trees as well. Some specimen trees get to the shape you want more easily than others. On a mugo pine, for example, you'll spend a lot of time trimming lower growth until the trees finally "get the point" and stop trying to send out branches at ground-level. (A Blue Star juniper I tried this with never did get the point, so this isn't foolproof.)
When I was admiring one railroader's beautiful specimen trees, he said, "My wife just cuts off anything that doesn't look like part of a tree." Like everything else in this article, your mileage will vary. Planting Your ConifersOnce you've got your trees in the shape you want, dig a hole in the ground and put them in so that they sit in the soil exactly as deep as they sat in the soil in the pot. Okay, you had that part figured out. But seriously, there isn't much more to it than that. If your soil is very poor, though, you should probably consider following the directions on the tag that came with the tree. Usually this says to:
In addition to the "conventional wisdom," consider the following suggestions.
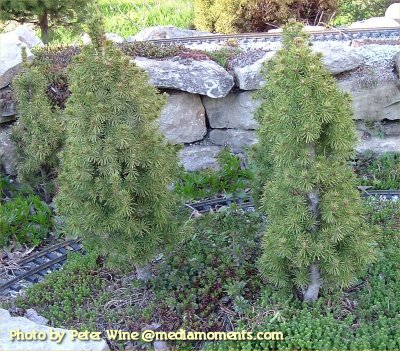
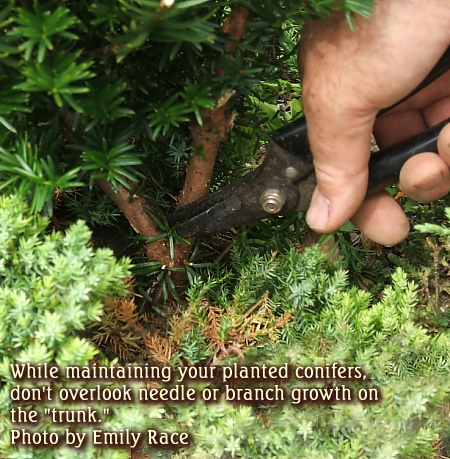
As months or years go by, pay attention to any dwarf conifers (such as Dwarf Alberta Spruce) that have grown up against each other or up against a wall. As I have mentioned, the warm, moist environment such crowding creates is especially inviting to spider mites and other tree-destroying vermin.Yes, it's hard to trim a Dwarf Alberta Spruce evenly all the way around the tree when it's in the ground, but you need to do that work every so often, so the tree is ready to take advantage of late winter and early spring rains. Do NOT just trim the tree branches back wholesale, like the nurseries do. Each place you cut a branch will create two or more new sprouts in the spring. A nice, even trim, clipping off only the outside inch or so will result in such a crowd of new branches that your tree will have a nearly airtight "shell" that looks great by next July and may kill your plant by the following June. |
|
|
|
| 
|
 |
 |
|
 |
 |
Note: Family Garden TrainsTM, Garden Train StoreTM, Big Christmas TrainsTM, BIG Indoor TrainsTM, and BIG Train StoreTM are trademarks of Breakthrough Communications (www.btcomm.com). All information, data, text, and illustrations on this web site are Copyright (c) 1999, 2000, 2001, 2002, 2003, 2004, 2005, 2006, 2007, 2008, 2009, 2010, 2011, 2012, 2013 by Paul D. Race. Reuse or republication without prior written permission is specifically
forbidden.
Family Garden Trains is a participant in the Amazon Services LLC Associates Program, an affiliate advertising program designed to provide a means for sites to earn advertising fees by advertising and linking to amazon.com.
For more information, please contact us

 |  |