Every kit comes with a drawing that shows how the pieces are supposed to go together. Many kits even come with "prefinished" appearance so you're not supposed to have to paint them. However, I've discovered that a few extra steps before you set a building kit out on your railroad contribute dramatically to the attractiveness and usefulness of that structure for years to come. For example, painting structures with spraypaint that is made for outdoor use:
- Defends the structure against ultraviolet light, protecting it from fading and turning brittle (The UV-resistant plastics used in Garden Railroad structures slow the process down, but they don't eliminate it, as you'll notice when you visit most garden railroads that are over a few years old. If you like the finish and just want to protect it from fading, spray it with a flat or satin UV-resistant clear finish.)
- Makes the structure uniquely yours, so it doesn't look like everyone else's out-of-the-box structure.
- Eliminates the plastic sheen that is a dead give-away on out-of-the-box buildings (even the ones that come "pre-weathered.")
- Keeps the walls of the buildings from glowing when you illuminate them from within.
This article includes many hints for improving the appearance and durability of your finished structure and saving time while you do so. Other additions, such as weathering or adding windows, are also very helpful; those will be covered in other articles.
Note: The focus of this article is on creating "paint jobs" that will hold up for years under adverse weather conditions including blistering suns and hard rains (although they'll hold up even longer if they don't remain outside through the winter). However, the basic techniques described in this article are just as useful for preparing a structure to add realism and interest on an indoor railroad or display village.
 What You Need What You Need
The Family Garden Trains Article Stuff to Have On Hand describes stuff you should keep on hand so you don't have to make a run to the store every time you want to spend twenty minutes fiddling with a model. A few items from that list that relate specifically to painting are:
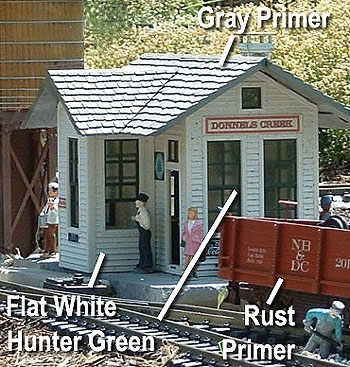
- Gray Primer - for undercoat and industrial gray.
- Rust (Red) Primer - for barns, boxcars, covered bridges, for undercoating objects that will be painted darker, for "dusting" items you want to look rusty or weathered.
 Flat Black - for topcoat and some weathering Flat Black - for topcoat and some weathering
- Flat White - for topcoat
- White Primer - (optional) for undercoating items that will be painted white.
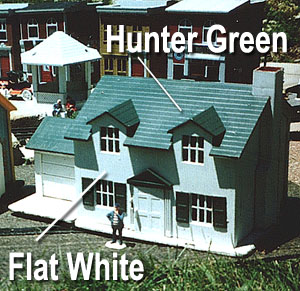
- Other Flat or Satin Outdoor Finishes - flat or satin outdoor finish to make your building unique. In my part of the world, green roofs on farmhouses are common, so I usually keep a can of satin Hunter Green onhand. The next time you make a road trip, pay attention to colors that are common in your part of the world for the kind of buildings you are modeling. (For example, the frame train stations in this part of Ohio tend to be yellow or yellow-green, although I chose other colors for mine.)
- UV- and Weather-Resistant Clear Finish - to protect any surfaces painted with acrylics, as well as any signs, decals, etc. Note: these sometimes react weirdly with other paint or with decals, so test on a sample first before you actually use it.
    Acrylic Craft Paint - Good for details - you'll probably accumulate a few of these as you go; just remember that if you use them for anything but spot painting, you may want to coat them with a coat of UV finish to hinder fading outside. Acrylic Craft Paint - Good for details - you'll probably accumulate a few of these as you go; just remember that if you use them for anything but spot painting, you may want to coat them with a coat of UV finish to hinder fading outside.
- Superglue - a two-pack or three-pack of a cyanoacrylate adhesive (this will set you back about $1 and speed up assembly of your structure).
- Waterproof structural glue or silicone caulk - for reinforcing structural walls when your basic assembly is done.
- Cheap Craft Paintbrushes - the kind you can get ten for a dollar so you can use them for quick touchups and pitch them when you're through with them. (Of course, if you're good at painting with a brush and want to use expensive brushes and maintain them, you certainly may, but expensive brushes won't "buy" you anything in the kind of painting we discuss in this article.)
Where to Paint
Figure out where and when you're going to work.
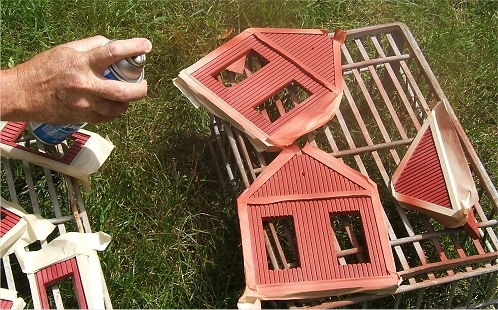
 Outside - My preferred location for spray-painting models is outside in the shade on a spring or summer day with no wind. (Okay, that's ideal, so I have a backup below.) I have some old milk bottle cartons that I like to lay parts out on, so the spray can move freely around the pieces as I paint them (instead of gumming up along the edge where the item meets the newspaper or whatever). If you don't have legal access to old milk cartons, you can easily tack "hardware cloth" over a wooden frame to get the same effect. Outside - My preferred location for spray-painting models is outside in the shade on a spring or summer day with no wind. (Okay, that's ideal, so I have a backup below.) I have some old milk bottle cartons that I like to lay parts out on, so the spray can move freely around the pieces as I paint them (instead of gumming up along the edge where the item meets the newspaper or whatever). If you don't have legal access to old milk cartons, you can easily tack "hardware cloth" over a wooden frame to get the same effect.
- Inside - If you have to paint indoors for whatever reason:
- Avoid Close Places and Open Flames - Find a place that has good ventilation and that's not close to any open flames (such as the pilot light on your water heater, furnace, or dryer).
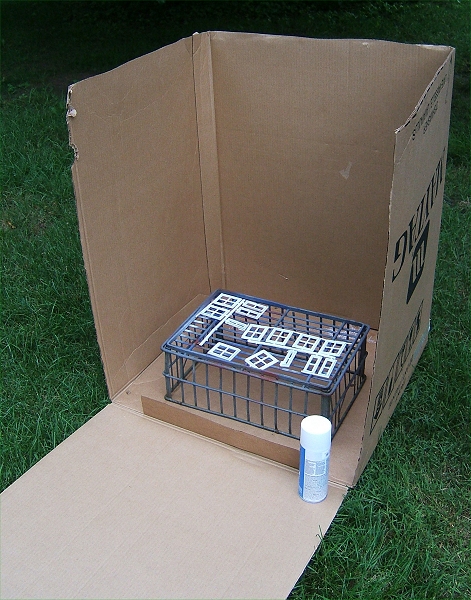
- Make a Paint Booth - Although some people build elaborate paint booths, the easiest way is to start with a big box, like the box from a large television set. Cut the top and one side off, leaving the bottom and three sides. This way you can put your painting surface and the object(s) to be painted on the bottom, and reduce the amount of overspray that finds its way to the rest of your work area. (You'll never entirely eliminate some spray drifting around the room, so I wouldn't use the living room for this part of the project.)
What You Do
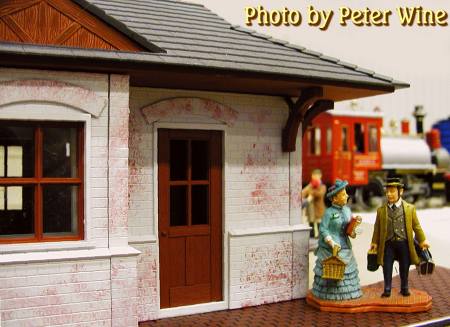
Buy a Building Kit You Like - First, find a plastic building you'd like to start with. I recommend Piko's "Pleasantown" or "Gingerbread" line as easy beginning projects that won't cost you so much that you freak out if you mess something up. Note: the materials for most of building made for garden railroads say that they are UV-resistant and you don't need to paint them, etc. But before the cute photo on the box convinces you to take the "shortcut" of not painting the structure, please visit a few garden railroads that are more than a couple of years old and decide if that's how you want your structures to look in a few years. Decide what colors you want to paint the thing; don't feel obligated to use the colors on the box, especially if they're not common for this kind of structure in the region you're modeling.
Examine the Model
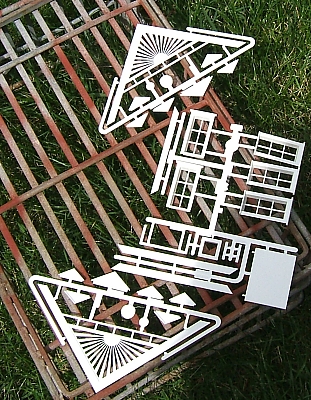
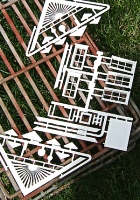
Open the box and spread the "sprues" out on a clean surface. The parts "sprues" are those little plastic trees that the parts come attached to. Do not break or cut the parts off the sprues. Contrary to what many authors tell you, it's far easier to get an even, attractive paint job on the parts while they're still attached to the sprue. Decide which sprues you want to paint which colors. If some parts on a sprue will wind up another color, you still may want to keep them on the sprue until you've primed them at least.
Look for Opportunites for Special Treatment - How do you want to handle brick, stone, woodgrain, and other textures? If you plan for your structure to have a newly painted look, don't worry too much about this step. (Generally, you're better off going for a newly painted look on your first couple of projects until you get the hang of things.) However, if you'd like more details or a more weathered appearance consider the following alternatives to a simple top-coat-on-a-primer-coat finish. Most of these are best done before the building is assembled.
- Contrasting Trim Color - On some models the "trim" is molded into the shape of the walls. The best way to paint contrasting trim color on a single piece is usually to prime the whole thing, then get out the masking tape and tape off either the trim or the base coat, then paint the unmasked part. Then after a day, take off the tape. Then mask the part you didn't mask before and paint the part that still needs a finish coat.
 "Red Bricks" with White or Gray Mortar - One way to get mortar lines on a molded "brick" surface is to spraypaint the "brick walls" the color that you want the bricks to be (rust primer is usually effective). Then, after the pieces have dried thoroughly, water down some white, cream, or light gray acrylic paint. With the pieces laying flat, flow the paint over them so that the "wash" runs into the cracks. Then, before the acrylic dries, wipe the surface so that the bricks stay "red." "Red Bricks" with White or Gray Mortar - One way to get mortar lines on a molded "brick" surface is to spraypaint the "brick walls" the color that you want the bricks to be (rust primer is usually effective). Then, after the pieces have dried thoroughly, water down some white, cream, or light gray acrylic paint. With the pieces laying flat, flow the paint over them so that the "wash" runs into the cracks. Then, before the acrylic dries, wipe the surface so that the bricks stay "red."
- "Stone" with Contrasting Mortar - The reverse is true when you want the mortar to be a consistent color but the stones, blocks, or bricks should vary. Spray the molded "stone" surface with gray primer or whatever color you want the mortar to be. Then mix a couple acrylics into a range of similar colors. Using a sponge (or your own fingers, if you're not picky about that sort of thing), dab just the surfaces of the "stones" with various colors so the final effect looks variously-colored stones (or blocks or bricks) set in mortar.
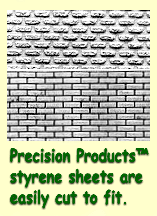
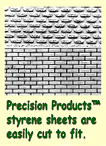  Brick Effect without Molded Bricks - If you don't have a molded stone or brick surface but would like a brick appearance, you can go to a dollhouse supply and buy a roll of 1/2"-inch scale "Magic Brik" tape that has a brick pattern. You spray paint the pieces in "mortar" color, let the parts dry thoroughly, stick on the pattern tape, and spray paint the pieces in "brick" color. When you peel the pattern off, you'll have a brick appearance. Magic Brik even sells a "brick" product that you spread on before you peel the tape off to give you a textured pattern, but I haven't tried exposing that to serious weather. If you try using this product, spray the dried "bricks" thoroughly with a protective clear, flat coating before you set the structure outside for any length of time. In short, using Magic Brik products can be a lot of work and potentially expensive, but it does give you an option for an unusual finish on an otherwise boring building. They make a rock pattern, too, if that's of any interest. Another alternative for adding texture to a non-textured surface would be to order 1:24 brick-face or stone-face "plastic veneer" sheets from Precision Products, cut them up as necessary and glue them to the building walls, etc., before you paint. Brick Effect without Molded Bricks - If you don't have a molded stone or brick surface but would like a brick appearance, you can go to a dollhouse supply and buy a roll of 1/2"-inch scale "Magic Brik" tape that has a brick pattern. You spray paint the pieces in "mortar" color, let the parts dry thoroughly, stick on the pattern tape, and spray paint the pieces in "brick" color. When you peel the pattern off, you'll have a brick appearance. Magic Brik even sells a "brick" product that you spread on before you peel the tape off to give you a textured pattern, but I haven't tried exposing that to serious weather. If you try using this product, spray the dried "bricks" thoroughly with a protective clear, flat coating before you set the structure outside for any length of time. In short, using Magic Brik products can be a lot of work and potentially expensive, but it does give you an option for an unusual finish on an otherwise boring building. They make a rock pattern, too, if that's of any interest. Another alternative for adding texture to a non-textured surface would be to order 1:24 brick-face or stone-face "plastic veneer" sheets from Precision Products, cut them up as necessary and glue them to the building walls, etc., before you paint.
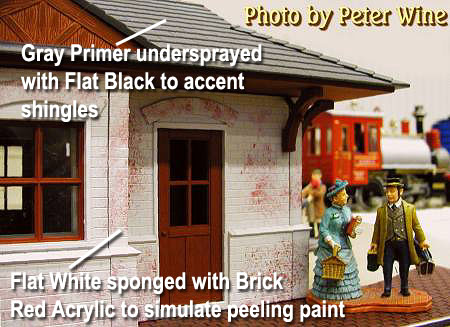
- Weathered Wood - If there is a woodgrain on the parts, and you want them to look like the paint is peeling, consider spraying a colored or white topcoat over a brown or light brown finish. Then, as a final step, scrape or sand the topcoat lightly to reveal the color underneath. The final effect should be of paint clinging to the cracks but peeling from the more exposed parts. Note: you can also use a razor saw or coarse sandpaper to put woodgrain on parts if you want. If you try this, use some very fine sandpaper to knock any "plastic fuzz" off the model before you paint it.
- Peeling Paint on Clapboard Siding - If your structure has clapboard siding (the overlapping horizontal boards), you may also get the effect of peeling paint by painting the structure one color (say white,) then dabbing a light brown paint at the outer edge of the siding on the lower third of the building (the upper parts get more protection from the weather). This is one effect that you can easily add after the building is assembled, so you don't have to decide on this right now - just get your primer and "finish" coats on.
 Peeling Paint on Brick - Similarly, using a sponge to dab red or rust-colored paint on a structure that has a brick finish but has been painted a solid color gives the impression that the topcoat is flaking off, revealing the brick color underneath. Again, the sponging occurs after the building is assembled, so you don't have to decide right now. Peeling Paint on Brick - Similarly, using a sponge to dab red or rust-colored paint on a structure that has a brick finish but has been painted a solid color gives the impression that the topcoat is flaking off, revealing the brick color underneath. Again, the sponging occurs after the building is assembled, so you don't have to decide right now.
- Weathered Roofs - Many people weather roofs after building assembly by mixing black, charcoal, or brown acrylic with water to make a "wash," spreading the wash over the shingles, then wiping the shingles lightly before the wash dries so that the cracks between the shingles hold the darker color. Then they spray the whole thing with a clear UV- and weather-resistant finish before they set it outside. One advantage of this is that you have excellent control of the finished product, and that you don't have to do it before you glue the structure together. One thing I've tried that's riskier, but faster, takes place before the building is glued together. I spraypaint the roof with the "finish coat," say gray primer. Then I hold the roof pieces "upside down," and spray them edgewise with a darker paint so that the paint hits only the lower edge of the shingles. (Any "dusting" of darker color that strays to the "top" of the shingles just adds a sense of depth, so the application doesn't have to be perfect.) On a structure with a "metal" roof, it's possible to do this with a rust primer, so that the "rust" shows up mostly on the "ribs" of the roof. If you try this and turn things too dark, you can always go back over with another coat of gray primer and try again.
If you've decided to use any of the above techniques to add special interest to your structure, it's up to you to figure out which layers of paint to add when. If you have several techniques in mind for the same building, you may have to make yourself a list to make certain you get the right colors on in the right sequence. On the other hand, most "wash" techniques can be done after a building is assembled, so if you leave a step out accidentally, don't panic.
Replenish Your Supplies - Take inventory and make a list of products you will probably need. Yes, I know I'm repeating myself, but keeping about $10 worth of supplies on hand will save you some time-wasting trips to the store to get stuff you didn't realize you needed until later.
Clean Each Piece - Parts often arrive dusty; plus any oils you put on them by handling them will keep paint from adhering properly. Clean the pieces off with a cleaning product that doesn't leave a residue (I especially like Glass Plus) and dry them thoroughly with cotton towels that don't leave a lot of fuzz (most dish-towels are fine). Make certain to dry out the little "cracks" and other recesses that have been molded into the pieces. Allow them to dry thoroughly. Note: From this point until you are entirely finished painting the parts, be careful to wash your hands every time you get ready to handle any of the pieces. Otherwise, you risk adding an imperceptible coating of oil, which will affect the way that the next layer of paint adheres (or doesn't adhere) to the part.
Prime Each Piece
Now it's time to get out the spray paint. Because you already have at least two colors of primer on hand (if you've been paying attention), there's no reason not to go ahead and put on a layer of primer so it can be drying while you run to the store for whatever else you need.
- Choose a Primer - Choose a primer appropriate to the topcoat you plan to use. Gray primer for colors that will be painted light; red/rust primer for colors that will be painted red or brown, etc. If a piece is to be painted white and you have white primer, go for it. Otherwise use gray primer, even if the piece is molded in white. Most white topcoats will cover gray primer better than they will cover white plastic. If you leave the white plastic unpainted, it will yellow. Also, if paint it white without priming it first, the "finish coat" will be more prone to peel.
 Shake, Rattle and Roll - Shake the primer can until the little ball inside rolls around freely whether you hold the can upright, upside down, or sideways. If the paint has been stored where it is less than, say 65 degrees Farenheit, make certain the can warms up a little, too. Shake, Rattle and Roll - Shake the primer can until the little ball inside rolls around freely whether you hold the can upright, upside down, or sideways. If the paint has been stored where it is less than, say 65 degrees Farenheit, make certain the can warms up a little, too.
- Go to Your Painting Station - Take the part sprues you intend to paint with this primer to your painting station, being careful to handle the parts only by the sprues so you don't transfer any oils from your hands to the part surfaces.
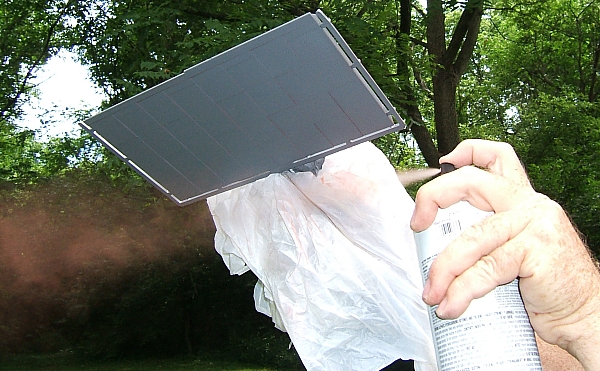
- If your parts are large and flat, or if they're not on sprues at all, it usually works out best to lay them on your grid and give them several light coats from different angles. The advantage of this is that you can do something else between coats.
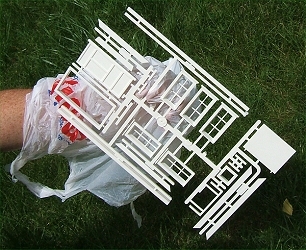
- If your parts are three-dimensional or there are many small parts on a sprue, it may be more efficient to hold the sprue in "thin air" and spray all sides a little bit at a time until you're sure you've got it all. This will likely take less total time than spraying both sides of things on a grid. But you're pretty much stuck holding it between coats, unless you come up with some brilliant workaround. If you try this approach, take along a cheap rubber glove or a plastic grocery bag so you don't paint your hand too much.

- Get the First Part Sprue Ready - If you will be holding the sprue, put the glove or bag on your left hand (or your right hand if you're left handed). With your protected hand, pick up the first sprue you intend to prime, still making sure to hold only the sprue.
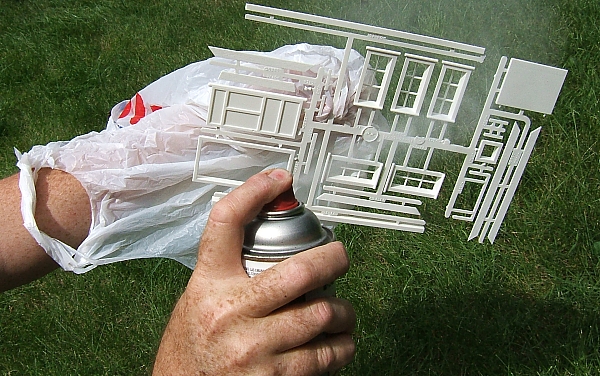
- Start the First Coat - Holding the can eight to ten inches away from the parts, point the can just slightly to the right or left of the sprue so the parts don't get hit with a blast if the paint comes out unevenly at first. Press the button to make certain you have a clear, fine spray. Then move the spray smoothly past the parts. Do not attempt to cover the parts on your first pass.
Examine the parts. If you did this right, you should have between 60% and 80% coverage of the side the paint hit, and the paint should seem  dry by the time you hold the part up or bend over for a closer look. If the coverage is lighter than that, you can get more generous on your next pass (you could make a slower "pass," allowing a tad more time for the sprue to collect paint). If the coverage is heavier or takes longer than a minute to dry, you need to let the sprue dry thoroughly, then be more stingy on your next pass (hold the can further from the sprue and make a quicker pass). If paint is actually running, dab off the excess and allow the parts to dry thoroughly before you start again. dry by the time you hold the part up or bend over for a closer look. If the coverage is lighter than that, you can get more generous on your next pass (you could make a slower "pass," allowing a tad more time for the sprue to collect paint). If the coverage is heavier or takes longer than a minute to dry, you need to let the sprue dry thoroughly, then be more stingy on your next pass (hold the can further from the sprue and make a quicker pass). If paint is actually running, dab off the excess and allow the parts to dry thoroughly before you start again.
- Continue the First Coat - Rotate the parts slightly so you can get a different angle, and go again, continuing to use light, smooth, conservative strokes. When you have to wait between applications, watch the parts for a moment before you leave, to make certain the paint isn't starting to run somewhere).
If you are priming several sprues or sets of parts the same color, you may easily start the next sprue while you are waiting for the first pass of paint on the first sprue to dry. If a tiny bit of the original coat is showing through the primer, that's okay, especially if you're using white primer, which does not cover as well as grey or rust/red primer.
- When all the parts you are painting this color are done, wait until they dry thoroughly, remove them from the painting station, store them in a place where they can continue to air out, and start on the next color.
 Add Finish Coat and Special Treatment Add Finish Coat and Special Treatment
Before you handle the sprues and parts again, wash your hands to keep from depositing oil on the newly painted parts. If all of the parts on a sprue are to receive the same topcoat or special treatment, leave them attached. Otherwise, it may be necessary to cut some of the parts off now.
Depending on how each part is to be finished, apply the next coat of paint. Again, use several light coats instead of a few heavy coats, which can cause runs and obscure detail.
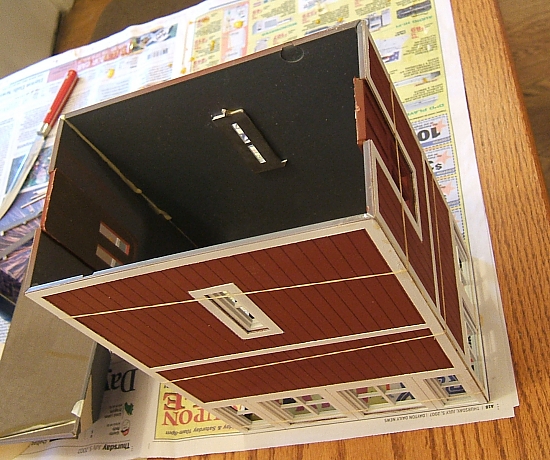
 If you are going to use masking tape to paint part of a part, wait at least overnight after a paint job before getting out the masking tape. Again, you will usually paint parts like this in three passes. Step one is the priming, which every part gets. Step two is either the trim or the "base coat", whichever makes more sense for you to do next. Most people paint the whole piece in the trim color, then, a day later, mask off the trim and paint the "base coat." The photo to the right shows the trim of a building masked off so I could easily add a base coat. If you are going to use masking tape to paint part of a part, wait at least overnight after a paint job before getting out the masking tape. Again, you will usually paint parts like this in three passes. Step one is the priming, which every part gets. Step two is either the trim or the "base coat", whichever makes more sense for you to do next. Most people paint the whole piece in the trim color, then, a day later, mask off the trim and paint the "base coat." The photo to the right shows the trim of a building masked off so I could easily add a base coat.
- If you are going to add a special say a brown layer that you will later expose by scraping off part of a lighter-colored topcoat, add that now. When those pieces have thoroughly dried, add the topcoat. When that dries thoroughly (say, overnight), use a razor saw, sandpaper, or something similar to scratch off some of it, leaving the topcoat color in the "cracks" undisturbed.
- If you are going to use a "wash" or similar technique to add detail to a brick wall or roof, add the final topocoat to those pieces now. Note: If you are using a primer for your topcoat as well as your undercoat, you should still treat this as a separate pass from the priming coat, making sure you have 100% coverage this time. Most modelers who use a wash wait until the building is assembled completely to appy that.
- If you are going to use sponging or some other technique to add texture to a "brick" surface, spray the "mortar" color now, being careful not to obscure detail or fill in the mortar cracks so deep that your sponge can't discriminate between the "surface" and the "cracks."
- If you are going to use "Magic Brik" tape, or some other technique to add bricks to a surface, spray the "mortar" color first. Then wait overnight, apply the Magic Brik tape, and spray the brick color.
 Finally, add any other special treatment you need to add before assembly. This could include: Finally, add any other special treatment you need to add before assembly. This could include:
- Using "underspray" to darken the edges of shingles on a shingle roof or to add rust color to the ribs of a metal roof.
- If you are going to use a light "wash" to soak into the "mortar lines" of a brick wall, do that after the base topcoat dries, then wiping the mortar color off the surface of the bricks before it dries.
- If you are going to sponge "stone" colors onto a stone wall, be careful not to fill in the mortar lines.
- If you wish to sponge a "peeling paint" pattern into a clapboard or "painted brick" surface, you may do that now or later - remember that the "peeling paint" will be mostly applied lower on the "walls" anyway, so having the roof attached won't keep you from doing a good job.
- If you plan to use a wash on the roof, or to apply an overall "weathering" wash as many indoor railroaders do, you may want to wait until the building is assembled, so you can get a more consistent finish. If you have
applied any washes at the pre-assembly phase, you may want to add a clear flat or uv-resistant finish to the parts that have been so treated before you begin assembly - it will help keep your wash from being inadvertently wiped off as you work, and will protect it from the weather in the future.
Prepare Parts for Assembly
Study the assembly instructions again. Make certain you know which part will eventually go where.
Cut Parts from Sprue as Needed - Wash your hands, get out a sharp knife and trim the first batch of parts you will be gluing together away from the sprue.
Touch Up Sprue Cuts - Hold the parts temporarily in place to see if the place where the part was attached to the sprue will show on the finished model. Collect any parts on which the sprue cut would show, and take them (in a clean, dust-free container) back to some place with very good ventilation, along with the cheap craft paint brushes and the appropriate spray paints. Get the spray cans ready, take the lids off, then wash your hands again. Collect all the parts that need the same color touch-up. Spray a bit of the paint into the into the lid you took off the can, until you have a few liquid drops of the color inside the lid. You'll be working closer to the paint than you have in the past, so you will need to take special care to avoid breathing the fumes. Using one of the cheap paint brushes, touch up all the parts that need that color. These will take a few minutes to dry, during which you can be shaking up the can for the next color you need. Note: many modeling magazines stress cutting the pieces off the sprue before you start painting, so you wouldn't need this step. On the other hand, you would be handling many individual parts many more times. Leaving parts on the sprue as long as possible costs you maybe 20 minutes at this stage, but saves you much more time (perhaps several hours, for a complicated model) while you're doing the basic painting.
When you're done touching up the sprue cuts, throw the dimestore brushe(s) that you used into the trash, put up your paint cans, and get ready to glue.
Glue The Building Together
Now you can get out of the basement or garage and backyard and work safely inside the house, as long as you cover the kitchen table or whatever work surface you plan to use with plenty of newspaper.
Note: If your structure came with little plastic "glazing" pieces to glue into the frames, you may go ahead and glue them in according to the kit instructions. However, I've noticed that much of the "glazing" that is injection-molded (it comes on a sprue) crystalizes and yellows after a few seasons of direct sunlight. So if I'm not in a hurry, I cut up Lucite scraps and glue them to the walls before the final assembly of the building. For buildings without glazing, the Lucite still applies. (Lucite is a kind of thin Plexiglass people use for storm windows - you can usually get bits you can use for your buildings from any hardware store.)
If you've never used Superglue (cyanoacrylate) before, you should know that all those urban legends about people glueing their fingers together or whatever are true. That said, cyanoacrylate will only set up that quickly when it's sandwiched under pressure between two relatively non-porous surfaces. Otherwise it behaves more like any other glue. Still, take reasonable precautions not to drip glue on your finger, then scratch your eyelid or something.
 The other thing to remember is that, at this point, every bit of every surface you are going to be gluing is covered with at least two layers of spray paint. My friend Nick Ariemma uses an X-acto knife to scrape the paint off the areas where the pieces come together. This helps glue set up more quickly and makes a more solid joint. Once you are glueing plastic to plastic, cyanoacrylate sticks pretty good. The other thing to remember is that, at this point, every bit of every surface you are going to be gluing is covered with at least two layers of spray paint. My friend Nick Ariemma uses an X-acto knife to scrape the paint off the areas where the pieces come together. This helps glue set up more quickly and makes a more solid joint. Once you are glueing plastic to plastic, cyanoacrylate sticks pretty good.
Following the instructions in the kit, assemble any substructures (such as windows, etc.). If you are adding Lucite windows, the time to add them is usually right before you glue the walls together.
Take time after every few pieces, to rotate the structure and make certain it looks "right" from every angle. If the cyanoacrylate has run out onto a surface, wipe it away with something disposable. If it leaves a shiny streak after it dries, you can usually touch that up easily with a dimestore paint brush the same way you touched up the sprue cuts earlier.
When the whole structure is assembled, and the windows are in place, let it dry overnight, to make certain all the cyanoacrylate is set up completely. Then using waterproof Liquid Nails or some such, go back over the inside of the main joints of the building to reinforce them. (I used to use silicone caulk for this, but it gives out after a couple of summers in this application, something author Kevin Strong has also noted.) When that has dried overnight, add any washes, sponging, or other special treatments that you've reserved for this time. Then, if you've used lots of acrylic, wait overnight again, hit the thing with clear, UV-resistant, flat finish, and let it dry overnight again.
 At this point, painting your structure properly has probably cost you about $6-10 and added about three actual hours' time to what it would have taken you to assemble the thing right out of the box. At first, this may seem like a lot of handwashing, and letting things dry overnight, and so on, but you should know that you now have a structure that is attractive and unique and, in all likelihood, more weather-resistant than your house. At this point, painting your structure properly has probably cost you about $6-10 and added about three actual hours' time to what it would have taken you to assemble the thing right out of the box. At first, this may seem like a lot of handwashing, and letting things dry overnight, and so on, but you should know that you now have a structure that is attractive and unique and, in all likelihood, more weather-resistant than your house.
Now it's time to find a space for it. I like using 2x8x16" or similar concrete blocks to set my buildings on - it reduces the number of creepy crawlers that set up house. Other people just set out a layer of gravel or some other surface. Be certain to level things as well as you can, set some appropriate details around the thing, transplant some creeping thyme, acre sedum or whatever nearby, and watch your new structure settle into its community, where it will add interest for many years to come.
Tell me about your projects
If you have a particularly interesting structure painting project you'd like to tell other garden railroaders about, please contact me with the details.
|