| |||
 |
 |
 | |
 |
 | ||
 |
 | ||
 |  | ||
 |  | ||
| |||
|
|
|
| |
|
|
| ||
|
| ||
| | ||
| | ||
Written by Paul D. Race for Family Garden Trains(tm)
 |

|
Temporary Building Fronts from Recycled Plastic - Updated, 2013If you're read our article about recycling road spam, you'll know that "road spam" is my name for the obnoxious plastic signs that fly-by-night "businesses" and other scammers use to trash up OTHER people's neighborhoods with advertising. When I wrote my original article, I didn't have many specifics for what to do with it. But this time I had a pretty specific idea - I wanted to come up with a way to mount store front graphics that I could use to dress up temporary railroads. Once mounted, there's no reason that I can't leave these "buildings" up all winter long, to dress up my railroad while the relatively expensive buildings are in storage.Last fall, an out-of-state company that promised to fix the credit of ANYONE who would send them $250 and their social security number started dumping road spam all over the neighborhood where I worked. It's not a wealthy neighborhood, but many of the families work very hard to keep a good appearance on their streets. They don't deserve this vandalism, nor the public implication that their neighborhood is full of people with bad credit. Once again, if you're squeamish about acquiring materials this way, remember that it is a crime for the road spammers to put them up on public OR private property, and it is a perfectly legal public service to take them down and dispose of them. But recycling is even better, don't you think? Why should all that plastic go into landfills? PlanningI was going to be having a Christmas-themed open railroad soon, and I wanted to set up more "kids trains." I also wanted more "buildings" decorating those railroads. I've used lucite for similar projects, but for this exercise, I wanted to try a less expensive backing material.
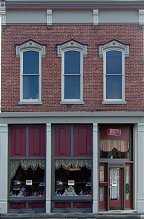
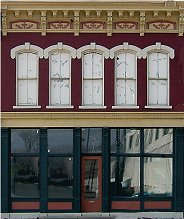
Investing In The ExperimentOrdering a new set of "weatherproof" labels for laser printers was the "risk" part of the equation - I didn't really know if they'd work in my laser printer. And $50 (roughly) is a lot to spend on an experiment. Of course, if you've been paying attention on these pages, you'll know that I've risked more on dumber ideas . . . . The labels were OnlineLabels.com's #OL176LP 8.5" x 11" -full-page "weatherproof polyester" labels made specifically for laser printers.For other graphics work, I had also bought a color laser, an HP CP 1525 (now discontinued). The local copy centers were hesitant to run full-page labels through their machines, but I had almost no trouble using the labels I bought on my HP. If you don't have a color laser, you may have better luck with your local copy centers that I did. With the backing media (road spam), I could make the buildings 9" high and 8" wide, and get four storefronts per spam. It would cost me about $1 worth of toner for each building, and each label had already cost me $1. So as long as I didn't waste toner or labels, I could put four "storefronts" together for about $8. No, they wouldn't take the place of real buildings on a permanent railroad, but I could use them on unguarded (or kid-friendly) temporary railroads without worrying about them. And they should add interest to what would otherwise just be a "naked" circle of track. Preparing the Graphics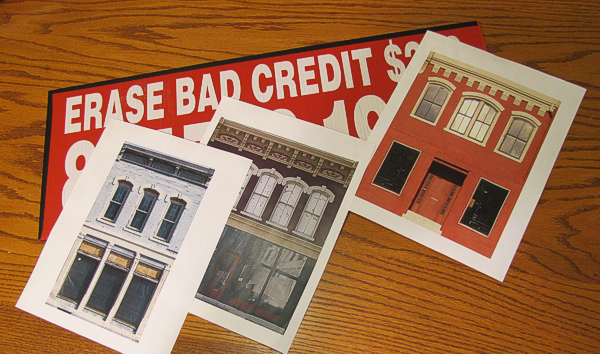 If you've used our Resources pages, you know we have a lot of graphic resources, including building front photos that have been cleaned up and resized to look good on a flat surface in a three-dimensional railroad. The photo to the right shows three of my photographed buildings, adjusted for height, and printed out on the OnlineLabels.com lables. If you've used our Resources pages, you know we have a lot of graphic resources, including building front photos that have been cleaned up and resized to look good on a flat surface in a three-dimensional railroad. The photo to the right shows three of my photographed buildings, adjusted for height, and printed out on the OnlineLabels.com lables.
Then I thought, the crests are against a black backround anyway - why not use black electrical tape to wrap over the top of the plastic and provide a "background" for the crests of the buildings? Going back to my original Corel-Draw source files, I squared up the black part that surrounded the crest on the original graphics. Then I resized the buildingst to 9"x8" and printed off the building fronts, one at a time. (For the "second pass," I have squared up the building header as well. This reduces some of the authenticity, but it looks better with a straight line backing material.) I also resized four of my building front photos to nine inches high and printed those off as well. I had designed most of the lithography-style building fronts in sets of three. For those sets, I cut eight inches off the spam. You can do that with scissors or a utility knife easily since you're not cutting across the "flutes." Printing the LabelsThe labels I ordered had a separation line near one end to help you peel the label off fhe backing paper. When I ran the labels through the printer, I made certain that the separation line would be at the bottom of the building, since I was concerned about aligning the label with the bottom of the fluted plastic panel. I wrote something on a blank piece of paper, stuck it into the paper tray, and printed a nearly-blank page over it, just to make certain I knew which way the labels would have to go in. That didn't prevent me from loading the first label upside-down anyway and printing the graphic on the backing material Although I loaded several labels at a time, I checked after each printout to make certain that the printer hadn't jammed. The first eleven or so labels behaved perfectly. Then on one batch, I was in a hurry, so I tried to print four at a time without stopping and restarting everything. The printer grabbed four labels at a time. It printed on one, left three labels blank, and printed graphics on three blank sheets of paper. Ooops. Back to one at a time. Still, considering how much the labels tended to curl when they came out of the packaging, I think the HP did a pretty good job of feeding them through. When the labels came off the printer, they reallywanted to curl, but I put them under my Greek/KJV/NIV Interlinear New Testament for a couple of days and they straightened out and stayed straightened out. Who says studying Greek is a waste of time? :-) Assembling the StorefrontsSince the back of the spam was deep red and unprinted, I thought I would use that side for the back of my "buildings." I did wonder if the printing on the front of the spam would show through my labels, but that doesn't seem to be a problem.Before I began attaching the labels, I ran a strip of black electrical tape along the top of the spam and along the left edge. I then cut the top and bottom margin off the label. On the lithograph-style building graphics, there's about an extra half-inch of graphic on each side of the building proper. I planned to install these labels so that there was only about an eight of an inch of black between the crests. On the first sticker, I let the excess material on the left edge run around the left corner edge of the fluted plastic panel. I left some of the excess graphic material on the right edge, since I was going to cover it with the next building graphic, and I didn't want any gaps. I then peeled the lower left corner of the label off the backing and started sticking it to the plastic, aligning it as carefully as I could. Try NOT to get the label on "cockeyed," even a little bit. Once more than a couple inches of the label have made contact, it's very hard to pull the thing off and start again. Once I got the first label on, I trimmed the left edge of the next one so that it would butt up correctly against the first one, and repeated three more times.
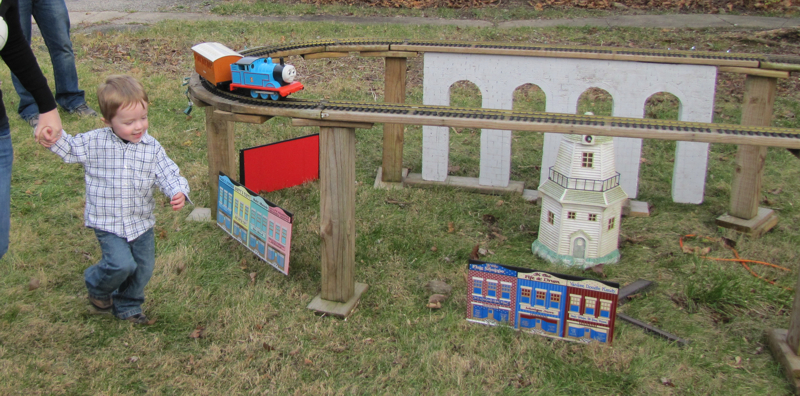
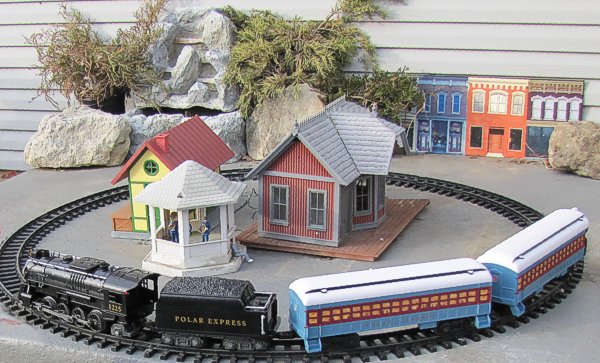
The transformation between unsightly road spam and charming seasonal train accessory was actually a bit startling. Setting Out the Storefronts
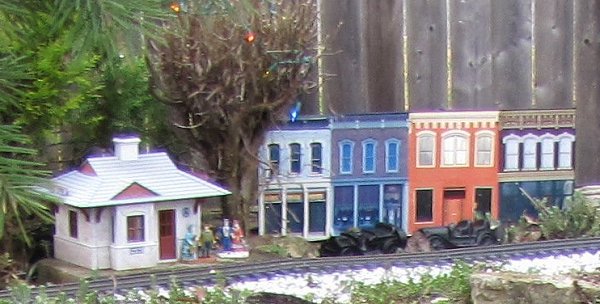
They looked great with the undersized Lionel "G gauge" train, though. Seems like a set of Christmas-themed buildings would be welcome next year. Later, I tried the photo storefronts at various places on my railroad. They looked the best when I could find a place where I could set cars or people in front of them, and where you couldn't easily see around the back to see that they were flat. Resources for You to TryEvery graphic listed below is a 9"-high building that should be ready to print on your color printer as soon as you download it. The photographs will take much longer to download than the drawings.When you get ready to print, make certain that the printer is set to print at full size (100%), not to "reduce size to printable area" or some such. Once you've got the first one printed out, measure it to make certain it's 9" tall. After that, use the same settings. Clicking on any of the following building names will open the PDF version of the file on your computer. You can then download the .pdf to your hard drive or print it right off of the computer. If you don't have a color laser printer, I recommend downloading all the files you want to print, loading them up on a thumb drive, and taking them somewhere to print off. If you think this looks like a doable project, please feel free to download as many graphics as you want to print of for your railroad or other project. Please do NOT do these projects up and go sell them at train shows - I always find out. :-) Building PhotographsThese are "rightsized" versions of cleaned-up photographs I originally posted on our Free Large Scale Signs and Graphics resource.North American Storefront Photo FilesThese building photos (and others) are available in other scales at our Building Front Photos page. Actually the four I've resized for this project are all from southwest Ohio, but if I get a lot of feedback, I have buildings from other midwestern regions to add. Sorry, none from California or Florida yet - unless you want to fly us out to get photos.
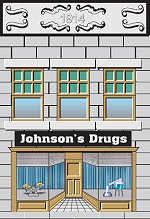
Note: For several more "cleaned up" buildings photos that you can use for similar projects, please go to our Building Storefront Photos page. Many of the buildings give you a range of size choices. Irish Storefront Photo FilesThese building photos are souvenirs from our May, 2012 trip to Ireland, as recorded in our article "Planes, Trains, and Doubledeckers.". We took dozens of building photos, but have only had time to clean up these so far. To me they have a faintly European look that would be at home on the Isle of Sodor or any Ireland or UK railroad. But most visitors would not be too confused if they saw them on a US railroad. The photos are available in other scales at our Celtic Storefronts page.
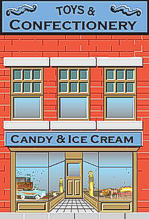
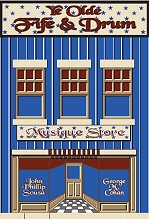
Note: For more sizes of these buildings photos, please go to our Celtic Storefronts page. Tinplate-Inspired Storefront FilesIn the early 1900s, the West Brothers company made candy boxes from tinplated steel similar to the material used for early toy trains. In 2011, cardboard Christmas ("putz") house designer Howard Lamey worked with me to create reproductions of several of these. We scaled the resulting project to look at home on an O gauge tinplate railroad. But the graphics I created for the project have already been used for other purposes, including printing just the storefronts and using them as backgrounds to indoor tinplate railroad.Later, Howard created a collection of seashore-inspired putz houses, and I added some coastal-resort-town-inspired storefronts based on the dimensions of the earlier project. When a reader mentioned that they were decorating their railroad for July 4th, we added our patriotic-themed Flag Day Store series. Depending on reader response, we may add versions for other holidays - what do you think? To adapt the storefronts to use outside, I originally expanded the black part around the curved crest shape, but after doing several of these, I think it would be better to square up the building headers (since the fluted plastic backing material is very hard to cut into a smooth curve and some readers disliked the big black areas that remained if you didn't). It's worth noticing that the pastel colors of the Seaside buildings faded faster than the darker colors of the Flag Day buildings. On my first pass, none of these were protected with UV-resistant clear acrylic spray, however, so I'll try that on my next batch and see how much difference it makes. Original West-Brothers-Inspired GraphicsThe following buildings are more-or-less reproductions of buildings that the West Brothers designed about a century ago. For more information, or for instructions about building three-dimensional versions of these for an indoor railroad or display village, please visit the Big Indoor Trains(tm)Building Tinplate-Style Storefronts article.
Seaside StorefrontsThese building graphics are inspired by the coastal resort towns of my distant childhood, and designed to imitate the tinplate toy buildings kids used to use with their Ives or Lionel trains a century ago. For more information, or for instructions about building three-dimensional versions of these for an indoor railroad or display village, please visit the Big Indoor Trains(tm) Building Seaside Storefronts article.
Patriotic Building FilesDress up your railroad for Flag Day or July 4 celebrations. For more information, or for instructions about building three-dimensional versions of these for an indoor railroad or display village, please visit the Big Indoor Trains(tm) Building Flag Day Storefronts article."
ConclusionA year and two months after these temporary storefronts were first used outside (and they've been outside ever since), most of them are still in pretty good condition but a few are starting to look bad. It's apparent that:
Note: I did not spray any of these with UV-resistant clear acrylic spray, as I recommend to readers, because I wanted to see the "worst case scenario." I believe that appropriate protective spray would at least double the effective lifespan of building fronts created this way. That is consistent with my recommended uses:
These labels definitely stick better than anything I've used so far for similar projects. If you've created a similar project, either with graphics or with recycled plastic materials, please let us know so we can pass your experience on to our readers as well. In the meantime, enjoy your trains, and especially any time you have to spend with family in the coming months. - Paul |
|

| 
|
|
 |
|
 |
 |
Note: Family Garden TrainsTM, Garden Train StoreTM, Big Christmas TrainsTM, BIG Indoor TrainsTM, and BIG Train StoreTM are trademarks of Breakthrough Communications (www.btcomm.com). All information, data, text, and illustrations on this web site are Copyright (c) 1999, 2000, 2001, 2002, 2003, 2004, 2005, 2006, 2007, 2008, 2009, 2010, 2011, 2012, 2013 by Paul D. Race. Reuse or republication without prior written permission is specifically
forbidden.
Family Garden Trains is a participant in the Amazon Services LLC Associates Program, an affiliate advertising program designed to provide a means for sites to earn advertising fees by advertising and linking to amazon.com.
For more information, please contact us

 |  |