 | |||
 |
 |
 | |
 |
 | ||
 |
 | ||
 |  | ||
 |  | ||
| |||
|
|
| |
|
|
| ||
|
| ||
| | ||
| | ||
| Written by Paul D. Race for Family Garden Trains(tm)
and New Boston and Donnels Creek: |
 |


|
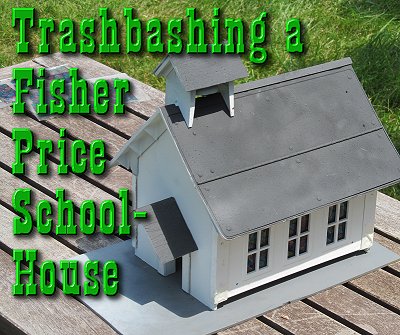
Trashbashing a Fisher Price SchoolhouseLongtime readers know that back when I got interested in garden railroading, only two companies were making US-style buildings in scales that looked good with my trains - Fisher Price and Playskool. Current Fisher Price and Playskool buildings are much flimsier and much more toy-like, but some of their classic pieces are still around. Please don't spend $60 on a collectible-quality set, then pull it apart to repaint it - you can get a variety of structure kits on our Buildings for Garden Railroad Page. The CMS structures on that page are especially affordable. But every time I go to a really big flea market I see at least one beat-up-but-usable Fisher Price or Playskool structure for a few dollars. A century and a half ago, both schoolhouses and churches had belfreys for calling their respective flocks. So it's no coincidence that the Piko schoolhouses and churches are identical under the paint. And it took no great imagination to turn the Fisher Price schoolhouse into a church. In fact, it's so large in comparison to most building kits for garden trains, that it would look out of place if I finished it as the single-room schoolhouse it was based on. I converted my first one back in the 1980s, and didn't take photos. After a decade outside, the pressed-wood ends had swollen to the point that the building began to lose its structural integrity. I took it out of service in 2011, hoping to have it refurbished in time for the June, 2013 open house season, but I didn't quite. Nevertheless, I did some work on it that summer, hoping to have it ready for our November, 2013 open railroad. In the meantime, I've taken enough photos to help anyone who has come across one of these turn it from a toy to a model church that will outlast most out-of-the-box kits.
What You GetThe Fisher Price Schoolhouse has plastic walls, a Masonite floor, and pressed-wood ends. One of the most useful features is the hinged roof and side, made so children could access the inside of the building. The hinged part of the roof is partially metal, and it includes a long metal "piano hinge" that is mostly hidden when the roof is closed. When you flip up the hinged portion of the roof, one of the walls drop down, giving you all kinds of room to get things in and out. Looking for a place to hide your sanding pad, shrub snippers, or a small dandelion fork? Look no further.If you're only going to use this indoors, ignore everything we say about disassembling the thing and replacing the ends and bottom with plexiglass. The ends and bottom will last indefinitely indoors. On the other hand, if you want to use this outdoors, you'll want to replace the Masonite floor at least. In damp climates like Ohio, mealy bugs and other insects can make short work of the floor. In my case, my open railroad schedule often results in me leaving most of my buildings outside year-round. I replaced the floor after about year three, and the ends after year eight. Your mileage will vary according to things like rainfall, termites, etc. If I ever do another one of these, I will replace those components starting out. That's how I'm writing these instructions. What You Need
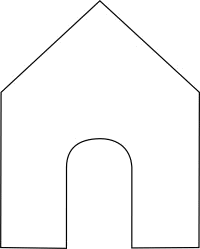
Print and Check the Template - If you click on the picture to the right, you'll get a PDF template to use when cutting out the replacement ends. I've adjusted it to correct for a mistake I made in the project shown - I cut the ends about 1/3" too long, and I had started gluing things together before I noticed. I made up for it later by gluing some strips of plexiglass under the walls before I permanently fastened the thing to the new base. That said, some printers will print this the wrong size, so hold the template up against the building before you disassemble it.
Examine how the hinged wall works. You can see that once the floor is gone, the wall piece that includes the blackboard will simply come out. You'll remove the floor early in the process, but if you pay attention to how things go back together, the replacement floor will work just as well.
|
 |
 |
 Prime the "inside" surface as well as the "outside" surface of the pieces - this helps protect the plastic. In the case of the plexiglass pieces, it also reduces the amount of light that will shine through the walls when the building is painted. (If you use clear plastic for the ends, use several coats of primer, and including one interior coat of black paint if you have any handy.)
At the end of this process, let the pieces dry overnight.
Even after the primer coat is thoroughly dry, continue handling these pieces like photos - only with very clean hands and only by the edges.
I also painted the "eaves" under the roof the same color, not bothering to mask the roof since I was going to paint it afterwards.
Use the same "baby step" approach to paint as you did to prime. Add several light coats twenty minutes or so apart, and coming from different angles. Be sure to spray up under the "eaves" of roof.
 Painting the Roof(s)
Get the four walls and the corner pieces from the hinged wall, get your favorite glue, and spread out a bunch of newspapers wherever you're going to work. Lately, I've been using "Fix All" glue which I've been getting at Big Lots. It dries much slower than Superglue, but seems to hold better over the long haul. If you use this, crack a doorway or window - the vapors are strong.
Put the end walls up into the corners of the gables and test the fit. The channels that held the old pressed-wood ends are far too wide for the plexiglass. That's fine. The OUTSIDE edge of the plexiglass wall will go where the "outside" edge of the pressed-wood wall went.
 I glued the non-hinged side in place, taped it so it would stay put, and let it set to the point where it was almost stiff, but still a little flexible. Then, as you can see in the photo to the right, I laid a bead of glue where the end wall would need to contact the channel. I laid the end wall into the channel and used little wadded-up pieces of newspaper to force the end wall to stay on the glued surface until the glue set. By the time you have two walls in place, you'll be able to visualize how the rest of it goes together.
After you have the second end wall in place and the glue has set, test the fit of the corner pieces and the hinged wall (the one that used to have a chalkboard). Then, making certain you have the corners oriented the right way, glue those in place. Don't glue the hinged wall in place if you want to be able to open the building easily. Brace and tape the corners in place until the glue has set.
The hinged wall will not stay on the building until it is fastened to the base.
For each row of windows, I cut a single piece of plastic. Our article on Glazing Windows with Lucite tells you everything you need to know about that.
 Use your favorite solution to light the building from inside. I installed lighting, using a fixture that would hold the Malibu-style "T-5"wedge bulbs. I use 4-watt bulbs, though I would use 2-watt if I could find them. Any more is way too bright.
For more information on using 12-volt garden lighting to light your buildings, check out our article Lighting Buildings with Low Voltage Garden Lighting
 The first time I did this building, I printed a stained glass pattern onto a special "decal" paper that isn't available any more, then glued it right to the glazing. For this iteration, I'm using "windows" that I printed onto overhead projector film with a color laser. To download the stained glass pattern I used, please visit our Resources page.
The photo to the right actually shows building with the other side "open" so the light would hit the stained glass and give you some idea how it would look when lit. At night, when it is lit from inside, it looks especially nice.
One other thing I had to add that you won't - if you do it right: Because I accidentally cut the end walls taller than the side walls, the "hinged wall" wouldn't stay in place. Even if I glued it in place, there would be a huge crack for light to go through when I illuminated the building. So I cut four thin strips of plexiglass to length, primed them, and glued them under the side walls. They look fine gray because they could represent a foundation. But your building shouldn't need these.
 Conclusion
Soon after I added those strips, I set it out temporarily for a November Open Railroad. It is on a 2x8x16" steppingstone, backfilled with gravel. It is also holding the sanding sponge I use to clean my track, as well as a number of small tools.
Unfortunately, I had to wait several weeks to a photo of it installed on the railroad - from the week I set it out until this week, it has been under six inches or more of snow. When I tell people that this is  the kind of winter we used to have in my childhood (in Ohio), they point to news reports that say its the coldest or snowiest winter in thirty years. I say, "Exactly."
In the meantime, My railroad has gotten as big as it's going to get, so this is probably the last one of these I will do. With the organic components replaced and the plastic properly protected from the elements, there's no reason this can't help meet the spiritual needs of Donnels Creek for another ten years before it needs any more touchup to speak of.
You may like a challenge, or you may decide that it's a lot of work for what you get, and you'd be better off with a store-bought kit, even for much more money. But, in the meantime, I hope this has given you some ideas for projects you can try, whether with kits, repurposed toys or ????


|
| 
|
|
 |
|
 |
 |
Note: Family Garden TrainsTM, Garden Train StoreTM, Big Christmas TrainsTM, BIG Indoor TrainsTM, and BIG Train StoreTM are trademarks of Breakthrough Communications (www.btcomm.com). All information, data, text, and illustrations on this web site are Copyright (c) 1999, 2000, 2001, 2002, 2003, 2004, 2005, 2006, 2007, 2008, 2009, 2010, 2011, 2012, 2013 by Paul D. Race. Reuse or republication without prior written permission is specifically
forbidden.
Family Garden Trains is a participant in the Amazon Services LLC Associates Program, an affiliate advertising program designed to provide a means for sites to earn advertising fees by advertising and linking to amazon.com.
For more information, please contact us

 |  |


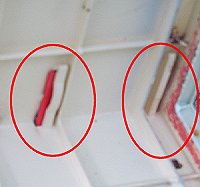 Remove the Belfrey - I find that it's easier to work with the building if you take the belfrey off. Examine it closely where it attaches to the roof. You'll see that the roof has little "tracks" and the bottom of the belfrey is shaped so that it "snaps" in place. This wasn't made to be disassembled, but once you see how it snapped in place, it's not hard to use a screwriver or something to nudge the little "catches" into releasing.


