You Are Here.
Jump to other pages.
Preparing for Christmas Train Day 2019 on the NEW New Boston and Donnels Creek RR.  Click to see a bigger photo. Garden Railroading Primer Articles: All about getting a Garden Railroad up and running wellGarden Train Store: Index to train, track, and other products for Garden Railroading
Large Scale Starter Sets: Begin with a train you'll be proud to runBest Choices for Beginning Garden Railroaders: a short list of things you're most likely to need when starting out
Large Scale Track order FormSturdy buildings for your garden railroad.
Large Scale Christmas Trains: Trains with a holiday theme for garden or professional display railroads.Free Large Scale Signs and Graphics: Bring your railroad to life with street signs, business signs, and railroad signs
Garden Railroading Books, Magazines, and Videos: Where to go to learn even more
Collectible Trains and Villages: On30 Trains and accessories designed by Thomas Kinkade and others

Written by Paul D. Race for Family Garden TrainsTM


Please Read: How to Help Our Site at No Cost to You - Some of our articles contain recommendations for products we like and vendors we personally trust. Some of those vendors may pay us a very small commission if you click on a link and buy their products. This costs you nothing at all and helps offset the costs of what we do. So if we point you to something you decide to buy later, please make certain you come back through our site and click on the link directly. Thanks.


Preparing for Christmas Train Day 2019

Decking the eastern expansion and preparing it for dirtscaping. Click to go to article.This is a followup to our article "Decking the NEW New Boston and Donnels Creek Part 2. It describes our efforts to get an expansion to our raised platform railroad ready to hold trains and accessories. And because it wasn't ready before November, it only makes sense that the first trains running there will be seasonal.

Last year, I ran "spruce" garland around the top of the train shed and ran little Christmas lights around the outside edge. I also set up a little raised railroad near the big one to put James or Percy on for the kids watch. Outside of the railroad area, I set up two battery-powered trains for kids to run on the deck and put additional strands of lights there. Along with a few additional seasonal touches around the yard. No "serious" Christmas decorations on the house yet, though, since it's not even Thanksgiving. Together with the Christmas music playlists I've made over the years, it conveys the "spirit of the season" and gives kids lots of fun without going "over the top."

This year, I hope to accomplish the same setup and decorations, but this year, we're also planning to welcome the Lionel Battery Powered Hogwarts Express to our arsenal of running trains. I wanted to, anyway, but a trip to Universal Studios Orlando gave me some additional inspiration.

In the meantime, the eastern extension isn't big enough to hold the big trains I hope to run when the other half of that platform is built. But it is big enough to hold two loops of track - one based on 5' curves and one based on 4' curves. Knowing that they are temporary, I nevertheless crawled around on my hands and knees to get every piece screwed together and a good solid power connection made, so it will be reliable as long as it's there.

I used up the last of my track connection screws in the process. Not to worry - I've ordered a couple spare sets of screws.

Gravel-Scaping

Starting to dump pea gravel on the new platform, as a temporary measure to hide the black vinyl and give the accessories something to sit on.I can't finish dirt-scaping until I have the "permanent" track and roadbed in place. In the meantime, to make the platform look a little more finished, I camouflaged the uneven lower edge of the corrugated steel panels with my remaining rocks and poured pea gravel everywhere to hide the black vinyl. When the more permanent track and roadbed needs to be installed, it can easily be swept aside or scooped up and reused elsewhere.

Lighting Additions

In addition to the light strands wrapped around the bottom of the middle platform, I attached a rope light to the inside edge of the trim. You can see it in the photo to the right. That way it will hopefully throw a little light on the train I put there.

An acquaintance in northern Kentucky who has Christmas-themed open railroads uses rope lights to outline the ROW for those showings, but without a "permanent" ROW, this seemed more practical.

I am also outlining the "base" of the railroad, including the pond, with colored rope lighting I used to use for the same purpose on the old railroad. I staked it in place and put mulch behind it so it would look like all those bare places were supposed to be there. (I also put mulch in a few places that tend to get muddy so any visitors wouldn't get stuck in the mud, literally.)

Choosing Trains

At this point, I have four powered track loops on the railroad, and I plan to erect a simple raised railroad loop that I take to clinics nearby.

In times past, I've put realistic trains on the railroad proper (though sometimes they were painted in Christmas colors). And I've put Thomas or James on the temporary raised loop.

Christmas-themed Bachmann Trains on the NEW New Boston and Donnels Creek, Nov. 2018 Thomas running on a raised loop at our Christmas open railroad, 2013

The battery powered trains work fine on the back porch and deck, since I can keep them far enough apart so the remote control doesn't interfere.

But this year, we're going to be adding a battery-powered Hogwarts Express, and we've spent some time preparing castles and other resources to go with it. Though it's a bit undersized for "Large Scale," Lionel's set #7-11080 looks and runs great on the upper platforms of our railroad. Unfortunately, because of the steel panels and the electronics in the train shed, you have to keep walking around the railroad with the remote to keep it going.

Lionel's G gauge battery-powered Hogwarts Express on the middle platform.  Click for bigger photo.

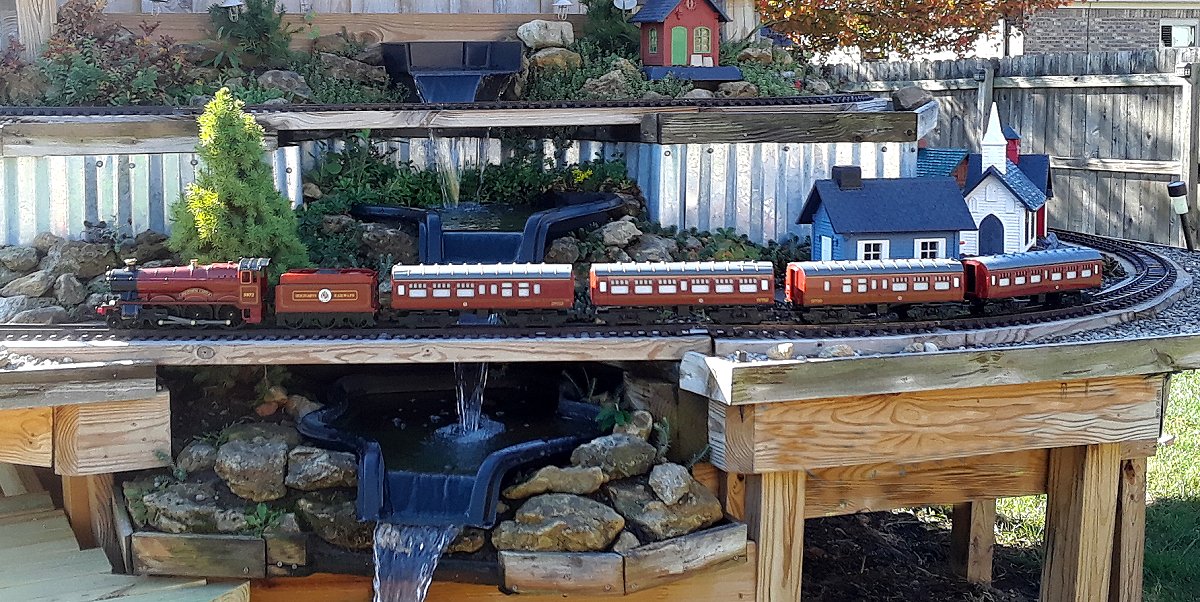
BTW, this is the old, discontinued set which actually runs on 45mm track (plus two extra coaches I picked up separately). If you want to run a Hogwarts Express on existing garden railroad trackage, look specifically for the discontinued set #7-11080. Other sets, like #7-11960 will NOT run on your garden railroad track.

I considered running the train on a loop of track on the back deck. But the concensus seems to be that the Hogwarts Express deserves to be run on the new platform. That said, there are two loops of track, either of which could be powered. I can't put a typical Large Scale Click to see the history of the real-world trains that are now standing in for the Hogwarts Express, including modeling suggestions.train on the other loop - it would dwarf the undersized Hogwarts Express. Maybe my Christmas-colored eggliner. If only someone made a "Knight Bus" in the right scale. :-)

For more information about Hogwarts Express, including the real British trains that have been repainted and otherwise repurposed for the role, as well as a more complete discussion of the various model options available to hobbyists, click on the photo to the right.

Click to see our article about trashbashing Fisher Price castles to provide a background for our Hogwarts Express railroad.Also, the toy castles I've repurposed to go with the train are best viewed from the front. To see a step-by-step account of that "trashbashing" effort, click on the photo to the right.

Driven Indoors

I worked very hard in the early part of November to get as much ready as I could, including mulching under and around the railroad platforms, adding additional light strands, testing the trains I planned to put out, etc. But I was highly motivated by the fact that we were supposed to have bitterly cold weather the week before the open railroad. For a long time, they were predicting a high of 40F on the day of the event, so that didn't discourage me.

But we were driven indoors by several inches of snow on Monday and cold weather Tuesday.

Early snowfall on November 11-12, 2019.  Click for bigger photo.

Not to worry - I had plenty I could do indoors. For one thing, I had printed up a Platform 9 3/4 sign on full-page weatherproof "stickers" from Online Labels.com. I had been planning to stick them to a plywood circle and suspend them from an ornamental bracket like this one from Home Depot. But time was getting too short for such experimentation (and it is really too cold to be working in our detached garage right now). So I gutted a "railroad clock" I bought from Hobby Lobby several years ago and used outside until the clock faces faded almost too much to be seen.

Using "quick and dirty" protocols, I cut out cardboard circles, stuck the stickers on them, magic-markered around the edges and popped the signs into the clock where the faces used to be.

The Platform 9 3/4 stickers I printed on weatherproof labels with my color laser, alongside the old Hobby Lobby 'railroad clock' that I've taken the faded clock faces from. Click for bigger photo. The Platform 9 3/4 stickers were applied to cardboard circles, and the space around them colored by a rather inelegant means. Click for bigger photo. The Platform 9 3/4 sign installed inside the old clock shell. Click for bigger photo.

I realize that not everybody has an old "railroad-style" clock laying around, or a color laser, or a really fat Sharpie, but hopefully this will give you some ideas if you ever want to try a similar project for yourself.

In addition, I will be:

  • Checking my battery inventory for the three or four battery-powered trains we will be setting up.
  • Installing the temporary raised railroad (weather permitting).
  • Laying track for the temporary railroads (including the battery-powered Lionel G gauge trains, including the Polar Express)
  • Testing and cleaning the wheels on the track-powered locomotives, including backup locomotives, and backups for the backups
  • Minor repairs on a couple cars I want to run
  • Finishing the gravel dump on the new platform and setting out the castles for the Hogwarts Express display
  • Setting out other structures on the "scale" platforms.
  • Lots of other little things
  • Fixing or replacing all the things that go south when you're preparing for something like this.

In case you're wondering why I didn't get all that stuff done before I published this article, check out this photo taken four and a half days before the open railroad event. (I usually get this kind of photo in January, but early snowfalls seem to be much more common lately.)

The lights are in place, and most of the rest of the NEW New Boston and Donnels Creek is ready for our open railroad. The snow will probably be gone by then, but it sure is pretty for now. Click for bigger photo.

Once it warmed up a tad, I installed the Platform 9 3/4 sign where the clock usually hangs.

Home-made Platform 9 3/4 signs attached inside an old Hobby Lobby clock.  Click for bigger photo.

I also brought the castles and the Hogwarts Express out for a photo op. I can't show a video of it running in the snow because there is still a lot of ice between and on the rails. Hopefully that will melt off today.

The Lionel #7-11080 G gauge battery-powered Hogwarts Express with an extra car on the new extension of the NEW New Boston and Donnels Creek railroad. Click for bigger photo

Keep in Touch

If you're seeing this before November 16, 2019, and you're not that far from Springfield, Ohio, you're still invited to come over and see or help with the open railroad. (Use the contact page to ask directions.) If not, make certain you check us out next year.

Finally, please let us know about your ongoing projects. Ask questions, send corrections, suggest article ideas, send photos, whatever you think will help you or your fellow railroaders. In the meantime, enjoy your trains, and especially enjoy any time you have with your family in the coming weeks,

Paul Race

FamilyGardenTrains.com

Christmas Train Day, 2019.  On our third year in the new home, we host another Christmas-themed open railroad, giving many families a jump start on Christmas celebrations and sharing the experience of running trains with lots of kids. Click to go to articleProceed to "Christmas Train Day, 2019" - Three years after starting a garden railroad in our new home, we host another Christmas-themed open railroad, giving many families a jump start on Christmas celebrations and sharing the experience of running trains with lots of kids.

Click on the photo to see a brief record of our busiest weekend in November, 2019.

Decking the eastern expansion and preparing it for dirtscaping. Click to go to article.Return to Decking the NEW New Boston and Donnels Creek Part 2 - Getting the next part of the railroad ready to install trains. Includes installing 2"x6" decking, vinyl sheeting, edges to hold back the gravel, and corrugated steel panels. It's not done, but it will give us another place to set up trains for our next Christmas-themed open railroad.

Click on the photo to see our status as of late October, 2019.


Installing posts, joists, framing, and decking for the eastern expansion of the NEW New Boston and Donnels Creek. Click to go to article.Return to "Framing the NEW New Boston and Donnels Creek RR - Part 7" - Installing posts, joists, framing, and decking for the eastern expansion of the NEW New Boston and Donnels Creek. Although this installation was complicated by having to fit into an existing framework, the methods used could work for any raised-platform railroad.

Click on the following link to see our progress of early October, 2019.

Installing the in-ground pond and preparing to install the last connecting pool to make our waterfall complete.  Click to go to article.Return to "Planning the NEW New Boston and Donnels Creek RR - Part 5" - Once the major components of the water feature were installed and tested, we decided to add one more bit of railroad proper before our "Christmas Train Day," this November. The addition, about 5'x11', will allow us to put a small train and some scenery closer to eye level for youngsters. Eventually it will be part of the larger plan that will allow us to run our bigger cars and locomotives.

Click on the photo to see our plans for the next addition, as of late September, 2019.

Waterscaping Part 4: Installing the last connecting pool, so the whole planned waterfall is complete except for backfilling, etc.  Click to go to article.Return to Waterscaping Part 4. - Installing the last connecting pool, so the whole planned waterfall is complete except for dirtscaping and planting.

The process included checking the pump, extending the hoses, rescuing toads, building the platform, trimming the platform, testing the pool's location, etc.

Click the photo to go to the article.

Installing the in-ground pond and preparing to install the last connecting pool to make our waterfall complete.  Click to go to article.Return to "Waterscaping, Part 3" - After seven months of crazy long work hours, I finally got some free time to continue working on the railroad. Weather permitting, I often worked all the live-long day. This article describes installing two posts that will eventually support the last connecting pool, then digging the big hole for the in-ground pond, complicated by a three-month drought that turned the ground to concrete.

Click on the photo to see our progress as of mid-September, 2019.

Hosting a Christmas-themed open railroad, our first in the new place, November, 2018.  Click to go to article.Return to Christmas Train Day, 2018 - After two years without our traditional Christmas Train Day (something we did from 2008 through 2015), we were anxious to get started again, even without a huge right of way to show off. The kids' trains, the extra Thomas railroad, the popcorn popper and two Bachmann Christmas trains got a big workout. And the visiting kids all loved it!

Click on the photo to see a lot of last-minute preparations and some photos of the November 10, 2018 event itself.

Putting the walls and windows on our garden railway train shed.  Click to go to article.Return to "Adding a Train Shed Part 6" - Installing the board and batten siding on our train shed, installing the windows, installing the trim, testing the "tunnel entrances," and more.

By the way, going over lumber receipts in early 2019, I couldn't believe I was still siding the train shed in late October, and managed to have an open railroad in mid-November. It is a little crazy how fast things can go together if you have a deadline and a lot of gift cards.

Click on the photo to see our progress as of late October, 2018.

Planning the door, walls, and windows of our garden railway train shed. Click to go to article.Return to "Adding a Train Shed Part 5" - Planning the doors, walls, and windows of our garden train shed.

Includes choosing the siding and windows, installing the door, painting the windowframes, and adding crosspieces to support the vertical siding boards.


Click this link to see the previous article.Return to "Adding a Train Shed Part 4" - Choosing and installing underlayment and drip edge to protect the sheathing until I can get the final roof installed.

Now the roof is waterproof enough to get us through the next couple of months at least, maybe more.


Putting the sheathing and end trim in place on our garden railway train shed. Click to go to article.Return to "Adding a Train Shed Part 3" - Adding fascia, sheathing, and end trim to the in-progress train shed.

I thought about bringing in helpers for this part, but a reader commented on how helpful it was to see how one person could do this sort of thing by himself, so I just kept plugging away.

Click on the photo to see our progress as of September 13, 2018

Click to go to articleReturn to "Waterscaping Part 2" - Getting this year's waterscaping project done (for now at least). Installing and dirtscaping the third level of the waterfall. Installing pump and filter, adding an extra container and modifying the ones we already had installed to keep the water running smoothly. And lots of other tweaking. Includes tips about introducing fish and plants, as well as other information about water features in general that you may find helpful.

Click on the photo to see our status as of August 5, 2018.

Putting the rafters in place on our garden railway train shed. Click to go to article.Return to "Adding a Train Shed Part 2" - Adding rafters to the frame of the in-progress train shed. Now it's starting to look like it might actually be a structure and not just a crazy collection of posts.

The way we got the rafters and ridge board up wouldn't work for everybody, but it worked for us, and hopefully will help other folks to "think outside the box" - literally in this case.

Click on the photo to see our progress as of July 14, 2018.

Click to go to articleReturn to "Adding a Train Shed Part 1" - What started out as a simple addition of a deck to stand on when putting trains on the track got a little more ambitious when I realized that JUST installing the deck this year would require more work next year. So we framed out what we planned to be a train shed attached to the railroad. If it ever gets finished, I can easily put trains on the track at a moment's notice instead of schlepping them out from the garage.

Click on the photo to see our status as of July 9, 2018.

Click to see our first article on adding the waterfall on the NEW New Boston and Donnels Creek garden railroad.Return to "Waterscaping the NEW New Boston and Donnels Creek Part 1," our article on getting the top two layers of the waterfall on solid footing and getting the third layer framed. After we finish decking and dirtscaping the third layer, we will probably add a washbasin or something for the water to flow into, then add a pump to get the waterfall flowing. No big pond until next year at least - too many other projects.

Click on the photo to see our progress as of June 13, 2018.

Click to go to articleReturn to "Dirtscaping the NEW New Boston and Donnels Creek RR, Part 2. - Adding barriers to keep the rocks, dirt, and plants where they're supposed to go, placing platforms and running wiring for buildings, adding rocks, dirt, and plants to the upper level of the railroad.

Click on the photo to see our status as of June 1, 2018.

Click to see the second article on adding 2x6 roadbed to the NEW New Boston and Donnels Creek.Return to "Adding Raised Roadbed to the NEW New Boston and Donnels Creek, Part 2" - Trimming the corners off the roadbed on the upper layer and cutting the pieces that will support the curves on the middle layer. We need to get the upper two tiers of the pond installed before we totally complete this step, so the article doesn't quite show the finished product. You'll see it later as part of other articles.

Click to see our first article on adding 2x6 roadbed to the NEW New Boston and Donnels Creek.Return to "Adding Raised Roadbed to the NEW New Boston and Donnels Creek RR, Part 1" - Sorting out our priorities for the spring and summer of 2018. There a lot of little chores we really should get done before we start on the next big addition. Click to see our plans as of February 27, 2018.

Click on the photo to see our status as of February 20, 2018

Click to go to articleReturn to "2018: Springing into Spring on the NEW New Boston & Donnels Creek RR." - Sorting out our priorities for the spring and summer of 2018. There a lot of little chores we really should get done before we start on the next big addition. Click to see our plans as of February 27, 2018.

Click on the photo to see our status as of February 20, 2018

Click to go to articleReturn to "Dirtscaping the NEW New Boston and Donnels Creek RR, Part 1. - Putting edging around the existing "layers" of the new railroad, and beginning to add gravel and rocks. There were a few test runs, but we got stopped early by bad weather before we could dump the rest of the rocks, gravel, and dirt, much less plant the plants we hoped to get in before snowfall.

Click on the photo to see our status as of November 21, 2017


Click to go to articleReturn to "Decking the NEW New Boston and Donnels Creek RR - Decking the 'middle layer' of our proposed three-tier outdoor railroad. Prepping more track, laying out track and decking to make certain we have measurements correct, installing most of the remaining decking for this layer.

Click on the photo to see our status as of October 25, 2017

Click to go to articleReturn to "Framing the NEW New Boston and Donnels Creek RR, Part 6" - Modifying and finishing the framing on the second layer, cantilevering, using R3 track versus all other pre-curved track formats, finalizing the track plan, why painting the track makes old and new track blend better, and more. This will be the last bit of "framing" in 2017, and it worked out well, considering.

Click on the photo to see our status as of October 15, 2017

Click to go to articleReturn to "Framing the NEW New Boston and Donnels Creek RR, Part 5" - Spreading the billboard-sourced vinyl underlayment on the top layer. Prepping used Aristo track for (hopefully) many more years of service. Laying the first loop of track, attaching power wires with spade terminals, and testing conductivity with a Bachmann streetcar.

Click on the photo to see our status as of October, 10, 2017

Click to go to articleReturn to "Framing the NEW New Boston and Donnels Creek RR, Part 4" - Planning and running the decking for the top layer, testing the track plan, checking clearances, prepping used track with new railjoiners, examining the vinyl I ordered to go over the decking, and more.

Click on the photo to see our status as of September 26, 2017

Click to go to articleReturn to "Framing the NEW New Boston and Donnels Creek RR, Part 3" - Getting the frame finished on the top layer, ordering other things I'd need eventually, deciding on materials for the decking on the top layer (at least).

Click on the photo to see our status as of September 17, 2017

Click to go to articleReturn to "Framing the NEW New Boston and Donnels Creek RR, Part 2" - Once I had the overall frame relatively solid, I hooked up the underground power lines to two GFI plugs that should be in easy reach once everything is finished. I also decided to frame out the top railroad layer while I could still access the center of the railroad easily. Because I was running out of vertical space, I reconfigured that layer. Then after I got the "core" pieces on, I changed my plan again. But the whole thing is getting easier and easier to visualize, and is getting closer to complete with every board I cut and fasten on.

Click on the photo to see our status as of September 7, 2017

Click to go to articleReturn to "Framing the NEW New Boston and Donnels Creek RR, Part 1" - Once I started dropping posts in the holes and screwing things together, I didn't want to stop before I had the basic frame built (for one thing, the wood warps less once it's fastened in place). Now the folks driving down the street past our house (we're on a corner lot) probably wonder if I'm building an elaborate chicken coop, but that's fine with me. I still need to make a few more lumber runs and do a lot more cutting and sawing, but having the basic frame in place should make the next bits a lot easier.

Click on the photo to see our status as of August 10, 2017

Click to go to articleReturn to "Breaking Ground on the NEW New Boston and Donnels Creek" - Okay, in case you wondered if we'd ever get started on the thing, we broke ground in July, using a manual post-hole digger. Well two manual post-hole diggers. But by the end of this article, we're ready for the posts to start going in.

Click on the photo to see our status as of the end of July, 2017

Click to go to articleReturn to "Planning the NEW New Boston and Donnels Creek, Part 4" - Well, the rented post-hole digger fell through, so we dug our vegetable garden with a manual post-hole digger (the scissors kind). In addition, I stake out where the railroad was going to be. Twice. And tweaked the plans again. Sorry about the redo's, but sometimes just walking around the yard trying to visualize things makes me reconsider something that seemed "settled" only a few days before.

Click on the photo to see what we were considering as of late May, 2017

Click to go to articleReturn to "Planning the NEW New Boston and Donnels Creek, Part 3" - We have still not broken ground. In part because we plan to rent a post-hole digger and dig the post holes for our raised vegetable garden and the first phase of the garden railroad at the same time, and we don't have enough lumber on hand yet. (If we didn't break it down into multiple trips, we'd be blowing out the shocks on our minivan.) In the meantime, we used a line level to see if the slope of the back yard was as bad as we thought it was (it's worse), and we did other site preparation, including planting a whole bunch of spruce tree seedlings to eventually give us some privacy in our side and back yard. Plus, I'm still wavering a little on the "where-to-start-first" issue.

Click on the photo to see what we were considering as of late April, 2017

Click to go to articleReturn to "Planning the NEW New Boston and Donnels Creek, Part 2" - More plans. We've moved on from the 2"x6" roadbed-on-posts to a sort of "train-table-outside" plan. Our goals include low-maintenance, high interest, and high reliability. We're also trying to get around having a thousand dollars' worth of dirt hauled into the back yard. If you want to get some idea of what our planning process looks like, reading these through in sequence may help. Or it may drive you crazy.

Click on the photo to see what we were considering in early April, 2017

Click to go to articleReturn to "Planning the NEW New Boston and Donnels Creek, Part 1" - If you're subscribed to our newsletter, you know that we moved just after Thanksgiving in 2016, leaving behind most of the track, a few of the bird feeders, and one Bachmann train set for the new owners. We also left behind a high-maintenance garden that we do not intend to replicate at the new place. This is the first chapter of a new chapter in our lives, which we hope will include a lot of "lessons learned." But first, some serious landscaping had to take place.

Click on the photo to see what we were considering in March, 2017

Click to go to home page of the New Boston and Donnels' Creek RR, Paul Race's home railroad. Return to the New Boston and Donnels Creek RR Page - This is the page describing Paul Race's progress and frequent rework on his own garden railroad, started on a shoe-string budget in 1998, later expanded, and later refurbished several times as issues arose. Issues that Paul hopes to avoid by building the next iteration above ground.

Click on the photo to see the home page of Paul's railroad.


Return to the Family Garden Trains Home PageReturn to Family Garden Trains' Home Page - The home page with links to all the other stuff, including design guidelines, construction techniques, structure tips, free graphics, and more.

To read more, or to look at recommended Garden Railroading and Big Indoor Train products, please click on the index pages below.

Visit our Garden Train Store<sup><small>TM</small></sup> Bachmann Starter Set Buyer's Guide


Click to see buildings for your garden railroad


Note: Family Garden TrainsTM, Garden Train StoreTM, Big Christmas TrainsTM, BIG Indoor TrainsTM, and BIG Train StoreTM are trademarks of
Breakthrough Communications (btcomm.com). All information, data, text, and illustrations on this web site are
Copyright (c) 1999, 2000, 2001, 2002, 2003, 2004, 2005, 2006, 2007, 2008, 2009, 2010, 2011, 2012, 2013, 2014, 2015, 2016, 2017, 2018, 2019 by
Paul D. Race. Reuse or republication without prior written permission is specifically forbidden.
Family Garden Trains is a participant in the Amazon Services LLC Associates Program,
an affiliate advertising program designed to provide a means for sites to earn advertising
fees by advertising and linking to amazon.com.


For more information, please contact us

Click to see new and vintage-style Lionel trains.
Click to see new and vintage-style Lionel trains

Visit related pages and affiliated sites:
- Trains and Hobbies -
Return to Family Garden Trains Home page
Return to Big Indoor Trains Home page
Garden Railroading Primer Articles: All about getting a Garden Railroad up and running well Big Indoor Trains Primer Articles: All about setting up and displaying indoor display trains and towns. Garden Train Store: Index to train, track, and other products for Garden RailroadingBig Christmas Trains: Directory of Large Scale and O Scale trains with holiday themes
On30 and O Gauge trains to go with indoor display villages and railroads
Visit Lionel Trains. Click to see Thomas Kinkaded-inspired Holiday Trains and Villages. Big Christmas Train Primer: Choosing and using model trains with holiday themes Free Large Scale Signs and Graphics: Bring your railroad to life with street signs, business signs, and railroad signs Click to see HO scale trains with your favorite team's colors.
- Christmas Memories and Collectibles -
Visit the FamilyChristmasOnline site. Visit Howard Lamey's glitterhouse gallery, with free project plans, graphics, and instructions. Click to return to the Old Christmas Tree Lights Table of Contents Page Click to sign up for Maria Cudequest's craft and collectibles blog.
Click to visit Fred's Noel-Kat store.
Visit the largest and most complete cardboard Christmas 'Putz' house resource on the Internet.
- Family Activities and Crafts -
Click to see reviews of our favorite family-friendly Christmas movies. Free, Family-Friendly Christmas Stories Decorate your tree the old-fashioned way with these kid-friendly projects. Free plans and instructions for starting a hobby building vintage-style cardboard Christmas houses. Click to find free, family-friendly Christmas poems and - in some cases - their stories. Traditional Home-Made Ornaments
- Music -
Heartland-inspired music, history, and acoustic instrument tips.
Best-loved railroad songs and the stories behind them.
Learn important guitar chords quickly, to jump start your ability to play along on any song. With a few tools and an hour or two of work, you can make your guitar, banjo, or mandolin much more responsive.  Instruments with movable bridges can have better-than-new intonation as well. Resources for learning Folk Music and instruments quickly Check out our article on finding good used guitars.
Carols of many countries, including music, lyrics, and the story behind the songs. X and Y-generation Christians take Contemporary Christian music, including worship, for granted, but the first generation of Contemporary Christian musicians faced strong, and often bitter resistance. Different kinds of music call for different kinds of banjos.  Just trying to steer you in the right direction. New, used, or vintage - tips for whatever your needs and preferences. Wax recordings from the early 1900s, mostly collected by George Nelson.  Download them all for a 'period' album. Explains the various kinds of acoustic guitar and what to look for in each.
Look to Riverboat Music buyers' guide for descriptions of musical instruments by people who play musical instruments. Learn 5-string banjo at your own speed, with many examples and user-friendly explanations. Explains the various kinds of banjos and what each is good for. Learn more about our newsletter for roots-based and acoustic music. Folks with Bb or Eb instruments can contribute to worship services, but the WAY they do depends on the way the worship leader approaches the music. A page devoted to some of Paul's own music endeavors.