| |||
 |
 |  | |
 |  | ||
 |  | ||
 |  | ||
 |  | ||
| |||
|
|
| | |
| | ||
| | ||
| | ||
| | ||

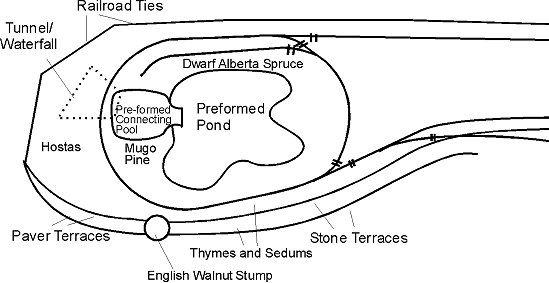
Landscaping and Pond Construction, 1998-1999 (Including Notes from 2008)Note: This article was originally written in the summer of 1999, so some of the information, like what I had left to do, etc., is out of date. Although I've made corrections, consider it a sort of journal entry showing what progress had been made after about twelve months of work. In the spring of 1986 I had a 12x60-foot area of my side yard that was virtually unusable. Two trees overhung it with such low branches you couldn't walk through part of it, and it sloped several inches from the inside of my yard to the fence. Then a freak windstorm intervened and took the tops out of both of them so I had to cut them down. The English walnut came down in a day, the trunk of the maple didn't come down for sometime, having eaten up my chainsaw blade almost completely. :-( Scrounging Raw Materials - Once the brush was moved, I decided to reclaim that corner of the yard. The city of Springfield, Ohio was doing roadwork on old Main street, and had pulled out many railroad ties that had once served the trolley lines. These were white with concrete dust, but in better condition than ties that had been exposed to the air for the last ninety years. I was able to get several from a discard pile to start my landscaping project, as well as a bunch of old brick pavers. The good pavers became a sidewalk, the pavers in poor condition went into a rock garden--more about that later. Installing a small pond - At a year-end sale at Meijers, I had picked up a 100-or-so-gallon pond liner, the hard vinyl kind (Marcourt brand, Jamaica configuration, I think). I determined to put the pond in a raised section at the south end of the newly-cleared area. With some measurements and a much-abused level, I figured out the slope of the ground, and placed the pond where I thought the lip would be level if the ground level were raised an average of 18". (It would really be about 12" at the "front," or East side, and about 24" at the "back," or West side.) With this "design" in mind, I didn't have to dig out the entire pond area, only where the deepest part would go. Good thing, too, because there were plenty of roots I had to chop out just to get the "base" of the pond to sit right. I dumped sand in the bottom of the hole, then, using the level on a straight 2x4, I set the pond in and shoveled sand in all around the base, settling it as well as I could. (Note from 2008: In retrospect, because I used sand and because I didn't make certain to fill all the gaps and air pockets around the lower level of the pond liner, I created a haven for chipmunks, and later for moles and voles, which would eventually harm the railroad installation - aren't you glad I made all these mistakes so you don't have to?) "Raising" The Garden - In the meantime, I had built a back "wall" from the old trolley ties behind the planned raised garden, leaving 30" between that and the fence for access. When the pond was ready to "backfill," I ordered 15 cubic yards of dirt from a local topsoil company. They dumped it near the pond, and I spent evenings the next couple weeks, shoveling and wheelbarrowing it into place around the pond and between the pond and the railroad ties. Then I took the broken pavers and made a sort of terraced rock-garden riser at the southeast edge of the garden. I created another two terraces on the front (East) side with limestone blocks and "hunks" we had on our property (from previous owners and torn-down prehistoric sheds). As I built up the terraces, I "backfilled" around the front of the pond. By building a raised garden, I hoped to make access to the tracks easier when I'm old and grey (if we live here that long--which should only require a few more weeks at this rate). As it is, I still do a lot of bending over and blowing sand out of switch mechanisms--more on that later. A side benefit was that I didn't have to excavate for the entire pond, which would have been a chore with the tree roots, etc.
Note from 2008: Over the years since 1998, the sand worked its way into the soil and essentially disappeared, but it may have contributed to keeping the soil soft, which exacerbated several problems, including weeds and disruption by burrowing animals and frost heave. In late 2008, I pulled up the loop of track that I had laid in 1998. I dug a ditch, and poured concrete underneath that. In perfect hindsight, I now realize that I would have saved myself many hours over the "long" haul if I had done that in the first place. For details on that operation, and why it was necessary, check out our article on Refurbishing Garden Railroad Roadbed. First Track Laid - At any rate, I installed an oval of Aristocraft track going around the pond, with a short siding on the far side of the pond. I used ten-foot-diameter curves, because those were the widest available at the time. I also liked the Aristocraft track because the rail-joiners screw together instead of relying on friction and pressure to make electrical and mechanical contact. At the time I didn't run jumper lines--the Aristo track made such a good connection I didn't need to. I did wind up running some later, just to be on the safe side, when I did some other work. Note from 2008: That Aristocraft track - which I had also been using in the side yard earlier, before it spent ten years on the NB&DC, including several years in direct sunlight - "gave up the ghost" in 2008. That is, the ties had started to break down Back to the Pond - By the time I had the dirt in place and leveled, and had put some track out, it was early autumn, 1998. I picked up a smaller, connecting pond at a closeout in Lowes and installed it with its base at the level of the roadbed. A friend donated some more limestone odds and ends. I laid a couple inches of sand around the lip of the lower pool, and used the flatter stones to build an edge around the pond. After they had settled somewhat, I dumped some sand mix between the stones around the edge of the pond and sprinkled it down, hoping to bond them at least a little. Some bonded right away, some bonded after a couple applications, and some still broke loose, but overall, they are keeping their places fairly well, and that's all I really wanted. I used some of the chunkier limestone to build a sort of wall to camouflage the base of the connecting pool. In the spring of 1999, I experimented with installing a "waterfall" fixture above the roadbed, crossing over the train to create a short "tunnel" and a longer "waterfall" effect. That "go" wasn't very effective (sorry, not photos, you'll have to take my word for it. I used a black molded plastic "streambed" from a hardware store. Laid on a "bridge" of pressure-treated 2x12s, it looked a lot like a black molded plastic "streambed" from a hardware store. Later I went back and cut some 2x12s into "pie shapes", then used them to build a 90-degree "wedge" that crossed the right of way with a little more style. I lined the wedge itself with pond liner, to keep any moisture that escaped from the "streambed" from landing in the "tunnel." Then I arranged the "streambed" and placed rocks and sedum all around it. Between 2001 and 2008, it looked like a rock-and-sedum-surrounded black molded plastic streambed from a hardware store, a much more effective look. You can probably tell that I have done almost everything so far by trial and error, planning in detail only the next step ahead. At this point, I plan to replace the "waterfall" with something more impressive in the coming months; I'm just not sure of the best way to do it. Pond Life - At my children's urging, I put three "feeder" goldfish in the pond; one survived the winter. (No, the other two didn't freeze, they got sick and died.) In the spring of 1999, I brought some arrowhead and water hyacinth back from a trip to the Lousiana bayou, and some if it survived. I'd been told that water hyacinth has to be bought new each year in this part of the country, but I may be able to keep the arrowhead alive if I bring it inside. (P.S. The arrowhead didn't make it - PR) In March, 1999, I installed a 100 gal/hr pump, as well as a "mechanical" filter that is supposed to keep the gunk in the water from ruining the pump. (I was told to get a pump with a rating about the same as the size of the pond.) I didn't install a "biological" filter, because the pond people I talked to said if I had a healthy ecosystem, etc., the plants would keep the water clean, especially the water hyacinth. Well, most of the water hyacinth I brought back from the bayou died, THEN I learned that an anti-algae agent I poured in the water last fall when it was as green as jade also kills water hyacinths. Also, Louisiana has been using a bio agent against their water hyacinth problem (a real ecological disaster down there), and I may have brought back sick plants. The other thing is that the water kept getting murkier, not clearer. So the filter wasn't doing much good even at that. So at any rate, I broke down in April 1999, and got some of those little deformed wiffleball things that are supposed to go into a biological filter and added them to the base of my filter. Plus I bought a 300 gal-hour pump. I don't know if it was the pump, the hyacinths, or the wiffle-balls, or all three, but eventually the single-cell agae stopped turning my water green. However the stringey stuff started growing several places, including all over my water hyacinth roots. On Mother's Day, 1999, we planted a hardy water lily and some rushes. The water lily was a root/start only, but is shot several leaves to the surface in about two weeks. The rushes were slightly less encouraging, taking longer to look like they were going to make it. Other Pond Problems - Because I brought the level of the sand and dirt almost up to the level of the pond, earthworms would crawl into the pond every time it rains and drown, yecch. Also, sand washes in every time it rains. (These problems were solved when the ground around the pond settled a little.) The pond was partially overhung by a remaining maple (the neighbor's), so it got filled with leaves in the fall, maple buds and "flowers" in the spring, and "helicopters" in the summer. I need to be more diligent about fishing stuff like this out than I am, I'm sure I have left things decay too long between cleanings. Again, it's quite organic!
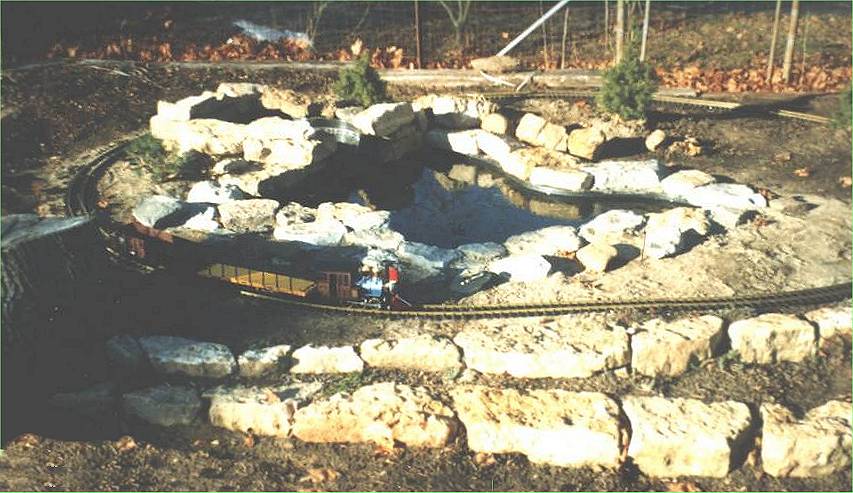
The picture on top of this page was taken in December, when the Mugo Pine and Alberta Spruce were the only green things in the garden and it looked, frankly, like a southwestern desert. Now that the multitude of hostas and other plants we put around the pond are up, the D&RGW locomotive no longer looks quite so at home. For a picture that shows the hostas in an early stage of growth, go to the updated Pictures page.
Rock Wall Plant Update--In the first week of May, I also transplanted more creeping thyme and "stubby fingers" sedum around the pond and the rock walls, so I have high hopes for a nice filled-in look by late summer of this year. Some of the spring pictures on the Pictures show this as well. Fish Update--In the early May, 1999, I assisted in the goldfish bowl contest at our local elementary school, and brought back several new denizens. We had 7 gold goldfish and 3 black ones (a couple died right at the beginning, probably due to abuse by the goldfish handlers at the festival). My youngest daughter kept looking at the fancy goldfish at the pet stores longingly, I told her no, we had enough. All the goldfish quickly grew larger than when we brought them home, a couple doubled or more in size in a few months. Don't have any good pictures of the fish, though. < Next Steps: Next - To see more photos of these early stages, please proceed to the next page in the series, NBDC 1998-2000 Pictures, click here. Previous - To return to our page About New Boston and Donnels Creek" click here. To return to the New Boston and Donnels Creek Index Page, click here To return to the Family Garden Trains Home Page, click here | &nspb; |
Reuse or republication without prior written permission is specifically forbidden. Family Garden Trains is a participant in the Amazon Services LLC Associates Program, an affiliate advertising program designed to provide a means for sites to earn advertising fees by advertising and linking to amazon.com. For more information, please contact us |
 |  |
| Visit related pages and affiliated sites: | |||||
| - Trains and Hobbies - | |||||
 |  |
|
 |
|  |
 |

|

|  |
|

|
| - Christmas Memories and Collectibles - | |||||
 |

|
 |

|

|
|
| - Family Activities and Crafts - | |||||
 |

|

|

|

|

|
| - Music - | |||||

|
 |
 |

|

|

|

|

|

|

|

|

|

|

|

|

|

|

|