| |||
 |
 |  | |
 |
 | ||
 |  | ||
 |  | ||
 |  | ||
| |||
|
|
| | |
|
|
| ||
|
| | ||
| | ||
| | ||
| Written by Paul Race, Bruce Jahn, Ric Golding, Greg Adams, Paul Stump, Scot Osterweil, Dick Friedman, and Mike Cote for Family Garden Trains |  |
|
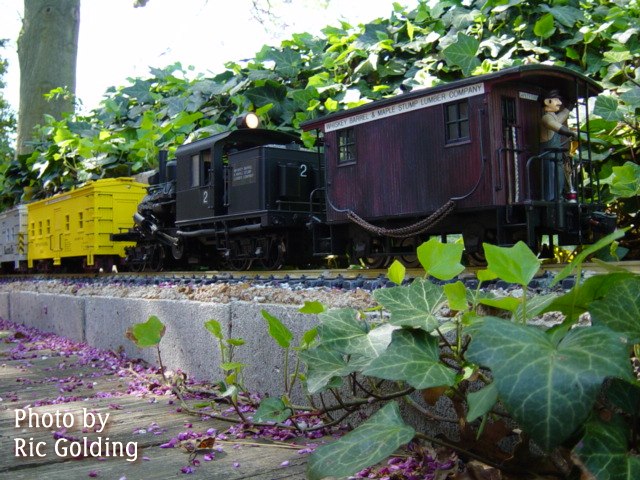
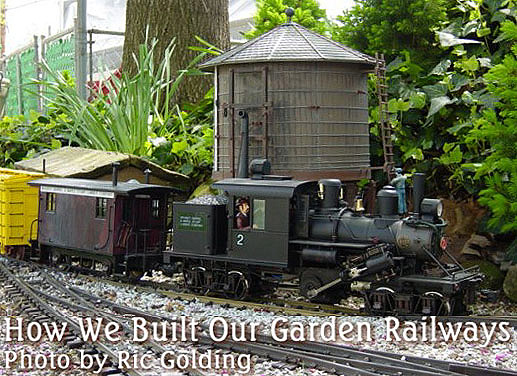
After writing an article about the history of my railroad, the New Boston and Donnels Creek, I requested several friends to tell me their major construction technique. Obviously, from the responses, people build their railroads all kinds of ways. This article presents a few methods that were completely different from the way I did things. Like most of our Family Garden Trains articles, we want to give beginners ideas that encourage them to get started. is to give other hobbyists and would-be hobbyists some ideas for things they might try. Bruce Jahn, of Livermore, California I started out digging a 6"x6" trench, laid in 1" plastic conduit and two lengths of 1/2" rebar, followed by concrete. I also pushed 1x1x18" redwood strips down into the center surface of the concrete just in case I ever saw a reason to "fasten" the track. These have about a foot between each, but haven't used them....I wouldn't do it next time. I also buried in the concrete a pair of 12 gauge stranded wires which stick out about every 100 feet for continuity. I've never run without this connection between the rails and power pack, and since I soldered all rail joints, don't know what the difference would be without this buss. I used ballast comprised of something in my area called "1/4 by dust" and over the years it has settled in and the track still, after about 12 years, still looks wonderful and takes a fair amount of punishment (I use only code 250 N/S track). About every 30+/- feet, the conduit connects to a junction box accessible along the track. This was intended for additional low or 110 voltage stuff, but remains to this day empty, but I'm still glad I did it since I have future plans. On another part of the railroad, I got in a hurry and merely laid the track on dirt and used the same ballast. This was to be the small oval for my wife's live steamer, but I use it the most for my track powered stuff. After about 7 years, I've about had enough frustration and soon to take up the track and repeat the concrete method. This track I also soldered the joints, but the various greenery the grows up is a pain. All my track is at ground level, except for a portion that travels through a brick (raised) bed. My yard is small and not very conducive to wide open spaces, so next time I'd be forced to do the ground level stuff again...much to my disappointment. Next big project includes digging out under a portion of my house (few basements in California) where I'll hang a six track ladder yard so when I'm relaxing in my hammock watching the trains pass, I'll be able to watch six different trains pass. That's the dream. Ric Golding, of Carlyle, Illinois
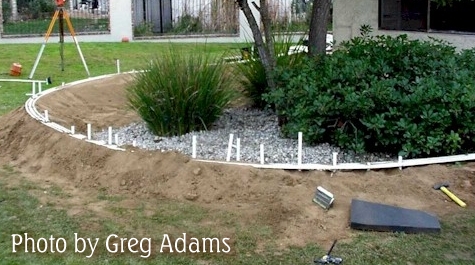
I float my track on ballast. But to keep it rather level I have built up the ground around it with concrete block and landscaping stone. All the concrete block is set to achieve the proper grade and then filled with agricultural limestone. The dirt that was dug out to allow the concrete block to sit at the right height is used on each side of the concrete block to build the fill up. So even though the yard has a little bit of slope to it, the roadbed is relatively level. All grade is controlled to less than 2%, except on the KVCabins portion which has a tight switch back and requires the Climax. Where the right of way is directly at ground level, there is a trench dug to about 6 inches deep and filled with agricultural lime and then chicken grit or other ballast material applied at track level. Been on the ground 7 years and very little problems or distortion. Reballasting is an on going part of maintenance, but I haven't done the whole line in 3 or 4 years. I guess the biggest lesson I've learned is that you have to come up with the program of track laying and operations that works for you. I really enjoy laying new right of way and therefore I don't look at it as a chore. The KVRwy is an operations oriented railroad. We run a tourist line and expect equipment to run slow and smooth through switches, but just like the one to one guys we watch every wheel as it clears a frog. So there is no excitement of a derail and we can many times back the equipment up and rerail it with minimal sky crane involvement. A perfect session is the equipment coming out of the sheds, running its schedule and going back to the storage shed without a derailment, uncoupling or hand touching the equipment. Smooth Sailing, Greg Adams, of Greater LA
Usual disclaimers - I have no interest in Mainline other than I use their products. Paul Stump, Berryton, Kansas
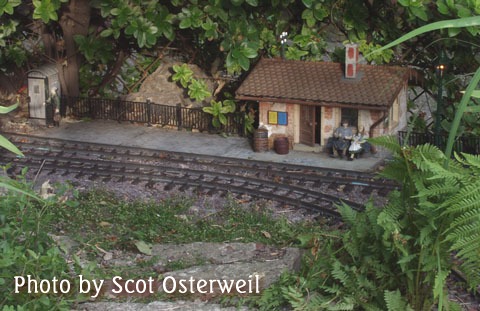
I needed to create a 4" to 6" high ROW between two bridges. This is fairly level ground and about 10 feet in length. Having no extra dirt on hand and seeing as the shovel was all the way around the house in the basement anyway, I thought "why not try these lava rocks as filler?" I spread a base of about 6" wide and 2" to 4" high along the length. These rocks vary from .5" to 2" in diameter and I used a leaf rake followed by a 2" x 8" x 24" board to level things out a bit. Then I poured a topping of grower-size chicken grit to height, watered, tamped and added grit using track as the final tamper/strainer. So far this section is good and tight. We have not had any major rain, large dogs or rodents to test it however. Then winter will no doubt teach me a thing or two. Btw, a forty pound bag of lava rock is US$2.50 and the forty pounds of grit runs about US$4.50 in this area. I will attach a couple pix here though. This is not the 10 foot section but shows the same technique. So far it will hold my weight standing on the track... I'll pass on lessons learned, as they are... http://qsl.net/n0lrf/gwhizpage/gwhizpage.html (Note: Paul recently moved to this page. He has posted many new photos, but they are all on the same page, so it will take a while to download, especially if you have dial-up. If you're interested in building your own old-timey locomotives or modeling in 13.7:1 (7/8n2), it's definitely worth a look. ) Scot Osterweil, of Brookline, Mass. on his Chemin de Fer du Rhone (CFR)
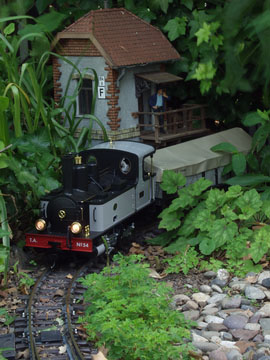
Basically, I threaded a route through the existing topography, just like a real railroad, except that it was plants rather than hills that I was skirting. The area was pretty flat so I didn't have to deal with grades. The natural grades never exceed 2%. I dug a trench 6 inches wide by 4 inches deep, filled it with granite dust (also called crusher fines) which really is scale ballast. It locks up just like the big stuff. After I had a level roadbed I added the sectional track and than topped it off with more granite dust to the tops of the ties. Every year I have to add a little more ballast, but the time involved isn't bad, and I enjoy the way the maintenance mirrors real railroad maintenance. I couldn't elevate my layout because that would have meant elevating the whole garden (it being so narrow) which would have defeated the purpose. However, if I had a garden with enough room, I would elevate the ROW about a foot, but only so long as that wouldn't interfere with attractive landscaping. I prefer layouts that are integrated with their gardens over those that isolate the track as if it were a tabletop train layout.
I built the layout using sectional track, although on the straights I used 4 foot lengths which are almost as long as the alternative of flex track. The sectional track has worked fine electrically, but is subject to widening gaps at the joints. This is particularly true on a curve where the layout suffers some foot traffic. I will eventually replace the most vulnerable sectional stretches with flextrack. On the other hand, the ability to use sectional track (without the need for a rail-bender) probably encouraged me to start building sooner. Although one should always strive for perfection, when perfection prevents you from getting started it becomes destructive. It's not always a bad idea to build what you're comfortable with now, even if you end up replacing it later. This is particularly true if it's the difference between building something and building nothing. Dick Friedman, near Sacramento, California I began building my rr with aluminum 250 rail joined with stainless steel joiners and floating on a bed of roofing shingles. After the tracks were joined, I leveled it my using 1/4 inch sea foam as ballast. It is slightly greenish like granite, and has lots of sharp edges and dust. After a light watering, it lock until the next rain. Fortunetely we don't have too much of that here. Over time, I've added two switches and a small yard, ballasted with some salvaged road construction sub base.
What would I do differently? I wouldn't waste time with stainless steel joiners. In two years, I've replaced them all with Hillman clamps (not a commercial, just my experience of a 100% reliable electric connection). Problem with aluminum rail? None. It conducts electricity as good as brass. AMOF, my house is wired with aluminum. It's a little light weight, but I don't have deer walking on it, so it's fine. It does require a little more support that 332, but I suspect that's more a matter of lighter weight than composition. When I installed the rr, it was in an existing garden. I reused the drip system for my new plants, and my garden lights for the buiildings. Both work fine, although I did upgrade the power supply. I used automobile and radio shack lighting for the other lights which is a drain on a "basic" garden lighting. Buildings are a combination of kits, birdhouses, "inherited" buildings, assembled buildings, and scratch builts. Most are lighted. Mike Cote, of Holliston, Massachusetts I built mine the old fashioned way...I hired a guy who builds them for a living and paid to get it done! Hey I like to run trains and I'm a software engineer and it was a hardware problem. If you'd like to add your construction tips to the mix, please e-mail me Comments by contributors Bruce Jahn, Ric Golding, Greg Adams, Paul Stump, Scot Osterweil, Dick Friedman, and Mike Cote are copyright by their respective authors.
|
Family Garden Trains is a participant in the Amazon Services LLC Associates Program, an affiliate advertising program designed to provide a means for sites to earn advertising fees by advertising and linking to amazon.com. For more information, please contact us |

 |  |
| Visit related pages and affiliated sites: | |||||
| - Trains and Hobbies - | |||||
 |  |
 |
 |
|  |
 |

|

|  |
|

|
| - Christmas Memories and Collectibles - | |||||
 |

|
 |

|

|
|
| - Family Activities and Crafts - | |||||
 |

|

|

|

|

|
| - Music - | |||||

|
 |
 |

|

|

|

|

|

|

|

|

|

|

|

|

|

|

|