| |||
 |
 |  | |
 |  | ||
 |
 | ||
 |  | ||
 |  | ||
| |||
|
| | |
| | ||
|
|
| ||
| | ||
| | ||
Written by Paul D. Race for Family Garden Trains(tm)
 |
 |
This is a supplement to my construction articles. Like most "indoor" railroaders, most outdoor railroaders start with a circle or oval of track sections that include preformed curves. But once they get a vision for what is really possible in their back yards, many outdoor railroaders start thinking "outside the circle." Eventually, many demand track plans and installation techniques that serve their vision, and not the other way around. The worst example of the limitations of preformed curves is probably when a train coming off a straight section lurches into a curve like a toy. Real trains ease into curves through "easements;" in an easement, the curve is barely perceptible at first, then becomes greater once the train has "eased into" the curve. Now it is possible to create something like easements using sectional track, if you want to mix and match preformed curves. In fact my article on Planning Your Garden Railroad for High Reliability offers suggestions for doing this on a small loop. But for larger railroads, it is generally more cost-effective, less frustrating, and more attractive and reliable in the long run to use long pieces of "flex track" that are bent to suit the planned right-of-way. On my dad's HO railroad, the answer was simple, buy a bunch of "flex track," wrap it anywhere you wanted track, and tack it down. But garden railroad track (depending on what kind of track you use) will have from 9 to 27 times the "cross section" of HO train track. All of it seems to want to "spring back." The most common track (which uses code 332 brass rail) is just about impossible to curve the way you want it to without special tools. This is where railbenders come in. These are tools that keep pressure on all the right parts of the rail as you pull it through a series of rollers. This even pressure is important because if you accidentally bend the top of the rail (the "head") more than you bend the bottom (the "foot"), you'll wind up with rail that's skewed, bent in three dimensions instead of two, and just about impossible to straighten back out. But before we go into too much detail, we'll fill in the gaps about so-called "flexible" track, usually called "flextrack" for short. | ||||||||||||||||||||||||||||||
|
The following topics will be discussed in the article:
What is flextrack?In many cases, "flextrack" consists of pieces of track 36" or longer on which the "tie strips" are attached loosely, so they have lots of lateral "give." For smaller scales, that's all you need to know. You can wiggle N or HO flex track into almost any shape, then tack it to your table, snip off the extra rail, and have a "working railroad." But the rails on Large Scale flex track (the kind used in garden railroads) are much thicker; a better name for some of it might be "straight pieces with give." | |||||||||||||||||||||||||||||||
 |
Why Use Flextrack? Some of the advantages have already been discussed, but here is a more complete list: Some of the advantages have already been discussed, but here is a more complete list:
True, some Large Scale flextrack has more "give" than others, depending on the size of the rail and the material used.
 | ||||||||||||||||||||||||||||||
|
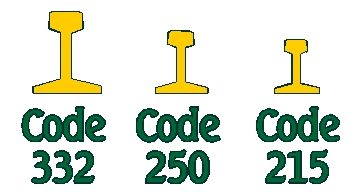
The following table summarizes the major choices facing a person shopping for Large Scale flextrack in the spring of 2006:
| |||||||||||||||||||||||||||||||
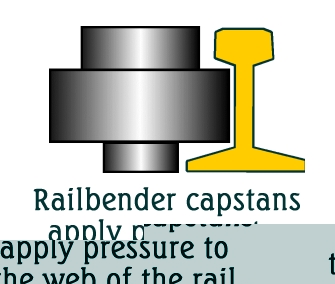
Railbenders
Railbenders work by gripping and applying pressure on the center, thin part of the rail, known as the "web," at the same time holding the rail on a level plane.
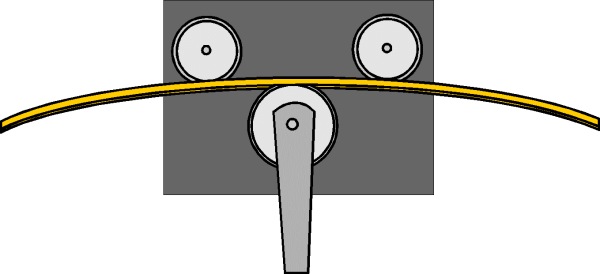
Most railbenders bend one rail at a time. If you buy "flex track" that had the rails and ties already assembled together, you'll have to slide the rails out of the ties, bend each of them, then slide the rails back into the tie strips. Some companies will sell you the rails and tie strips unassembled to save you having to take the track apart to bend it. That said, most people seem to agree that the biggest hassle of railbending is putting the tie strips back onto the track after it is bent. There is one railbender that bends rails properly while they're still in the tie strips, but it currently costs more than the other kind, so it's mostly being used by professionals and people with really big railroads to build. |
Using a Single-Rail RailbenderBecause most railbenders work about the same, I've combined and "averaged out" tips from several people who've used different kinds but all had similar advice. If the manufacturer's instructions say to do something differently, follow them closely, of course - this is just to fill in the gaps.Note: - At this time (June, 2020), most of the single railbenders I recommended or referred to have been discontinued. If you find one by Aristocraft, Lindsay (Llagas Creek), or Sunset Valley, or if you build your own, the instructions for a single rail railbender will remain about the same.
|
Using a Double-Rail RailbenderAt this time, only one mass-produced railbender bends both rails at once while the ties are still installed. Train-Li's Easy-Bend DuoTrack also functions as a track gauge and level. In fact it offers so many features that buying it would be a no-brainer, except for the price difference. Even then, if you're planning on installing a couple hundred feet of track or more, you may find that the amount of labor it saves is worth the cost difference. For landscapers and professional installers, this will save enough man-hours to pay for itself on the first job. (That said, some folks who are always tweaking things find that they occasionally need to bend a rail at a time, so they wind up with both.)According to the Train-Li web site and several user comments, it seems that you find a place to work (a bit of driveway, or a solid roadbed, if you already have it installed). Then you slide the railbender onto one end of the track. If the track is already installed and you are just trying to "tweak" it, you can even "wiggle it" to get it onto installed track without an open end. Adjust the DuoTrack it for the curve you want, and roll it back and forth until you have the amount of bend you need. Kevin Strong also mentioned that you can get around the "last straight inch" problem by attaching the "next" piece of track with a rail joiner or rail clamp that attaches to the foot of the rail only (this wouldn't work with Aristo rail joiners, which also fasten to the web). When you're satisfied with the curve, and the track is in place, double-check the levels and move on. |
About Train-Li's EasyBend Duo Track (Available from Train-LI) (Available from Train-LI)The EasyBend DuoTrack has twice as many capstans as the single-rail benders described above, so it works on track that is assembled, curving both rails at the same time. The built-in levels make it easy to check your work as you go. Train-Li also claims the following advantages:
The DuoTrack has been tested on AristoCraft code 332 stainless steel track - the "stiffest" large scale track you can buy, with very good results, although they say it takes a little more strength to tighten the adjustment knob. Train-Li also offers wheelsets to convert a code 332 DuoTrack to a code 250 DuoTrack and vice versa. |
 |
Home-Made RailbendersYou can see by now that it wouldn't take a rocket scientist to recreate a single-rail railbender. All it really takes is precise measuring skills and access to a good lathe and drill press. In fact, I know of two people who have built their own railbenders after looking at the commercially-available ones and saying "Is that all there is to that?" One fellow used wheels from an inline skate for his capstans.I have seen photos of one home-made railbender with a hardwood base that replaced the idler capstans with stacks of carefully selected washers instead of solid rollers. The washers were mounted on "sleeves" through which bolts were fastened to the board, so that the washers could spin freely but would have enough vertical pressure to keep the footer down on the board where it belonged to avoid rail twisting. I'm not sure how he constructed the "drive" capstan (the one with the crank). The advantage of trying something like this is that it would cost very little to experiment with (except for any rails you ruined in the process, if you weren't careful). The disadvantage is that you could spend a lot of time "tweaking" a homemade railbender that you "ought to" spend building your railroad. I have yet to see a home-made two-rail railbender that would replace the Train-Li DuoTrack. |
User Reports on RailbendersAs part of my research for this project, I asked several friends about their experience. Here are their comments, edited in some cases for brevity:Ray Turner (of Mystic Mountain Arts) writes:
Track bent just right to fit the landscape looks so much better than sectional track that it's worth all the trouble. The Aristo bender has a good handle to turn - provides the leverage needed for code 332 rail. The Llagas Creek one has a coupling for an electric screwdriver to power it, but I've never felt the need for it. I can just run the rail thru it by hand.
|
Kevin Strong, frequent Garden Railways contributor, says:Single-rail railbenders:I've used Llagas Creek, Sunset Valley, Aristo, and a few others. All work identically, and have the same bugs. They're certainly adequate for bending rail, and if you're going to be handlaying your own track, or working with rail that can easily be threaded onto the tie-strips, then they'll work very nicely. The advantage they offer is the ability to stagger your rail joints--that is, one joint falls in the middle of the section of the opposite rail. This results in a stronger joint, as the opposite rail helps stiffen the joint to prevent sagging or peaking. Compound or reverse curves can be done, but you need to onthread the rail or unclamp the bender and re-attach it. It's hard to gauge exactly where these curves have to be, but it's possible with a bit of practice. [Kevin also warns about the "last straight inch" and the dangers of unsupported rail twisting as it leaves the railbender. These warnings, which were echoed by several other contributors, have been "embedded" in the directions above. - ed] Dual-rail benders:If you saw my review of the Train-li [DuoTrack] railbender in the April GR, you know how much I love this concept. "The greatest thing since sliced bread" about covers it. For pre-assembled flex track, there's no better way to work. You clamp this hummer on top, and glide it back and forth along the section of track until you get the radius you want. You can bend through the end of the rail simply by clamping another section of track onto the end of the first and continuing on. Hillman's or other rail clamps work very well for this. Since the bender grabs onto the head and web of the rail only, there are no worries about railjoiners getting in the way of the works. [Note: I'm not sure this would with rail joiners or rail clamps that use most of the web, such as AristoCraft joiners. - ed] This tool makes laying track in place very simple. You just keep adding track and running the bender over the sections until they're bent into position. Reverse curves are a bit easier, you need only remove the bender and reverse it. One other advantage of this railbender--it's got levels built into it, so you can check your track geometry. Also, by lightly clamping the bender to the rail, you can use it to coax the track back to level during routine spring maintenance. It does have some shortcomings. You can't bend individual rails with it. The mechanics of the bender require the rails to be held by a tiestrip. If you're handlaying your track, this isn't the railbender for you. Also, it's expensive. It's akin to buying a power miter saw vs. a hand saw. If you've only got 50' of track to lay, then it may not be worth the expense. But for those with 300'+ of track, it's money very well spent. Later, K |
Noel Arnold Says:I use the Aristo bender and it does well, the problem is assembling the track, which is a pain. I am awaiting delivery of the new bender for both rails (supposedly is shipping today, even though I ordered it three weeks ago, apologies were sent when their supply ran out). If it works the way it is purported to, it will be wonderful, it is so much easier to put ties on straight track. It may actually work making compound curves also, I'll probably experiment.[Editor's Note: After this comment, Noel did receive his Train Li DuoTrack rail bender. While it seems to work as promised, he hasn't had a chance to try it out properly yet. Stay tuned.] |
Dick Friedman says:I have used a railbender to make the curves on my RR. I chose to use Llagas Creek code 250 aluminum track to minimize joints, and to give me a more realistic looking track profile. It comes as 6 foot length of flex track. More like "spring track" as it doesn't keep its set when you just bend it like you might with small scale flex track. The plus of the bender is that the track remains at the curve you've made with the bender. I drew a curve on a big piece of cardboard, and kept bending the rail until it was on the curve. It was easy to do, and later I helped a friend bend his code 332 brass the same way. Nice thing about benders: you can bend only a portion of a rail, so your curves don't have to start on a joint! Only real drawbacks are that the curves are not easily repeatable. Once you've got your 5 foot radius curve, the next piece through will not be 5 foot. If you've got a lot of curves to do, it may take a while, especially if they have different radii. (I love it when I talk Latin!) To simplify my project , I made all my curves the same: 5 feet radius. That way I only had one curve to match to. Minor annoyances are having to take track apart, reassembling the curved rail onto straight tie sets. Final tip. minor adjustments in curvature can be done by gently bending the curves across a tummy. Don't laugh, it works. |
An unknown contributor added:I borrowed one of unknown origin and made a copy. It works well for me. Some have complained of the rail twisting, but I have not had this problem. I find that if I bend the rail to an approximation of the curve I want, it's not hard to tweak it when I lay it after I thread on the ties. I have installed rail that I have bent on my trestle, on wood and on free floating ballast. All have worked equally well for me. I clamp the rail bender in a Black & Decker "Workmate" that my wife gave me years ago. It is perfect for that and many other purposes. I insert a section of rail and tighten the bender. If it is not the correct radius I tighten it a little more and run it back the other way. If I over bend it I simply reverse it and take out some of the bend. If it is just slightly over bent I some times do that with my bare hands. The only drawback is that the last inch or so doesn't bend well due to the location of the rollers on the bender. I can usually tweak the end with a large pair of pliers and that seems to take care of it. You can also cut off the last inch is that is better for you. I have even bent an "S" curve by running one end through and then reversing it and running the other end through. |
Train-Li, Suppliers of the EasyBend DuoTrack rail benderAxel Tillmann, proprietor of Train-LI writes:Thanks for the coverage of our EasyBend DuoTrak. One thing that I find worth mentioning, that we offer a conversion kit, allowing customers that have both code 250 and 332 to use the same base unit for both track types without the need to reinvest into a another units. The conversion time is less than 5 minutes. I have also attached a picture of the rail bender which shows also the horizontal and vertical levels. Also we offer a KeepParallel Clamp which keeps one of the rail parallel, therefore you only have to cut one rail end after the bending process. I also would like to mention that we offer one of the more advanced rail joiner for code 332. I joiner can take over any function. I have attached a datasheet for you as well as the datasheets for the rail bender. Regards, Axel Tillmann, Proprietor Train-li USA phone: 508-529-9166 |

| 
|
 |
 |
 |
 |
 |
Note: Family Garden Trains?, Garden Train Store?, Big Christmas Trains?, BIG Indoor Trains?, and BIG Train Store? are trademarks of Breakthrough Communications (www.btcomm.com). All information, data, text, and illustrations on this web site are Copyright (c) 1999, 2000, 2001, 2002, 2003, 2004, 2005, 2006, 2007, 2008, 2009, 2010, 2011, 2012, 2013 by Paul D. Race. Reuse or republication without prior written permission is specifically
forbidden.
Family Garden Trains is a participant in the Amazon Services LLC Associates Program, an affiliate advertising program designed to provide a means for sites to earn advertising fees by advertising and linking to amazon.com.
For more information, please contact us

 |  |