| |||
 |
 |  | |
 |  | ||
 |
 | ||
 |  | ||
 |  | ||
| |||
|
|
| | |
| | ||
|
|
| ||
| | ||
| | ||
Written by Paul D. Race for Family Garden Trains(tm)
 |


|
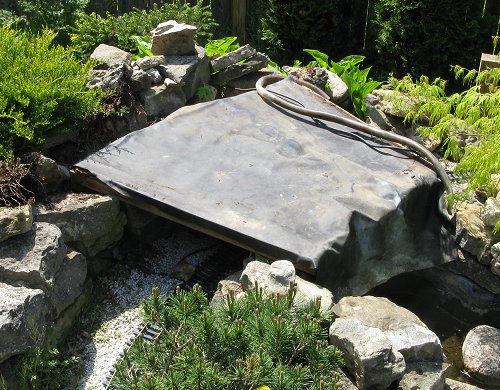
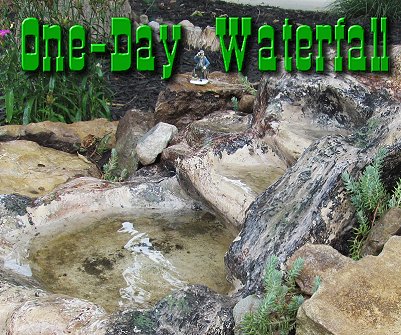
One-Day WaterfallThis article reports a recent project in which I made a one-piece "store-bought" waterfall look like a permanent installation in my neighbor's yard with only a pile of rocks, a bag or two of topsoil, and a few handfuls of low-growing groundcover. It came about because my neighbor wanted to install an old waterfall fixture that her mother had once owned.You'll notice that:
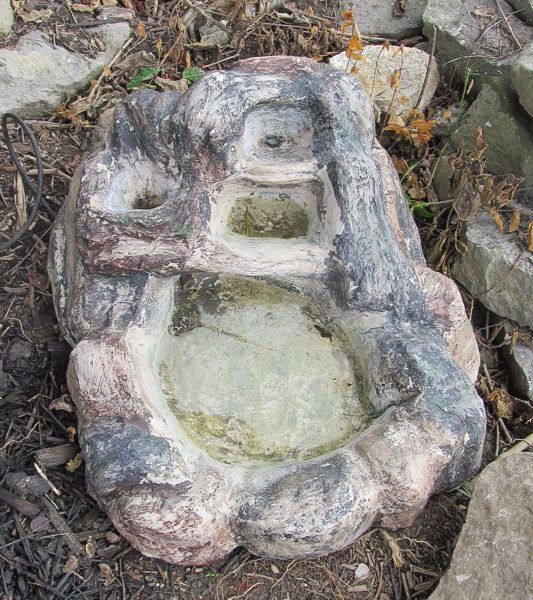
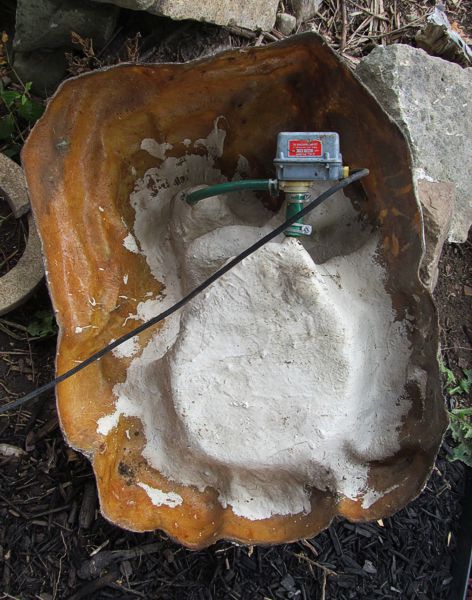
Old and New FixturesOne caveat is that this old fixture was better built than most you will find today. Prebuilt waterfalls and fountains today are mostly resin with a little fiberglass or similar material to add a wee bit of strength. My neighbor's fountain was mostly fiberglass, more like a Corvette fender than modern garden-center fountains. In addition, most prebuilt fountains and waterfalls today use pumps that sit under water and use a magnetic drive (no gears) to pump the water. This old fixture has a pump that would be home on a lot of professional equipment, attached to the underside of the feature. The advantage of this setup is that you can't see the silly black box. The disadvantage is that if the pump breaks it will take some "doin'" to fix or replace.
You'll notice from the photos that the old fixture has faded and been repainted with a brush. It's not as pretty as the new fixtures, but the paint fades on the new ones eventually, too. I could have touched the thing up, but I prefer to crowd the fixture with real rocks and appropriate groundcovers so that once the groundcover fills in, you can't see much of the fake rocks anyway. Choosing Your FixtureAssuming you didn't inherit a fiberglass waterfall fixture, you'll need to choose one.
Where Do You Get Rock Piles Today?Our neighborhood is about 80 years old, and was built over old farms. As a result, there's no shortage of big rocks, mostly broken limestone pieces that were once foundations for barns, sheds, or outhouses. I used a lot of these from my own yard when I built my railroad. My neighbors inherited a rock pile from a previous homeowner who thought that the best way to dispose of old concrete blocks, pavers, or big rocks was to throw them into the bushes near the driveway. Those bushes are cleared out, now, and we dug out more than enough rocks to do this job credibly. You can buy rocks, of course. Or if you don't want to throw your back out, you might try building a framework of "Bob Treat" rocks and cliffs from lumber, chicken-wire and concrete. Since we had "home-grown" rocks on hand, that's what we worked with.For an in-between approach, see our notes below on building a "tunnel" that comes around behind the waterfall. The tunnel's framework could be pressure-treated wood, and you could still pile enough rocks and dirt on top of the framework to get sedums or whatever goundcovers you use to grow. Rock ShapesIf you're using a rock pile, you're essentially going to be building a 3-dimensional jigsaw puzzle. But the fit doesn't have to be exact. Eventually you'll be pushing dirt and groundcovers into the cracks between your rocks anyway. If your plants survive, any bad gaps will be camouflaged within a year. But I can't help commenting on the shapes of the rocks I have used.North of the Mason Dixon line, it's easy to come across rocks that are more or less round. They won't be stable unless you stack them more or less like cannonballs, which will force a fairly gradual slope. Further south, "found rocks" tend to be more jagged. Both shapes are useful, if you have enough to stack. If you have both, jagged rocks look more in "scale" with your trains, but that's not critical, as long as your final installation looks natural. In Midwest farming country, we have a bunch of limestone that was quarried a century or more ago, used in foundations, and eventually torn out. Of course these pieces were cut into rectangular shapes by the quarries. But the molecular structure of limestone is such that, when it breaks, it almost always breaks on a diagonal, leaving you with a bunch of wedge-shaped pieces. These can take some imagination to use, but it can be done.
Don't feel bad if, when you're done arranging your rocks, it looks like a pile of rocks around a plastic waterfall. Once you've added dirt and the plants have had a chance to settle in, it will all look quite natural. Installing the Waterfall Fixture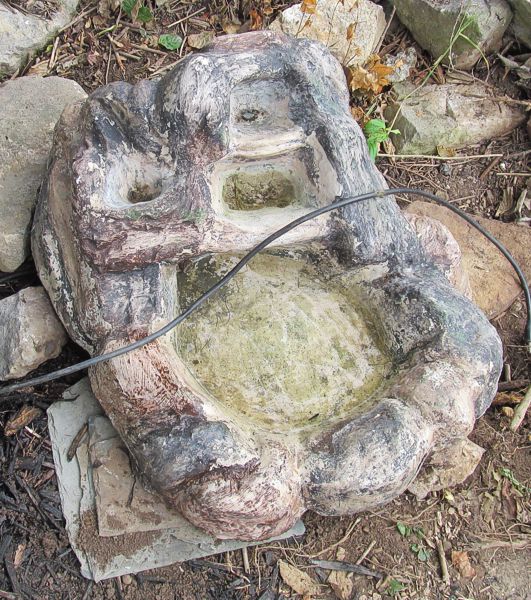 For this project, we had a hillside on which most of the earth hadn't been disturbed for decades, so it was nicely packed down. It wasn't level,though. To get things level, I poured about a quart of water into the bottom "pond" of the fixture, and used that as my "gauge" of whether the fixture was level or not. I then "shimmed" the thing to level using chunks of old roofing slate. Afterward, I set other rocks around the periphery of the base to distribute the pressure. (Here's where the wedge-shape broken limesone pieces can come in handy.) For this project, we had a hillside on which most of the earth hadn't been disturbed for decades, so it was nicely packed down. It wasn't level,though. To get things level, I poured about a quart of water into the bottom "pond" of the fixture, and used that as my "gauge" of whether the fixture was level or not. I then "shimmed" the thing to level using chunks of old roofing slate. Afterward, I set other rocks around the periphery of the base to distribute the pressure. (Here's where the wedge-shape broken limesone pieces can come in handy.)
Installing the RocksWhen choosing which rocks to install first, keep in mind that:
Yes, I know that this may seem contradictory, but the point is to think about structure, not aesthetics, your first layer or two.
Little Kid Warning - Small visitors will climb your rocks, especially if your final arrangement looks like stepping stones to them. For that reason, make sure that each rock is resting solidly on the rock(s) beneath it. Safety trumps "fancy." Installing the DirtOnce you've got the rocks about where you want them, pull the top layer back enough to poke dirt down in all the gaps. You might not be filling EVERY gap, but try to get enough dirt in between the rocks for the roots of your plants to find their way down to the ground. As you work, bring your upper layers back in toward the fixture and try to get the top of the dirt more or less level with the stones. Don't worry about the stones getting dirty (although you might try to watch how much dirt you get into the "pond").Installing the GroundcoverI suggest groundcovers that will look in scale with your trains and not overwhelm the pond. In my case, I have lots of sedums that I can transplant by the handfuls, so that's what I used for this project. I would recommend using plants you know well, so if they start to look bad, you can troubleshoot any problems. Sedums work well in Ohio because they tolerate cold and heat, drought and flood. If you have a very hot dry location, you might have good luck with "chicks and hens" or something similar.
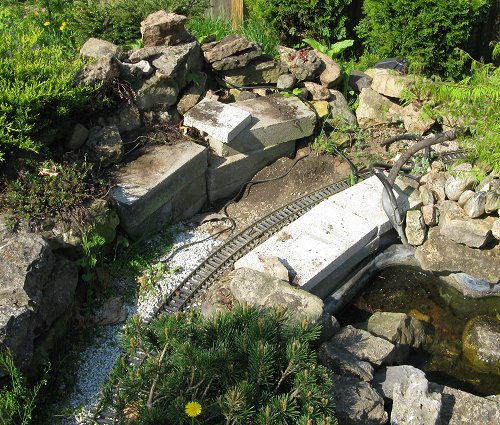
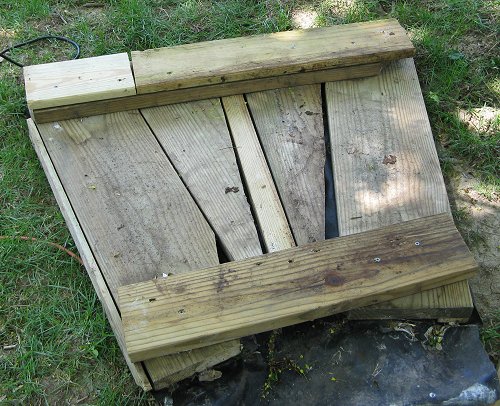
If you have something you'd like to try in your part of the world, go for it. Find out what informal "rock gardeners" use in your neighborhood? Just be careful not to plant something that will take over your yard. As an example, a friend near Sacramento has great luck with Ajuga (bugleweed), though he has to drip-irrigate it to get it to flower. When I tried the same thing in a state with ten times the rainfall, it took over my railroad in a week, and I had to rip it all out. You will want to moisten the groundcover every day for several days, and during any long dry spells after that, just to make certain it has a chance to root. Installing OrnamentalsYou don't have to keep everything in scale with your train, of course. My neighbor doesn't have a train, so I'm thinking that ferns or similar plants might look nice if we can get and keep them growing. That said, I've also recommended that she add three Dwarf Alberta Spruce in the area, to add a little more charm and make the whole area seem more like a miniature natural setting. We'll see how it all comes out.WaitWhatever you plant around your waterfall, it will take a bit of time to fill in. My garden-loving Aunt Margaret used to have a saying about perennials - "The first year they sleep; the second year they creep." Once they do "take," though, they will even spread across the bare rock in ways you can't believe. The best part is how they camouflage the gaps between your stones and help disguise the fiberglass or resin "rocks" lining the watercourse itself. And that natural look is exactly what you want.ConclusionAs you can see, we used no tools besides a shovel and garden hose, and no special skills, just a little time spent leveling the fountain and then putting together a jig-saw puzzle of rocks around it. Yes, you can get lots fancier. But you don't have to.When I tour other folks' railroads, I am always amazed at how creative and inventive their water features are. But I've also learned that even a fairly simple water feature, installed in a naturalistic setting, can add 9-months-of-the-year charm to any back yard. Please let us know about your own projects and any tips or tricks you'd like to share. In the meantime, enjoy the season, and especially enjoy any time you have to spend with your family in the coming months. * One approach to incorporating a big fixture might be to put a "tunnel" behind it, using concrete blocks or pressure-treated wood to frame the thing out. Top it with 2x12" planks topped with thick plastic sheeting for a "roof." Make the structure's overall height come within, say six inches of the fixture's height, then pile rocks and dirt on top of it until the peak of the fixture blends into the slope of the overall "hillside." If you have a very large fixture, you'll have to add some additional framing so the tunnel "portals" don't look too high. Of course, such an approach will add a day or two to your project, but it will be worth it in the long run. I haven't done this exactly, but I did something similar when I rebuilt my tunnel in 2010. Here are some photos that should give you some idea of what I'm talking about.
|
|

|
| 
|
 |
 |
|
 |
 |
Note: Family Garden TrainsTM, Garden Train StoreTM, Big Christmas TrainsTM, BIG Indoor TrainsTM, and BIG Train StoreTM are trademarks of Breakthrough Communications (www.btcomm.com). All information, data, text, and illustrations on this web site are Copyright (c) 1999, 2000, 2001, 2002, 2003, 2004, 2005, 2006, 2007, 2008, 2009, 2010, 2011, 2012, 2013 by Paul D. Race. Reuse or republication without prior written permission is specifically
forbidden.
Family Garden Trains is a participant in the Amazon Services LLC Associates Program, an affiliate advertising program designed to provide a means for sites to earn advertising fees by advertising and linking to amazon.com.
For more information, please contact us

 |  |