| |||
 |
 |  | |
 |  | ||
 |  | ||
 |  | ||
 |  | ||
| |||
|
|
| | |
| | ||
| | ||
| | ||
| | ||

Thomas the Tank Engine® and James the Red Engine® are copyrighted images and registered trademarks of Britt Allcroft (Thomas) Limited


|
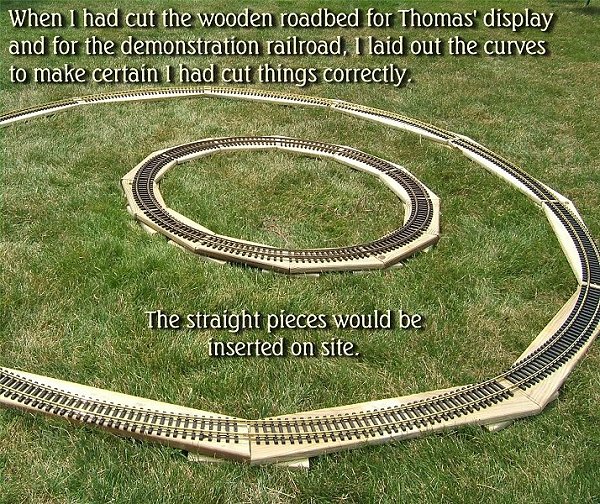
The Thomas ChroniclesBook 2: Building Things to Take with Us In Thomas Chronicles Book 1 we described the invitation from Holden Arboretum to present some "how-to" sessions on Garden Railroading. We were also asked to use Thomas The Tank(r) and his friends to interest the younger visitors.I rewatched some old Thomas videos from the library so I could remember what the settings looked like, and I bought a Thomas, a James, a backup Thomas, and three cars for them to pull.
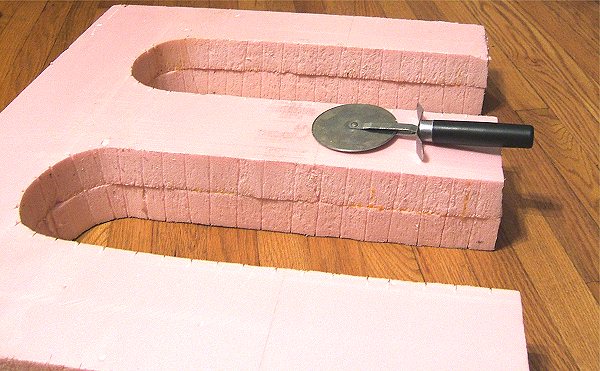
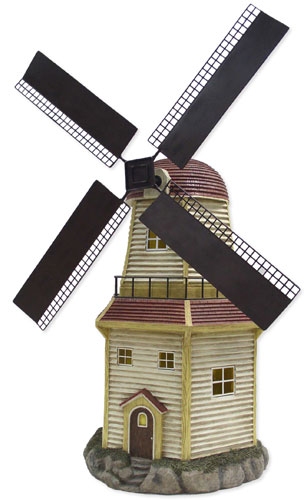
While I was making those preparations, Holden Arboretum contacted me and told me that they had permission from the publisher to use photographs of Thomas and his friends in their marketing materials, but we couldn't build a railroad that looked like the Isle of Sodor. Of course, there was no danger of that, given our time and budget. I did want to represent one "scene," so to speak - the viaduct that Thomas crosses no matter where he's going in all of the earlier videos, the one with a windmill at one end. I got back to WalMart just as they were marking their solar-powered windmill down, so I was able to get one for $30 that looked just as nice as it did when it was $50. To create the viaduct, I thought I'd use an inexpensive material that I've seen other folks use for viaducts with some success - insulation foam. While I was buying lumber for my raised railroad, I also bought a piece of 2"x4'x8' Dow Corning pink insulation foam (Modular 150, if that helps).
I also worried a little about how I was going to cut the shape of a viaduct into the foam. Cutting styrofoam with many tools results in a very hashed-up looking edge. I know lots of folks who have those styrofoam cutters that use a heated wire (like an oversized cheeze slicer), but I didn't have one, or know where to get one big enough for this job quickly. So, while I was at the hardware store getting some more screws for my wooden roadbed, I picked up a new set of saw blades for my hand-held Black & Decker jig saw. I got the ones with the most, tiniest teeth I could buy - it was labeled for "coping" and "scrolling."
Back to the viaduct. I thought that if I made it 5' long, it could fit under one of the 5'-long pieces of track once the roadbed was raised. But then I realized that I wasn't taking the posts into account, nor the "plates" (the connecting pieces under the main roadbed). I'd really only have four feet and some inches to work with. So I cut one of the insulation boards in half lengthwise and started figuring out how to design a 2'x4' viaduct that would get the idea across, without exactly being a faithful copy of the Isle of Sodor's viaduct. For one thing, I wasn't planning on reinforcing the foam like I might for a permanent installation, so I knew I couldn't make the "legs" of the viaduct too long and narrow without risking a break that might be hard to fix three and a half hours away from home. Also, each piece still had a "snap" line running lengthwise, eight inches from the edge. I decided that, if nothing else, I would turn the pieces so that the snap lines weren't across from each other - otherwise there would be a built-in weak spot in the finished structure. If I'm boring you, sorry, but a few days later, lots of folks asked how I built the thing, so I figured I'd better describe it in detail at least once. In the basement I had several coffee cans I was planning on using to store something, although at the moment I don't remember what it was. I took a coffe can, a Sharpie (fine-point permanent marker), a yardstick, and a framing "sqare" to the back yard. I kept repositioning the coffee can and trying to visualize what the final result would look like if I used the can's 6" diameter to measure out four or five cuts in the 2'x4' piece of foam. After several tries, I figured that if I had five posts (four cutouts) that would give me about the right width of posts as well. I also figured out that spacing the 6" arcs five inches apart (OD) would leave enough space on the ends to keep the end posts from being too fragile. So I drew a line that divided the 2'x4' board in half lengthwise. I used the "snap line" on one side to line up the center of the arcs, then I drew a guideline three inches "above" the snap line where the top of each arc should be. I spaced the arcs 5" When I was certain I had marked one properly, I put the "scrolling" blade into my little jig saw and started sawing. To my surprise, it not only cut through smoothly, it also left no mess, except for a small hail of tiny bubbles that the wind quickly blew under my deck for a future home-owner to wonder about. (Later I learned that my dad had used the same sort of blade on insulation foam he had cut to build a mountain on his HO railroad decades earlier, so I'm probably telling most of you something you already know.) In fact, my jig saw tore through the material so fast, I actually messed up a couple of the curves, because I slightly overshot them. Also, although I had my B&D jig saw set to make a 90degree cut, it was a couple degrees off, so the cut was deeper at the back than at the front. If I get around to using the rest of the foam board to make another viaduct, I'll spend more time tweaking things before I start cutting. But I was running out of time to get this ready for Thomas.
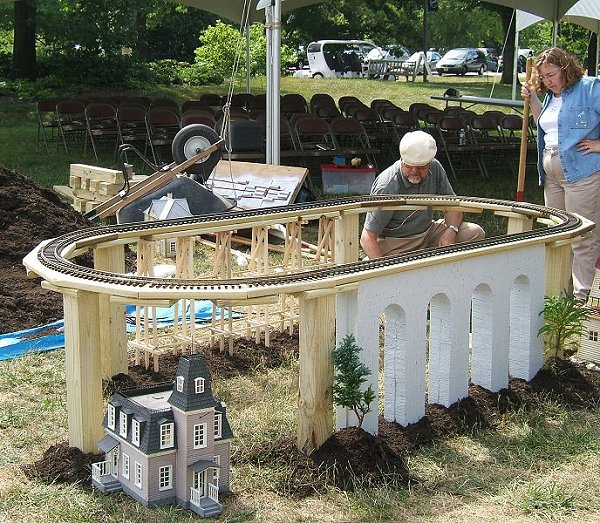
I carved some more-or-less horizontal lines with the pizza cutter, then used a knife tip to make the shorter vertical lines. In retrospect, a wood chisel exactly the width of the horizontal lines I needed would be the right tool to make an indentation without trying to cut through the surface. I then painted the foam with two coats of acrylic house paint (spray paint will make it dissolve). Wanting to get a more weathered look, I did try a little spray paint on when I was sure the foam's surface was sealed. But the foam dissolved slightly at several points where the house paint apparently hadn't quite sealed it. So after it stabilized, I wound up giving the viaduct another smooth coat of house paint. Maybe next time, I'll try to find an acrylic spray to do the "weathering." In the meantime, I had built a small trestle while I was working on my Trestles 101 article. I made it two feet tall, thinking that I would use it under the demo raised railroad after I got it built on Sunday. (Saturday would be a demo of a ground-level railroad.) While I was testing out everything I was taking, I discovered that the fairly powerful power pack I was going to take for Thomas had stopped working between the last time I used it (December, 2006) and now. So I put two starter set power packs (the kind you get when you buy a Large Scale train) into my box of things to take, hoping at least one of them was still working.
I decided to fasten my hastily built trestle under one of the 5' straight pieces across from my hastily carved and painted viaduct. Unfortunately, I couldn't get the trestle to stay fastened under the 5/4"x6" without the "caps" trying to pull themselves out. So I turned the trestle upside down and shot several small wood screws I had bought for another project through the caps into a 4'-long piece of decking, then turned the whole thing right side up. George Kuzner, one my helpers from NOGRS, held the thing in place while I shot down short decking screws from above. Then we used mulch to disguise the fact that the bottom of the trestle was actually hanging in the air by a half-inch.
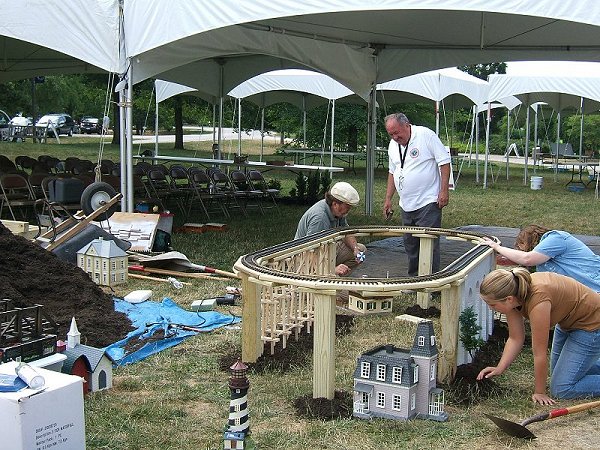
We also used the little AristCraft track screws to screw all of the pieces of the track together. When we had the little railroad mechanically stable, Molly and Shelia set out some buildings George had brought, as well as some plants from the Arboretum, then used mulch liberally to dress up and disguise things. Finally, George found the 3M very fine sanding pad I use to wipe my tracks and got the track nice and clean (on top, anyway) for Thomas. Click here to continue to The Thomas Chronicles Part 3: A Pretty Good Railroad . |

| 
|
|
 |
|  |  |
Note: Family Garden TrainsTM, Garden Train StoreTM, Big Christmas TrainsTM, BIG Indoor TrainsTM, and BIG Train StoreTM are trademarks of Breakthrough Communications (www.btcomm.com). All information, data, text, and illustrations on this web site are Copyright (c) 1999, 2000, 2001, 2002, 2003, 2004, 2005, 2006, 2007, 2008, 2009, 2010, 2011, 2012 by Paul D. Race. Reuse or republication without prior written permission is specifically
forbidden.
Family Garden Trains is a participant in the Amazon Services LLC Associates Program, an affiliate advertising program designed to provide a means for sites to earn advertising fees by advertising and linking to amazon.com.
For more information, please contact us
 I figured if I bought the 2" stuff, it would be wide enough to look decent when I doubled it. The foam piece had "snap lines" running lengthwise at 16", 24" and 32" from the edge. These are 1/4" grooves that you can deepen with a knife to snap the form to a width appropriate for house framing. When I got the foam home, I used a knife to deepen the 24" snap line, broke the board in half, and stuffed it under the deck so it wouldn't blow away before I got back to it.