|
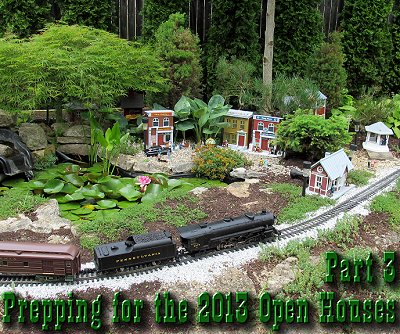
Prepping for the 2013 Open Railroads
Part 3
As we mentioned in our article Prepping for the 2013 Open Railroads Part 1, our New Boston and Donnels Creek RR was on the open railroad tour schedule for the morning of Friday, June 7, 2003. An informal "tour" was also scheduled for and Sunday afternoon, June 9. By the time you see this the convention will be over, but I want to tell "the rest of the story." For one thing, readers tell us that they like the personal nitty-gritty accounts - it reminds them that you don't have to be a rocket scientist to do this.
Part 1 included getting buildings ready, something we started in the cold months.
Part 2 focused on the weeding, track clearing, and getting a few more "little people" ready to set out.
Once we were down to the final few days, I had to focus on things I had to get done, and "let go" a whole bunch of things I wanted very much to get done - which explains the stacks of lumber in my garage and back yard that were going to be structures and trestles . . .
Next on my list was making sure the track was ready to handle my bigger trains, then making sure I had trains and backup trains ready to go.
Checking Track Joints
Yes, I have already cleaned and cleared the track. But on a subsequent weeding binge, I discovered was that some of the little screws that hold the AristoCraft rail joiners to the rail had been working their way loose, and a few were missing altogether. I went around the railroad tightening and, when needed, replacing the screws. This helped electrical continuity as well as the mechanical "smoothness" of the track.
Reconnecting Power
To power their track, Aristo supplies a set of thin little wires with lugs on one end. If you can remember to do it before you ballast, you can screw the lugs under the little screws that hold the tie strips to the rails. I'm not sure that the 22 gauge wire or whatever they use is up to the task of powering bigger trains, but in my case, those leads have long since broken apart anyway.
Some time back, I had attached lengths of 18-gauge brown "lamp cord" to lugs and fastened them to the Aristo track on both loops. In fact, I've been using brown lamp cord for jumper lines since about 2003. I buy it on a "spool" from Radio Shack. So far, not one section has broken down. The brown cord helps me keep it straight from the black cord of my lighting systems. The "bead" along one edge helps me keep the polarity straight.
The lamp cord and lugs on the north (smaller) loop were still in good shape. The feed to the mainline, however, had been kicked apart (almost certainly by me). So I dug out some 16 gauge brown lamp wire and attached that to the mainline. Then I tested my 3-amp power-supply and separate controller setup with a small locomotive to make sure the mainline was getting a good connection all the way around. It was. One part of the smaller north loop seemed like it could use a jumper, but it would handle small trains without it, so I let it go for now.
 Re-ballasting Re-ballasting
On real railroads in our part of the world, ballast is a long pile of crushed rocks that provide a stable base for the railroad ties. On some garden railroads (including about a third of mine), the ballast still serves a purpose - even though we use gravel instead of rocks, our ballast makes it easier to keep the track level over unstable or uneven roadbed bases.
Since we broke ground fourteen years ago, I have used crushed granite chicken and turkey grit for my ballast. It looks reasonably authentic, and - unlike the crushed limestone gravel I could buy locally - it doesn't dissolve in our somewhat acid rain. Gran-I-Grit, the brand I have always used, makes several grades - starter, grower, developer-layer, turkey, and turkey finisher. The finer grades are really only good for cosmetic toppings; when I've had a choice, I have bought the turkey grades. Sadly, in the last fourteen years, I think I must have bought every last bag of the three largest grades in the tri-county area, and none of the stores I have bought from have bothered to restock. Nor do they understand why I'd rather pay $8 for a 40 pound bag of crushed granite than $5 for a 5-pound bag of crushed limestone (which I can get for $5 a trash can load at the gravel pit).
I was able to track down one bag of Developer layer (the smallest useful grade). Also, I still had two and a half bags of the same left over from the last time I did a re-ballast, so I wound up "stretching" them in ways I would not have done by choice.
Still, once the ballasting was done, the track was a lot smoother and more level. I got out one of my Aristo heavyweight passenger cars - the longest cars I own, and pushed it around the mainline carefully to check clearance. I moved a couple rocks a bit farther back from the track, and clipped some Blue Rug Juniper that had shot out some extra stems since the last time I clipped it (a week ago).
The track is not as level as if I had all the ballast I wanted, but it was smooth enough to imagine running big trains.
 Mulching Mulching
Back when we first moved to our "big house in the country" and realized that we would always have "blank spots" on our flowerbeds, we realized that mulch makes things look more planned and more complete, even when they aren't. Mulching took me an entire evening, plus an extra hour or so. But it made all the difference in the world. It also let me hide some of the garden lighting wires that keep working their way up out of the soil.
Later, during Friday's open house, a visitor read the label on an unopened mulch bag and said, "So you like this Black Satin mulch, huh?" I said, "I like whatever Home Depot puts on sale on Memorial Day weekend." It was the first time I had used a dark mulch. Though I didn't pick the color, really, I have to confess that it did make a nice appearance. It also made it very easy to see weed seedlings that I missed or which were just now coming up.
Buildings
Now that we've decided what business each of the trashbashed storefronts will represent, I printed the graphics and started putting them on. It didn't take long to put on the new ones. I didn't get to all of the old ones, though.
Then we had to decide where the buildings would go and what figures and accessories to use on them. Many of these buildings have been outside for years, but things like a fir tree going from three to fifteen feet in diameter have caused them to migrate from one part of the railroad to another. For this open house, several buildings that are usually in New Boston (near the pond) found their way to Donnels Creek. That's the ground-level town that used to have a more Western flavor before three Piko clapboard storefronts that a friend assembled without painting started deteriorating and I found them a new home.
Once we decided where each group of buildings would go, I knew I wouldn't have time to set them up on concrete pavers as I usually do. So I used a trick I use on display railroads and my own Christmas-themed open hourse. I picked up three bags of pea gravel and spread that around to represent the roads and to provide a "base" that could be easily adjusted to level the structures.
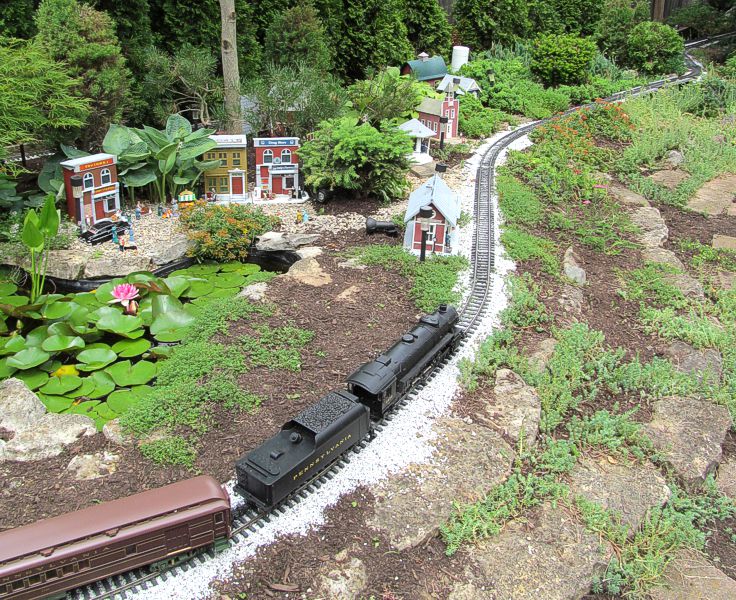
The following photo shows Donnels Creek a few days later, after figures were added and trains were running, but you get the general idea.
Going Loco Redux
If you've been reading for a very long time, you know that I have three Lionel Atlantics, and several Aristo steamers. Why three Atlantics? Well, I got the first one when I was a young parent of three consulting in New Orleans, and saving every penny, since I had no way of knowing how long the contract would last.  As a Pennsy fan, I had been wanting one of these PRR-inspired locomotives, but couldn't justify paying the prices people were asking. In a New Orleans hobby shop, I saw a box of parts for $60 and took a chance on it. Eventually, I got it running and hooked it up to an Aristo tender. (The photo at the right shows it before it had the running gear replaced.) It was my "premier" locomotive for several years, but, being cobbled together, requires more maintenance than I usually have time to give it. As a Pennsy fan, I had been wanting one of these PRR-inspired locomotives, but couldn't justify paying the prices people were asking. In a New Orleans hobby shop, I saw a box of parts for $60 and took a chance on it. Eventually, I got it running and hooked it up to an Aristo tender. (The photo at the right shows it before it had the running gear replaced.) It was my "premier" locomotive for several years, but, being cobbled together, requires more maintenance than I usually have time to give it.
Liking the Atlantic, but wishing it was more reliable, I subsequently bought two others when I saw them for a very low price - one NYC and one PRR. But I confess, I liked the old one better and mostly left the newer two locomotives in the box until recently.
 In testing out my rolling stock for the open houses, I discovered that my cobbled-together Atlantic was missing a screw in the valve gear, so I'll have to order another part. Neither of the other two Atlantics were running great on my still-not-quite perfect mainline, but the NYC one ran better than the PRR one for me. So I put an Aristo tender tender on the back of it (you can make the hook you need by turning an LGB-style coupler upside down). I figured I could use it on either line, although it ran better on the short line, which is more level at the moment. In testing out my rolling stock for the open houses, I discovered that my cobbled-together Atlantic was missing a screw in the valve gear, so I'll have to order another part. Neither of the other two Atlantics were running great on my still-not-quite perfect mainline, but the NYC one ran better than the PRR one for me. So I put an Aristo tender tender on the back of it (you can make the hook you need by turning an LGB-style coupler upside down). I figured I could use it on either line, although it ran better on the short line, which is more level at the moment.
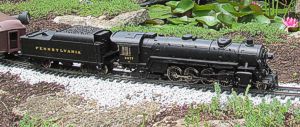 Since those purchases, I've bought a used Aristo Mikado, which runs like a Swiss watch. Because of its reliability, it is my first choice. Since those purchases, I've bought a used Aristo Mikado, which runs like a Swiss watch. Because of its reliability, it is my first choice.
In the meantime, I was still lining up backups and backups for backups - because, on an open railroad, anything that can possibly go wrong will. I have a couple of very used Aristo 0-4-0s, a like-new Bachmann 0-4-0, and a few other odds and ends like Bachmann 4-6-0s that I've picked up over the years.
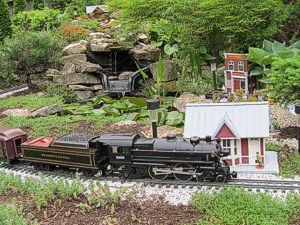
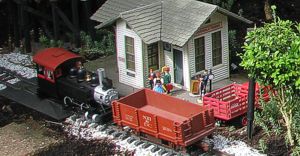 While gathering cars to run on the railroads, I came across the Bachmann 0-4-0T again, and thought, "why not?" As it turned out, it looked so nice and ran so well that I wound up using it on the lower, smaller track. This was the version with the metal running gear. It's not a Spectrum, but it has definitely been reengineered since the original starter kit version. While gathering cars to run on the railroads, I came across the Bachmann 0-4-0T again, and thought, "why not?" As it turned out, it looked so nice and ran so well that I wound up using it on the lower, smaller track. This was the version with the metal running gear. It's not a Spectrum, but it has definitely been reengineered since the original starter kit version.
For this week's open houses I planned to have two electrically-operated trains running on the main railroad. I also set up a loop of track for my Lionel Thomas, though I didn't expect to get that train out, since there weren't going to be that many kids on the tour.
I also have two battery-powered, remote-control Lionel trains that run on G gauge track - a Polar Express and a Santa Fe. For our Christmas-themed open railroads, I set these up for the kids to run. So I planned to set one out on our old swimming pool deck.
Refreshments
Since the open house was going to be in the morning, we originally figured we'd have things like cookies and coffee. Shelia made lots of cookies, plus coffee, lemonade, and tea. Then we learned that the bus that came our way wouldn't arrive at 10:15 or later. So folks who got on the bus at 7:30 might be getting hungry for something else.
Now, the last time we had an open railroad during a national convention, we had about 20 visitors. What would we get this time? Surely no more than fifty or sixty.
I figured if the cookies ran out, we could always do popcorn, using the popcorn popper we bought for our Christmas-themed open railroads.
Figures
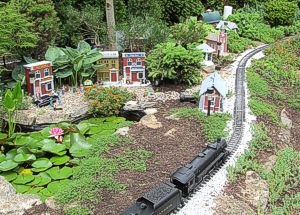
Since we've now done five Christmas-themed open railroads in a row, we've accumulated lots of Lemax and Lemax-like resin figures standing in snow drifts. The morning of the open railroad, I helped Molly get out three different containers that had our various collections of little people, and Molly tried to set out the figures without snow banks. When we had a figure we liked using in spite of its snow bank, Molly tried to camouflage its base in the gravel when she could. A few of the forty or so figures Molly set out are visible in the following photo of New Boston's "shopping district." (Click to see a bigger photo.)
Early Arrivals
About 7:30 AM, before Molly had even set out all the figures or I had all the trains on the track, people started arriving. I got the trains running, and more people arrived. Although the bus was coming later, lots of folks who had their own cars were trying to figure out how to get to every open railroad in the club (an impossibility on the bus.) Because we were one of the farthest railroads from the convention center, a good number of folks got up very early and drove out our way so they could work their way back.
At 8:00, by the time I put the open railroad signs out, we had already entertained six visitors. By 9:00, we had entertained sixty, and I was told that the bus on its way was pretty full.
Shelia baked more cookies. Then Molly got out the popcorn popper and realized we didn't have enough supplies. So Shelia made a supply run and Molly started popping up the corn we had. When Shelia got home, she made even more cookies. But to see how the open railroad went, you'll have to wait until our next report.
Conclusion
Once again, these accounts aren't exactly "how-to" articles, but we hope you get some encouragement or ideas from them.
Ironically, several folks who planned to come out had last-minute conflicts or some such, so we didn't see everyone we hoped to, but we were very glad to see the folks we did. If you ever think you might be coming near Springfield, Ohio, let us know and if there's any danger of running trains, we'll let you know.
If nothing else, it's proof that a family working around day jobs and a limited budget can still assemble and maintain a garden railroad that is a pleasure to run and watch year after year after year.
And maybe that's the best "takeaway" we can offer.
To return to the first or second article in this series:
In the meantime, enjoy your hobbies, and especially enjoy any time you can spend with your family in the coming season. Paul
 Return to New Boston and Donnels Creek RR Page Return to New Boston and Donnels Creek RR Page
|


|


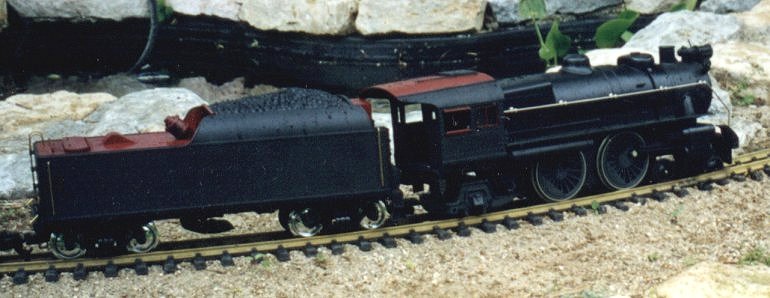 As a Pennsy fan, I had been wanting one of these PRR-inspired locomotives, but couldn't justify paying the prices people were asking. In a New Orleans hobby shop, I saw a box of parts for $60 and took a chance on it. Eventually, I got it running and hooked it up to an Aristo tender. (The photo at the right shows it before it had the running gear replaced.) It was my "premier" locomotive for several years, but, being cobbled together, requires more maintenance than I usually have time to give it.
 In testing out my rolling stock for the open houses, I discovered that my cobbled-together Atlantic was missing a screw in the valve gear, so I'll have to order another part. Neither of the other two Atlantics were running great on my still-not-quite perfect mainline, but the NYC one ran better than the PRR one for me. So I put an Aristo tender tender on the back of it (you can make the hook you need by turning an LGB-style coupler upside down). I figured I could use it on either line, although it ran better on the short line, which is more level at the moment.
 Since those purchases, I've bought a used Aristo Mikado, which runs like a Swiss watch. Because of its reliability, it is my first choice.
 While gathering cars to run on the railroads, I came across the Bachmann 0-4-0T again, and thought, "why not?" As it turned out, it looked so nice and ran so well that I wound up using it on the lower, smaller track. This was the version with the metal running gear. It's not a Spectrum, but it has definitely been reengineered since the original starter kit version.