| |||
 |
 |  | |
 |  | ||
 |  | ||
 |  | ||
 |  | ||
| |||
|
|
| | |
| | ||
| | ||
| | ||
| | ||


|
About the New Boston and Donnels CreekThe New Boston and Donnels Creek RR models a fictitious western Ohio shortline with connections to PRR (near the western edge of its mainline, so some funky combinations of gear show up not only on the shortline but on the PRR mainline).I started with mostly narrow-gauge gear, which was all that was available inexpensively for a long time, but have phased out most of it except for some D&RGW I keep for my daughter (the D&RGW fan) to run. Information about the locomotives and the other rolling stock we tried initially is on the Motive Power and Rolling Stock pages respectively. Climate - We are in botanical zone 5.5 which means it's "temperate" with an occasional really good freeze. So I use mostly hardy and perennial plants on the RR. About Our Family - Paul was instilled with a love of trains by his father, whose own father drove for the Nickel Plate and other midwestern railroads during the Great Depression. Paul and Shelia have three daughters who grew up with Paul's trains. They're grown and have moved away, but they often come back to help out with our open railroads, etc. Paul, in the meantime, was a professional technical writer from 1980 to 2020, so when Paul couldn't work on the railroad, he often wrote about it, keeping a detailed chronical of his mistakes as well as his progress. In fact, our web page's first name was NewBostonandDonnelsCreek.com, but we added so much other information that we decided it would make more sense to have a name with broader appeal. So we share most general garden railroading information under the FamilyGardenTrains.com name. And we use the "New Boston and Donnels Creek" pages as a sort of blog for our own family railroading efforts. In addition, Paul learned that much of what the "experts" told him in the 1980s and 1990s were wrong. As an experienced researcher and fact-checker, Paul started writing articles to "put things right." Ironically, our early articles were so popular that they've been plagairized many times, and another early web site owner tried to name his page "Family Garden Trains." Since those days, we have added hundreds of articles to our "Primer" pages. Though we touch on most aspects of garden railroading, most of what we post is for the sake of new and intermediate garden railroaders - information that can be hard to find on the pages that have Interations - Our first "outdoor railroad" was a loop of track we laid in the side yard for a few days so we could run our battery-powered "Big Hauler" on it. And we did accumulate some track-powered trains as well that came out at Christmas. But, of course, Paul had bigger and more permanent dreams.
The following section and the next 36 articles deal chiefly with the first iteration, which was built according to the most recommended approaches of the first-generation experts and writers. Recommendations I have learned to avoid since. But there may still be useful information, or you may enjoy learning about my mistakes, so feel free to keep reading. | ||
 |
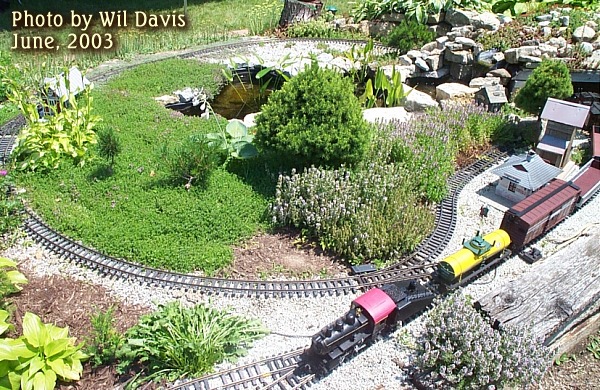
 Overall Construction - I have a vinyl pond, RR ties lining the back to give some height and to offset the drop in the "natural" terrain. The front is basically a terraced rock garden (using time-worn Ohio farmland techniques and time-worn Ohio limestone boulders for the most part). More details about the pond and early landscaping are provided on the Landscaping and Pond Construction - 1998 page.
Time Invested - I broke ground for the current RR in the summer of 1998. I then worked several hours a week on the RR in the fall of 1998 and the summer of 1999, thanks to a job in which I worked out of the house and could set my own hours. Work on the RR was basically halted in the fall of 1999, when I broke my ankle and couldn't do a thing for months on end. Construction resumed slightly in the early spring of 2000, but stopped again (for the most part) in May, when I got a job that required a commute of an hour each way.
In March of 2002, a neighbor's trees destroyed much of my work on the north loop and required significant rework on the south loop as well. Nevertheless, with a great deal of hard work (and patience on the part of my wife) I was able to get the north loop finished enough to run trains for the Convention. So what you see in the 2002 photos represents about 24 months' worth of part-time work and a few more months' worth of sneaking in an hour here or there every other week. Since then, work has included finishing buildings adding and trimming plants, and some more serious maintenance, such as pulling up track and pouring concrete underneath sections that have been plagued by moles. I did one section in 2005, and it was a success, so I did another, longer section in April of 2006. In late 2008, I pulled up my first loop of track, which had gotten very uneven due to frost heave aggravated by burrowing animals, and was overly prone to weeds growing up through the track. I dug a ditch, and poured concrete underneath that. For details on that operation, and why it was necessary, check out our article on Refurbishing Garden Railroad Roadbed. | ||
 Size, Etc. - Overall, the area that is "staked out" is about 60' by 14.' The mainline is a "dogbone" shape (more or less) with about a 120' of trackage. A smaller oval with narrower curves runs on the ground beneath the north loop of the dogbone. A few sidings, including a passing siding, and a siding that connects the two loops are in place, but seldom used, since time for switching operations is very limited. Maps and details are located on the Layout So Far page. Size, Etc. - Overall, the area that is "staked out" is about 60' by 14.' The mainline is a "dogbone" shape (more or less) with about a 120' of trackage. A smaller oval with narrower curves runs on the ground beneath the north loop of the dogbone. A few sidings, including a passing siding, and a siding that connects the two loops are in place, but seldom used, since time for switching operations is very limited. Maps and details are located on the Layout So Far page.
Track is mostly Aristocraft Euro that I got used or on sale. I like the Aristo because of the screw-on rail connectors that make for a better electrical connnection. The screws under the ties into the brass track make for very easy jumper connections, though I haven't needed many jumpers. If I was starting now I might use Aristo US track, but since 95% is the other kind, I'll just stick with that. Minimum radius curve on the mainline is 60" (Aristo 10-foot diameter curves), on the shortline is 30" (Aristo 5-foot diameter curves).
Next Steps: To proceed to the next page in this series, Landscaping and Pond Construction, 1998-1999, click here, To return to the New Boston and Donnels Creek Index Page, click here To return to the Family Garden Trains Home Page, click here | &nspb; |
Reuse or republication without prior written permission is specifically forbidden. Family Garden Trains is a participant in the Amazon Services LLC Associates Program, an affiliate advertising program designed to provide a means for sites to earn advertising fees by advertising and linking to amazon.com. For more information, please contact us |
 |  |
| Visit related pages and affiliated sites: | |||||
| - Trains and Hobbies - | |||||
 |  |
|
 |
|  |
 |

|

|  |
|

|
| - Christmas Memories and Collectibles - | |||||
 |

|
 |

|

|
|
| - Family Activities and Crafts - | |||||
 |

|

|

|

|

|
| - Music - | |||||

|
 |
 |

|

|

|

|

|

|

|

|

|

|

|

|

|

|

|