|
|
If you like trains or gardens, or both, garden railroading is an exciting hobby with many different ways to have fun. If you already know something about trains or gardens, or both, you may already have a "head start." But you should also know that you may need additional skills to get the most enjoyment out of your new hobby. That is why Family Garden Trains has spent so much time organizing articles to help beginning garden railroaders get started, whether you want to start big or small, whatever the size of your budget. This page is simply an overview of the options available to you and the reasons you might especially consider one or the other. I've also seen what works in the short term, and what works best for the long term, and can give some hints that may save you many hours of maintenance or rework in the future.
The first part of planning a garden railroad is choosing a kind of railroad to emulate and a track plan that will let you operate your railroad the way you want. This article doesn't talk about that, though these topics are mentioned in several of Family Garden Trains' other Primer articles.
The second part of planning a garden railroad is choosing whether you want to start with a few easy steps to get something started now (and maybe have to rework some later) or whether you want to start with something fairly elaborate now. Choices include:
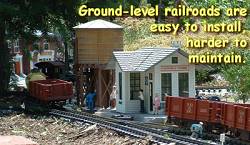
- Starting with a simple ground-level railroad that you could upgrade, raise, or improve later. This is best if you know you will be moving within a few years anyway, if your budget is limited, or if you know you won't get around to getting a more elaborate railroad installed for a couple of years anyway. The instructions in the "One Day Railroad" article will give you many ideas for what this sort of project.
 And starting your railroad this way doesn't necessarily mean that you have to rip the whole thing out if you want a raised railroad in the same place later. One way of raising a ground-level railroad is described in the article "Raising a Ground-Level Railroad." And starting your railroad this way doesn't necessarily mean that you have to rip the whole thing out if you want a raised railroad in the same place later. One way of raising a ground-level railroad is described in the article "Raising a Ground-Level Railroad."
On the other hand, if you are sure you want a ground-level railroad, and you're sure it is going to stay where it is, you mibht consider digging a 4"-6" trench underneath the proposed roadbed, then filling it with concrete. This will seriously slow down weeds and reduce maintenance overall for years to come. Our article "Refurbishing Garden Railroad Roadbed" describes a project in which I replaced a gravel-only roadbed with concrete - one thing I learned was that using concrete in the first place would have saved me a lot of work later.
- Starting with a trial ground-level railroad someplace besides where you plan to build a more elaborate railroad later. This is a great option if you have the space, since you can leave your "starter" railroad in place to enjoy while the rest of your yard is torn up with the larger construction projects. The "Building a Garden Railroad on a Budget" article will give you some ideas for such a phased-in project.
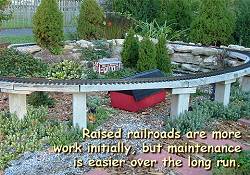 Beginning with a simple, raised railroad, such as the 2x6-based railroad described in the Building a Simple Raised Railroad article. This lumber-intensive approach gives you many of the advantages of a raised railroad right away (including lower maintenance and better view of the trains) without requiring that you have your landscaping in place before you run your trains. Again, you can raise a ground-level railroad, but if you know from the start that you're going to have a raised railroad anyway, and you have at least rudimentary skills, a circular saw, and a power screwdriver, this might be the way to go. Beginning with a simple, raised railroad, such as the 2x6-based railroad described in the Building a Simple Raised Railroad article. This lumber-intensive approach gives you many of the advantages of a raised railroad right away (including lower maintenance and better view of the trains) without requiring that you have your landscaping in place before you run your trains. Again, you can raise a ground-level railroad, but if you know from the start that you're going to have a raised railroad anyway, and you have at least rudimentary skills, a circular saw, and a power screwdriver, this might be the way to go.
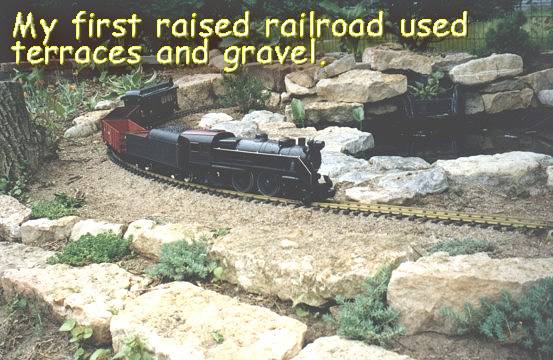
 Note: One common alternative to installing a lumber-based raised roadbed, then backfilling, is to do do the landscaping first, then treat a "terraced" area as the new "ground level." That's how I built the first loop of my own New Boston and Donnels Creek railroad. The downside of that method is that the ground may continue to settle for years, so you're replenishing ballast and otherwise making adjustments to the roadbed far more frequently than you would for a lumber-based roadbed. In my railroad, voles, moles, and chipmunks also liked the soft soil and kept undermining my roadbed; so I finally had to remove the track and ballast in several sections, pour a concrete "footer," then reinstall the right-of-way over it to solve the problem. (See "Refurbishing Garden Railroad Roadbed" for details on that procedure.) Note: One common alternative to installing a lumber-based raised roadbed, then backfilling, is to do do the landscaping first, then treat a "terraced" area as the new "ground level." That's how I built the first loop of my own New Boston and Donnels Creek railroad. The downside of that method is that the ground may continue to settle for years, so you're replenishing ballast and otherwise making adjustments to the roadbed far more frequently than you would for a lumber-based roadbed. In my railroad, voles, moles, and chipmunks also liked the soft soil and kept undermining my roadbed; so I finally had to remove the track and ballast in several sections, pour a concrete "footer," then reinstall the right-of-way over it to solve the problem. (See "Refurbishing Garden Railroad Roadbed" for details on that procedure.)
- Considering a
 Raised Platform Railroad. Using the same materials and methods you would use to build any other permanent backyard improvement (such as a patio deck), you can build a low-maintenance outdoor railroad that is raised high enough to keep you from wearing out your back and knees and flexible enough to let you tweak your track plan after the major construction is done. Best of all, it won't require periodic refurbishment or rebuilding as most other approaches do. Raised Platform Railroad. Using the same materials and methods you would use to build any other permanent backyard improvement (such as a patio deck), you can build a low-maintenance outdoor railroad that is raised high enough to keep you from wearing out your back and knees and flexible enough to let you tweak your track plan after the major construction is done. Best of all, it won't require periodic refurbishment or rebuilding as most other approaches do.
Note: After 40 years maintaining my own railroads and observing other folks', this is the approach I would recommend for anyone planning to operate their garden railroad for more than five years.
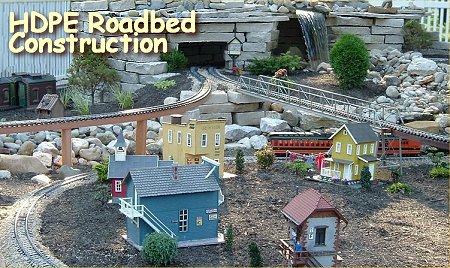
 Jumping right into an elaborate raised railroad, with multiple levels, bridges, etc. A 2x6 lumber-based method can be used for this (that was the "default" construction method for display railroads for several decades). But if you want the ultimate control over your design, as well as the ability to tweak your curves and grades easily "on the fly," consider using the "HDPE Flexible Roadbed" method. Jumping right into an elaborate raised railroad, with multiple levels, bridges, etc. A 2x6 lumber-based method can be used for this (that was the "default" construction method for display railroads for several decades). But if you want the ultimate control over your design, as well as the ability to tweak your curves and grades easily "on the fly," consider using the "HDPE Flexible Roadbed" method.
|
Considerations
Kind of Construction | Budget | Years You Expect to Live Here | Amount of Space | Ease of Installation | Maintenance Requirement | Suggested Reading |
| Simple Ground-Level Railroad you might raise or extend later | Relatively inexpensive: track, landscaping fabric, fine gravel, mulch, a few dwarf conifers and miniature thymes or sedums | Four or Fewer | Limited space or wanting to start small | Relatively easy | Relatively high, unless you use concrete for the base of the roadbed. | "One Day Railroad"
"Raising a Ground-Level Railroad." "Refurbishing Garden Railroad Roadbed" |
| "Trial" Ground-Level Railroad you install somewhere besides the location of your planned empire | Relatively inexpensive at first: track, landscaping fabric, fine gravel, mulch, a few dwarf conifers and miniature thymes or sedums | Four or more | Enough space to have a trial railroad running while the planned railroad is under construction. | Relatively easy | Relatively high for now |
"One Day Railroad"
"Building a Garden Railroad on a Budget" |
| Simple Raised Railroad | Add cost of posts and stringers (lumber), as well as the backfill, landscaping stones, etc. that you will eventually use to finish out the railroad's appearance. | Four or more | Limited space (below 20'x15') or wanting to start small | Slightly more skill | Relatively low once established | Building a Simple Raised Railroad |
| Raised Platform Railroad | Add the cost of posts, joists, frame, decking, a vinyl liner, and any gravel, dirt, rocks, and plants you want to place around the track. | Four to Forty | Any size from 6'x8' up | Moderate skill with power tools | Very low once established | Building a Raised Platform Railroad |
| Retaining Wall and Dirt Railroad | Add the cost of retaining wall blocks and hauled-in dirt, as well as any gravel, dirt, rocks, and plants you want to place around the track. | Four to fifteen in desert areas, four to ten in areas of medium or heavy rainfall | Any size from 6'x8' up | Mostly moving rocks and dirt into place | Weed and potential washout issues in areas with moderate or heavy rainfall | This approach was recommended in many early Garden Railroading magazines and publications. We have no articles because we no longer recommend it for most of our readers. |
| Elaborate Raised Railroad | To the landscaping expenses listed above, add the cost of extra track, extra lumber or HDPE or composite lumber. | Six or more | Minimum of 20'x15' for starters | Slightly more skill | Relatively low once established | "HDPE Flexible Roadbed" |
A few dollars' and minutes' worth of weed protection now will save you many hours of backbreaking labor later.
. . . if you plan to build a mechanically sound railroad anyway, it doesn't take that much more time (and very little additional money) to build an electrically sound railroad at the same time.
Building a railroad that is low-maintenance and easier on your back now will . . . benefit your physical health and . . . extend the number of years you can enjoy the hobby. |
Other Considerations
Although all of the methods described on this page and in the links below have been used with success, I have to confess that I have observed how railroads and railroaders hold up over the last two decades, and have formed some opinions over which kinds of railroads are most likely to provide the most enjoyment over the long haul. Some of my (admittedly idiosyncratic) "rules" to build by include:
- Practice ruthless weed prevention, whatever method you use. One advantage of 2"x6" roadbed construction is that it makes it just about impossible for weeds to disrupt railroad operations. If you use some other method of construction, be sure to be generous with heavy-duty landscaping fabric under and adjacent to the roadbed, and in any areas that you don't have planted at the moment, even around the trunks of your dwarf conifers, etc. A few dollars' and minutes' worth of weed protection now will save you many hours of backbreaking labor later.
Note: Longtime Large Scale railroader Diane Mann just reminded me that a layer of newspapers under the landscaping cloth will help keep seeds and roots that are lingering in the soil from working their way through the cloth. By the time the newspaper rots through, anything nasty left in the ground under the cloth should be taken care of.
- Provide a solid footing for your track, especially for permanent or semi-permanent railroads. This is especially true if you use code 250 or smaller track, but it's important even if you use the big, heavy code 332 track that comes with AristoCraft or LGB starter sets. Though you can't take precautions against every conceivable disaster, it's disheartening to come out on the one nice day you have to run trains that week only to find that shifting soil, washouts, heavy rain, small animals, large animals, or clumsy toddlers have damaged the track's support to the point where you have to reballast - at least - before you can run any trains that day. The more I see the more I become convinced that getting 2x6 roadbed under your track - even if it's a so-called ground-level railroad - will make your life easier in the long run. If you don't use this method, consider using some other method (such as concrete footings) to achieve a rugged base for your railroad.
- Make your track connections bullet-proof, mechanically and electrically. Yes, I know that some folks say that a battery-powered railroad is more reliable than a track-powered railroad, but don't get drawn into that argument until you've set out at least a temporary railroad and tried things out for yourself. The fact is that if you plan to build a mechanically sound railroad anyway, it doesn't take that much more time (and very little additional money) to build an electrically sound railroad at the same time. I always recommend that you use a track that has screw-on rail joiners that produce a good mechanical and electrical connection at the same time. AristoCraft track (no longer made) also had screw-on connectors underneath that make it very simple to run jumper wires between track pieces, or at least to the farthest reaches of the railroad. Some track manufacturers who don't use screw-on track joiners sell a conductive paste that helps your connectivity for several years, but it does fail eventually, and you find yourself running jumper wires anyway, if not replacing all of your railjoiners with aftermarket products (an expensive and time-consuming proposition). Even the AristoCraft rail joiners have been known to fail after ten years or so, but it's a lot simpler to visually inspect your rail joiners and to replace one here and there occasionally than it is to replace every joiner on the railroad at the same time.
In short, it only takes a a few more minutes per yard of track to build reliability and electrical backup into your railroad from the start, but it could save you countless hours of rework a few years down the line.
- Consider your own physical needs, not only now, but ten or fifteen years from now. When I built my first, temporary ground-level garden railroad in 1998, I was 46 years old, and it was no big deal to crawl around on the ground weeding, blowing dust out of turnouts, etc. Now that I'm a tad older (you do the math), I find it painful to spend too much time weeding even the raised parts of my railroad. Just after I wrote my article on Accessible Garden Railroads, I ran into a couple only a few years older than I who had been garden railroading pioneers in our area. They were selling off equipment because they could not physically bend over to run trains on their ground-level railroad any more, much less keep up with weeding and maintenance. Two of the other early ground-level railroads I have admired are now maintained by friends or relatives of the owners for the same reason. Building a railroad that is low-maintenance and easier on your back now will not only benefit your physical health and your enjoyment of the hobby for the next decade or three; it will also extend the number of years you can enjoy the hobby.
An engineering friend used to say, "You can have it quick, you can have it cheap, and you can have it good. Pick any two." I think he meant that if you went for "quick" and "cheap" you wouldn't get "good," and so on. That doesn't mean you should wait until you can afford your ultimate railroad before you put anything in the back yard at all. But it should remind would-be garden railroaders not to take shortcuts now that will cause big problems later on.
Reading my checklists, you might think that I have no maintenance issues beyond electrical connectivity, weeds growing up between the rails, and roadbed integrity. That's not true; I have occasional lighting or pond maintenance issues, and so on. But those don't hinder my ability to run trains, and, as a result, they don't reduce my enjoyment of my railroad as much as those problems that keep my trains from running. If I can run trains while I'm fiddling with the pond or the buildings, that's great. But if I can't run trains, the rest seems inconsequential. And I doubt that that I'm the only garden railroader who feels that way.
In fact, I've observed another correlation: garden railroaders who can run trains with a minimum of hassle tend to keep more active in the hobby and to invite more people into the "club." So I'm not telling you just what's "good for you," but also what's going to be good for your railroad and for the hobby in the long run.
|  |
| |
Garden Railroad Construction Links
To summarize, there are about as many ways to build a garden railroad as there are garden railroaders, but you owe it to yourself to pick a method and outcome that suits your short-term and long-term expectations for your railroad. The following links should help you decide what seems "doable" for you.
As always, please contact
us with questions, corrections, additions, suggestions, or for any other reason at all.
Best of luck, all,
Paul D. Race
|
|
Reader Feedack
Dick Friedman, of Greater Sacramento, CA, writes:
I like your "rules," Paul. Especially about weed
control. I put asphalt roof shingles under the rr.
Only mistake was to put half width under the track,
instead of an whole piece.
I agree about .250. I use it (aluminum) and it conducts electricity fine. The joints are a problem that I solved with clamps. It's also not as robust as larger brass stock. I had to reinforce mine with cedar boards.
P.S. Dick lives in a desert. You might have to use ground-rated pressure-treated boards in other parts of the county. Also, though I love aluminum track for a number of reasons, it doesn't seem to work for everybody, so try some before you invest a fortune. - Paul
|
| Home Pages |
Reading Index Pages | Buyer's Guide Pages |

| 
|
 |
 |
 |
 |
 |
Note: Family Garden Trains?, Garden Train Store?, Big Christmas Trains?, BIG Indoor Trains?, and BIG Train Store? are trademarks of Breakthrough Communications (www.btcomm.com). All information, data, text, and illustrations on this web site are Copyright (c) 1999, 2000, 2001, 2002, 2003, 2004, 2005, 2006, 2007, 2008, 2009, 2010, 2011, 2012, 2013, 2014, 2015, 2016, 2017, 2018 by Paul D. Race. Reuse or republication without prior written permission is specifically
forbidden.
Family Garden Trains is a participant in the Amazon Services LLC Associates Program, an affiliate advertising program designed to provide a means for sites to earn advertising fees by advertising and linking to amazon.com.
For more information, please contact
us