| |||
 |
 |  | |
 |  | ||
 |
 | ||
 |  | ||
 |  | ||
| |||
|
|
| | |
| | ||
|
|
| ||
| | ||
| | ||
Written by Paul D. Race for Family Garden Trains(tm)
 |
 |
Building a Raised Platform Garden RailroadAlthough there are countless aspects to garden railroading, the core of the hobby is running trains outside. Ironically, that is exactly the aspect of the hobby that eludes many hobbyists, including many who have installed garden railroads, then stopped running trains because the maintenance burden was too great. After 35+ years' involvement in the hobby, meeting hundreds of hobbyists, and observing countless railroads in all stages of construction, operation, and neglect, I have decided that the most important step you can take in beginning a permanent garden railroad is to create a long-lasting infrastructure that allows you to run your trains whenever weather permits without massive maintenance burdens, periodic major refurbishments, or constant strain on backs and knees. I also believe that adopting and showcasing such approaches will be far better for the growth of the hobby. Potential hobbyists will see you having more fun more often, and for years longer than some more conventional garden railroad approaches typically provide. This article describes one of the approaches that meets all of those requirements without necessarily costing any more than garden railroads built with more conventional approaches. It features:
True, other approaches may work better for some people. But after building a raised-platform railroad as a sort of "proof of concept," I see no significant drawbacks to this approach and many advantages. Even though there is still work to be done on my railroad, I can run trains literally any time there isn't ice on the track, without having to weed or do anything else first. That's a very far cry from my old railroad, where I often required a week's notice before entertaining visitors, just to pull the weeds that would interfere with operation or hide features. Build it to LastIn its most basic form, a raised platform is much like a small deck, the kind you might build next to a swimming pool. For those projects, you would choose materials that were guaranteed to give a lifetime of service. The same standard should be applied to any materials you choose for any outdoor railroad you plan to operate for more than three years.Above all else, avoid lumber products that aren't "ground rated." Ironically this includes real railroad ties and those oval-shaped "landscaping timbers." In states with rainy springs and humid summers, both break down after a few years' contact with dirt. In addition, please pay attention to local building codes for the sort of decks you would host a party on. Technically, you may not feel that you need something that substantial, but this way you can add just about as much dirt and as many rocks as you want and not have to worry that the thing will collapse. Plus, you never know when you or a helper might need to climb onto it to adjust something. Basic Construction PrinciplesThere are countless options and alternatives, but the best way to present our core topic is to use a sample of a small platform that uses the materials I have found most useful.
The platform itself will be a tad over 6'x8' and will have plenty of room to hold a loop of track using 5'-diameter (R2) curves. At the same time, most people would be able to reach most of the platform from a standing position. The grids in this article all represent 2'x2' squares. Don't worry about trying to memorize it at this stage. Everything is explained in more detail in the sections below. Yes, the example is simple, but you have to start somewhere. And for a lot of folks who are just trying to "get their feet wet" or make something for their grandchildren to run trains on, this would be a good start, with room for sidings, stations, groundcovers, and other plants. PostsFor better viewing and easier maintenance, something needs to get your railroad platform up off the ground. The most common and cheapest way is with ground-rated 4"x4" posts.
In this example, I assumed that two 4"x4"x8' "ground-rated" posts have been cut in half, and buried 24" into the ground. Depending on how you build on those, this will generally place the tracks somewhere between 28" and 32" above ground level, a comfortable viewing and working level for most people. If you want the railroad higher, all you have to do is buy longer posts - the rest of the project's cost is exactly the same. What if You Hate Digging Post Holes? You may be able to get by without post holes altogether, by using something like those "Dekblocks" that you set on the ground and put your posts into. These are most useful if you:
If you use this approach, please
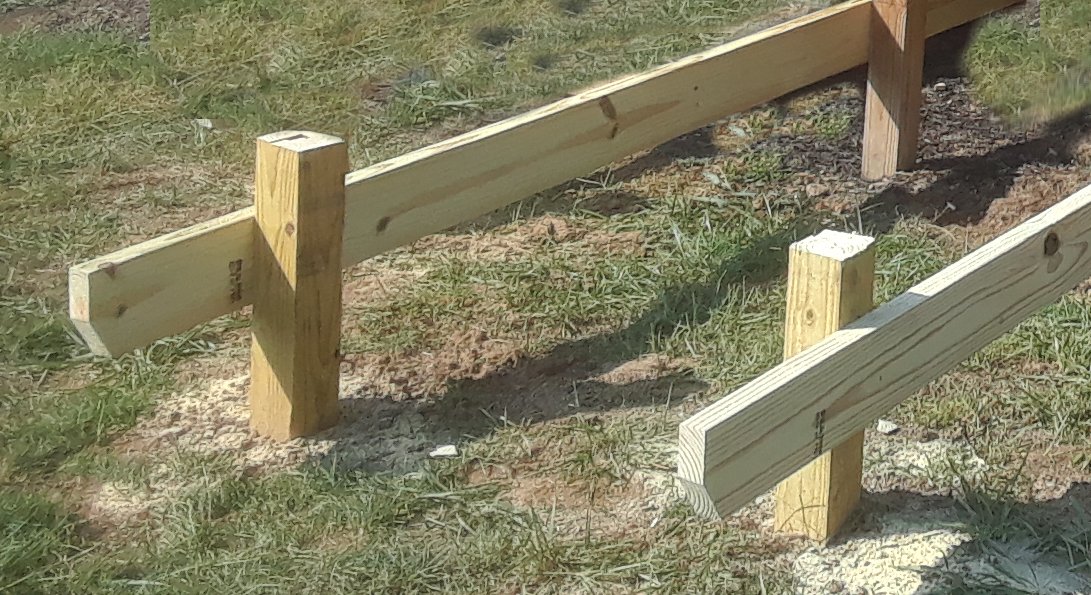
Note that using Dekblocks instead of sinking posts will increase the cost of your project. JoistsThese are boards that run between the posts. They will eventually support the frame. One key measurement is the span, that is, how far the joist stretches between supports (posts).In many regions, the rule of thumb is that the joist can span as many feet as it is inches deep. So a 2"x6" joist can go up to 6' between supports. My joists extend a foot beyond the posts at either end. They call this "cantilever" if you want to look it up. Since I'm using the same boards for the frame, the joists can be up to 6' apart. In this example, I chose to put them 4' apart. That way you'll still be able to reach most of the finished railroad without climbing on it. In my area (Springfield, Ohio), Home Depot's ground-rated 2"x6"s cost about the same as the other stores' pressure-treated 2"x6"s, so it's a no-brainer, especially since they'll be exposed to moisture from above and below.
Alternatively, if you feel very strongly about carriage bolts, nobody says you can't attach the joists with screws first to make drilling the holes for carriage bolts easier. Having the post sticking up a little is good, because you can fasten the frame to it as well for extra stability. But make certain the posts don't stick any further than 5" above your joists, or they'll interfere with the decking. For cosmetics, you might consider cutting the lower corner off your joists. This is entirely optional, but it helps make it look like you know what you're doing. FrameThese are the boards that will support the decking material. Again, I like using 2"x6"s.If you plan to use 2"x6"s for the decking, as I do, the frame boards can be up to 24" apart. If you plan to use typical 5/4 decking boards, composite boards, or plastic lumber, the frame boards will need to be no more than 16" apart. Note that I extend the frame boards 12" beyond the joists, another "cantilevering" practice.
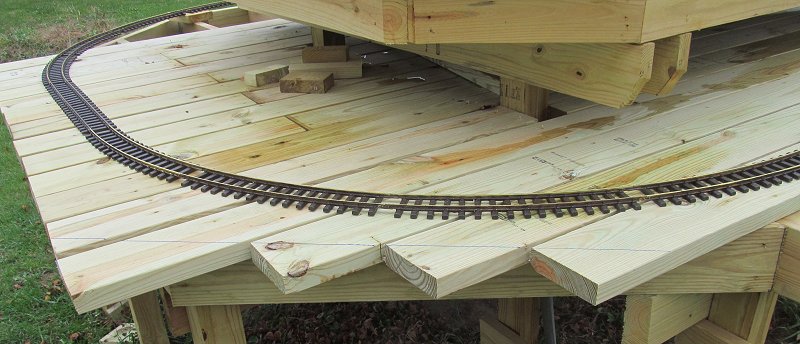
The photo below shows one part of my current multi-level railroad just after it was framed. This part is smaller than the railroad in the example, and it's not the same shape. The joists are running left to right, and the frame components are coming toward you. Hopefully it will give you some idea how the frame goes on top of the joists without being too confusing. If I ever build a railroad exactly like the example in this article, I promise to take plenty of photos.  Before you start building the frame, measure each post to make certain it won't protrude above the frame itself - it's a lot easier to cut them down before the frame is in place, though I have had to use my reciprocating saw to level at least one I underestimated. I attach the frame boards to each other with 3" screws made for pressure-treated wood. If a frame board goes up against the stub of a post, I fasten it to that to give a little extra strength. Each place a frame board crosses a joist, I "toenail" the frame to the joist. (That means shooting the screws in at an angle so they go through the frame board and into the joist.) Where I have longer spans or other concerns about stability, I may "toenail" the frame boards to the joists from both directions. DeckingFor my decking, I have been using ground-rated 2"x6" boards, running perpendicular to the frame boards. Not only do they resist the moisture from above and below, they also make the structure even more solid. Be sure and leave 1/2" gaps between the boards where you can.When I'm fastening the deck boards down, I leave a few extra inches on the ends. Then I set the track where I think it's going to lay before deciding exactly how to trim the edges. This also gives me a bit of "fudge factor" in case I underestimated how much room the track curves would require.
The picture below right shows how our example would look after final trimming has occurred.
LinerEven if you've used ground-rated boards for the decking, it's a good idea to keep the dirt away from the lumber itself.
The photo to the right shows "billboard vinyl" fastened black side up on the top level of my own three-level railroad. Since there have to be drainage holes anyway, I don't mind patching bits together to fit odd corners. Afterwards I poke holes through the membrane in the gaps between the decking boards, so rainwater doesn't puddle up. By the way, so-called weed-resistant "landscaping fabric" is useless for this purpose. Weeds will take root in it eventually, no matter how long the supposed warranty, and when you pull them out, you will pull everything else up at the same time.
I also like to put a little "lip" on the edge of the platform to slow dirt and gravel from sliding off the edge. So far I've had good luck slicing pressure-treated fencing board in half and trimming it to fit. I align the lower edge of the trim with the lower edge of the deck boards. |
|||||||||||||||||||||||||||||||||||||||||||||||||||||||||||||||||||||||||||||||||||||||||||||||||||||||||||||||||||||||||||||||||||||||||||||||||||||||||||||||||||||||||||
 |  |
 After the roadbed is fastened down, I set my circular saw to 1.5" depth and trim off the outside 'corners' for a more rounded look.
Ballast, more dirt and plants to come . . . .
For the sake of folks who think this approach looks more expensive than more conventional methods, here's a cost breakdown of both a raised platform railroad and a typical retaining-wall garden railroad that is the same size and raised to the same level.
 Note: This comparison does not take into account the cost of the train and track. You'll also need a train, something like this example. You'll also plus need some straight track to make an oval.
Piko and LGB Large Scale train sets come with 4'-diameter curves that you can use outside. That said, 5'-diameter curves or larger will help your trains to run better and look better. (Personally, I recommend keeping the 4'-diameter curves inside to run around the Christmas tree.)
Whatever you decide construction-wise, you will likely have something like $500-$650 into trains and track on top of the cost of construction, unless you find a good buy on used or closeout products.
Don't let the cost of track scare you off - it's all part of building the most robust, reliable, maintainable garden railroad possible. Operationally, I would rather run a cheap train on a solid roadbed and good track than a good train on cheap track and less-than-solid roadbed.
Update for 2021 - Due to an increased demand for lumber between 2020 and this writing (June 2021), some boards you need for this project have literally doubled in price. Don't let this put you off.
Since I started writing and speaking about this topic, I have met any number of people who said they couldn't afford to start their railroad because the cost of lumber was so high. Ironically, most of the same people subsequently bragged about the tens of thousands of dollars worth of trains sitting idle in their garages.
It's true that the total building materials cost for this small sample project last year was $252. And that the same materials list this year comes to $467.
But even with the current high cost of lumber, a raised platform railroad is likely to be cheaper than a traditional dirt-and-retaining wall railroad. (See below,)
And waiting another year to start building your railroad because you want to save a few hundred dollars in lumber means that you'll have one more year less enjoyment and one more year explaining to your friends and family what you plan to do eventually. Start a little one like this example if you have to. You'll learn a lot and have something to show for it.
Raised Platform Sample
| Ground-rated 4"x4"x8' Posts | |||
| Ground-rated 2"x6"x8' Boards (for joists) | |||
| #10 x 3-1/2 in. Tan Exterior Star Drive Wood Screws (1 lb. box for screwing joists to posts, then you can use the rest for the frame until you run out) | |||
| Ground-rated 2"x6"x10' Boards (for frame) | |||
| Ground-rated 2"x6"x10' Boards (for decking) | |||
| #10 x 3in. Tan Exterior Star Drive Wood Screws (5 lb. box for frame, decking, and roadbed) | |||
| 24 sq. ft Sheet Vinyl. The price listed is an estimate, since there are so many choices.) | |||
| 5/4 by 5.5" by 8' Pressure-treated or Cedar dog-eared fence board (for trim. I had to buy this at Lowes because Home Depot doesn't stock 8' lengths.) | |||
| #6 1-5/8 in. Philips Bugle-Head Wood Deck Screws (1 lb., for fastening trim to deck edge. You can use different screws, but I like the gray ones because they blend in with the trim boards once they fade to gray.) | |||
| Ground-rated 2"x6"x12' Boards (for roadbed) | |||
| Total | |||
Of course, prices will vary and some materials may not be available in your region. But these items are posted for comparison to the next table.
Retaining Wall Raised Railroad - this example assumes the same dimensions. It also assumes you're going to use some sort of sheeting to control weeds and that you plan to build a weed-proof, stable roadbed. If you build the roadbed from lumber as I do, you'll need twice as much wood, since you'll need another layer of "plates" to hold the "stringers" together.
Alternatively, you could cut a trench (6"x6" or more) and fill it with crack-resistant concrete. That would take about 6 bags. At about $7 a bag, that's $42, admittedly cheaper than the lumber roadbed I price out below.
Remember - any roadbed solution that doesn't support your track firmly and prevent weed growth may cause you a great many maintenance headaches in the future.
You may live somewhere where dirt delivery is cheaper or even free. But in most areas, for most people, you'll learn quickly that "dirt cheap" is a misnomer.
| 6 in. x 17.5 in. x 7 in. Concrete Retaining Wall Block (~18 blocks per layer, 4 layers.*) | |||
| ~3.5 cubic yards of dirt (Cost Varies, but around here that would be about $45 worth of dirt and $100 to deliver) | |||
| 24 sq. ft Sheet vinyl (for weed control any place you DON'T want plants to grow. Please don't use "landscaping fabric" of any kind) | |||
| 2 lb #9 3" screws for holding the roadbed plates to the stringers | |||
| Ground-rated 2"x6"x12' Boards (for roadbed) | |||
| Total | |||
*If you buy the cheaper 4 in. x 11.75 in. x 6.75 in. Concrete Retaining Wall Block, you'll need ~168, so your total cost for the blocks will be ~$250, but your railroad will be less stable and more prone to washouts
Height Considerations - If you want your railroad to be a foot higher than the examples shown:
Of course, if you have a buddy who owns a dump truck or lumber yard, all bets are off. This is just to suggest that the cost of building a raised railroad that will literally last a lifetime may be less than building the kind most people consider, which may still eventually have problems that a properly installed raised platform railroad will never have.
But I will assert that the same materials and methods that let folks build, say, a back-yard deck that will last a lifetime will allow you to build a railroad that lets you run trains far more often and stay operational for years longer than the more conventional approaches I see in most of the outdoor railroads I encounter.
I welcome comments, criticisms, questions, etc. In fact, I've already gotten push-back from folks whose attitude is "Don't scare people off by mentioning actual work. Get them to think all they need is a train set and by the time they realize what they're getting into they'll be hooked." But that's not working, by any number of metrics.
You know, back when I was a kid running indoor trains, most books on model railroading started with building a train table or some more elaborate framework. And that didn't discourage our generation. Why should building a sound infrastructure outside be any less important?
In publishing something that I think will work better and longer for most people, I'm considering the longevity, not only of my hobby, but of the hobby as a whole.
In the meantime, I'm revisiting articles I wrote earlier that suggest the "get anything at all going in the back yard" approach, because I don't want to be guilty of convincing any more would-be hobbyists that installing a garden railroad you intend to run for years should take any less thought or work or quality of materials than installing any other permanent backyard feature.
Please contact us with any feedback at all. I am especially interested in seeing any examples of railroads that use this or a similar method and hearing about your experience with them.
In the meantime, enjoy your hobbies, and especially any time you have to spend with your family in the upcoming weeks!
Paul Race
FamilyGardenTrains.com
 |  |
| Note: Family Garden Trains?, Garden Train Store?, Big Christmas Trains?, BIG Indoor Trains?, and BIG Train Store? are trademarks of Breakthrough Communications (btcomm.com). All information, data, text, and illustrations on this web site are Copyright (c) 1999, 2000, 2001, 2002, 2003, 2004, 2005, 2006, 2007, 2008, 2009, 2010, 2011, 2012, 2013, 2014, 2015, 2016, 2017, 2018, 2019, 2020, 2021 by Paul D. Race. Reuse or republication without prior written permission is specifically forbidden. Family Garden Trains is a participant in the Amazon Services LLC Associates Program, an affiliate advertising program designed to provide a means for sites to earn advertising fees by advertising and linking to amazon.com. For more information, please contact us |
| Visit related pages and affiliated sites: | |||||
| - Trains and Hobbies - | |||||
 |  |
 |
 |
 |  |
 |

|

|  |
 |

|
| - Christmas Memories and Collectibles - | |||||
 |

|
 |

|

|
|
| - Family Activities and Crafts - | |||||
 |

|

|

|

|

|
| - Music - | |||||

|
 |
 |

|

|

|

|

|

|

|

|

|

|

|

|

|

|

|