| |||
 |
 |  | |
 |  | ||
 |
 | ||
 |  | ||
 |  | ||
| |||
|
|
| | |
| | ||
|
|
| ||
| | ||
| | ||
Written by Paul D. Race for Family Garden Trains(tm)
 |
 |
Editor's Note: This article takes some of its content and much of its methodology from our 2012 article "Building a Simple Raised Roadbed." At that time, pressure-treated roadbed on posts was one of most common and effective practices for raised railroads, especially in non-desert areas. Then I spent the next eight years telling folks who could use this kind of roadbed in other situations to go to that article. Recently I realized that A: that article needed serious updating and B: readers who JUST need to make a roadbed needed an article without all that superfluous information about posts and postholes. I'll try to update the other article eventually, but here is the new version, with lots more photos and explanation than the old one - Paul Simple Wooden RoadbedRoadbed is whatever supports your track and ballast. If you lay your track right on the dirt, as some folks in desert states have done, you have a dirt roadbed. If you put your track on gravel, as folks in low-rainfall states often do, you have a gravel roadbed.However, in many parts of the country, either approach will mean that you spend most of the "train running season" weeding. If nothing else, you should consider a solution that keeps weeds from growing up through the track. Not to mention that your track can shift in every direction with the effects of weather, burrowing animals, and more. If you want a sturdy, ground-level permanent railroad, and your back yard is level, you could dig a trench and fill it with crack-resistant concrete to lay your track on. However, it's hard to make changes to such an installation, or to take it up when you move. There are many other solutions, many of which I discuss in other articles, but by far the most inexpensive and flexible solution for garden railroads of all kinds is a 2"x6" wooden roadbed made of pressure-treated or (preferably) ground-contact-rated lumber. Such a roadbed:
Simple Method, Common Tools - Many beginners who aren't used to working with lumber of any kind shy away from this because it seems complicated. But it's actually very simple, and the only tools you really need are a power saw, a power drill, and a template you can download from this page. Long-Lasting Materials - Modern ground-contact-rated lumber is used in all kinds of construction these days, including structures that are planned to last for fifty or a hundred years. Before ground-contact-rated 2"x6" boards were available, thousands of garden railroaders used ordinary pressure-treated lumber, and many of the railroads that were installed with good drainage are still holding up after decades. Tracking down ground-contact-rated 2"x6"s will do even better - giving you an infrastructure that neither you nor your children, nor (probably) your grandchildren should ever have to upgrade or replace. Yet it can be taken up or moved easily if necessary. Using With Raised Railroads - Hundreds, if not thousands, of successful garden railways have been built using this kind of roadbed, then supporting it on posts sunk deep into the ground, then surrounding it with retaining walls and backfilling with dirt. By the time they've backfilled, planted groundcovers, and ballasted the track, you can't see this infrastructure, but it's there just the same, keeping the right-of-way rock-steady in spite of nature's extremes or humans' clumsiness. Our first article that described using this approach was called "Building a Simple, Raised, Roadbed." This article concentrates just on the roadbed because it has so many other uses. Using In Regions with Deep Frost Lines - If you live where the frost line is too deep to sink posts, you can use this method to build a "floating" roadbed with so much structural integrity that the right-of-way stays smooth even after the roadbed has been rising and falling all winter. You may have to shim up sections here and there each spring, but that's usually less than an afternoon's work.
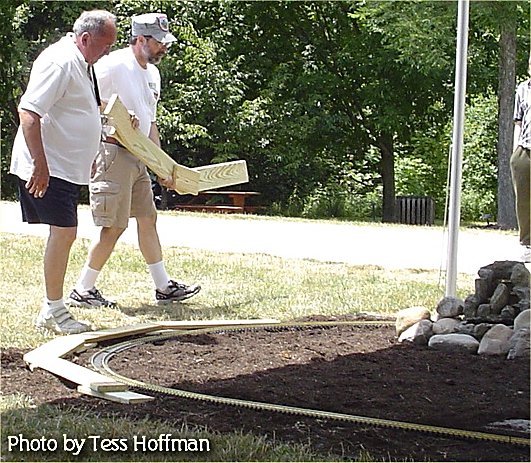
The photo to the right shows an early iteration of a railroad in Ottawa, Canada, where frost heave is serious, and the frost line is too deep to practically sink posts. Fred Mills' IPP&W Railway was initially built using the kind of lumber roadbed shown on this page, supported on concrete blocks. Every spring, he would spend a half-day shimming up any sections that were a little low, and be ready to run for the summer. Today, Fred's railroad looks quite different because he's added a lot of platforms for holding train yards, stations, and industries (those platforms are also built from 2"x6" lumber). But this early view shows an approach that worked very well for him for decades. Low Cost - As of this writing, ground-contact-rated 2"x6"x12' boards are in the $10-$11 range in Ohio. Yes, they may be more expensive where you are. Why do I choose 12' boards? Because the only waste in this method is at the ends of the boards, and if you use, say four 12' boards versus five 10' boards, you'll have less waste. You need at least half again as much board length as you'll have track (we explain that below). So if the railroad loop you plan to start with has, say 30' of track, you'll purchase at least four 12' boards, for a cost in the $45 range (in Ohio on September 5, 2020). Update for September 14, 2020 - Because of several simultaneous national crises, including multiple hurricanes and forest fires, the cost of the boards jumped to $17-18@ in the ten days since I typed the above. The price may go down again when things settle down, but my "four boards" example will be more like $70-$80 in the meantime. You'll also need enough screws to have ten screws per each track section and a few extra. Let's say in our example, you used 18 pieces of track; that's 180+ screws. A 5-pound box of #9 3" screws for pressure-treated wood will cost you between $25 and $30 and should give you plenty of extras. (Check the box label when you pick them up). If you're planning on building more eventually, you might want to go for the 10-pound box, especially if it only costs half again as much. I like to get the kind with the star heads, they're harder to strip out than the philips-head screws, and most of them come with a star bit to fit into your power drill. So the entire cost of the roadbed for our 30' right-of-way example would be between $70 and $120 (using Sept. 14, 2020 figures). Not too bad for something that supports your track solidly, prevents weeds growing up through the rails, and which can be used indefinitely, reconfigured at need, raised if you desire, moved elsewhere, or removed entirely if need be. Fast Construction - We've "done the math" for you." Once you cut the first couple of pieces, you'll find that this goes very fast. I have done this several times for railroads with up to 60' of track, and I've never had trouble finishing the sawing and subassembly part of this in a few hours. Of course, if you have a complicated layout, with turnouts, etc., you'll have to do some of the math yourself. But it's not hard. The templates below will guide you in cutting each piece. How Much Lumber Will I Need? The horizontal boards that support the track directly are called "stringers." The boards that lay underneath and hold them together are called "plates." The horizontal boards that support the track directly are called "stringers." The boards that lay underneath and hold them together are called "plates."
In most of my projects, I've made the plates only about 10" long, no matter how long my stringers were, since I was fastening the roadbed to a sturdy infrastructure. However, if your roadbed is going to be "floating," that is, sitting where it might be subject to frost heave or other shifting, you should consider making your plates as long as feasible to reduce vertical "wobble." Calculating Lengths of 2x6 Lumber - You will use 2x6s for the horizontal part of this structure, so how much you need depends on how much track you have, plus at least 50% more to use for the plates and to compensate for waste at the end of each board. If you are using preformed curves (and you remember what diameter track you bought), you can use "PI" to figure out how many linear feet of curved track you have. (I use 3.2 to compensate for the fact that the outside edge of the roadbed is longer than the inside) And you can obviously figure out the straight ones with a tape measure. For example, One 4'-diameter circle of track will require about 12.8 linear feet of 2x6 stringers (4'x3.2). The following table gives the minimum lengths of 2x6 you'll need for the most common preformed track diameters - remember to add at least 50% extra length for the plates and to compensate for waste at the end of each board. And don't forget the straight track sections. Those are easy - a 5' straight track section needs 5' of stringer, plus some extra for plates.
If you would rather do the math yourself, the Appendix to this article gives you the figures you need. Measure and Cut the 2x6 StringersThe stringers that will support straight pieces of track are easy - a five-foot stringer supports a five-foot piece of track.The stringers that support the curved pieces of track have to be cut at the correct angles. The angle you use depends on whether the track you are using comes 12 pieces to a circle, 16 pieces to a circle or, in a few cases, 8 to a circle. (By the way, Lionel's "Ready-to-Play" track comes 24 to a circle. To use with this method, put two pieces together and treat them as one piece of 12-to-a-circle track.) Once you're sure how many pieces of your track make a circle, download and print the appropriate template. That will help you cut your roadbed appropriately. Do not resize or allow your software to resize the template, as the angle must stay the same to be accurate. Print the templates in "landscape" (sideways) mode on your printer. (If you want to check your printout against an actual protractor, please do so.)
Using a curved piece of track and the template you printed, measure and cut the horizontal pieces you need from the 2x6s. The examples shown below use the curves that make a 60" track circle. Like the curves that make a 48" track circle, they are twelve to a circle. However the principle applies to any track circle, as long as you are using the correct template. The photo below shows me using my template for 30 degree curves to mark the first cut.
The next photo shows the template "flopped over" to the other end to mark the second cut.
The next photo shows the first stringer as cut out.
If you're certain the first stringer is very precise, there's no reason you can't just flop it over and mark the next section of the board to cut. But use the same stringer for a template every time. If you use the next stringer as a template, then the next stringer, and so on, your stringers will keep getting longer or shorter, depending on how fat your marker is or how much material your saw blade converts to sawdust. Be sure to:
The photo to the right shows the stringers in a circle when I'm done. Of course, there will be some straight pieces to cut, but those are easy. By the way, you'll notice that some of the track pieces don't align exactly in the center when you install them. For example, some curves tend to spring outward a degree or two from where they should be. Once you connect a circle or loop, you hardly notice, but if you just leave an arc of three or four together, they won't curve exactly as much as they "should." That's okay, the important thing is that they're supported. Determine the "bottom" of each stringer.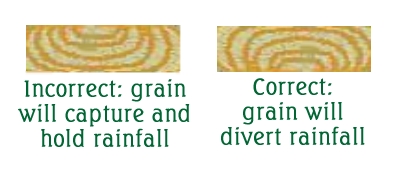 Look at one end of each piece of 2x6 you have cut. If the grain of the piece simply looks like a series of parallel lines, simply label the least attractive side "B" or some similar indicator that means something to you. On the other hand, if the grain makes a "bowl" pattern on one or both ends of the board, you want to make certain that, in the final installation, the pattern resembles an upturned bowl instead of a right-side-up bowl. That way the grain of the wood will shed moisture instead of capturing it. Again, once you've decided which side needs to be on the bottom, mark it clearly. Why do we mark the bottom and not the top? Because in the final assembly, the top will be visible, but the bottom will not. Look at one end of each piece of 2x6 you have cut. If the grain of the piece simply looks like a series of parallel lines, simply label the least attractive side "B" or some similar indicator that means something to you. On the other hand, if the grain makes a "bowl" pattern on one or both ends of the board, you want to make certain that, in the final installation, the pattern resembles an upturned bowl instead of a right-side-up bowl. That way the grain of the wood will shed moisture instead of capturing it. Again, once you've decided which side needs to be on the bottom, mark it clearly. Why do we mark the bottom and not the top? Because in the final assembly, the top will be visible, but the bottom will not.
Prepare Subassemblies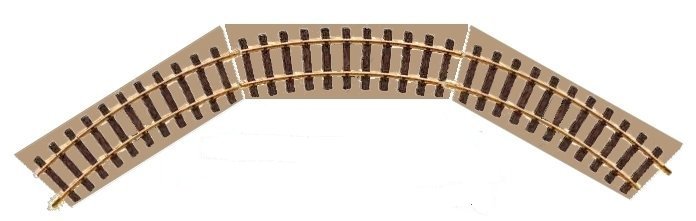 For most people, it works better if they fasten a few pieces together at a time and install them in sections. This gives you another chance to make certain your roadbed is going together exactly as planned, and helps you get the plates right where they need to be. To start this process on a segment with curved sections, lay 2 to 4 cut pieces of 2x6" together on a flat, hard surface like a driveway or patio. To check the position of the boards, fasten a few curved pieces of track together and lay them on top. For most people, it works better if they fasten a few pieces together at a time and install them in sections. This gives you another chance to make certain your roadbed is going together exactly as planned, and helps you get the plates right where they need to be. To start this process on a segment with curved sections, lay 2 to 4 cut pieces of 2x6" together on a flat, hard surface like a driveway or patio. To check the position of the boards, fasten a few curved pieces of track together and lay them on top.
When you are satisfied with the position of the stringers, center your plates under the junction between the pieces, then remove the track. Holding the pieces you are working on carefully in place, use the 3" screws to fasten the plates to the stringers. Each set of five screws is driven in an "X" pattern. As you continue to put your subassemblies together, you may wish to fasten a plate to one end of each subassembly before you move it into position. This will give you a chance to make certain that end is properly assembled, and reduce the amount of screwing you have to do when the whole thing comes together.
Since this roadbed was going onto a solid, firm base, I didn't make the stringers very long. If it was going on the ground or something else that might be unstable, I would make the stringers much longer. Assembling - Once you've made your subassemblies, move them to the place you need them and fasten them together.
This is actually from a demonstration railroad I built for a local NMRA club event. Like the photo above, it uses 5/4" decking instead of 2"x6" boards, but you get the idea. For a very small railroad such as this, 5/4" boards would work, if you could get ground-contact-rated ones. But I would have to travel 120 miles to get those, so I only use them for demo and temporary railroads that will never touch the ground.
If you're going to be laying your roadbed "on the ground," put any weed barrier down first. If you are going to be setting your roadbed on concrete blocks or some such, move those into place.
|
|
Note: Family Garden Trains???, Garden Train Store???, Big Christmas Trains???, BIG Indoor Trains???, and BIG Train Store??? are trademarks of Breakthrough Communications (www.btcomm.com). All information, data, text, and illustrations on this web site are Copyright (c) 1999, 2000, 2001, 2002, 2003, 2004, 2005, 2006, 2007, 2008, 2009, 2010, 2011, 2012, 2013, 2014, 2015, 2016, 2017, 2018, 2019, 2020 by Paul D. Race. Reuse or republication without prior written permission is specifically
forbidden.
For more information, please contact us |
 |  |
| Visit related pages and affiliated sites: | |||||
| - Trains and Hobbies - | |||||
 |  |
 |
 |
 |  |
 |

|

|  |
 |

|
| - Christmas Memories and Collectibles - | |||||
 |

|
 |

|

|
|
| - Family Activities and Crafts - | |||||
 |

|

|

|

|

|
| - Music - | |||||

|
 |
 |

|

|

|

|

|

|

|

|

|

|

|

|

|

|

|


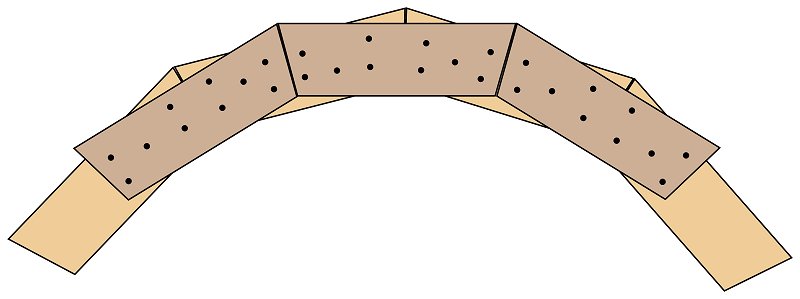
 The photo to the right shows 12 stringers fastened to plates to support a 48" circle of track. I included this photo to give you an idea of how your roadbed will look as it progresses.