Family Garden Trains, click on any link below: | |||
 |
 |
 | |
 |
 | ||
 |
 | ||
 |  | ||
 |  | ||
Family Garden Trains, click on any link below: | |||
|
|
|
| |
|
|
| ||
|
| ||
| | ||
| | ||
| Written by Paul D. Race for Family Garden Trains(tm) |
 |
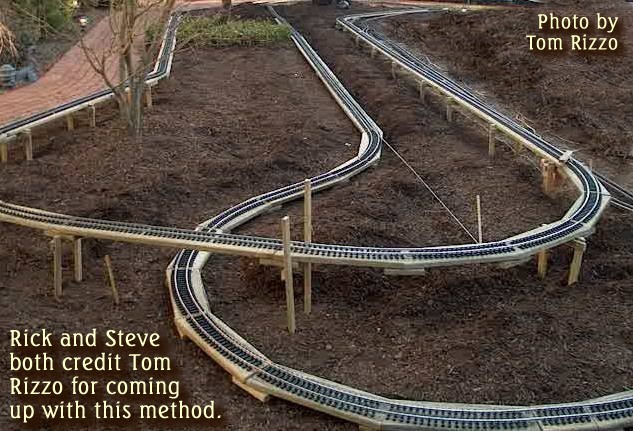
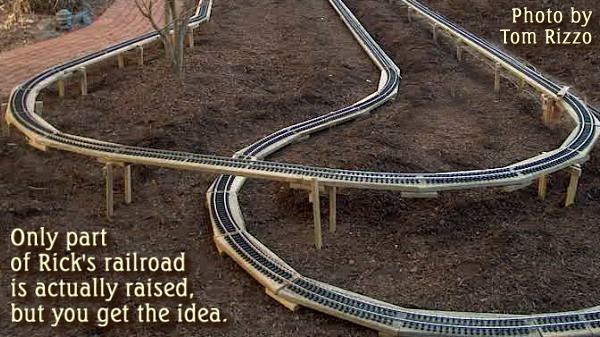
This is not a construction article, per se, as I don't have all the information I would usually provide in an article of this scope. However, I thought it would help fill the gap between the ground-level "1-Day Railroad," which can be put together in a few hours and the Simple Raised Railroad, which requires a bunch more planning and digging. Lots of folks who've started with a ground-level railroad have decided later that the only thing they don't like about their railroads is kneeling down all the time to fiddle with things. Many have gone back, taken all the track up, and rebuilt with some method that raised the railroad, which often caused their railroad to be out of commission for a season or two. So when I saw a method that could be used to raise a ground-level railroad without forcing folks to "start all over," I got excited. In this railroad, the designers and builders planned from the beginning to raise at least part of their railroad. However, they lay the track on the ground first, then raised it. I can think of no good reason why anyone with a ground-level railroad could not adopt the technique described in this article to raise their railroad to a more convenient height. Rick Padley, the owner, is a retiree who helped inspire and inform our article on Accessible Garden Railroads. Two members of the Long Island Garden Railway Society, an active and talented club, helped Rick design and begin to install his railroad. As you'll see, the process used by Tom Rizzo and his "assistant," who prefers to be known only as Steve, goes something like this:
As of April, 2006, we don't have any photos of the finished railroad because it hasn't been finished yet. But we hope this gives you some ideas you can use. |
|
|
The advantages of raised railroads are spelled out in detail in the Simple Raised Railroad article. Still, if you've operated a ground-level railroad for more than one season, you have figured out the most important advantage for yourself - saving your knees and back. The rest of the short list includes:
In addition, putting a solid 2"x6" (or 5/4"x6") roadbed underneath your track provides several immediate advantages, including a smoother, more reliable track pattern, and serious weed abatement even if you don't get around to raising the roadbed for a year or three. Okay, so you know why I'm "gung-ho" about raised railroads. It's also worth mentioning that for anyone who already has a ground-level railroad, this method allows you to build and place the roadbed a little at a time so that you don't have to take your railroad out of operation while that part of the work is being done. Now lets talk about how to get your railroad off of the ground without having to start over. What do I Need?This won't be a complete list of tools or requirements, because a very complete list is already described in detail in the Simple Raised Railroad article. But you will need:
|
Measure and Cut the StringersIf you used pre-curved track segments, you can use the instructions below to determine the size and shape of each stringer. Start by downloading and printing the first template below (unless you may have installed some 8'-diameter curves, which require the second template). Note: If you used "flextrack" (not preformed curves) to build your railroad, you'll have to figure another way to measure your angles for each piece of roadbed, but the following tips will give you some idea of what is involved. |
| Most pre-formed garden railroad curves come twelve to a circle. This includes most curves that make a 4' circle, a 5' circle, and a 10' circle. | for curves that come 12 to a circle | 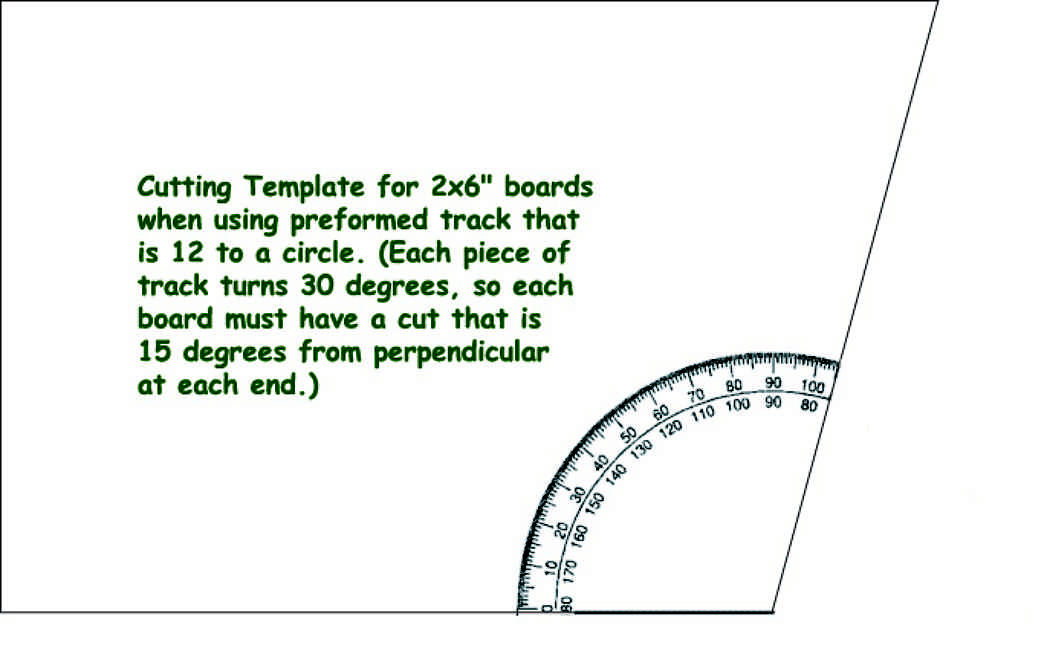 | |
| Most pre-formed garden railroad curves that make an 8' circle comes 16 to a circle. These require a different template. | for curves that come 16 to a circle. |  |
| 1. Take the 75degree template and a scrap bit of the material you plan to use for stringers (2x6 or 5/4"x6") to your railroad. Lay the template on the board as shown and slide the board under the edge of a curve. | 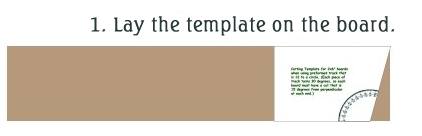 |
| 2. Slide the board so that the piece of track you are testing is centered above it and see if it aligns with the template. If the end of the track doesn't align as shown, try the other template. Then, using the template you chose, mark the end of the board. | 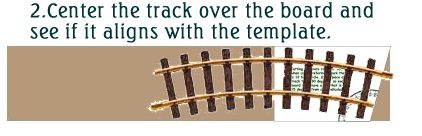 |
| 3. Flop the template over, slide it underneath the track, and use the template to measure and mark the other end of the board, making sure to keep the track centered. | 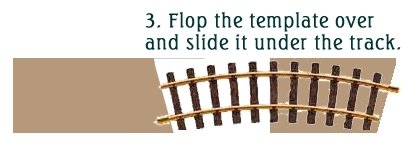 |
| 4. Cut the board as you marked it; then check the fit. You may use the first board you have cut as your template for any other curves of that size. If you have several sizes of curves, you will have to do this process once for each size of curve. | 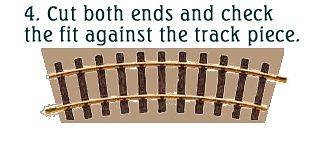 |
|
5. To check your work, slide the first few pieces you cut under a curved area of your track. You'll see that you have some "give" in either direction, but you want the curves to be reasonably centered on all adjoining pieces and to line up fairly well with the ends. If your pieces seem a tad short or long, make the appropriate adjustments on the next few boards you cut. Once you're certain you're "doing it right," cut the rest of the pieces you need in this size, and move on to the next size. | 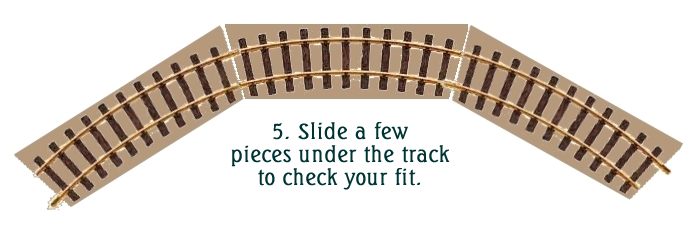 |
Determine the "bottom" of each stringer.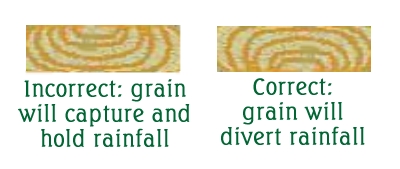 Look at one end of each piece of stringer you have cut. If the grain of the piece simply looks like a series of parallel lines, simply lable the least attractive side "B" or some similar indicator that means something to you. On the other hand, if the grain makes a "bowl" pattern on one or both ends of the board, you want to make certain that, in the final installation, the pattern resembles an upturned bowl instead of a right-side-up bowl. That way the grain of the wood will shed moisture instead of capturing it. Again, once you've decided which side needs to be on the bottom, mark it clearly. Why do we mark the bottom and not the top? Because in the final assembly, the top will be visible, but the bottom will not. Look at one end of each piece of stringer you have cut. If the grain of the piece simply looks like a series of parallel lines, simply lable the least attractive side "B" or some similar indicator that means something to you. On the other hand, if the grain makes a "bowl" pattern on one or both ends of the board, you want to make certain that, in the final installation, the pattern resembles an upturned bowl instead of a right-side-up bowl. That way the grain of the wood will shed moisture instead of capturing it. Again, once you've decided which side needs to be on the bottom, mark it clearly. Why do we mark the bottom and not the top? Because in the final assembly, the top will be visible, but the bottom will not.
Cut 1x6" PlatesThis shouldn't take long - crosscut your 1x6s into the length you've decided on for your plates, one for each stringer you've cut. |
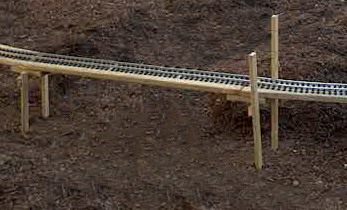
Install the Stringers Under the TrackNext you need to get the stringers underneath the track, with the plates underneath them fastened multiple times. This part will seem time-consuming, but you can do it a few feet at a time without disrupting your railroad too much. In fact, you will discover that a railroad properly installed on solid wood roadbed is easier to maintain than one laid in the gravel, even before you raise it. Shoot at least three screws into each end of the plate (for maximum sturdiness, shoot five screws into an X-pattern on each end of the plate if you have room). Note: Although I recommend shooting the screws from the bottom in the Simple Raised Railroad article, they're a lot easier to shoot in from the top in this installation. And my friend Wil Davis pointed out that screws shot in from the top nearly disappear anyway, and they're far easier to back out if you need to make adjustments.Note: If you have purchased a copy of Marc Horovitz' and Pat Hayward's Gorgeous Garden Railways, turn to page 88 for before-and-after photographs of a railroad that started this way in Toronto some years back. (Click here for a review of that book. | 
|
Test Track Installation So FarWhen you've fastened all of your stringers together, you might want to try running a train around the track (or pushing the longest car you have, if you don't have power hooked up at the moment) to make certain that there aren't any places where the track binds or is twisted out of gauge. You may need to slide some bricks or scrap lumber under sections to level the track (more or less) for this test.Trim the Excess off the Plates and StringersNext, using your circular saw, whack off any ragged corners where either the stringers or the plates stick out excessively. Generally, I use from one to three straight cuts at each joint to get things looking pretty even without straining my circular saw too much. Once you're certain you have a smooth railroad so far, it's time to take a breather and go look for the laser level. |
 |
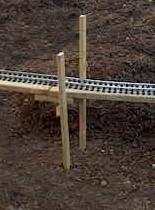
Tap In the StakesWhen you're ready to start the next phase (whether it's a day later or a year later than the first phase), get a bunch of stakes pre-cut and go out to the garden with a heavy hammer and work gloves.Tap two stakes into the ground everywhere you've determined you will need a bracket. Make certain you drive the stakes below the frost line. When you're done, walk around the right-of-way making certain that none of the stakes pushed the stringers out of line. Note: Right after I posted this article, Steve (who prefers to be known only as "Steve") told me that they actually used scraps of 2/3" to raise the track to the height they wanted, then put in the stakes. Oops. I like my way better. Again, your mileage will vary. |

|
Raise the RoadbedI haven't tested the details on this section exactly. They're based on similar projects I've done, and on what I've been able to glean from the photographs and e-mails from Rick. But I haven't had a chance to do this exactly yet, so you may feel free to experiment. A second pair of hands is especially helpful on this part of the project.
|
Inspect the Track and Finish Fastening the BracketsWhen you have worked your way around perform at least one careful inspection to make certain that the track is resting properly on the roadbed all the way around, and not pinched or bent, either horizontally or vertically. Also, (as my friend Wil Davis reminded me) make certain there are no vertical kinks, either upward or downward - both will cause uncoupling if not derailments. You can use a 4-foot level or a very straight piece of 2x6 for this.Using your levels to make certain everything stays where it is supposed to, go back around with your power screwdriver and fasten the brackets more securely. After every few feet, go back and press against the roadbed gently to make certain that the structure seems sound. Add extra screws or extra brackets anyplace that seems "soggy." In addition, if you have a long straightaway, you may want to add extra lateral protection by adding some cross-bracing here and there. You may be tempted to screw the track down to the stringers. Don't. The rails will expand and contract faster than the wood stringers. If you fasten them together firmly, one or the other will suffer (usually the track). You may screw the roadbed down at one point, or, worst case, at two points opposite each other on an oval. This will give the track room to expand and contract, while keeping it from slipping completely off the roadbed. If you feel that you need more "assurance," consider getting some weatherproof wire, drilling small holes here and there next to the ties, and "wiring" ties losely down to the stringers, so that they can skootch around a little, but not enough to come off of the stringers. When you're finally satisfied that the railroad is sturdy (or at least sturdy enough to hold until you install trestles or backfill, wipe the track clean, put on a locomotive (not your most expensive one), and let it go slowly around the track. Look for places where voltage seems to drop, or the locomotive seems to jerk or struggle. You may find yourself running jumper cables to get maximum voltage to the far end of the track. When you're satisfied with the electromechanical status of your new raised roadbed and track, you are ready to address the "cosmetic" issues. |
Trim the Excesss off the BracketsUsing a reciprocating saw or whatever else you're comfortable with, trim the stakes to the level of the roadbed, then trim the crossbars and any crossbracing pieces to match up with the stakes. | 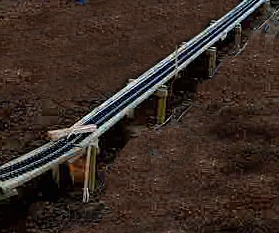
|
Close the GapNow part or all of your railroad is a foot or more off the ground. You can backfill, build retaining walls, build rockgardens, or even put in a pond to fill in the blank between the ground and the railroad level. There's also no reason you can't add a trestle or bridge appearance to all or part of the raised section. The best part is that you can have your trains running the whole time you're working on the rest of this stuff. Options include:
ConclusionOnce again, this is an entirely experimental approach for raising a pre-existing ground-level railroad, and you should feel free to adapt it in any way that makes sense to you. You will find much additional information in the "1-Day Railroad," and Simple Raised Railroad articles. Regardless of the exact methods you use, however, I do want your feedback, especially if you've already tried something like this or are planning to try it this summer.Many thanks to Wil Davis for his helpful suggestions, and for Dick Friedman, Ric Golding, Bob McCown, and others for their input. I'm keeping the pressure on Rick and his friends to keep the photos coming, by the way. Best of luck, all, Paul D. Race
Note: Family Garden Trains?, Garden Train Store?, Big Christmas Trains?, BIG Indoor Trains?, and BIG Train Store? are trademarks of Breakthrough Communications (www.btcomm.com). All information, data, text, and illustrations on this web site are Copyright (c) 1999, 2000, 2001, 2002, 2003, 2004, 2005, 2006, 2007, 2008, 2009, 2010, 2011, 2012, 2013 by Paul D. Race. Reuse or republication without prior written permission is specifically
forbidden.
For more information, please contact us 
| |||||||||||||||||||||||