 | |||
Family Garden Trains, click on any link below: | |||
 |  |
 | |
 |  | ||
 |  | ||
 |  | ||
 |  | ||
|
Written by Paul D. Race for Family Garden Trains(tm)
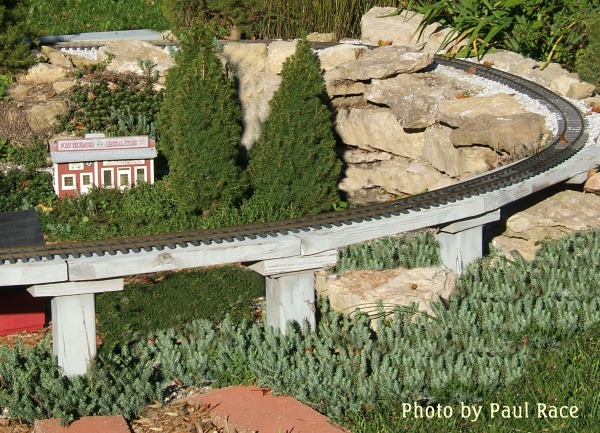
Although some magnificent railroads have been built using this approach, this article focuses on building a simple railroad that a couple people without any particular skills could have operational (though not cosmetically finished) in a weekend. The idea is to get you used to thinking in three dimensions and developing skills you will use later when you get around to building your empire. Update for 2020 - In the years since I wrote this article, I have developed another more extravagant method for building a raised right of way that should hopefully turn out even lower maintenance in the long run. But even that method uses 2"x6" pressure treated roadbed similar to this method. And after fifteen years of weeding my old railroad (which was only partially raised), I'm more of a believer in using solid lumber roadbed than I've ever been. If you're interested only in the tips for cutting the roadbed itself, I have a more streamlined article with new illustrations here. Whether you leave the roadbed raised above its surroundings or backfill up against it, this approach. In other words, if your garden railroad fantasy includes the notion that you can run trains any time you want to, without having to go through a bunch of track maintenance every time, this is one of the best and least exensive ways to achieve that. Even if you count in the price of a ~$30 post hole digger. In the years since I wrote this article, I've also witnessed several magnificent garden railroads that used less rigorous approaches fall into disrepair and eventually abandoned by their owners, because the time they "saved" initially was far outweighed by the amount of time it took to keep the railroad remotely operational.
Another way of looking at this is to note that this project requires about the same tools, intelligence, and effort as installing a few feet of fence. However, in case you have never done anything along this line, I have broken the process up into many small steps, and provided diagrams and templates to make it easier to follow. For the sake of this article, we are assuming that you plan to use preformed track curves (the kind that come already curved in a box), and that your "layout" will allow "continuous running" (such as on a circle or oval). Our example will be based on an oval, although you may certainly use other shapes with this method. By the way, there's no reason you can't use "flextrack" and a railbender to create your own curves while building a simple raised railroad, but we are saving the railbender skill for another article. Advantages of this method include: Also, since I first wrote this article, I have built three portable raised railroads that used 5/4" decking instead of 2"x6" planks. One was made for 10'-diameter track and it worked fine for two demo setups and teardowns. I gave the lumber to a friend near Cleveland after that, and lost track of it, so I don't know how the stuff fared after that. The other two were made for 4'-diameter track and have been used for clinics and temporary open railroads. That said, it's impossible to get ground-rated 5/4" decking throughout most of the United States, so I wouldn't trust it for a permanent installation in constant contact with the dirt. To me, the additional cost of ground-rated 2"x6" boards (available at most Home Depots) is offset by the additional robustness and probably lifespan. PlanningIf you are planning to raise a ground-level railroad (such as the railroad described in the 1-Day-Railroad article), you already have most of what you need, except for the lumber, concrete (optional), posthole digger, and any additional materials you need to compensate for any expansion. If this is your very first outdoor railroad project, you will find the planning information in the 1-Day-Railroad article very helpful. The process will be different, but the list of materials for each size of railroad is about the same for a simple raised railroad as it is for a simple ground-level railroad - except for the lumber, of course.One difference between a raised railroad and a ground-level railroad is that when you get everything where you think you want it and you put your track on the wooden "roadbed, you may find that your measurements are off a tad and you need to cut and insert a little piece of track to make things meet up right. Of course this won't happen to you, but on the rare chance that it might, you may consider picking up the following things before you start (in addition to all the things listed in the 1-Day-Railroad article):
How Much of the Railroad Should I Raise? Any single loop of track should be raised to about the same level at the same time, so your train doesn't fly down one hill and struggle up the next as it circles. That doesn't mean that you have to raise all of the earth around the train at the same time. In fact, you may leave part of the "scenery" at ground level, so that it "drops away" from your roadbed. This almost gives the effect that the train is going up and down hills, when, in fact it's on level track. Such a solution also provides many more opportunites for scenery than a totally "flat" railroad, be it on the ground, or two feet up.
How Big a Railroad Should I Build?If you haven't already set a loop of track in your back yard, you may not realize how tiny the 4'-diameter circle of track that came with your train looks outside. In fact, most people who plan to run big, modern trains consider a 10'-diameter circle of track about the minimum; bigger is better. Trains just look better and run better on wider curves.On the other hand, if you're really cramped for space, just experimenting for now, or you're thinking about having a dinky mountain train circling the waterfall four feet off the ground and adding another, bigger railroad a foot or two lower, you may find a 5' or even a 4' circle fits your needs. But lay it out in the grass (or maybe on cement blocks) before you get out the shovel, so you know what you're getting before you put a bunch of work into it. What if I Want More Than a Circle of Track?
|


| Track Diameter of preformed curves | per circle | of each curve | per circle | |
| 4' Diameter | ||||
| 5' Diameter | ||||
| 8' Diameter | ||||
| 10' Diameter | ||||
| Flextrack |

Cutting and Installing Your Posts
Doublecheck Your Track Plan
Once you get everything ready to go, you may want to doublecheck your track plans. For a small loop, this may be as simple as putting the track pieces together and laying them where you expect the track to go once it's installed permanently. The advantage of this approach is that you can easily mark the locations where the supporting posts need to be. That way you can get one person digging post holes (or moving DekBlocks) while you go off and start cutting lumber.Note: If, when you're laying out your track, you find a section in which it looks like you will have to cut a piece to make everything fit, just make a note to yourself, and let it go for now. Your railroad is likely to undergo minor variations as the stringers and track are installed, anyway, and there's no sense cutting track until you're certain of the final measurements.
Mark the Post Holes
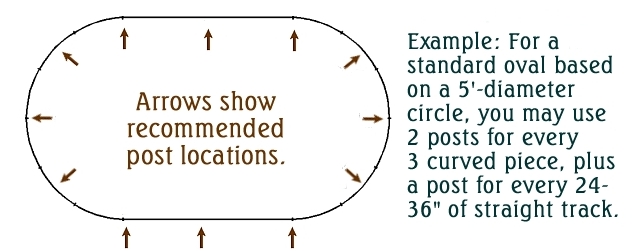
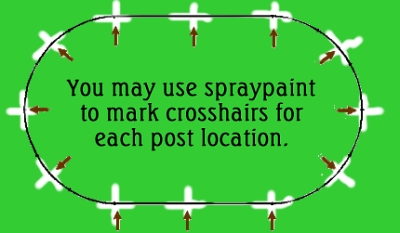 By now you've already decided how far apart your posts are going to be. If you have laid out your track on the ground, the easiest way to "spec" where the posts will go is to stick a stick or stake in the ground every place you think there should be a post, before you take the track up again. If you have used a less hands-on method to verify your post locations, the whole measuring thing is up to you. When you're certain where each post should be, use a can of spray paint or some such to make a big cross-mark around each location large enough to keep you from losing your exact location once the post-hole digger starts tearing things up.
Dig the Post Holes
This task can also be done while someone else is cutting the post holes or the roadbed. Dig your post holes at least as deep as the frost line in your area, without getting the hole so wide that you lose your markings (this is why a post hole digger is very handy). Try to keep the dirt together to one side, since you'll use some of it to backfill once you set your post.Cut the Posts
To figure the length of each post, add the depth of the frost line to the height you want your roadbed to be elevated, plus a few inches to compensate for uneven ground. For example, in my area the frost line is generally considered to be 18". If I want my roadbed to be 24" above ground, my posts need to be at least 42" long. Since I can get 4"x4"x8' pieces of pressure-treated lumber pretty cheap, I'll probably just saw them in half, which will give me 6" of "fudge factor."Note" Do not cut your posts at an angle under the impression that you can pound them into the ground more easily. When frost surrounds a post that is "squared off, the horizontal presure on the sides helps overcome the vertical pressure that might other wise cause the post to rise. But when frost surrounds a post that is cut at an angle, the horizontal pressure is converted to vertical pressure, the way squeezing a watermelon seed makes it shoot out (but slower).
Set the Posts
Setting a post is best done by two people working together. Wear old pants and shoes you don't mind getting muddy. Bring a level with a "sideways" bubble, a bag or partial bag of concrete, plus your water source, to the hole, along with your precut post. Pop the post into the ground, making certain that its final location is centered in the "crosshairs" you sprayed on the ground earlier. If you're using concrete mix, you'll have to hold the post in place while your helper pours a quarter to a third of a bag of concrete mix into the hole. If you wish, your helper may splash some water into the hole after it (loosely following the manufacturer's instructions for the mix). Some folks just leave the concrete dry and let it get wet and "set up" later when it rains or the water table raises. Then, using the level, keep the post vertical as your partner scoops the dirt back into the hole and begins packing it in place. You'll need to keep checking the level against two adjacent sides of the post to make certain it is vertical "front to back" as well as "left to right." Not all of the dirt will go back into the hole, but get as much packed back in as you can. Use a 2x2 to tamp the backfill in as firmly as you can. Then move on to the next post. You'll be surprised how fast the whole process goes once you've done a couple.
To be on the "safe side," some folks (especially those counting on concrete really hold things in place) like to do the posts one day and the stringers (horizontal pieces) the next day. But if your posts are well set, there's no reason the the stringer team can't follow the posthole team fairly closely.
Making the Final Cut
When your posts (or at least a segment of your railroad) are solid, figure out which post is "shortest," then get out your laser level and mark all the other posts to the same level (unless you are planning on a grade of some kind). You may discover that, though you planned to raise your railroad to 24", the shortest post now is 28" above the ground. You may choose to leave it that height and bring all of your other posts to that level, but remember that you may need extra backfill, retaining wall blocks, or other materials to make up the difference. You also need to keep in mind that the 2x6" stringers and the 1x6" "plates" will add about an additional 2.3" to the height of the project. Personally, I think a railroad that's 30" off the ground is easier on the knees and back, but don't bust your overall budget or build a railroad your grandchildren can't see just because you have enough "extra" height to add six inches to your railroad.Note: If you didn't use concrete to set the posts, or if you think you may want to adjust the grade later for some reason, consider attaching 2x6" blocks to the posts and using those to support the roadbed. The "Horizontal Support" alternative method described in Appendix 1 provides more informaton on this alternative.
Measure and Cut the 2x6 Stringers
The horizontal boards that connect bridge or trestle piers and support the track are called "stringers." The stringers that will support straight pieces of track are easy - a five-foot stringer supports a five-foot piece of track.On the other hand, the stringers that support the curved pieces of track have to be cut at the correct angles. The angle you use depends on whether the track you are using comes 12 pieces to a circle, 16 pieces to a circle or, in the cast of many O gauge trains, 8 to a circles. Once you're sure how many pieces of your track make a circle, download and print the appropriate template. That will help you cut your roadbed appropriately. Do not resize or allow your software to resize the template, as the angle must stay the same to be accurate. Print the templates in "landscape" (sideways) mode on your printer. (If you you want to check your printout against an actual protractor, please do so.)
| Most garden railroad track comes twelve to a circle. This includes most track that makes a 4' circle, a 5' circle, and a 10' circle.
Note: Though it isn't recommended for outdoor use, traditional American Flyer S gauge track and much of the track that comes with HO train sets, also take 12 curves to a circle. So if you are building a temporary railroad for those trains, you will probably use this template as well. | Download the template for track that comes 12 to a circle |  |
| Most garden railroad track that makes an 8' circle comes 16 to a circle. This requires a different template.
Note: Though it isn't recommended for outdoor use, Lionel's O-72 FasTrack "half-pieces" also take 16 curves to a circle. So if you are building a temporary O72 railroad using FasTrack, you will probably use this template as well. | Download the template for track that comes 16 to a circle | 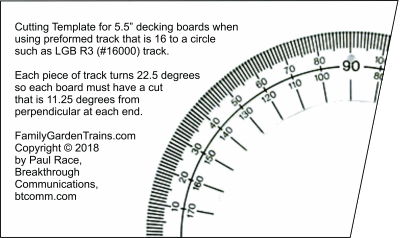 |
| Lionel's standard track, including O, O27, and FasTrack, comes 8 to a circle. If you are building a temporary Lionel railroad, you will probably find this template useful. | Download the template for track that comes 8 to a circle | 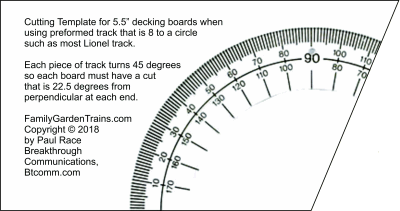 |
Using the template you printed earlier, measure and cut the horizontal pieces you need from the 2x6s. The examples shown below use the smallest curved track pieces, which make 48" circles. However the principle applies to any track circle you buy, as long as you are using the correct template.
| 1. Use the template to measure and cut the appropriate angle at the end of the board. If you absolutely have to do the math yourself, see the appendix. | 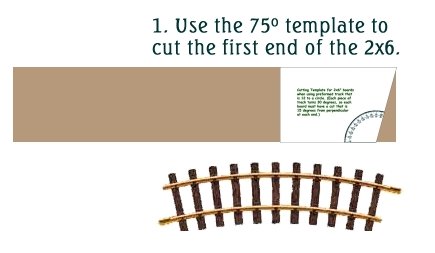 |
| 2. Remove the template temporarily and align the piece of track you are cutting for along the 2x6 as evenly as you can, lining one end up with the end that you cut. | 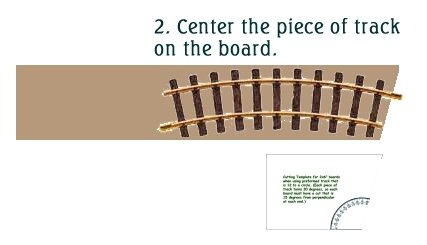 |
| 3. Flop the template over, slide it underneath the track, and use the template to measure the other end of the board. | 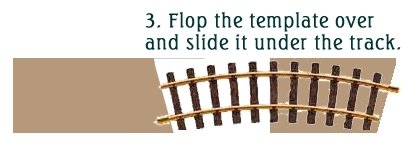 |
| 4. Cut the other end of the board appropriately. You may use the board you have cut as your template now. Mark it somehow so you don't accidentally pick up another one and start using it. Even very small differences between pieces can cause problems if they're multiplied across several pieces. Rotate your new template board 180 degrees to mark the next piece. Then do the same again. You should have three even-sized pieces. | 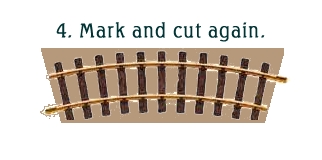 |
| 5. To check your work, lay the three pieces you have cut so far together and fasten three pieces of track together on top of them. You'll see that you have some "give" in either direction, but you want the curves to be reasonably centered on all three pieces and about the same length. If your pieces seem a tad short or long, make the appropriate adjustments on the next three boards you cut. Once you're certain you're "doing it right," feel free to cut the rest of the pieces you need in this size, and move on to the next size. If you're not sure how to measure the pieces to go underneath the straight track, I'm afraid I can't help you. | 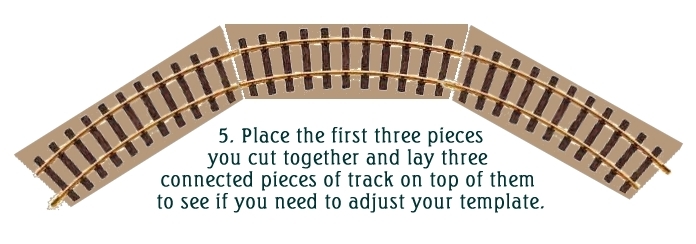 |
6. When you are done cutting the stringers, start on the 1x6" boards. Cut one 10" board for every piece of roadbed you have cut so far. These will be used as "plates" to join the roadbed.
Determine the "bottom" of each stringer.
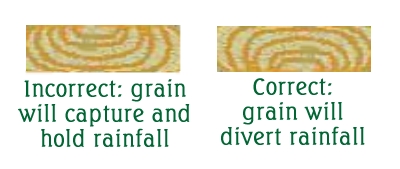 Look at one end of each piece of 2x6 you have cut. If the grain of the piece simply looks like a series of parallel lines, simply lable the least attractive side "B" or some similar indicator that means something to you. On the other hand, if the grain makes a "bowl" pattern on one or both ends of the board, you want to make certain that, in the final installation, the pattern resembles an upturned bowl instead of a right-side-up bowl. That way the grain of the wood will shed moisture instead of capturing it. Again, once you've decided which side needs to be on the bottom, mark it clearly. Why do we mark the bottom and not the top? Because in the final assembly, the top will be visible, but the bottom will not.
Prepare Subassemblies
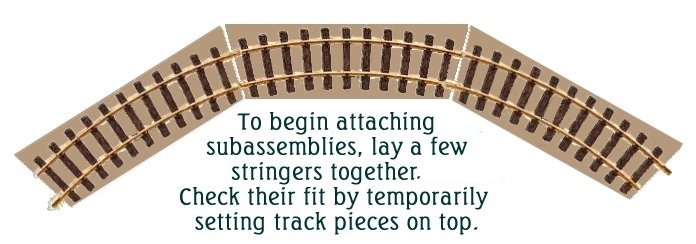 Some folks who use this method simply take the pieces out to the posts and start screwing them down. Others fasten a few pieces together at a time and install them in sections. This gives you another chance to make certain your roadbed is going together exactly as planned, and helps you get the plates right where they need to be. To start this process on a segment with curved sections, lay 2 to 4 cut pieces of 2x6" together on a flat, hard surface like a driveway or patio, with the "B" side up. To check the position of the boards, fasten a few curved pieces of track together and lay them on top.
Update from 2009: - When I built my first railroad this way, I used the "upside-down-method to reduce the number of screw-holes visible from the top when the roadbed is assembled and to make it easier to center the "plates" where they needed to be. Since then, I've learned that most folks don't use an up-side-down assembly, and their finished roadbed looks as good and holds up as well as mine - after all, these 2x6 boards were designed to have screws shot through them from the top. So you can do it right-side-up if it's easier or makes more sense to you this way.
When you are satisfied with the position of the stringers, remove the track and center 1x6" plates over the junction between the pieces. Holding the pieces you are working on carefully in place, use the 2" screws to fasten the plates to the stringers. 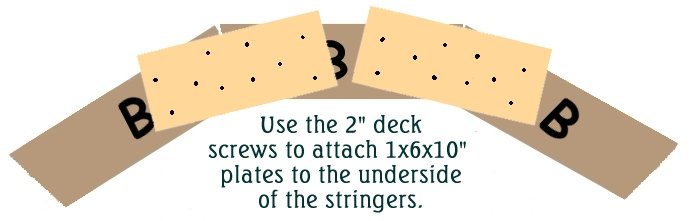 I'm told that professional installers recommend ten screws per plate, especially if you have longer stringers. Each each set of five screws is driven in an "X" pattern. The assembly may still have a little up-and-down "wiggle" when you've finished; but remember, the whole thing will be supported by posts every so many inches eventually.
The final test of a subassembly comes when you turn it right side up and set it onto the cut posts where it is supposed to go. It is, unfortunately, normal for a piece or two not to be centered very well onto over the appropriate post, but as long as there aren't too many mismatches, and the stringer overlaps the post by at least an inch in each case, consider it a successful installation.
As you continue to put your subassemblies together, you may wish to fasten a plate to one end of each subassembly before you start fastening them each to posts. This will give you a chance to make certain that end is properly assembled, and reduce the amount of "upward" screwing you have to do when the whole thing comes together.
Note: Although the method above works well for a person working by himself, I've known teams of folks who've installed everything on the posts at teh same time, driving screws down through the stringer, plate, and post all at the same time. Be careful where your "help" is holding on to things when you start shooting screws, though.
Screw Subassemblies to Posts
When you have screwed together subassemblies as long as you or your team can reasonably handle, start fastening the subassemblies to the posts, begining with the section closest to the most common viewing position. (That way, if you have a glitch somewhere else, it won't be as noticeable to most viewers.) Generally this works better if you have three people, one to hold and fasten the piece being worked on, and two to hold the adjacent sections in place to help you make certain you're getting things exactly where you need them.Begin by screwing a long deck screw through the 2x6" stringer and 1x6" plate right into the post. Do not fasten the screw down as firmly as possible, until you've go the whole section (or whole railroad) fastened down loosely. Now do the next post in each direction. Again, you might consider laying the appropriate track pieces on top of each assembly as you get it fastened down to make certain things are going together as well as possible. If it turns out that part of your assembly needs to be taken back up and adjusted, it's a lot easier to do before you have the whole thing bolted down as firmly as possible. Also, some of your plates may be screwed only to one stringer. You'll have to get down and shoot some screws up through the plate into the stringer that isn't fastened yet.
By the time your stringers and plates are attached loosely to the posts all the way around, you should be able to tell if any more adjustments need to be made. When you're certain the "fit" is as good as possible, use the level one more time to make certain the roadbed isn't rising and falling unnecessarily between posts, or that the rail height of any piece of track is uneven. If you need to slide a "shim" in between a plate and a post, this is the time to do it. Again, when you're satisfied you have everything as leveled and centered as possible, go back and add the other long screws (at least two per post) and tighten down the ones you've already installed.
 Install Track
By now, you should have most of the track pieces fastened together laying where they belong. If you have AristoCraft or USA trains track, screw the track pieces together using the screw-on rail joiners that come with the track. If you are using some other manufacturer's track, follow that manufacturer's guidelines for a permanent installation. If you discover that you have to cut a piece to get something to fit properly:
When things finally look like you hoped they would, wipe the track clean, put on a locomotive, and let it go slowly around the track. Look for places where voltage seems to drop, or the locomoitive seems to jerk or struggle. You may find yourself running jumper cables to get maximum voltage to the far end of the track. When you're satisfied with the electromechanical status of your new raised roadbed and track, you are ready to address some cosmetic issues.
Trim Ragged Corners
Using your circular saw, whack off the ragged corners where either the stringers or the plates stick out. Generally, I use from one to three straight cuts to get things looking pretty even without straining my circular saw too much. (Famed display railroad designer Paul Busse has been seen using a $200 circular saw to cut smooth curves into stringers and plates, but I won't recommend that to anyone without a huge tool budget and a lot of skill.)Closing the Gap
Now part or all of your railroad is a foot or more off the ground. You can backfill, build retaining walls, build rockgardens, or even put in a pond to fill in the blank between the ground and the railroad level. There's also no reason you can't add a trestle or bridge appearance to all or part of the raised section. The best part is that you can have your trains running the whole time you're working on the rest of this stuff. Options include:
Conclusion
 Once again, this is only one approach for raising a roadbed, and many other approaches have been used successfully. (A few related approaches are described in Appendix 1 below.) However, if you are just starting out, and you want to try to single most "tried and true" method for raising a garden railroad, this is a great place to start.
As always, I want your feeback; please let me know what is helpful, what is confusing, and what shortcuts or "gotcha's" you'd like me to pass on to our readers. In the future, I hope to add a section on variations that have been used successfully; however I didn't want to add too many of those variations in the core article; it's quite long enough.
Best of luck, all,
Paul D. Race
Appendix 1: Popular Variations
Because this method has been around so long, it has been adapted many time sto specific needs or interestes of individuals. This is simply a short list of some of the more popular variations.
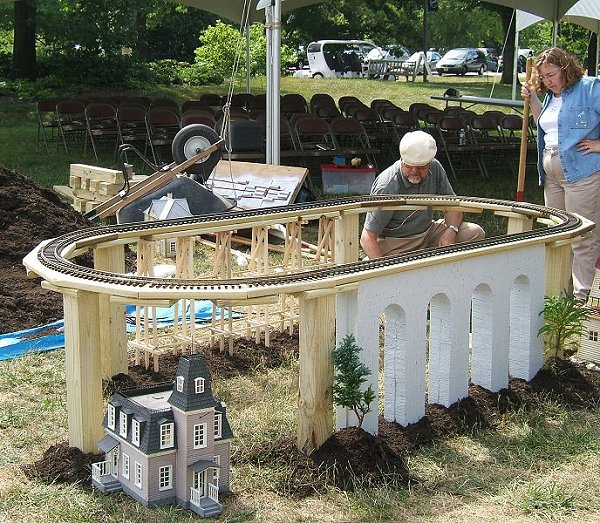
 My old garden railroading friend Fred Mills lives near Ottowa (in Canada), where the frost line is so deep up there he would have to sink "fence posts" half way to Niagra Falls to get past it. He also likes being able to shift things around as his needs and interests change, and doesn't find sunken 4x4 posts flexible enough. So, among other approaches, Fred has used DekBlocks, concrete pier footings that have a slot that takes a 4x4 post. You can see one in the lower right corner of the photo.
 Temporary Display Layouts
Appendix 2: Calculating Cutting Angles for Roadbed
To do the math yourself:For example:
Now isn't it easier just to use the little templates?
If you have any images of your railroad construction that you'd like to share or any tips or other things I've left out, please get in contact, and I'll publish whatever you have.
Best of luck,
Paul D. Race, Editor for Family Garden Trains


