| |||
 |
 |  | |
 |  | ||
 |  | ||
 |  | ||
 |  | ||
| |||
|
| | |
| | ||
| | ||
| | ||
| | ||
Written by Paul D. Race for Family Garden Trains(tm)
 |
|
|
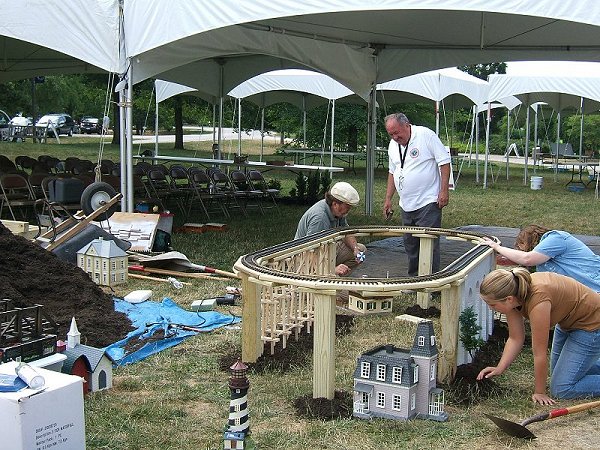
Building a Temporary Outdoor RailroadEver wish you could set up a small temporary outdoor railroad for a special occasion, such as Christmas decorating, a kid's party, train club publicity, or a neighborhood block party or street fair? Or do you wish you had a garden railroad, but you rent your house? Turns out, it's pretty simple to make a portable outdoor railroad that you can set up and tear down again and again, and move in the average hatchback.The Little Railroad that CouldI first built the temporary railroad that I use every year for a 2007 garden railroading clinic in Holden Arboretum (near Cleveland), I didn't really think I'd still be setting it up at least once a year five years later, but, the truth is, it disassembles easily for storage, it's not that much trouble to set up, and it's useful for all sorts of things.I've also run all kinds of trains on the little railroad, including the Large Scale Thomas and James, streetcars, and the Lionel toy "G gauge" trains that use plastic track. What About Other Scales?I also get inquiries from people wanting to set up a temporary outdoor Lionel railroad for Christmas or other events. The big difference in creating one of these for a Lionel train is that Lionel curves are different, so you use a different template when you cut the lumber. And you can't leave Lionel trains or track out overnight unless you're really into rust. (Atlas and Gargraves make O-gauge track you can leave out, in case you wondered.) Temporary S, Standard Gauge, HO, and On30 railroads are also possible.To be as inclusive as possible, we've included templates and tips for garden trains, Lionel, American Flyer, HO, and On30 trains in the article. Whatever scale you use, selecting the right template from the table at the end of the article is the key to a mistake-free 2-3 hour project. And once you've built it the first time, it's easier to take down and set up every year than a lot of seasonal decorations. More Than You Probably Need to KnowThe instructions may seem long (because I am including enough information for just about anybody to do it right the first time), but they all boil down to a few simple steps that make total sense once you get into them. Here's a summary.
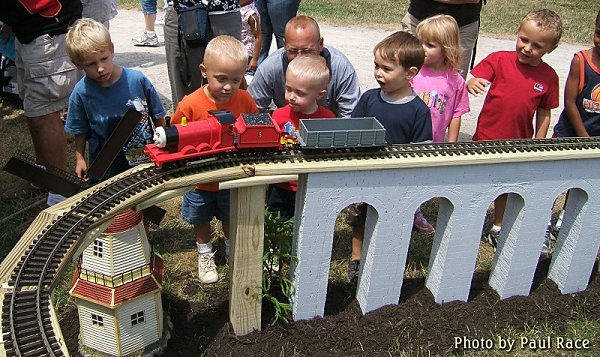
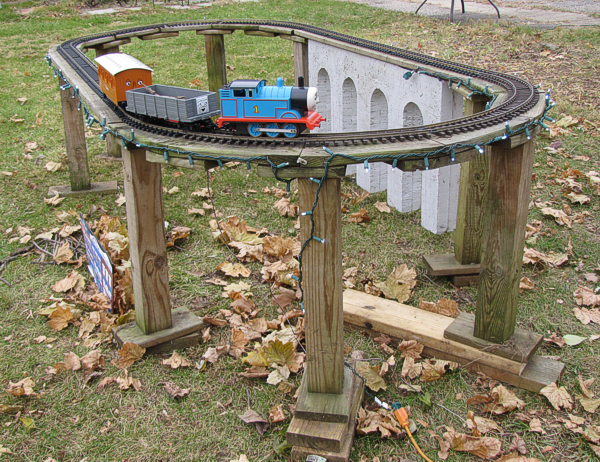
For most people, the first time they do this, the first eleven steps equate to one trip to the hardware/lumber store and three hours in the back yard with a circular saw and power drill (with a Phillips-head bit). You can work by yourself except for step 11, where another person can be a big help. And the last, decorating bit can take as long as you want. Folks who seldom use power tools may be afraid of all the cutting, but the templates make it very easy to cut the correct angles. Folks who are afraid of cutting up a bunch of lumber, then realizing they did it wrong, are glad to discover that they can test their cutting after the first few pieces and make adjustments if they need to. And if you "butcher" a stringer, you can always reuse the lumber for a plate or base plate, so it's pretty hard to waste lumber on this project. The next time you build one of these, you'll "whip it off" much more quickly. Differences Between Temporary and Permanent ConstructionWhen I use a similar technique to build permanent raised outdoor railroads, I cut the posts longer and sink them into the ground instead of putting them on bases. To make the railroad as solid as possible, I also use 2"x6" pressure treated lumber for the "stringers" instead of 5/4" decking. That said, the decking has held up suprisingly well. As far as I can tell, there's no reason you couldn't use the instructions and recommended materials in this article to set up a railroad that would last for several years and still disassemble and reassemble somewhere else with a little power screwdriver work.Why Solid Roadbed?Technically, a person could put a loop of track directly on the ground or on a circle of concrete blocks or the like. But trains run better if the track is smooth and even. If you're going to use plastic track or track that comes with indoor trains, a solid roadbed is critical. And when you're running a display railroad on which the trains may be running eight hours straight, anything you can do to minimize derailments is well worth it.If you're going to be setting up an HO or O gauge railroad with 36"-diameter circles (they really take up about 38" of space), you could get a piece of 4x8" plywood and either cut arcs out for the track, or use it as a tabletop. But I consider the look of the roadbed built up from boards as more elegant and much more durable. And it's really very little work once you get the hang of it. Why Raised?One friend who sets up temporary railroads at special events uses 6" or 12" posts, which frankly, work better if you're running trains around ponds or other ground-level features.That said, we find 2' posts helpful for kids' railroads - kids like having Thomas or James at eye level, and it's easier for us old folks to get the trains on and off the track.
If this is for a winter display, you would be surprised how easy it is to "whisk broom" off a raised railroad and run trains, even when there's a foot of snow on the ground. That said, if your ground is level and you want to put your roadbed, say, on concrete blocks, that works too. The main thing is to have a solid roadbed. Once you've done that, the whole "railroad" will handle trains safely and disassemble, transport, and reassemble easily. And of course it can easily be made longer and or wider simply by adding a few more supports and more straight boards, which are no trouble to cut and install at all. What kind of Track and Train Will I Need?I've used both garden trains with brass track and toy trains with plastic track.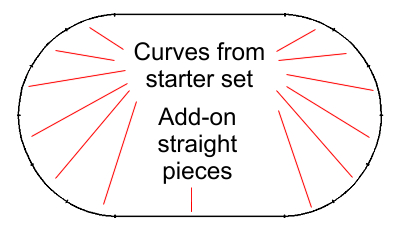 If you have garden trains, this will give you a good use for the 48" track circles that come with train sets and are too tight to use anywhere but around the Christmas trees. To make the train long enough to keep little kids' attention, I usually add two 5' pieces of add-on track. If you have garden trains, this will give you a good use for the 48" track circles that come with train sets and are too tight to use anywhere but around the Christmas trees. To make the train long enough to keep little kids' attention, I usually add two 5' pieces of add-on track.
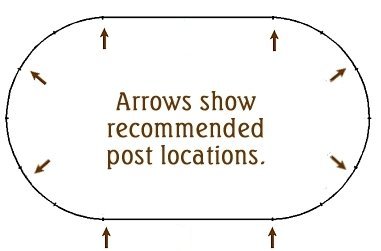
On the other hand, if you have a train that comes with plastic track, you'll already have enough straight track to make your railroad even longer. Just adjust your "straight decking" measurement and number of supports accordingly. Any small train (like the kind you get in a train set) or single item like a trolley will do just fine. For example, I have Bachmann street cars that I run on this RR when there aren't any kids around to appreciate Thomas. Ordinarily the power supply that came with the train set has more than enough power. The Bachmann street cars will even run on an HO power pack. How Much Lumber and Supplies Will I Need? The drawing to the right shows the basic principle of this approach. If you want to build the same sized railroad I built, you'll need about 48' of #2 grade 5/4"x6" decking and two 8' 4"x4" #2 grade posts. At today's Home Depot pricing, that's about $50 worth of lumber. Yes, you may wind up paying more, but still, it's not going to bankrupt most families. The drawing to the right shows the basic principle of this approach. If you want to build the same sized railroad I built, you'll need about 48' of #2 grade 5/4"x6" decking and two 8' 4"x4" #2 grade posts. At today's Home Depot pricing, that's about $50 worth of lumber. Yes, you may wind up paying more, but still, it's not going to bankrupt most families.
And once you have the basic framework in place, how much time and money you spend decorating and accessorizing it is up to you. 5/4"x6" Decking lumber - This will make the "stringers," the long pieces the track sits on. It also works for making the 10" "plates" to connect the stringer pieces and the "base" pieces that the little posts sit on. To figure out how much decking you need for your stringers
In this example, I had a 4'-diameter circle and two 5' straight pieces. So 3.3x4'=13.2' of decking for the curves, plus 5' for the straightaways, making 23.2' of decking for the stringers. Multiplying by 115% (to add in the fudge factor), I get just under 27'. There is a table in the appendix for the minimum lengths of 5/4"x6" decking you'll need for the most common preformed track diameters. To figure out how much decking you need for the "plates" under the roadbed count the track pieces you expect to use. In my case, I used 12 curves and two straights, so I needed 14 "plates" to connect them all. At 10" each, that's 140 inches, or just under 12'. To figure out how much decking you'll need for the base plates, count your number of posts. As you see in the photos, I used 6 posts the first time I set it up and 8 posts ever since. My 10" base plates seem to be long enough to keep everything stable as long as everything is fastened together properly. So using my example, 8 base pieces x 10" equals 80" or a bit under 7 foot. Total 5/4" decking requirement based on the above math are about 47'. Home Depot often sells 8' "seconds" pretty cheap. I might have made due with 6 boards, for a total cost of around $30-36, depending on what they were charging for lumber that day. But I usually buy an extra board or three just to be on the safe side. (I can always take it back if I don't need it).
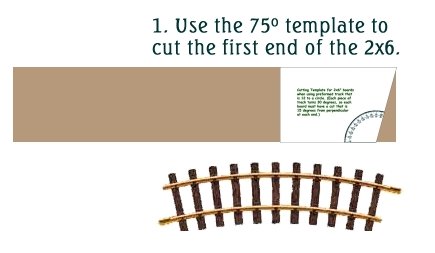
4"x4" Pressure-treated posts - For permanent railroads, most folks use one post per Lengthwise, 1' and 2' posts are the most popular. Hopefully you can do the math for how may 4"x4"x8' posts you need to start with. 2" Deck Screws - You'll use these to screw the stringers to the plates - you don't want them too long. Get the extra, extra galvanized kind that works with ACQ lumber. You will need about 10 per piece of track. Get an extra dozen or so just to be on the safe side. 4" or 5" Deck Screws (for ACQ lumber). You will need about 3 per piece of track. Get an extra dozen or so just to be on the safe side. Note: Whenever you buy lumber for an outdoor train project, be sure to pick the lumber out yourself. A few knot-holes won't cause you any problems, but if the boards are twisted at all, you can't use them. Don't feel bad about going through several dozen boards to get six good ones. The salespeople at the hardware store may pretend you're being a twit by "taking all the good boards for yourself." But you're not taking that many boards, and trust me, contractors who care about their finished product do exactly the same thing. Measure and Cut the 2x6 StringersThe horizontal boards that connect bridge or trestle piers and support the track are called "stringers." The stringers that will support straight pieces of track are easy - a five-foot stringer supports a five-foot piece of track.On the other hand, the stringers that support the curved pieces of track have to be cut at the correct angles. The angle you use depends on whether the track you are using comes 12 pieces to a circle (most common for G, S, HO, and On30), 16 pieces to a circle (LGB 1600 curves), or 8 to a circle (most O gauge and Standard Gauge trains). The table at the end of this document will help you. Once you're sure how many pieces of your track make a circle, download and print the appropriate template. Do not resize or allow your software to resize the template, as the angle must stay the same to be accurate. Print the templates in "landscape" (sideways) mode on your printer. (If you you want to check your printout against an actual protractor, please do so.)
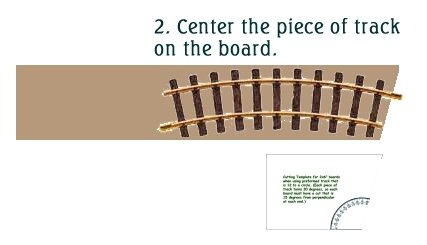
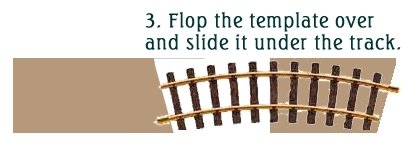
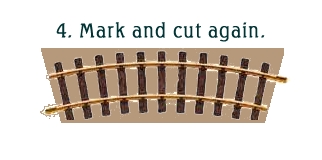
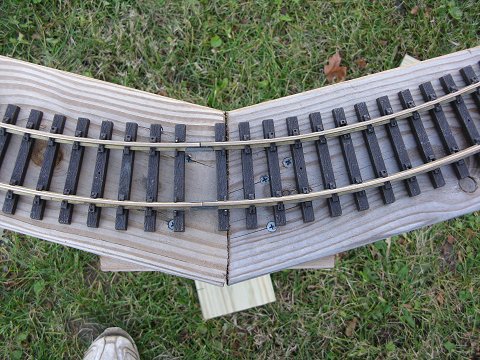
Cutting the Decking - Using the template from the appendix, measure and cut the stringers (horizontal pieces) you need from the decking material. This example uses the smallest curved garden train track pieces, which make 48" circles. However the principle applies to any track circle you buy, as long as you are using the correct template.
6. When you are done cutting the stringers, start on the "plates." Cut one 10" board for every piece of roadbed you have cut so far. These will be used as "plates" to join the roadbed. Determine the "bottom" of each stringer.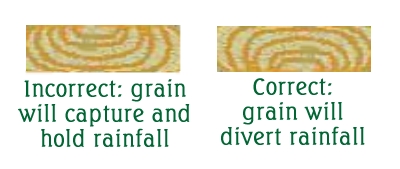 Look at one end of each piece of 2x6 you have cut. If the grain of the piece simply looks like a series of parallel lines, simply lable the least attractive side "B" or some similar indicator that means something to you. On the other hand, if the grain makes a "bowl" pattern on one or both ends of the board, you want to make certain that, in the final installation, the pattern resembles an upturned bowl instead of a right-side-up bowl. That way the grain of the wood will shed moisture instead of capturing it. Again, once you've decided which side needs to be on the bottom, mark it clearly. Why do we mark the bottom and not the top? Because in the final assembly, the top will be visible, but the bottom will not. Look at one end of each piece of 2x6 you have cut. If the grain of the piece simply looks like a series of parallel lines, simply lable the least attractive side "B" or some similar indicator that means something to you. On the other hand, if the grain makes a "bowl" pattern on one or both ends of the board, you want to make certain that, in the final installation, the pattern resembles an upturned bowl instead of a right-side-up bowl. That way the grain of the wood will shed moisture instead of capturing it. Again, once you've decided which side needs to be on the bottom, mark it clearly. Why do we mark the bottom and not the top? Because in the final assembly, the top will be visible, but the bottom will not.
Prepare Subassemblies
Note: When I first wrote these instructions, I was in the habit of putting my subassemblies together upside down, to minimize the number of screw holes that would be on the top, once the roadbed was assembled. In retrospect, that was overkill. A friend explained that if you drive them in correctly, the screws basically disappear anyway, and he was right.
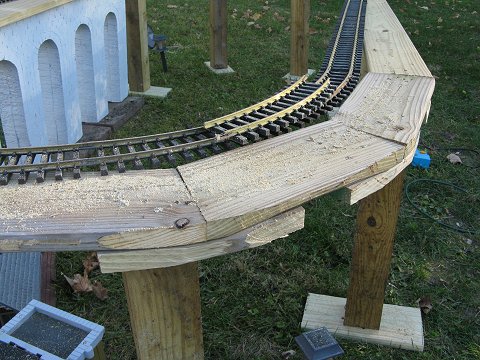
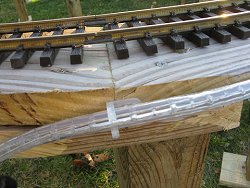
Screw Subassemblies to PostsWhen you have your subassemblies screwed together, screw the base pieces onto each post and set the posts about where you think they will go. I set the base plates perpendicular to the right of way for additional stability.Attaching subassembies to your posts goes much easier if you have someone holding a couple posts up at a time, and setting the next post or two up as you go work your way around. Frankly, this is the only part of this project where having a second person really helps. There are a few "shaky" moments at first during which the stringers could shift sideways and the whole thing could collapse like a house of cards. Having a person to hold it steady as you're screwing it together will make your life much simpler. In railroads that use 4' curves or less, I like to start with semi-circle subassemblies. I set up the four posts that will hold up the first semicircle and start screwing the subassembly down to them. This is a relatively stable way to get started. Make sure each post is under a plate, so you have a flat surface to drill down through. The posts don't have to be under the center of the plate - in most cases they won't be. Begin by screwing a long deck screw through the 2x6" stringer and 1x6" plate right into the post. Now do the next post in each direction. Once you have the whole right-of-way lightly attached to the posts, lay your track pieces on top of the assembly to make certain you did the math right. Then remove the track and fasten the whole thing together with additional screws. You may notice bumps or depressions in the soil that make certain posts "taller" or "shorter" than they should be. Usually a bit of gravel or a judicious bit of shovel work "fixes" the problem. Alternatively, you could "shim" up the track in those places once everything is stable, or slide pavers or scrap lumber under the base plates (I have a "worst-case-scenario" photo of this "fix" a few inches down the page). As you begin attaching subassemblies together, you'll be adding in stringers you haven't attached to the subassemblies yet. Usually this isn't hard, especially if you have help. By the time your stringers and plates are attached loosely to the posts all the way around, you should be able to tell if any more adjustments need to be made. When you're certain the "fit" is as good as possible, use the level one more time to make certain the roadbed isn't rising and falling unnecessarily, and that the rail height of each piece of track is even. If you need to slide a "shim" in between a plate and a post, this is the time to do it. Again, when you're satisfied you have everything as leveled and centered as possible, go back and add the other long screws (at least three total per post) and tighten down the ones you've already installed.
In fact the first time we set this up, we covered the bases with mulch, and the whole thing looked much more permanent and professional - something to think about if you're doing this for a garden club or someplace that might want a more professional look. Smoothing Off The Corners - For a final touch, you can use your circular saw to "smooth off" the corners. This is especially helpful if you're going to add rope lighting or some such around the outside edge.
Finishing IdeasAs I mentioned earlier, dumping mulch on the bases makes the whole thing look much more permanent and finished than it would otherwise. I don't usually bother with this in my own back yard, especially when I set this up for a 6-week span before Christmas, but it's something to think about if you're setting it up someplace "classy."I used to find the tallest buildings I had and set them around, but there was always the danger of some little person kicking one. These days, I tend to use temporary building fronts made from recycled signs. The dress things up a bit, but if a kid manages to damage one, I'm only out about $6. Come to think of it, there's no reason I couldn't make these taller for next time, which would help fill the gap between the ground and the raised railroad. Speaking of "filling the gap," it never really bothers the kids that Thomas (or whichever train I'm running) is over 50 scale feet above the ground, but it does look better if you can camouflage the gap a little. Here are some ideas for that and other "cosmetic" additions:
ConclusionThough we designed this little railroad for one purpose, we now realize that this kind of construction has dozens of applications. It can be as temporary or as permanent as you want to make it. It's ideal for rental properties, seasonal railroads, or special events or shows.It's even useful for folks who have plans and room for a big permanent garden railroad. If that describse you, I'd recommend taking an afternoon off of that effort and building one of these so:
In fact, if I'd built this railroad before I started my big permanent one, I'd have done things differently on the big one and I'd have avoided a bunch of rework later. This project can also be relatively inexpensive. To build something similar to my original loop today (based on current pricing,) you might find yourself spending:
Buildings and other "decorations" are up to you, but if you dig around the rest of our pages, you'll see some inexpensive ways to add those as well. Here's hoping that this simple inexpensive project will give you a taste of what it is to create an attractive, low-maintenance outdoor railroad. How long you keep it up, how many years you use it, and what you do after this is up to you. :-) Please contact us with suggestions, corrections, photos, etc. And, above all, enjoy your trains. Appendix: Decking and Template TableThis table shows the minimum lengths of 5/4"x6" decking you'll need to make a circle of roadbed to support the most common preformed track diameters. Caveats:
|


Note: Family Garden TrainsTM, Garden Train StoreTM, Big Christmas TrainsTM, BIG Indoor TrainsTM, and BIG Train StoreTM are trademarks of For more information, please contact us
|
||||||||||||||||||||||||||||||||||||||||||||||||||||||||||||||||||||||||||||||||||||||||||||||||||||||||||||||||||||||||||||||||||||||||||||||||||||||||||||||||||||||||||||||||||||||
 Choose the right template for the kind of track curves you have, using the table at the end of the article.
 Cut the posts to the length you've decided on.
 Cut three "stringers" (the horizontal pieces that support the track) from 5/4" decking using the correct template from the table at the end of the article.
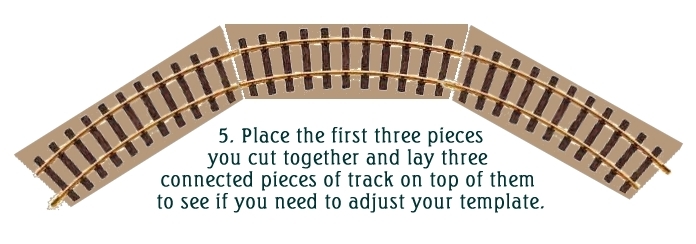
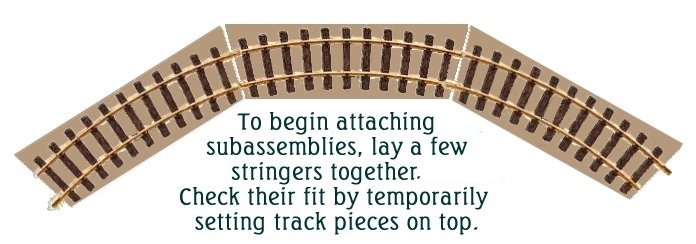
 Test the stringers by fastening three pieces of track together and setting it on top of three stringers.
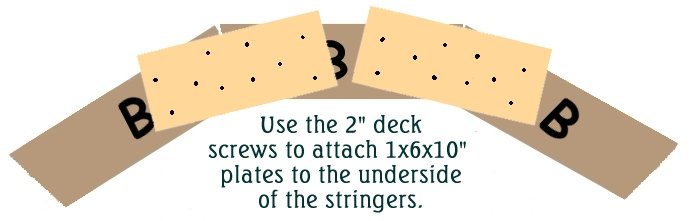
 Create subassemblies (arcs or semicircles) that you can fasten together once you start setting things up. (You screw the stringers to the 10" plates using 2" deck screws).
 With the help of a friend, screw the subassemblies to the posts, using 4" deck screws.