| |||
 |
 |
 | |
 |
 | ||
 |
 | ||
 |  | ||
 |  | ||
| |||
|
|
|
| |
|
|
| ||
|
| ||
| | ||
| | ||
Written by Dave Knoch for Family Garden Trains(tm)
 |

|
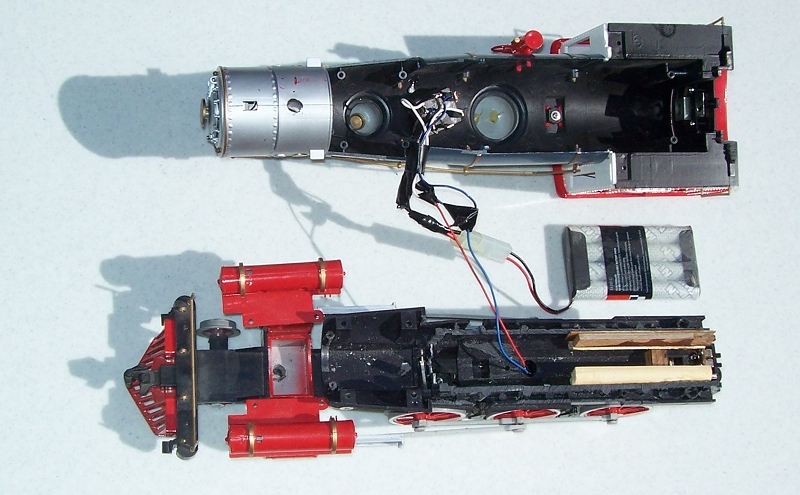
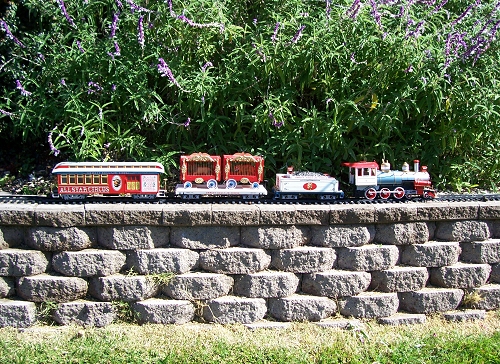
Editor's Note: Dave Knoch has been running battery powered trains in his garden railroad for many years, often on plastic or aluminum track. When he saw our article about Garden Railroading with Toy Trains, he offered to share some of his experiences with our readers. If you have an old Bachmann locomotive in need of repair, you might contact Bachmann before you do anything - they will fix all of their electrically powered locomotives for a flat fee, and sometimes they'll take a look at the battery powered ones too. But we included this article as an example of how to retrofit almost any battery-powered locomotive with a directional switch if desired. If you have any questions for Dave, contact us and we'll pass your comments to him. New Life for a Battery-Powered Bachmann Ten-WheelerI bought the original battery-operated Bachmann 10-wheeler Circus Train years ago. After it broke, I put it in an old picnic cooler and basically forgot all about it. Recently we were cleaning out the garage and I decided to see if anyone at our Central California Coast Garden Railway Society would like it. I asked if anyone there knew how to repair it. The answer I got back was, "Why would anyone want to spend at least $90 to repair an old engine that was probably now worth only $40?" When I got home I looked at my beautiful red, white and blue engine and thought to myself, "What have I got to lose?" I decided to try and make it runable again myself. I no longer had the simple remote control that came with the set. So I figured I would simply operate it with a basic 3-way switch (forward/stop/backward) that you can get from Radio Shack. I laid my engine on a thick piece of soft foam, which would be my "operating table." First, I had to figure out how to pull the engine apart. I removed all the screws that I found in the bottom and sprung apart the tabs on the cab so it would slip off the base. I removed the running boards on each side. Eventually, the top finally came off, revealing the innards. Because I no longer had the remote, I removed the whole circuit board and most of the wires. Basically, the only wires I left were the red and blue power leads to the motor. I also took a hacksaw and removed any interior walls which would obstruct my new race-car type battery which I would use to power the engine. I also glued two strips of triangular basswood in the two sides of the rear of the former battery compartment. These were to hold the new battery pack vertical. (You can see them in the photo below.) Next, I tackled installing the control switch. I removed the plastic bell from the top of the boiler and enlarged the hole large enough so that the switch could be installed.
I soldered each connection. Where the wires branched off, I covered the joint with electrical tape. To finish the job I reinserted the two screws in the sideframe (between the drive wheels), one on each side. To charge or change batteries all you have to do is remove these.
 Here are other articles with tips and tricks about running battery-powered toy trains outside.
|


|

| 
|
|
 |
|
 |
 |
Note: Family Garden Trains?, Garden Train Store?, Big Christmas Trains?, BIG Indoor Trains?, and BIG Train Store? are trademarks of Breakthrough Communications (www.btcomm.com). All information, data, text, and illustrations on this web site are Copyright (c) 1999, 2000, 2001, 2002, 2003, 2004, 2005, 2006, 2007, 2008, 2009, 2010, 2011, 2012, 2013 by Paul D. Race. Reuse or republication without prior written permission is specifically
forbidden.
Family Garden Trains is a participant in the Amazon Services LLC Associates Program, an affiliate advertising program designed to provide a means for sites to earn advertising fees by advertising and linking to amazon.com.
For more information, please contact us

 |  |