 | |||
 |
 |  | |
 |  | ||
 |
 | ||
 |  | ||
 |  | ||
| |||
|
|
| | |
| | ||
|
|
| ||
| | ||
| | ||
Written by Paul D. Race and Mike Whitcomb for Family Garden Trains(tm)
 |
| Please Read: How to Help Our Site at No Cost to You - Some of our articles contain recommendations for products we like and vendors we personally trust. Some of those vendors may pay us a very small commission if you click on a link and buy their products. This costs you nothing at all and helps offset the costs of what we do. So if we point you to something you decide to buy later, please make certain you come back through our site and click on the link directly. Thanks. |
| This Site is a Cookie-Free Zone - Except for discussion forums that you have to expressly registor for, none of our pages use cookies of any kind. Some of the vendors we link to do, but that won't affect you unless you click on a link to their pages. Your continued use of this page indicates that you agree to our policy. For details, click here. |
|
In this article, we outline a method for converting one example of Lionel's current line of battery-powered toy trains so that it will run on "G gauge" (45mm) track, the kind most garden railroaders use. Lionel's current (2019+) line of battery-powered toy trains run on 2" track, which keeps the 30,000 or so families with garden trains from running these "Ready to Play" trains on their G gauge railroads (45mm track, about 1.775"). I'm sure Lionel made that choice because their earlier line of battery-powered toy trains were all too compatible with G gauge toy trains from New Bright, Scientific Toys/Eztec, and similar companies. This way, if your first bigger-than-027 train is a "Ready to Play," you cannot currently expand your railroad empire with anyone else's product, Does that sound a little silly? Not if you remember that Lionel invented O gauge for exactly the same reason. But all is not lost - at least some of the "Ready to Play" steam trains can be coerced into running on 45mm track if you have a dremel and a few ordinary hand tools. But before we go into that, here's a quick run-down of the trains Lionel made that will run on G gauge (45mm) track. Trains You Don't Need to Convert - Although these are all discontinued, they still pop up from time to time, especially on used markets like eBay.
What Are "Ready to Play" Trains?Starting about 2018, Lionel began releasing battery-powered toy trains in a new format. The "Ready to Play" trains are virtually identical to the earlier battery-powered line. But they run on wider track - 2" (compared to G gauge, which is about 1.775").They are solid enough, and built to be handled by children. If you don't have a train yet, and you just want to buy something for the kids to play with, they're a pretty good deal. Especially for certain pieces, like the Hogwarts Express. As an example, the original G gauge battery version of the Hogwarts Express (7-11808, below left) was only made for a short time . Today, used sets are going for 2-4 times what the sets cost new.
The "Ready to Play" version (above right) was available in some stores for $50 after Christmas, 2019. It's still available for about $60 on sites like Amazon.
Caveat: This article is targeted toward people used to disassembling and working on model trains. Although this isn't a difficult conversion by model railroading standards, it does require tools, experience, and time. Frankly, if the only train you have is a "Ready to Play" set, and you lack any good reason for converting it to G gauge, you're better off leaving it set up for 2" track. Whatever you do, don't buy one of these and imagine you'll be able to have it running on your G gauge track in one evening with no problems. Mike didn't report any major problems, but I always encounter an unexpected "gotcha." Chances are you will, too. Since I first published this article, I've picked up a "Ready-to-Play" Polar Express. It looks like it would be a more difficult conversion. Also, I haven't had my hands on the little diesel sets yet, so I don't know how much, if any of this content will apply to them. If you try something like this, please let me know what you find. If nothing else, read this article carefully and be certain you understand it from beginning to end before you get started. I know, I may sound paranoid, but folks who have misread or failed to follow the instructions in other "how to" articles have sometimes blamed me when things didn't work out the way they expected. I'll gladly advise anyone who encounters a snag, but I'm not responsible if something goes sideways for you. Visual CompatiblityPaul speaking: Before I had the two sets side by side, I thought the new "Ready-to-Play" set looked smaller and cheaper than the "G gauge" set I owned. When I had a chance to compare them in person I realized that the passenger car bodies use the same exact mold, and that the changes to the locomotive mold are virtually imperceptible from more than a few inches away.
Click on the little picture to see photos of my comparison. Drive Wheel AdjustmentsWhen you remove the bottom cover of the locomotive, you see that the "bearings" are really rectangular plastic bushings that sit in the edge of the frame. Click on the photo below to see a "blowup."  The bushings aren't glued in; they slide right out. Three obstacles keep you from just shoving the wheels closer together.
The fourth obstacle is that once you've slid the wheels in, the axles stick out too far for the connecting rod to get over it. All of these obstacles will be addressed in detail in the following sections.
|
||||||||||||||||||||||||||||||||||||||||||||||||||||||||||||||||||||||||||||||||
 |
 |
The wheel should still be snug on the axle when you're finished. Now you should be able to push the wheel inward. One way to do it evenly is to put a nut in a nut driver, brace the other end of the axle on your work surface and push it in. (See above right.)
 Once you have the wheel set adjusted so it will run correctly on 45mm (G gauge) track (1.775"), the axles will be sticking out too far for the slide rods to slide over them.
Here's where you need a dremel with a cutoff blade. You could use a hacksaw with a very good blade, but you have to be very careful not to nick the face of the driver in the process.
There's no reason, you can't start the locomotive while it's upside down and observe the movement. Once you're sure it's going to be smooth, you can lubricate (optional) and close it up.
Optional - Lubrication - The bushings/bearings are supposed to be lubricated from the factory. But if you can't tell that they have, I would be inclined to consider dabbing just a tiny bit of Labelle #108 (light weight oil) or #107 (medium weight) where the axle goes into the bearing.
Labelle recommends the #107 for larger trains, but a local friend has been using #108 on his Large Scale trains for a long time with no problems. Come to think of it, I often run trains in cold weather, so maybe #108 would be better for me to use in this sort of application.
Both lubricants are synthetics that are safe on plastics. I'm also told they don't attract dirt as much as petroleum-based lubricants, though I haven't seen any absolute proof of that.
If the gears don't seem to have any lubrication to speak of, I would consider dabbing a tiny bit of Labelle #160 grease on the gears. Run the train (upside down) a minute, and you should see the grease working its way through the mechanism. You might need one more tiny dab of grease to be confident it is getting everywhere it should.
BTW, Labelle #160 grease includes the chemical component of Teflon, so it's considered to be better long-term than similar products from other companies.
Do not get grease or oil anywhere it shouldn't be, and wipe away any excess.
You can get a combo pack with #106 and #107 from Amazon here.
A combo pack with #106 and #108 is available here
Then screw the bottom plate back in place.
Also, I haven't seen the "General" (4-4-0 "American") in this line yet, but I wouldn't be surprised if its pilot wheels need tweaked as in the following section.
In our example, regauging the pilot and tender wheels on the Hogwarts locomotive is relatively easy, since there aren't any spacers. They only need to be popped out, squeezed into gauge, and popped back in. If you need extra pressure, you can always use the nut driver you used on the drive wheels.
Try to have about the same amount of axle sticking out of each wheel when you're finished, so the wheelset sits "centered" in the truck when it's reassembled.
The passenger cars on the Thomas "Ready To Play" train should be easy to regauge. There are no spacers, so you might could just force the wheels inward until they fit on 45mm track properly. Some of the other other cars may work as easily.
However the passenger car wheels on the Hogwarts train and some of the others have spacers built into the bearings/bushings.
The axles are not supported by the truck frames - rather by a square box that sits inside the wheels. One good point of this is that you don't have to worry about shortening the axles themselves once you adjust the wheel gauge.
The following photo shows what the truck parts look like with the bottom plate removed.

As the following photo shows, trim the extra plastic back until the wheels can be pushed inward far enough to fit on 45mm track. Don't cut so far back that the bearing/bushing doesn't fit snugly into the frame.

Once you have the wheels adjusted and the bushings back into the frame, you might want to lubricate them too.
Screw the cover back on. Don't overtighten the screws - they strip out more easily than you might think.
Then test the car by pushing it lightly around tight curves, any s-curves, or anything else your railroad can throw at it.
When you're satisfied, test the whole train!
 Videos
For a brief YouTube video of the "Ready-to-Play" version running outside on a temporary Right-of-Way, click here. I was actually a little surprised at how well it looked running outside. And on the video you can hear the sound bytes of the kids meeting each other during the first train ride of the first movie. Note: I can't guarantee that any set you buy will have exactly this set of sound bytes. For some reason, Lionel keeps changing them.
If that link doesn't work, click here.
Amazon Link - True confession - if you click on an Amazon link from my site and buy the train on THAT VISIT, I get a few dollars. At the moment, Amazon is offering the "Ready-to-Play" Hogwarts Express at a nice discount from list price, plus free shipping. Yes, you might be able to get it cheaper elsewhere. . . . But if you want to check it out, please click here.
To see more "Ready-to-Play" trains on Amazon, or if the link above doesn't work, click here.
Paul speaking: While we're on the subject of Hogwarts, I'll add two links to related articles:
 In October, 2019, Shelia, daughter Emily, and I spent a week in Orlando, mostly visiting the parts of Universal Studios park that weren't there the last time we went. Especially the "Wizarding World" parts, and most specifically, the Hogwarts Express trains and stations.
I took lots of notes and photos that I used for an article about the Hogwarts Express, including the real-world train that inspired it and some of the models that it has inspired in turn. To see the article, please click on the little picture.
 And for readers who noticed the castle in my "open railroad" photograph above, here's an explanation of how we tried to create an appropriate setting for the Hogwarts express by repurposing old toy castles. Click on the picture to see that article.
Please get in touch if you have any feedback, questions, or anything to add to this article. Or if you attempt this with a diesel set.
Enjoy your trains, and especially enjoy any time you can spend with your family this season!
Paul Race
FamilyGardenTrains.com
Here are other articles with tips and tricks about running battery-powered toy trains outside.

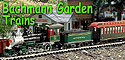
Garden Railroading on a Shoe String - Our lead article on "Shoe-String Garden Railroads," with many ideas and links to helpful articles.

Garden Railroading with Toy Trains - For more information about garden railroading with toy trains, including brand descriptions, buying advice, etc., click on the little picture to the right.

Budgeting for a Shoe-String Garden Railroad - Lists potential expenses most folks don't think about ahead of time, along with ways to reduce or skirt them with planning.
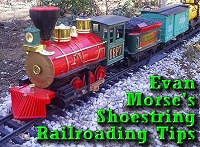
Evan Morse's Shoestring Railroading Tips - Things that work for one Shoestring Railroader, mostly about track.

Converting Lionel's "Ready to Play" Trains to 45mm - Lionel's current line of battery-powered toy trains run on 2" track. But they don't have to.

Lionel's G Gauge Toy Trains - All about the battery-powered G gauge toy trains Lionel made in the 2011-2015 period. Most are a great choice for a "shoe-string" railroad.
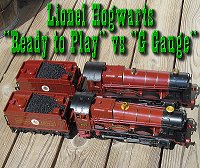
Comparing Lionel's Hogwarts Express Versions - Click for a 'hands-on" comparison of Lionel's two battery-powered Hogwarts Express trains. Here's a quick summary: the passenger car molds are the same; the locomotive molds are different.
 remote. Click to go to article.")
New Life for a Battery-Powered Bachmann Ten-Wheeler - Lose the remote?
You can use these tips to add directional switching to battery-powered locomotives.

Into the Woods - a Geo-cacher builds an elaborate trestle-based dogbone railroad in a forest, then locks up a Scientific Toys/Ez-Tec train set with clues that fellow geocachers can use to get the train out and run it.

 |  |
Note: Family Garden Trains???, Garden Train Store???, Big Christmas Trains???, BIG Indoor Trains???, and BIG Train Store??? are trademarks of
Breakthrough Communications (btcomm.com). All information, data, text, and illustrations on this web site are
Copyright (c) 1999, 2000, 2001, 2002, 2003, 2004, 2005, 2006, 2007, 2008, 2009, 2010, 2011, 2012, 2013, 2014, 2015, 2016, 2017, 2018, 2019, 2020 by
Paul D. Race. Reuse or republication without prior written permission is specifically
forbidden.
Family Garden Trains is a participant in the Amazon Services LLC Associates Program,
an affiliate advertising program designed to provide a means for sites to earn advertising
fees by advertising and linking to amazon.com.
For more information, please contact us
| Visit related pages and affiliated sites: | |||||
| - Trains and Hobbies - | |||||
 |  |
 |
 |
 |  |
 |

|

|  |
 |

|
| - Christmas Memories and Collectibles - | |||||
 |

|
 |

|

|
|
| - Family Activities and Crafts - | |||||
 |

|

|

|

|

|
| - Music - | |||||

|
 |
 |

|

|

|

|

|

|

|

|

|

|

|

|

|

|

|

 in the box. Note the words 'G Gauge' prominently displayed. Click for bigger photo.")
 in the box. Note the words 'Ready To Play' in fine print. Click for bigger photo.")


