|
|
Printed Buildings for Outside Railroads
Setting up a business district for your garden railroad can be expensive, which can be a problem for folks on a budget or folks whose railroads are exposed to vandalism or theft. With a lot more folks on a budget this year, this seemed like a good time to try something that would be easy and inexpensive to make (or replace).
 I have investigated several different kinds of projects that would fit this category if I could just work out the bugs, so more article ideas may follow this one, but for this project, I'm leveraging graphic resources that many indoor railroaders have found very useful, and hoping that simple weatherproofing will help them hold up outside. I have investigated several different kinds of projects that would fit this category if I could just work out the bugs, so more article ideas may follow this one, but for this project, I'm leveraging graphic resources that many indoor railroaders have found very useful, and hoping that simple weatherproofing will help them hold up outside.
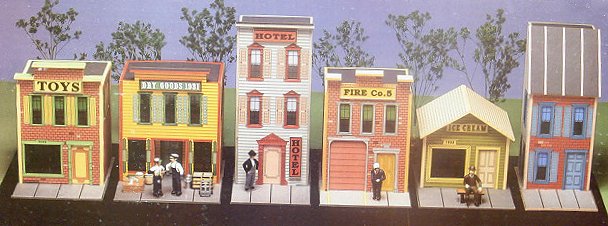
I'm not the first person to create printed Large Scale buildings, of course. As an example, Bachmann made some in the 1980s. They used cardboard, so they weren't really going after the Garden Train market. In case you haven't seen them, here's the graphic from Bachmann's original packaging. As you can tell, they weren't going after the "serious model railroader" market either.

For the project in this article, I started with building photos that I had already cleaned up. I then resized, and "sliced and diced" them to make them fit standard North American concrete blocks (which are typically 15.5" long x 7.5" high x 7.5" deep).
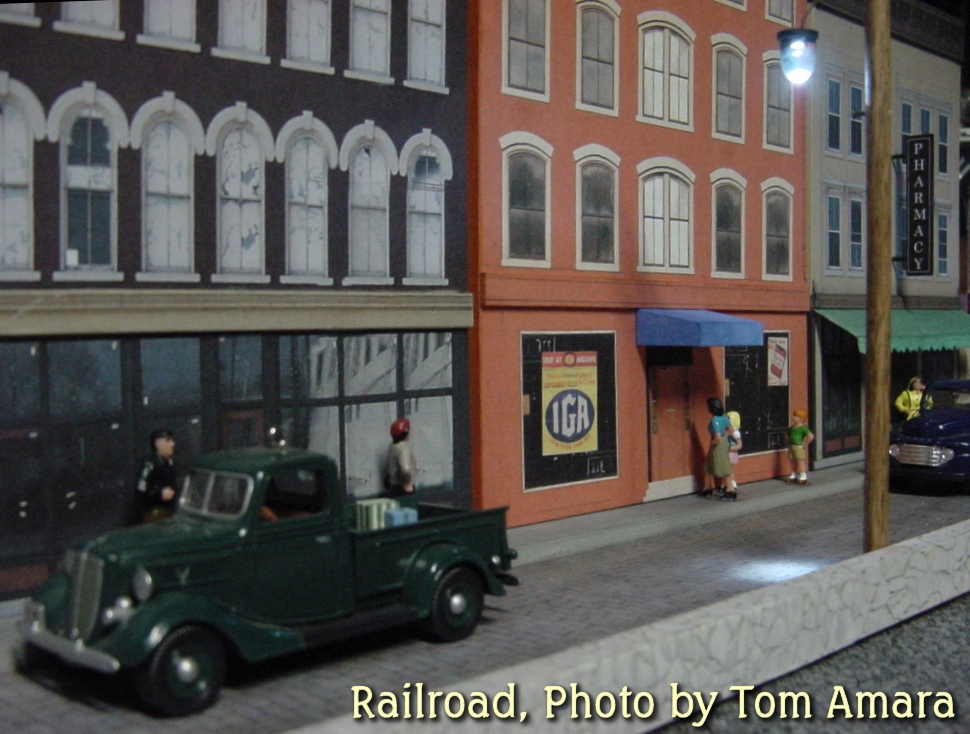
Longtime readers will recognize these buildings as we have made these graphics available to indoor modelers for several years. Howard Lamey's HO-scale adaptation of them is shown below left. Tom Amara's O scale adaptation is shown below to the right. But nobody's used these outside yet to my knowledge.
Unlike the indoor projects, which use card stock and cardboard, this project involves printing the graphics on full-paged weather-resistant labels, applying those labels to a smooth weatherproof backing, UV-protecting the labels, and fastening the backing to carefully chosen and prepared concrete blocks. The resulting buildings won't have quite the appeal or "play value" of the $90-160 buildings they are standing in for, but they are:
- Easy to make, even for folks with few skills
- Cheap,
- Different,
- Too heavy to steal easily, and
- Easy to replace if they are stolen or vandalized.
The following list shows typical requirements for this sort of project.
- Concrete blocks (the kind with closed or nearly closed ends if possible)
- Appropriate labels for your printer:
- For an inkjet printer, you should be able to use the ink-jet permanent vinyl paper from www.papilio.com. This seems to be available only from their web site, but you can buy it in packs of ten so you don't have to spend a lot of money trying this out. Kevin Strong, a frequent Garden Railways contributor, says he has had several signs printed with this product outdoors for over two years with no noticeable deterioration or fading.
- For a color laser printer, you might be able to use Avery 6575 labels
 . Unfortunately they come 50-to-a-pack. But Amazon sells them at a pretty good discount. . Unfortunately they come 50-to-a-pack. But Amazon sells them at a pretty good discount.
- The internet lists other options as well. The choice typically involves using polyester labels for laser printers and vinyl for inket. The polyester labels seem better equipped to handle the heat generated by colored lasers - I wouldn't recommend using vinyl in a color laser unless you need an expensive boat anchor. Either way, please follow the manufacturer's instructions carefully, and err on the side of caution.
- In many parts of the country (but not Dayton, Ohio, as far as I can figure), specialty printers and copy centers have these materials in stock. They will even print the graphics for you (for an additional fee, of course).
- Wal-Mart primer spray paint cans: flat black, red/rust primer, gray primer
- One can of clear outdoor-ready acrylic satin spray coat for UV protection
- 1/8" Lucite window material or something else relatively flat and weatherproof
In addition to the obvious expenses above, you have to consider the approximate ink usage of printing full-page graphics on your color printer, or of having the labels printed at a copy center.
Buy the Right Blocks
Most skids of concrete blocks include an assortment. Most concrete blocks have big openings on the ends. You want to look for the kind that is square on the end (or maybe has a slot), since that square end will either represent a wall or a roof depending on the way it is turned when the building is finished.
Select the Graphic(s) You Want
Each concrete block is about 7.5" deep x 7.5" high x 15.5" long. I found 8.5x11" full page labels that could be printed on a laser printer (or at a copy center). Those two measurements controlled how I edited my building graphics to make them work for this project:
- The maximum width image you can print on most color printers is 8".
- A block laying on one side would give me room for two side-by side buildings, each about 7.75" wide.
- The same block, still laying on its side, would be 7.5" "high," so the building fronts couldn't go much more than 9" high without looking silly.
- In 1:29 or smaller scales, I could fit a two-story building in that space.
- To get a two- story building in 1:24 or large scales, (without doing what the plastic building manufacturers do and compressing every dimension but the door size), I'd need to turn the block on end.
- The same block on end could hold a 4-story building in 1:35 or so.
So, you see, that, because I was trying to make existing graphics work with predefined outer measurements, the scales vary a little from building to building, although I will confess that all scales are approximate. If you're interested in historical or geographic details about the original structures that inspired these graphics, please visit our Building Fronts page.
It so happened that most of my "digital building" collection was more suitable for smaller scales in this context, but I did manage a few 1:24-ish buildings for the Narrow Gaugers among us. (Of course you can always use the smaller-scaled buildings in the background).
The buildings I've rescaled for this project so far are:
Buildings for Standard Gauge Railroaders
 |
 |
 |
| Dillingers, two story, 1:37 scale |
Gray, two story, abandoned building, 1:33 scale |
Red and Green, two story building (was 3-story), 1:34 scale |
 |
 |
| Yellow Brick Store Front, 1:32 scale |
Goody's Bar (squared off for this project) 1:34 scale |
 |
 |
 |
 |
| Salmon store front, 1:37 scale (print both files) |
Gray abandoned building, 1:33 scale (print both files) |
Buildings for Narrow Gauge Railroaders:
 |
 |
 |
 |
| Dillinger's store front, 1:25 scale (print both files) |
Gray abandoned building, 1:24 scale (print both files) |
|
 And, just for Narrow-Gaugers, I've included a four-sided 1-story 1:23 building that would look very much at home on any Narrow Gauge railroad from 1:20.3 to 1:24. To recreate just the building front, print and overlap the first three files. To print the whole building, print all the files twice. And, just for Narrow-Gaugers, I've included a four-sided 1-story 1:23 building that would look very much at home on any Narrow Gauge railroad from 1:20.3 to 1:24. To recreate just the building front, print and overlap the first three files. To print the whole building, print all the files twice.
|
 |
 |
One-Story Powerhouse
1:23 scale Left Side |
One-Story Powerhouse
1:23 scale Middle |
 |
 |
One-Story Powerhouse
1:23 scale Right Side |
One-Story Powerhouse
1:23 scale Building End |
Print the first three files for a 1:23 building front only.
Print all files twice for a wrap-around building |
By the way, the narrow gauge railroaders shouldn't feel "slighted" that the buildings are 1:23 or 1:24. Since their overall dimensions are not compressed, they are actually much larger than plastic buildings that are advertised as 1:22 or larger.
 Apply the Graphics
The photo to the right shows the first batch of buildings I decided to try, all in more-or-less appropriate scales for my 1:29-1:32 railroad. These were printed on a color laser (In years past, I might have tried my Alps printer, but it is just about shot, and printing graphics this large on it would have been prohibitively expensive.)
The first time I tried these, I stuck them onto some fluted "road-side spam" plastic, which I prepared very carefully, but the stickers bubbled up after a few days. So I tried some Lucite (acrylic "glass") scraps I had on hand, with better results.
I cleaned each panel carefully with "Fantastic," a great cleaner for getting up oily finger prints, etc., dried them thoroughly with lint-free towels, then let them air dry a bit - the same procedure I always use before painting anything plastic.
When cutting out the stickers, I cut the top edge flat across the top instead of trying to accommodate the little trim bits that poke up on most of the graphics. I even cut the gable off of Dillingers, for simplicity's sake.
When applying the stickers, I started from the top edge, since that would be the edge people would see the best, then worked my way down. I figured that if the lowest edge was a little "off" it would be harder to see anyway.
The stickers have a diagonal backing that you can peel off a little bit at a time as you apply, but you have to be VERY careful not to let the sticker touch down before it's properly placed. Pulling the sticker back up usually damages the printed graphic, especially if you've used a laser printer  (which deposits dry ink particles on the surface rather than using ink that soaks into the label). (which deposits dry ink particles on the surface rather than using ink that soaks into the label).
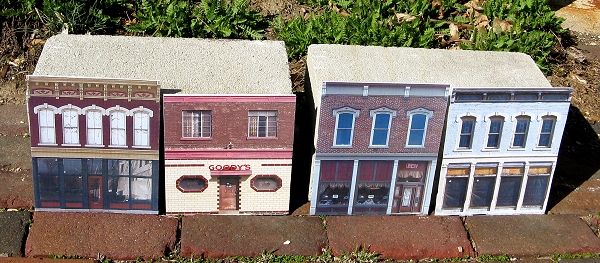
The photo to the right below shows two building fronts leaning up on concrete blocks just to judge the visual effects. After nearly 20 years of nothing but two-story building on my railroad, these four-story-wonders looked pretty cool, I thought.
The next photo shows the four 2-story store fronts, graphics applied to plastic, leaning against concrete blocks. Not quite as impressive, but still promising.
A Note About Lucite
I've been using Lucite for years, as replacement windows in locations that keep getting busted out, and as glazing for my garden railroad buildings. I even have an article about cutting Lucite for the latter purpose. The one addendum to that article I would make is that it is MUCH easier to cut Lucite "across" a strip of material than it is to cut a long piece lengthwise. So if you don't already have some scrap Lucite (or Plexiglass or whatever) and you want to use that material on this project, consider having the glasscutter at your hardware store cut it to width (probably 7.75" for this project), then you can cut it to length a building at a time. Starting at the top, apply the sticker. If you have a two-part building, apply the second sticker, then when you've figured out where the bottom edge of the graphic is, score the Lucite there very carefully, moved the score line to the table edge and apply pressure downward to snap off the excess. Save any true scraps for building windows or whatever later - in fact some folks build whole houses out of Lucite.
Why 7.75"? - Remember, these supposedly 8"x8"x16" blocks are really 7.5"x7.5"x15.5". The graphics I've provided are mostly about 8" across - even if I made them larger, most color printers would leave a 1/4" white margin all around the graphic. If you use 1/8"-thick plexiglass and apply the graphic perfectly, the graphic will just barely wrap around the edge of your plexiglass on both sides, concealing the shiny stuff. Trying out the procedures in this article, I tried different widths, in part by accident, and 7.75" seems to be optimum. 7.5" will work for the vertical versions. If you are using side-by-side building fronts on a horizontal block, though, you'll discover that two 7.5"-wide buildings leave a half-inch gap between the two. I painted that part of the block flat black, though, so the gap isn't that objectionable.
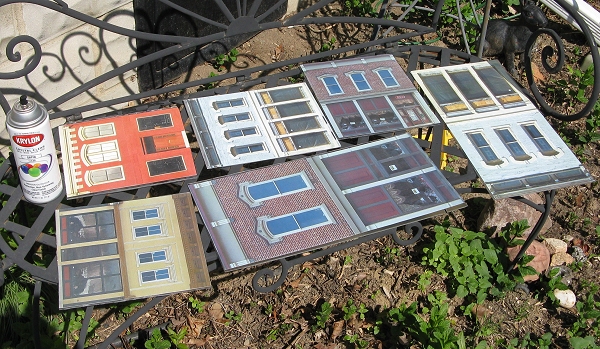
Weatherize the Stickers
 I admit, I kept sticking the building flats up on my concrete blocks as I worked just to make certain I was getting a useful effect. But before I appied anything "permanently," I sprayed each building flat with several light coats of an indoor-outdoor satin acrylic spray. This is both to protect from moisture and, even more critically, to protect from UV rays. Even at that, I suspect that these building fronts will have many times the lifespan in the shade as they would in the sun - consider setting them to face north if that is an option. I admit, I kept sticking the building flats up on my concrete blocks as I worked just to make certain I was getting a useful effect. But before I appied anything "permanently," I sprayed each building flat with several light coats of an indoor-outdoor satin acrylic spray. This is both to protect from moisture and, even more critically, to protect from UV rays. Even at that, I suspect that these building fronts will have many times the lifespan in the shade as they would in the sun - consider setting them to face north if that is an option.
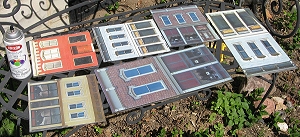
The photo to the right above shows a batch of building fronts drying out after a coat of acrlic. The spray will make the buildings look a tad darker and a tad yellower, but that's not a huge problem. Note: The weather-resistant labels are not as porous as you might expect, so don't try to saturate them on the first pass - you'll cause runs and streaks.
Paint the Blocks
When you've figured out which building fronts you're going to use, give your concrete blocks several coats of paint. I use WalMart's cheapest flat black, gray primer and rust (red) primer. You'll need to do several coats of paint, each sprayed from slightly different angles to get anything like complete coverage, but it does camouflage the "concrete block" appearance of the blocks at least a little.
Remember that the building front will cover the holes in the front, so you don't have to paint that side. If you leave the back "open," you will be tempting wasps. Depending on whether folks will see the "backs" of the buildings, you can either prepare another "building front" for the back or you can simply cut out out a piece of fluted plastic "yard spam" or some other cheap or "found" material and paint it with red or gray primer as appropriate.
- Paint the side that will be the "tops" of the buildings flat black.
- Paint the sides of any buildings that use the gray building front gray.
- Paint all other building sides with the rust primer.
- If you are using a block sideways to represent two buildings, paint the "bar" on the "front" black.
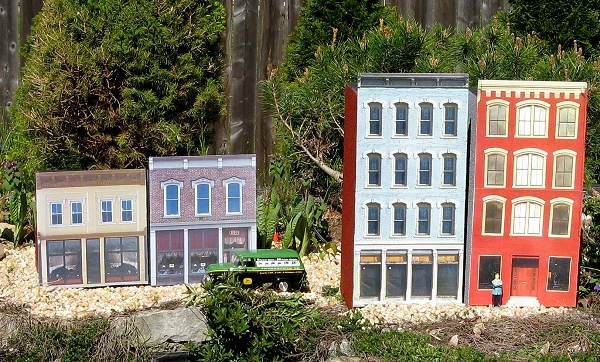
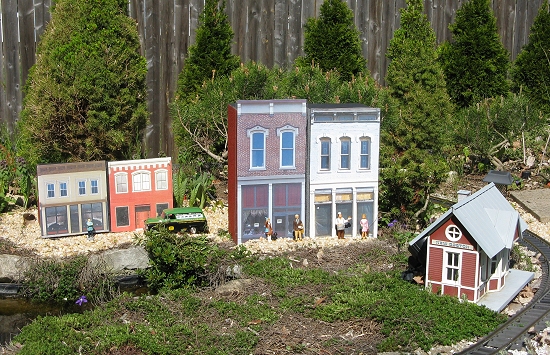
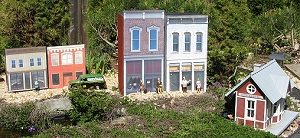 The photo the right shows the 1:24/1:25 vertical fronts and two of the 1:32+ fronts temporarily applied to blocks that have been painted. Technically the station to the right is 1:24, but, like all buildings made commercially for garden railroads, it is scaled down in every measurement but door heights, so it seems dwarfed by the "true" 1:24 buildings near it. Still, if I were setting up a permanent Narrow Gauge railroad, I think I'd rather have the more realistically scaled buildings and people near my trains. By the way, the salmon two-story to the left actually used the 4-story graphics shown in the photo below - I just counted wrong when I cut and printed things, and had a mis-match of graphics and Lucite pieces when I was done, so I "cut down" the 4-story by "editing" printouts with a pair of scissors. The photo the right shows the 1:24/1:25 vertical fronts and two of the 1:32+ fronts temporarily applied to blocks that have been painted. Technically the station to the right is 1:24, but, like all buildings made commercially for garden railroads, it is scaled down in every measurement but door heights, so it seems dwarfed by the "true" 1:24 buildings near it. Still, if I were setting up a permanent Narrow Gauge railroad, I think I'd rather have the more realistically scaled buildings and people near my trains. By the way, the salmon two-story to the left actually used the 4-story graphics shown in the photo below - I just counted wrong when I cut and printed things, and had a mis-match of graphics and Lucite pieces when I was done, so I "cut down" the 4-story by "editing" printouts with a pair of scissors.
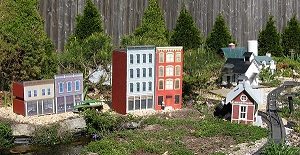 That said, I tend to run 1:29 and smaller trains, so the 1:32-plus-scaled buildings look better to me. In this photo the 1:32+ four-story store fronts have replaced the 1:24+ two story fronts. I SHOULD have put the gray block behind the gray building, but this was just a temporary setup to see if it looked like I was still "on track" with this project. Based on this "look," though, it looks like I need to get some more 1:32+ four-stories in the pipeline quickly. That said, I tend to run 1:29 and smaller trains, so the 1:32-plus-scaled buildings look better to me. In this photo the 1:32+ four-story store fronts have replaced the 1:24+ two story fronts. I SHOULD have put the gray block behind the gray building, but this was just a temporary setup to see if it looked like I was still "on track" with this project. Based on this "look," though, it looks like I need to get some more 1:32+ four-stories in the pipeline quickly.
What Remains to be Seen
It has only been a week since I coated the buildings with acrylic spray and set them in place. So I am still not 100% confident that this "technology" will hold up long-term against bad weather and harsh sunshine. Based on Kevin's experience it should hold up for two years at least, and maybe more. If it does give out after that, it won't cost that much or take that much time to print out another set of graphics, turn the Lucite panels around, and do the whole thing again.
This would also give me good options for setting up temporary railroads at clinics, flower shows, etc. Or for having Christmas versions of my buildings for the next Christmas-season Open House.
Conclusion
As the photos above imply, even if you don't want to use these buildings close to your viewers, they could make nice backdrops or fillers in your citiscapes. If you try a couple of these and you want to see more graphics, please contact
us and let us know whether you want to see more buildings suitable for Narrow Gauge (1:24-) or Standard Gauge (1:29+). (Left to my own resources, I'll probably veer toward the latter - it is just SO cool to see four-story buildings on my railroad.)
Also, if you have any tips or suggestions on this or any OTHER garden railroading topics that you'd like to share with our readers? Please get in touch.
Thanks, and best of luck, all,
Paul


 TM Buyer's Guide Pages"> TM Buyer's Guide Pages">

|
| Home Pages |
Reading Index Pages | Buyer's Guide Pages |

| 
|
 |
 |
 |
 |
 |
Note: Family Garden TrainsTM, Garden Train StoreTM, Big Christmas TrainsTM, BIG Indoor TrainsTM, and BIG Train StoreTM are trademarks of Breakthrough Communications (www.btcomm.com). All information, data, text, and illustrations on this web site are Copyright (c) 1999, 2000, 2001, 2002, 2003, 2004, 2005, 2006, 2007, 2008, 2009, 2010, 2011, 2012, 2013 by Paul D. Race. Reuse or republication without prior written permission is specifically
forbidden.
Family Garden Trains is a participant in the Amazon Services LLC Associates Program, an affiliate advertising program designed to provide a means for sites to earn advertising fees by advertising and linking to amazon.com.
For more information, please contact
us


|