 | |||
 |
 |
 | |
 |
 | ||
 |
 | ||
 |  | ||
 |  | ||
| |||
|
|
| |
|
|
| ||
|
| ||
| | ||
| | ||
Written by Paul D. Race for Family Garden Trains(tm)
 |


|
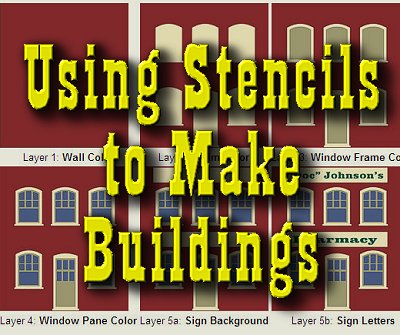
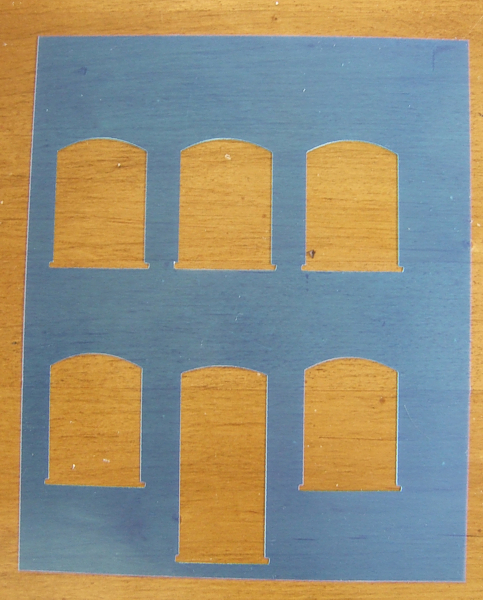
Using Stencils to Make BuildingsIf you've been reading our articles for a while, you know we like to suggest alternatives to the buy-everything-from-hobby-manufacturers rut that makes so many railroads look like clones and - in larger scales - costs real money. This particular article won't help you build the most realistic buildings you'll ever see, but it will let you put a personal stamp on your railroad and - if money is an issue - build whole communities for a few dollars.Yes, some self-appointed purists will turn up their noses at "home-made" buildings, etc., but your friends and family, and most of your visitors, will be more happy to see something unique that expresses your personality and interests than another me-too railroad that has, say, the same thirty plastic structures as the last five railroads they've seen. In planning this article, I was also interested in helping folks who are just starting outdoor railroads assemble some communities and industries for their railroads to serve from the start, even if they've already spent all the "real" money they can spare this season on trains, track and landscaping. I also like the potential for of "mass production." Once you have created and tried out your stencils, it's not that much harder to make five buildings than it is to make two. Not Just For Outdoors - Whenever I put something like this together for outdoor railroaders, I hear from indoor railroaders who want to do the same thing, so I've provided the resources in O and S scale as well. (S works better with Marx tinplate trains and Christmas villages, in case you wondered.) The designs we've come up with so far loan themselves to "Americana" decorating, and you can use any colors you want. So if you've been looking for a way to sneak a scale town (and maybe a train to serve it) into a room full of antiques, or into seasonal displays (in which you can change the buildings with the season), this may be a way to do it with originality and low cost. How Much Does It Really Cost to Make a $5 Building? I'll be honest - I used a craftcutter and two different software packages to create the stencils I use in this article. So you could say that the first building I made this way cost me about $600. But the second building cost about $5, as will every one after that. Besides, you can cut stencils out by hand - I have done it in the past and know several people who could afford cutters but choose to work with Xacto knives, etc. No Cricuts Need Apply - The other caveat is that you can't use a Cricut to cut out the stencil patterns we provide in this article. You CAN use similar products from Sizzix, Silhouette, Black Cat, etc. Unlike Cricuts, you can use these with "third-party sofware" like CraftEdge's Sure Cuts-A-Lot to cut out our patterns. (If you want to learn more about craftcutters, including why Cricuts can no longer be used for the kind of projects we describe in this article, please check out our "Introduction to Craftcutters" article.) Practice "Negative Thinking" Even if you're used to stenciling, this project may still "stretch" you a little.When you buy prepackaged stencils for craft projects, most of them only have one stencil. If you want to have different colors on the finished product, you simply put different paint colors over the different shapes. But to get the level of detail we need for our building projects, we'll need to layer our applications, using different stencils and letting the paint dry very well in between. We'll also be working from the "outside in," in the sense that we do the regions with the biggest areas of color first, and do progressively smaller areas, finishing with the windowpanes (which are actually painted over the windowframes, as you'll see. The reason I called this section "Negative Thinking" is that, all the while you're working with the stencils, you have to keep in mind that you'll be painting - not the shape you're holding in your hands - but the shape that isn't in your hands. For example, you may be holding a stencil that looks like windowframes, but you don't use that stencil to paint the windowframes, really - your stencil helps you paint the window panes. And when they're painted they give shape to the "windowframe." The photos below show three of the stencils I cut for this project:
Why do I label the first stencil "Layer 2"? Because the first layer is the wall color of the building. Further down, there's an example of the way you might paint a storefront using our "Business 1" stencil patterns. You'll notice that the stencils aren't quite centered on the blank, as a result of the fact that I was still getting used to my cutter when I cut these. But that's not a problem. After your wall color has dried thoroughly, you align the first stencil where you think it should go. Then it becomes critical - from that point on, each stencil needs to be aligned precisely over the parts you have already stenciled.
I have had good luck with the plastic "Art Minds" stencil blanks I found in a craft supply store. They're only 8"x10" but they hold up much better to repeated heavy use than the treated paper stencil blanks a lot of stores carry. Ironically, I haven't been able to find a good source online yet.
|
 |
 |
 |
 |
 |
 |
 At the moment, we have stencil sets for two buildings. Building 2 is the one we show above, with the arched windows. Building 1 (right) is similar, but with rectangular twelve-paned windows.
Each package includes .svg and .pdf versions of every stencil you need to complete the buildings as shown.
Now that that's out of the way, here are the links to the patterns we have so far:
Large Scale Buildings
O Scale Buildings
S Scale Buildings
Both links take you to a zip file that you should copy to your hard drive and unzip there. The stencil patterns are labeled 2-5 - don't look for a "layer one" stencil - you don't need one to paint the overall color of the building.
Note About O and S Scale Versions: By the way, the O and S scale versions have three stories, since they fit easily on a 10" stencil. In addition, I removed the fine windowpane detail from the S scale version, because it's very difficult to get right with a stencil.
Storefronts - To use these graphics to make a storefront, the building should be a few inches higher than the top of the windows in the stencil. A "false front" that holds a sign and has a bit of trim across the top would be appropriate. Each of our stencil patterns include several business names so you can mix and match.
Houses - To make a simple house with these patterns, you could use a "subset" of each pattern. For a short gable house, you could simply use the first story on the "front" of the house and the second story windows on the "side." Other versions are easy to imagine as well.
The following table shows several suggestions for using the same stencils to create a variety of buildings.
 |
 |

|  |
 |
Finally, the vast majority of articles on my web pages come as the result of more than one reader asking the same questions. So get in touch with any questions, corrections, complaints, similar projects, or what-have-you, and we'll be very glad to hear from and to help you if we can.
Enjoy your trains. Especially enjoy any time you have with your family in the coming months.
Paul Race
www.FamilyGardenTrains.com
www.BigIndoorTrains.com
www.BigChristmasTrains.com
www.CardboardChristmas.com


| 
|
|
 |
|
 |
 |
Note: Family Garden TrainsTM, Garden Train StoreTM, Big Christmas TrainsTM, BIG Indoor TrainsTM, and BIG Train StoreTM are trademarks of Breakthrough Communications (www.btcomm.com). All information, data, text, and illustrations on this web site are Copyright (c) 1999, 2000, 2001, 2002, 2003, 2004, 2005, 2006, 2007, 2008, 2009, 2010, 2011, 2012, 2013 by Paul D. Race. Reuse or republication without prior written permission is specifically
forbidden.
Family Garden Trains is a participant in the Amazon Services LLC Associates Program, an affiliate advertising program designed to provide a means for sites to earn advertising fees by advertising and linking to amazon.com.
For more information, please contact us

 |  |


 A few lines down, you're going to see a suggested process for painting your building's "face" on one layer at a time. The computer graphics I put together make it look easy. If you've never stenciled, you should know that it's not as easy as it looks. When you're working at this scale you use a kind of brush that goes up-and-down, not back and forth. And you work with a brush that is almost dry. If you use too much paint or a back-and-forth motion, the paint will work its way underneath the edge of the stencil and ruin the shape you're trying to paint. Tap-tap-tap-tap-tap. And tap some more. It doesn't require a rocket scientist to figure out, but it does take time.
 But Lowes, for example, sells little jars of any color house paint you choose for $3, and you get much more paint than you would get in the little craft store bottles for the same amount of money. I try to get flat or satin outdoor acrylic. I also try to choose colors that complement each other. Sometimes paint stores or paint departments of large hardware stores even have little flyers that show which colors work well together.