 | |||
 |
 |  | |
 |  | ||
 |
 | ||
 |  | ||
 |  | ||
| |||
|
|
| | |
| | ||
|
|
| ||
| | ||
| | ||
Written by Paul D. Race for Family Garden Trains(tm)
 |
|
Water gardening is a hobby in its own right, and many excellent books have been written on the subject. Before you dig your first pond, you should read a couple of those books and visit several garden railroads with ponds. This article is not intended to be replace such resources and experiences. Rather it gives general information about your options and required maintenance, followed by information about water features as they relate to garden railroads, including planning cycles and construction methods that dovetail with your railroad construction. What is a Water Feature?Garden railroaders use the term "water feature" to include any body or channel of real water on or near our railroads, including waterfalls, creeks, ponds, and fountains. One family I know has a real creek running through their back yard (a good and a bad thing). But most water features are man-made, requiring materials to contain the water (such as liners or concrete), and some means of circulating it (such as a pump). Like landscaping, water feature installation usually requires movement of large amounts of earth and rocks. Model railroaders who are used to indoor railroads and resin lakes and waterfalls often overlook the importance of water features, especially when they're designing their first garden railroad. But you should consider the advantages of well-planned and properly-installed water features when you are planning your right of way:
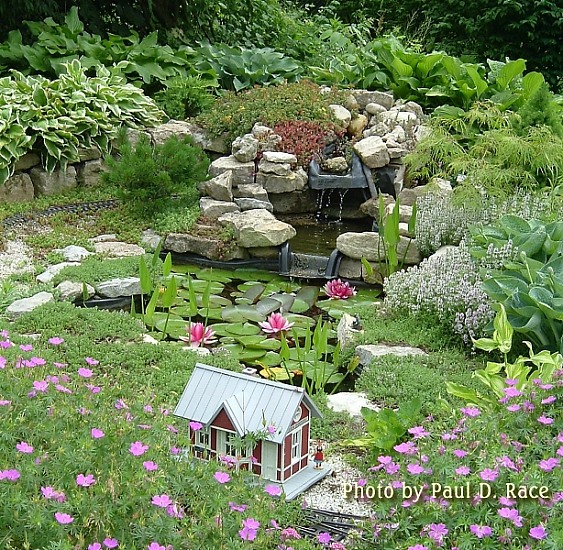
 That said, I've noticed that, when I visit other people's open houses, I tend most to enjoy those with attractive, and even substantial, water features. In my own garden railroad, I went "small" and "conservative," and later wished that I had made the water features larger and more prominent. I believe that it is reasonable to plan for your water features to represent a quarter of your overall investment in your garden railroad and as much as half of your initial investment. Next to your trains, the water features will receive the most attention and give the most pleasure of anything in your garden railroad.
Update for 2018Since I wrote this article, I have moved and started a new, entirely raised railroad with a three-tier waterfall. The information in this article is still valid, but I wanted you to have access to my current efforts in case they give you some ideas as well. Two articles about starting the new water feature are listed in the conclusion of this article.We now return you to our regularly-scheduled article. :-) Water Feature ChoicesBuilding water features requires you to make several choices during the planning stage:
Moving, still, or both?Still Features - Ponds are relatively placid. Without fish, they can be downright boring to a railroader used to watching (or making) things happen. Yet pond banks make an excellent setting for garden railroads, and they support a fascinating variety of plant life. And unlike moving water features, they don't require any particular engineering skills to install.Moving Features - Creeks and waterfalls require more engineering and more powerful water pumps to install and run properly. However, the sight and sound of running water captures many people's attention better than a pond. (Fountains can be nice, too, but they're aren't discussed here because, unlike creeks and waterfalls, they don't represent anything ordinarily occurring in nature.) Both ponds and moving water features require building and or digging skills, and present logistic issues that are better solved before roadbed and track are laid. Again, installing a complicated water feature may seem like too much trouble at first, but it will pay you in the long run to visit area gardens and garden railroads with water features before you start building your railroad. If nothing else, it will help you determine how important such features will or could be to your overall project. Size and depthSince you don't expect a "creek" or waterfall to support life, the size and depth of moving features is a matter of personal choice. However, the size and depth of your pond will affect the kind of life it will support and the kind of maintenance you will have to perform.Size - The water features on my first garden railroad included a little pre-formed "stream," a 15-gallon preformed "spillover" pool and a 100-gallon preformed pond. I "started small" because I was nervous about having a pond, and didn't want to take on more than I could handle. Since then, I've realized that my little pond required almost as much maintenance as if I had installed one five times that size, although it's much less interesting. The preformed liner that looked so big in the store and in the back of my van is far less impressive in the "great outdoors." You would be surprised how often the uninitiated underestimate the size of a body of water, generally by about half. So if you find a preformed pond liner in the store that you think is an appropriate size and shape, consider doubling the size of the pond to achieve the same effect in your yard. One side benefit of a large pond is that, although you may have to fish out dead leaves, etc., you don't have to weed it. (In fact some might claim that the larger a pond is, the less maintenance it requires per square or cubic foot.) So folks who are addicted to 20'-diameter curves and don't necessarily want to landscape and weed the 300+ square foot area a loop of track encloses, might consider installing a pond that takes up a good part of that space.
Depth-If you want live fish in your pond, and you don't want to coax them along in an aquarium every winter, you'll need to take pond depth into account. In Ohio, where I live, they recommend depths of 18" or more for goldfish and 24" or more for koi. However those are minimums, and people tend to have better success with their fish and more stable ponds if they increase those depths by a foot or so. On the other hand, friends in Michigan and Canada prefer ponds approaching four feet deep, and friends in New Orleans get by just fine with 12" deep ponds. When do you need a shallow pond? If you have small children, grandchildren, visitors, or pesky neighbor kids, consider installing either a shallower pond, or some sort of security around it. Also, if your water table is very high, or the ground where your pond will be located is constantly soggy, you might consider a shallow, slightly elevated pond. Otherwise, if your pond runs too dry and the surrounding ground is too wet, the liner may rise up out of the ground, destroying bridges, roadbed, track, and accessories in its wake. Just don't "cop out" and install a shallow pond because it's quick and easy -- if you reconsider later, it's a lot harder to go back and make a pond deeper than it would have been to make it deep enough in the first place. If for one of the reasons mentioned above you need a pond that is mostly shallow, you might consider installing a pond that is mostly 9-12"-deep, but which has a "deep spot" out in the middle where people are less likely to fall in by accident. (The deep spot will provide a place for your fish to "winter over," and will be the best place to plant hardy water lilies.) ShapeThe horizontal shape, or "footprint" of your pond is purely a matter of cosmetic choice, whether it is kidney-shaped, square, or forced by a preformed liner. If you want a natural-looking shape to your pond, some writers suggest that you outline various shapes on the ground with a garden hose until you find a shape and position that suits you, then lime or otherwise mark the sod around the future perimeter and take measurements.The "right" vertical shape (or contour) for you depends on what kinds of life you want your pond to support. In Ohio you can tell a gravel pit from a natural lake, because of the lack of water plants near the bank. A gravel pit's walls drop off too steeply to support marsh plants such as reeds, cattails, and rushes. If your pond walls drop steeply to a depth of 2' or more, you'll still be able to grow water lilies, but some plants will be difficult to support. For that reason, people who want a variety of plant life in their backyard pond usually use ponds of multiple depths, often achieved by using "shelves" in the banks of the pond.
Elevation and LocationWhen planning your pond, consider "line-of-sight" issues. For example, if you plan to view your trains from a seated position, you should consider placing your pond so that you can see into it from the same or similar position. Because I "cleverly" installed a preformed pond by sinking only the small, deep part and building up the ground around it, my first pond was about 12" above ground level. Worse yet, it sat back from the "edge" of the railroad by about three feet, so that it was difficult to see into from a standing position, much less a sitting position. And I'm not the only garden railroader who, for one reason or another has engineered such a situation.On the other hand, you don't want your pond so low that fertilizer and herbicides from your lawn seep into it. If the ground around the pond doesn't usually flood, you're probably safe with the edge of the pond a few inches above ground level. In short, for the best line-of-sight, consider placing the front edge of the pond low, and close to your "optimum" viewing location, so people who would just as soon watch the fish as the trains can see into the pond from a comfortable sitting position. However you shouldn't let the lack of an "optimum" placement keep you from installing some sort of water feature. Visitors to my railroad enjoy listening to the running water and watching the "waterfall" even if they don't often get a good look at the fish. Construction MethodsEvery manufacturer of pond equipment and supplies will tell you that there is only one good way to build a pond. Unfortunately that "one good way" depends on what products they have to sell. Pond owners can be just as "religious," depending on what worked or didn't work for them. However, this is your railroad and your decision, so you have to work within your comfort level with construction methods that complement the methods you are using elsewhere in your railroad.Liner IssuesThe biggest choice you face is typically what kind of liner to use. (Yes, I know gravel pits and natural lakes don't have liners, but they can drop or rise by millions of gallons depending on seepage and weather changes without killing their plants and fish. Will your pond have a margin that large? Also, is it fed by natural streams, or do you have to pay for the water you put into it?)Although some folks have used hand-poured cement "liners" with success, the most likely choices you face will be:
Up to about a 300 gallon pond, the kind of liner you use will depend largely on whether you feel more confident installing a "store-bought" solution or designing your own. Beyond 500 gallons, you'll probably be using some sort of flexible liner regardless. You might especially consider a preformed liner if:
You might especially consider a flexible liner if:
Although most people who use flexible liner are putting in very large ponds, the illustrations of a "flexible liner" pond on this page show a much smaller pond that a fellow installed behind a bed & breakfast in Michigan. Flexible liners tend to be:
A note about the relative cost of "pond-friendly" materials - Several folks who've used roofing EPDM have bragged that it cost them half of what the pond-certified materials would have. Of course, they priced the pond-certified materials at a pond supply and the other materials at a roofing supply or rubber supplier. If they had priced the pond-certified material from a rubber supplier, they may have discovered that it would only have cost them a few cents more to buy pond-certified materials in the first place. An example would be Firestone, whose roofing EPDM costs only 2-4 cents a square foot less than their pond-certified EPDM ("Pond Guard") when purchased in large quantities from a rubber sheathing supplier. But when you go to the pond supplier and pay list price, you don't know that. I'm not saying to deliberately stiff your local supplier. But if you're going to bypass your local supplier anyway, don't buy something unsuitable just because you don't know to ask the right questions. Comparing the price of materials purchased from different sources is like comparing apples and bananas.
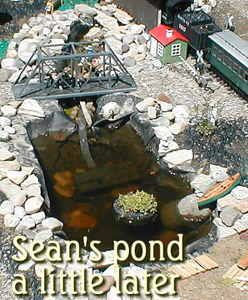
If you absolutely must have fish and plants flourishing from the outset, you could always request a sample of the material and put it in a bowl with a couple of cheap goldfish for a few weeks while you're planning the rest of your project. Liner Measurements - It's obvious to most people that the deeper your pond, the larger the liner must be to reach the same horizontal measurement. What may not be obvious is that if your pond is very convoluted (say, if it has two "deep parts" or a very strange shape), you will need even more liner, as much as half again as much as is "recommended." Many pond books give formulas, etc., for ordering liner. But keep in mind that if you order several feet too much, you can always use the excess to line creeks or waterfalls, or to leave a weedproof circumference around the pond. On the other hand, if you order a foot too little, may find yourself filling part of your pond back in after you realize your liner doesn't reach all the way across. Waterfalls and Creeks"Moving" water features are much more complex to design and install than ponds, although they may require less physical labor. There are, of course, "splash ponds" and other store-bought preformed pieces that you can use to create a channel of water or to represent a waterfall. However most of the best ones I've seen were built by people with masonry and or carpentry skills. The real key seems to be making sure that the water that comes into the waterfall or creek goes back into the pond where it belongs. This usually involves generous use of flexible liner, and some trial and error.A "creek" or "river" usually involves digging a trench or building a trough, lining it with a single long piece of liner, then disguising the edges (and maybe the bottom and sides) with rocks or other cosmetic additions. A "waterfall" usually involves an elevated basin or two, disguised as part of a "rock face," and strategically placed so that water splashes back and forth a little on its way down. My first water feature used a combination of the two. A little preformed "creek" lined with rocks drained into a "splash pond," that also served as a biofilter. The water from that splashed into the main pond. The "mountain" from which the waterfall cascaded also contained a tunnel. To make the span of the tunnel safe and to keep the whole thing from looking entirely like a pile of rocks, I used a large (buried) platform made of pressure-treated 2x10s spanning the track (resting on concrete blocks), and sloping slightly toward the splash pond. On top of that, I laid EPDM pond liner, and on top of that I put rocks, topsoil, sedum starts, and the store-bought "creek" piece. So the "crown" of that mountain is really a sort of odd-shaped flowerbox, sloping slightly toward the splash pond so that any water that does escape from the "creek" doesn't find its way onto the track below. The next waterfall will be more inventive, but at least this gives you some idea of something that can be done by a first-timer. (Note: Although most of my rock work uses limestone, I made a point of using quartz, granite and other non-limestone rocks in the water channel, since I didn't want the water getting harder and harder as it circulated.)
Pumps and FiltersWater must be cycled, oxygenated, and cleansed for optimum appearance and to keep your fish healthy. As a minimum, you need at least some sort of pump and filter.Filters - A good pond supplier can recommend a filter large enough to service your pond. Store-bought filters include:
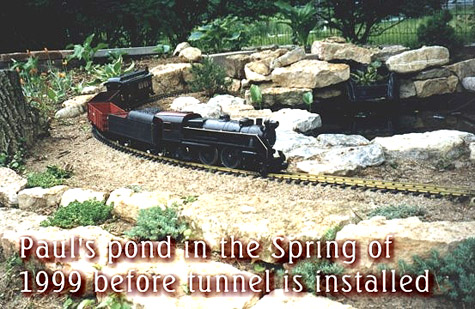
In my first pond, I installed a little "splash pond" that was located a little above the main pond. When I had water hyacinths or something in the splash pond, they did help keep the water cleaner than did the underwater biomechanical filter alone. Pumps - Pond literature usually recommends having a pump rated for about the size of your pond. So if you have a 100-gallon pond, and you buy a 100-gallon-per-hour pump, that should cycle your entire pond every hour, in theory. Two things are wrong with this equation. 100 gallons per hour is not enough to make your waterfall do anything more than trickle. But worse, your pump's rating is only good as long as your biomechanical filter is very clean and the pump doesn't have too push the water too far uphill. Of course, you should keep your biomechanical clean, don't get me wrong, but a little extra "umph" can make the difference between having sufficient flow and not having sufficient flow on those days when you haven't quite kept up. On the other hand if you have a thousand-gallon pond, I don't know if it's necessary to have a thousand-gallon-per-hour pump. There is probably some middle ground, such as 350-500 gph that will serve most people's purposes. At any rate, if you've purchased a pump and it's not enough, you might consider using it to power some smaller water feature (like a creek) and getting a bigger one for your main pond and or waterfall. Water Features and Your Garden RailroadNow that you have some idea of what is involved in planning, installing, and maintaining water features, it's time to consider how your water features will complement your railroad. Planning Water Features for a Garden RailroadIf you plan to have mountains, consider installing some sort of waterfall or stream to give a little added motion and interest to your garden. A very complex moving water project may need to be built before you install the roadbed and railroad, but a small, simple one may be added later. On the other hand, ponds, especially large ones, are almost always better built before the roadbed.If you are building your railroad in phases, as I recommend, you may decide to have no water feature or a little one, as part of the first phase (I would recommend installing a little one, even if it's a temporary fountain in a wine barrel, just to get your "feet wet," as it were). Or you may decide to get the main pond "out of the way," doing the major digging and landscaping as part of the first phase. Either way, before you begin your first phase you should have a good idea of where and how big you eventually want your pond to be. This is especially true if your railroad will be crossing or running close to the pond. Consider Access and Lines of Sight - To achieve maximum viewing pleasure from your "main" pond, especially if it isn't a very large one, consider placing it fairly close to ground level and close to the optimum viewing position for a person sitting near your railroad. Can you have a mainline separating the pond and the viewer? Of course you can. Should you have a complex switchyard or city between the pond and the viewer? Probably not, unless there's no way around it. When your railroad is complete, viewers will have many opportunities to approach and interact with the trains and accessories. But they may only have one good place for approaching and interacting with the pond--don't block it off unnecessarily. Consider Interaction with the Railway - If you plan to have the railroad close to or crossing a water feature, plan how that will work before you get out the shovel. For example, it's easy to span several feet of water with angle-iron-reinforced 2x6 or similar construction (one fellow uses small I-beams). But it may not look right if you don't have some "support" in the middle, even if it's not really holding up anything. Most garden railroad bridges or viaducts that cross water features avoid this problem (and create a more realistic setting in general) by crossing corners, inlets, or "rivers," not the length of the pond. If you do plan to have a creek, river or waterfall passing under a bridge, it's probably best to build that portion of the water feature at the same time or before you build the adjacent roadbed, etc., Whatever you do, leave some room to stand or kneel when you're adding features or roadbed later, so you don't have to balance on the edge of the pond while you're doing delicate work. Consider Cosmetics - Consider construction methods and designs that should complement your planned railroad. For example, in some parts of the world, you could create a "pond" by arranging four railroad ties in a square, rolling out a liner, arranging rocks around the edges, and trimming the excess. But you would have four straight lines, something seldom seen in the "real world." Too much exposed black plastic is another problem, so some means of disguising the edges and borders of your water features' lining would also help you create a realistic setting.
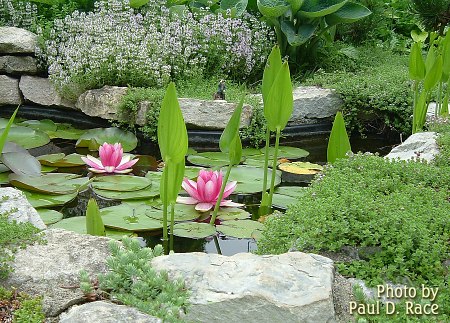
In addition, consider how your "land plants" will fill in and complement your pond. One of the biggest differences between my earlier and later photos is the amount of plant growth surrounding the pond. The effect of the "creeping thyme" creeping over the "banks" of the pond has been one of the most pleasant suprises of the entire exercise. As hard as it is to believe that this is even the same pond shown a few phots up, you may find it harder to believe that every plant shown in this photo was actually planted in the previous photo - some things just took a while to "settle in." Bad StuffBecause of danger of contaminating your pond or environment, here are a few warnings:
PreparationWhen you've decided on the size, shape, and depth of your pond, it's time to dig.Level the excavation - If you use "shelves," chances are you'll want them fairly level and a similar depth all the way around the pool. If you want a flat bottom, you'll need to level that, too. But the most important part is the top edge of the excavation. If your ground slopes at all, you'll find that you need to scrape some earth around the outside of the perimeter of the future pond, so that outside edge is level all the way around. Otherwise, more vertical liner will be visible on one side of the pond than on the other, which not only detracts from appearance, but exposes that portion of the liner to more UV. Protect the liner from beneath - No matter how careful you are to remove stones, roots, etc, in the bottom of your future pool, chances are that something will work its way out of the ground over the next several years and run the risk of puncturing your pond from the underside. Pond suppliers sell a sort of "blanket" sometimes called "underlay." Some writers recommend using newspapers, but I don't believe they would hold up for long enough to do you much real good. Others recommend using used carpet (the kind you see along the edge of the road on trash days). According to Helen Nash, author of Low-Maintenance Water Gardens, (Sterling Publishing Co., 1996), if you use a carpet with a waterproof backing (like indoor-outdoor carpet), you should slash it before you install it to keep it from holding water and creating more problems for you. InstallationAll the pond books have good chapters on installing. Some recommend that you lay the pond liner out a little at a time, starting from the middle, presumably deepest part, and filling gradually as you work your way up and out. Others show the entire liner sitting cheerfully in its place before any water is introduced. All agree that you don't trim the excess until you've filled the pond and it's had a chance to "settle in." For one thing, having a foot or three excess material around the outside edge of the pond allows you to lay "trim," stepping stones, gravel paths, etc., without worrying about having to weed them.Filling - If you're using a preformed liner, you should fill the pond while you're backfilling to make certain it doesn't shift out of "level" after you've got the backfill in place. Fill a little, backfill a little, check the level, fill a little, backfill a little, check the level, and so on. Whatever kind of liner you're using, you don't want it to stand empty for long. If you get a good rain before there's water in the liner, it could float up out of the ground and you'd have to start over. Plus, you don't want the liner needlessly exposed to UV, even if it is "resistant." It wouldn't hurt the future of your pond to fill it, let it stand a couple of days, drain it, and fill it again, in case there are any contaminants on or in the lining. If you're using non-certified lining material, you might want to do that a couple of times, especially if you have a well. (City dwellers might not want to be so generous with their water.) Either way, give the water another few days before introducing any fish or plants you care about. That way the water can warm to a temperature that is better for your fish, and any chlorine will have a chance to evaporate. (You can always introduce a couple ten-cent "feeder goldfish" and see if they survive before you try anything else.) When you do install fish and plants, follow the directions explicitly; for example, your pet supplier can tell you how to introduce goldfish gradually into the pond water, so the difference in temperature doesn't put them into shock. MaintenanceAs soon as you have fish living in the pond, the water will turn green, maybe before. Eventually gross thread-like material will grow on the pond sides and clog your biomechanical filter. When you go to the pond experts they will tell you that you need either:
Thread algae, on the other hand, requires chemical treatment in many cases. Find out what folks in your area are using effectively and get some of that. Just don't go to the pet store and buy something for aquariums - it may be dangerous to plants you want to keep. Your local pond supplier may have an anti-algae chemical he is not afraid to recommend to you, but please use it according to instructions. The one I use seems to contain some sort of sea salt, but I don't know for certain and the ingredients aren't listed on the label. (Note: Many pond owners deliberately add trace elements of sea salt to improve the health of their fish and cut down on algae growth. But be aware that water hyacinth and water lettuce, two popular aerating plants, are very sensitive to salt and may not even survive a .1% solution.) Eventually your pond will stabilize, the water lilies will bloom, and the water will remain more or less clear. (Note: A larger pond will remain more stable than a smaller pond once it's settled in.) From that point on, your main maintenance activities will consist of the following:
Autumn Leaves - Most people remove the nets when snows start. In my case, the neighbors don't rake at all, so leaves are blowing into the pond all winter long, even until late spring. This means that I can't remove my nets until spring, so I have to pick the dead leaves out of the net every so often. Once temperatures start averaging below 50 degrees Fahrenheit, stop feeding your fish altogether and turn off the pump. (You're supposed to remove it but I don't always get around to that). The fishes' metabolism slows down and they don't need as much oxygen or food. If you have plants sitting on the "shelves" of your pond, you can usually clip the leaves, then set the whole pot on the lower level of the pond to protect the plants from the worst of the cold. Winter Care - Over the winter, try to keep dead leaves, etc., from accumulating in the pond, as their rotting will reduce available oxygen for the fish.
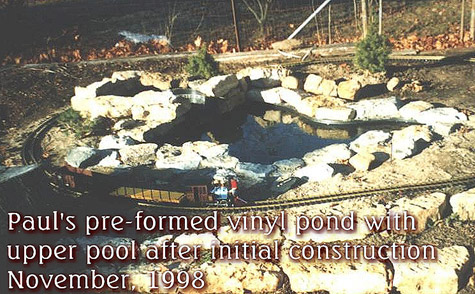
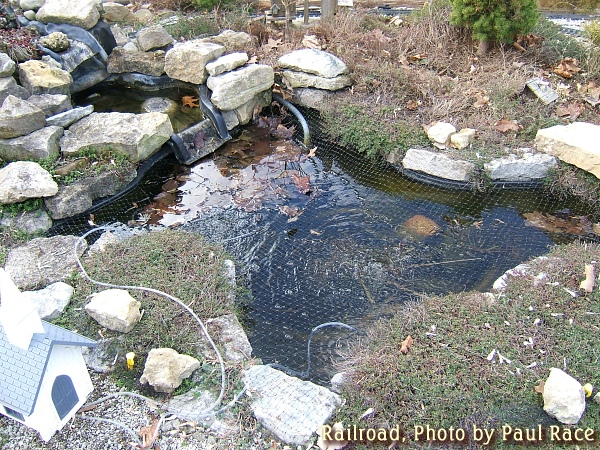
Don't get discouraged when things "brown up" and the pond is less than attractive. By taking care of the pond now, you'll ensure that in the spring it comes back better than ever. I was almost afraid to show these photos of my small pond midwinter, but then I remembered that a midsummer photo of the same pond is shown in the title, so you can always check that photo against these when you feel that things are looking too "dead." Whatever you do, doon't try to break a "breathing" hole in deep ice -- the concussion may kill your fish. Spring Care - As ices ceases to form, remove the heater, if you've been using one. Fish any dead leaves or branches out of the pond. Once the temperature is averaging 50 degrees Fahrenheit, get the biomechanical filter and pump going. Eventually you'll need to make certain your biofilter is operating properly as well, which may mean replacing the plants in it if you used annuals like water hyacinth. When frosts are about over (usually a couple weeks before the date you're allowed to plant tomatoes in your region--check with your garden supplier), raise your "shelf plants" back to their summer position ConclusionOnce again, be certain to visit existing garden railways with good water features and review several books on the subject before you commit to any design or construction methodology. This article is just an overview of the sort of things you'll have to take into account. But when you have made all the choices and done all the work, you should find that a properly planned, implemented, and maintained water feature adds significant enjoyment and viewer interest to your personal empire.Update for 2018 - Other Resources - Since we last revised this article, we moved and started a new, raised railroad. We evaluated many approaches to the new railroad as well as to the new water feature. Currently we have a dramatic waterfall but no pond to speak of - that will hopefully come next year. Here are two articles that describe our progress so far:
Click on the photo to see our progress as of June 13, 2018.
Click on the photo to see our status as of August 5, 2018. For more information: One of the most practical books on the subject is: Nash, Helen. Low-Maintenance Water Gardens A great web resource about fish health and related water issues is Koivet.Com. |

|
| 
|
 |
 |
|
 |
 |
Note: Family Garden Trains?, Garden Train Store?, Big Christmas Trains?, BIG Indoor Trains?, and BIG Train Store? are trademarks of Breakthrough Communications (www.btcomm.com). All information, data, text, and illustrations on this web site are Copyright (c) 1999, 2000, 2001, 2002, 2003, 2004, 2005, 2006, 2007, 2008, 2009, 2010, 2011, 2012, 2013 by Paul D. Race. Reuse or republication without prior written permission is specifically
forbidden.
Family Garden Trains is a participant in the Amazon Services LLC Associates Program, an affiliate advertising program designed to provide a means for sites to earn advertising fees by advertising and linking to amazon.com.
For more information, please contact us

 |  |


 Note: Since I wrote this article, several companies that make resin or vinyl "fountains" have begun working harder to make their "waterfalls" look more realistic. Depending on where you live, and what kind of stone you're using around your pond, you may be able to save some time and energy with a prefabricated waterfall of some sort.

 Waterscaping the NEW New Boston and Donnels Creek Part 1
 Waterscaping Part 2