 | |||
 |
 |
 | |
 |
 | ||
 |
 | ||
 |  | ||
 |  | ||
 | |||
 |
 |
 | |
 |
 | ||
 |
 | ||
 |  | ||
 |  | ||
| Written by Paul D. Race for Family Garden Trains(tm)
and New Boston and Donnels Creek: |
 |
|
|
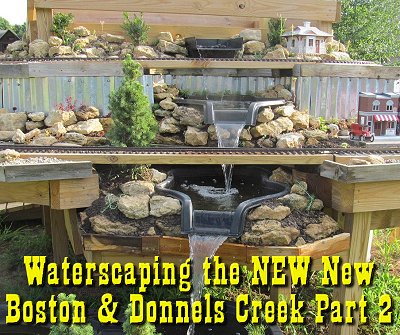
Waterscaping the NEW New Boston and Donnels Creek RR - Part 2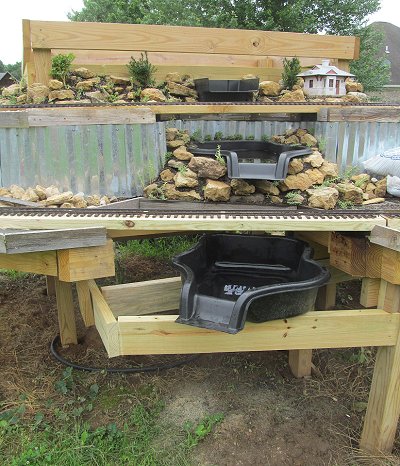 This is a continuation of my series on building the first two tiers of a proposed 3-level outdoor railroad, using more lumber than dirt. From the start, I planned to have a multiple-tier water feature, with waterfalls that the trains ran past and ponds the trains crossed over. This is a continuation of my series on building the first two tiers of a proposed 3-level outdoor railroad, using more lumber than dirt. From the start, I planned to have a multiple-tier water feature, with waterfalls that the trains ran past and ponds the trains crossed over.
Though planning for the water feature has been ongoing for months, the first article dedicated to its construction is here. At the end of that article - as shown to the right - I had installed and dirtscaped the top two layers of the water feature, a weir (spillway) and a Maccourt connecting pond that would spill into the next level. I had also jury-rigged a third level that would get a second Maccourt connecting pond once it was decked out. Again, the places that sell preformed ponds act like all you have to do is scrape dirt in the right places, line these things up, and throw some Hostas into the ground. But for a complex water feature, you need to make certain your pieces are supported properly, even if you will hide those supports once the pieces are all doing what they're supposed to do. Decking the Next Layer Down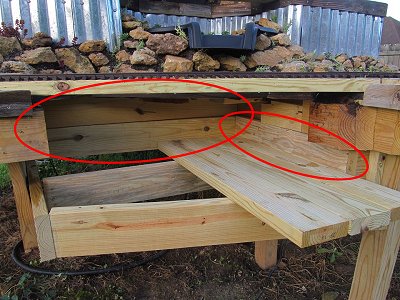 Because I wanted to put rocks and dirt and plants on this layer, too, I added some scrap lumber pieces around the new frame to keep the dirt where it was supposed to go and started decking. Because I wanted to put rocks and dirt and plants on this layer, too, I added some scrap lumber pieces around the new frame to keep the dirt where it was supposed to go and started decking.
In the photo to the right, the red ovals show some of the boards I used to close up the back and sides of the little deck. When the decking is finished, you won't be able to see through that layer. And it will allow me to pile dirt several inches deep around the connecting pool, for plants. I cut the decking boards a little larger than they will need to be, because I wanted to test that connecting pool's final placement before I trimmed them off. In the meantime, I went shopping for a water tank or trough I could use for this level to drain into. I had thought of getting a galvanized horse trough or some such, but they're not cheap, and no good used ones came available while I was in the planning phase.
The photo to the right shows one of my "tests." The utility tank is camouflaged by potted trees in this photo, but you can see it more clearly below. This will probably be replaced next year, when I (hopefully) install the next layer of railroad, but it will give me a chance to run the waterfall and get some pond plants started in the meantime. You can see that this photo was taken when I was just beginning the process described in our article "Adding a Train Shed Part 1". In fact, the waterfall stayed in about this configuration until I had gotten the rafters of my train shed raised, as described in "Adding a Train Shed Part 1". Choosing a Pond Pump - In the meantime, I priced many pond and waterfall pumps. In evaluating the pumps available to me, I tried to keep in mind that the top of the waterfall could conceivably be seven feet above the pump in the thing's final configuration (right now it's about 5 1/2' because the "pond" isn't actually in the ground). Most fountain, pond, and waterfall pumps' documentation tells how far they can be expected to raise a column of water before they give out. For me, at this level, there seemed to be a gap between the "not quite enough" and the "too much" pumps.
Apparently PondMaster rates their pumps conservatively. There was such a torrent of water that everything was churning like a washing machine. I read up on control valves and decided it would be safe to install one on the output side of the pump (never on the input side). The photo shows that valve attached. I set it to about 3/4 open, which reduced the flow enough to make it a little more manageable. (If you restrict the flow so much that the pump starts vibrating or rattling, you'll damage the pump.) The photo also shows the netting from a vegetable bag tied over the "prefilter" that comes with the pump. That was to keep the little tiny goldfish I bought from getting sucked into it. At this stage, the goldfish are more-or-less "canaries in the coal mine." They eat mosquito larvae, which is critical, but while you're getting the kinks worked out of your water feature, they may not survive. So don't start out with $40 Koi or even $7 Comets. A healthy .39 Comet will grow quickly in a healthy pond. About "Algae Bloom" - The pond water turned green up in record time. This is called "algae bloom" and happens quickly in untreated ponds. It may also come back after heavy rains change the chemistry of the water in your pond. Single-cell green plants turn the water into pea soup. You can see some of the algae forming over the pump if you click on the big photo. I bought some algaecide, making certain it was safe for other pond plants (some of them - meant for drainage ponds or the like - kill most or all pond plants). By the way, you can buy fancy filters that bombard the water they filter with ultraviolet light, killing the algae as it passes through. That's not a bad idea, really, but I've always found a few doses a year of a good algaecide worked for me at a fraction of the cost. Water Lily Starts - I also bought some water lily starters that came in a cardboard box from Lowes. As far as I can tell, they're bits of water lily roots packed in peat moss wrapped in netting. You drop them in the pond and cross your fingers. Save your receipt, especially if you buy them late in the season like I did - only about 2 out of 3 ever come to anything.
Once you have water lilies started at all, they spread, especially if you fertilize them or have a lot of fish. In a healthy pond, they may need divided within two or three years. So spending a few dollars early to get them started is actually better than spending a lot of money later to get the same effect. About Starting Gold Fish - By the way, do not take your children or grandchildren with you when you buy goldfish for a new pond. The chances of your first batch surviving is pretty low, since you may have to flush or treat your new water features multiple times until you get the bugs worked out. Whatever you do, do not let your children or grandchildren name the goldfish. Try to buy inexpensive, but healthy-looking goldfish. Look for goldfish that have "perky-looking" fins even when they're not being chased around the tank by a store employee's net. By the way, I always ask the store employees to let me net them myself. I can locate a nice, healthy-looking fish and keep track of him until he's safely netted. Even dying goldfish look "perky" when they're scared, so the store employee will just snag any old fish, even one that was all but belly-up a minute earlier. Of course, I used to raise tropical fish, so I have more experience at this sort of thing than the average garden railroader. Try to get them into your pond quickly - an hour in the bag may be too long. Twenty minutes in the bag in a hot car may be too long. Put the bag into the pond as soon as you get home, so the water temperature in the bag can adjust to the water temperature in the pond. Then, after a few minutes, unclasp the top of the bag, hold the opening tight with one hand, and turn the bag upside down. Put the end with the opening in the water. When the goldfish are at the lowest part of the bag, let it open gently, so that they spill into the water without getting caught in the plastic. Then say goodbye to them. If they have ANY place to hide, you won't see them again until they start feeling confident in their new environment. If your pond is shallow, and they have no place to hide, and you have a good population of raccoons in the neighborhood, you may not see them again period. The only reason to feed goldfish in an established pond is to get them to come toward you when you feed them. At first, you might want to feed them a little, just a pinch at a time. I've always had great luck training fish to come to me to be fed indoors, but not so much outdoors. And do I really want the fish so used to responding to vibrations that they come to the top when the raccoons come to forage or the foxes come to drink? Once the pond ecosystem is well established, you won't need to feed your goldfish at all - they're survive on mosquito larvae and certain kinds of algae. Installing The Third Level of the Waterfall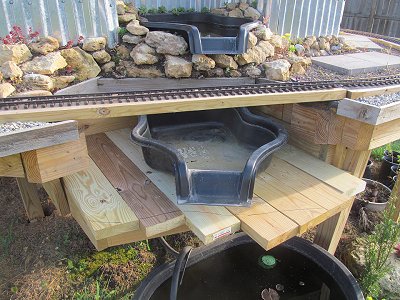
I know it seems like I'm backtracking, but I had to have the utility tank in a good place to receive water before I was certain that the second Maccort pond was in the best position. I tested the interaction of the various waterfall pieces by filling the utility tank with water, hooking the pump up to the hose I ran earlier, and letting her rip. The photo to the right shows the platform the second Maccourt connecting pond will be sitting on, with marks showing where I would trim. I screwed the 2"x6"s in place, then covered the utility tank with a tarp and used my circular saw to trim the edges. By the way, even with the pond pump's output reduced by the valve, there was a lot more flow than we had on the old water feature, so much that the water from the first Maccourt connecting pond blasted the 2"x6" board that is standing in for a bridge. I trimmed the lip off the thing a little, and that helped - very little water hits the bridge now. (I had to revisit this later, which is reported further down.) Reducing the ChurningNo matter how I moved the second Maccourt connecting pond around, it sat so high above the utility tank that the falling water really churned up the water in the tank. In a 200-gallon pond, this wouldn't be so much of a problem. But in the meantime my goldfish were being traumatized by the "whitewater" - I'm sure they were hearing banjo music.
I had to half-empty the utility tank to move it out of the way. Then I used some scrap, pressure-treated lumber to level the new fixture (more or less). The water spilling into my "main" tank now was much less violent. And rather than the goldfish freaking out every time the pump came on, they swam over to where the water was coming in - a normal feeding practice. Upgrading the FilterThe "prefilter" that came with the pump was meant to keep big things from going into the pump mechanism - it had nothing at all to do with cleaning the pond's water.At the old house, I had a shoe-box-shaped filter that included two filter pads and room for "bio-media" (described below). In the meantime, I tried to get by with a little rectangular foam filter that just stuck onto the end of the pump's intake (shown right). It was somewhat coarse, though, and dust-sized bits, such as dead algae from treating algae bloom, were still going through the system unhindered. When you have - essentially - a 60-gallon system with a pump that will easily handle ten times that, and it takes several days to clear the pond's water, that's not adequate. Eventually I found a TetraPond "flatbox" filter on Amazon for a good price. Later I found a filter identical to the one I had used before here Here's a warning about these things. BOTH of these filters, and a dozen similar ones vary widely in price. The Tetrapond filter I wound up purchasing for about $17 could have cost me as much as $60 from other online sites or brick-and-mortar pet stores.
The components of the Tetrapond Flatbox filter are shown to the right. The black plastic shell comes with a hose and connectors for attaching to your pump. It also comes with two filter "media," one coarse and one relatively fine. The little adapters were helpful, but I had to return to my local pond supply store and buy another one to hook the hose to my pump.
I had bought some "biomedia" balls earlier from my pond supply when I had considered making the weir at the top of my waterfall into a filter. About half of the bag fit into the lower chamber of the filter box. Once I had the box assembled and attached to my pump, I lowered them both into the utility tank that is serving as my pond, being careful not to smash any goldfish. I expect the filter to be useful even if and when I install a much larger "pond." Dirtscaping The Third Level of the Waterfall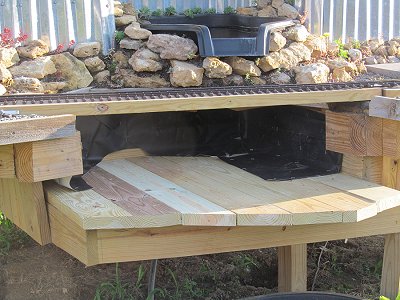 Once I had the edge of the supporting mini-deck trimmed the way I wanted, I added vinyl to keep the dirt I was going to use from resting directly against the timber. Yes, the 2"x6" pieces I used were "ground-rated," but why tempt fate?
 Once again, the vinyl was from a piece of billboard vinyl I ordered for a fraction of what roofing or pool lining vinyl would have cost. This piece happened to be in perfect condition, but for this use it wouldn't have to be, in case you're considering saving money the same way. When I had to stop working on this to pay attention to other things, I made certain to run the pump a little every day to keep the water clear and the pond aerated.
By now, I realized that this broader platform would give me more room to plant things, maybe even more little trees and shrubs. Test Run for Visitors - Just after I had the vinyl in place at this level, we entertained visitors from out of town. I put two trains on the track and started the pump for the waterfall. While it was running, I took a short video with my cell phone. If you want to see that, click on the picture below and wait a minute or three (depending on the speed of your internet connection). 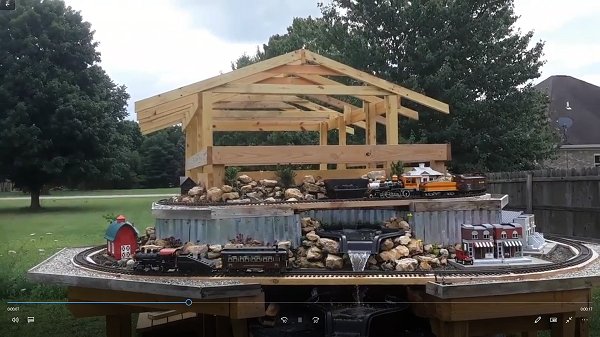 A side note to my model railroading friends who don't like trains "just" running in circles - I'm planning another level beneath these that will have more room for the trains to operate. In the meantime, the visitors we've had so far have quite enjoyed what they see here. Back to the dirtscaping: To hold the dirt back - as I had on the upper levels, I split some pieces of pressure-treated dog-eared fence boards and cut them to fit the odd shape of this level's deck. Yes, I realize that this isn't prototypical, but the truth is, since I'm consistently using the same material, visitors don't really notice it after the first minute or so. These are dogeared planks, listed as 1"x6"x6', but they're technically more like 5/8" x 5 1/2" x 6'. Split in half, they're about 2 3/4" inches wide.
The photo to the right shows the trim boards, as well as the first layer of rocks I installed to hold the dirt that will be filling most of the vacant space around the fixture in place.
I also poured and packed dirt behind the pond - even in places where plants couldn't possibly grow. That way the roots of anything I plant on this layer will have more room to spread. Also, leaving large cavities around pond fixtures encourages rodent settlement there. Don't ask me how I know. While installing the dirt, of course, I did get some into the water fixture. I "solved" that problem by turning the pump back on so anything floating on the top would work its way to the "big" pond. Then I flooded the big pond just enough so that the "floaters" from this step, plus the sawdust from the board-trimming step would seep out over the edge. If your pond is completely submerged in the ground, you'll have to use a net, I suppose. Adjusting the Flow of the Second Layer - In the meantime, the "bridge" of the second layer of the railroad was occasionally getting splashed by the first Maccourt connecting pond I placed there. The thing's lip was apparently designed to shoot water far out and away from the fixture. I had never I had trimmed the little lip back somewhat already, but at this point, I realized a bigger cut would be necessary. With a utility knife, I cut the lip back until it is barely a lip. The water still shoots out somewhat, but not nearly as far or as forcefully as it did before. If you compare this picture to the photo of the other, unmodified Maccourt pond just above, you'll see how much I carved away. Third Layer Dirtscaped - The photo below shows the first three layers of the waterfall, counting from the top down. Since the dirt around the second Maccourt pond was six inches deep and over a foot wide, I thought it might support a small Dwarf Alberta Spruce. The one I used was rootbound, and had a less-than perfect growth pattern, but I got it for half-price at a Walmart when I went in for something else, and I thought it would be a useful experiment. If it survives and gets too big, I'll replace it with a smaller one next spring. In the meantime, it helps the whole scene look just a little more organic, don't you think? I have other plants to transplant here, but it will be a few days, and I wanted to get a photo now. 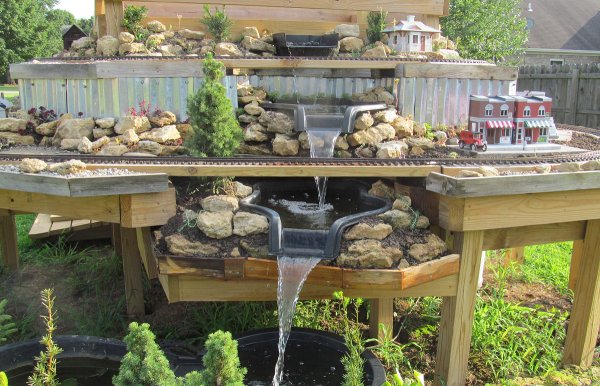 ConclusionAs this project starts looking less like a pole barn frame and more like a railroad and garden, folks have been very encouraging. Next year I hope to add something that's a little more like an actual pond for the waterfall to spill into. But in the meantime, it's a lot of fun to see and hear the water rushing, especially when there are trains on the track as well.This article has been WAY longer than most of them, but I wanted to show you every step I'm going through, even the mistakes I made. Hopefully seeing such details will encourage other folks to try something like this. And probably do it better, to be honest. But that's why I share. The next article will go back to the shed construction, as it's important to get the shed "under roof," as they say, before I do some of the other things I hope to get done before winter this year. As always, if I've helped you get any ideas at all for your next garden railroad construction, I will consider the time it took to document all of this time well spent. Best of luck, all, Enjoy your hobbies, and especially enjoy any time you can spend with your family in the coming season. Paul
I thought about bringing in helpers for this part, but a reader commented on how helpful it was to see how one person could do this sort of thing by himself, so I just kept plugging away. Click on the photo to see our progress as of September 13, 2018
The way we got the rafters and ridge board up wouldn't work for everybody, but it worked for us, and hopefully will help other folks to "think outside the box" - literally in this case. Click on the photo to see our progress as of July 14, 2018.
Click on the photo to see our status as of July 9, 2018.
Click on the photo to see our progress as of June 13, 2018.
Click on the photo to see our status as of June 1, 2018.
Click on the photo to see our status as of February 20, 2018
Click on the photo to see our status as of February 20, 2018
Click on the photo to see our status as of November 21, 2017
Click on the photo to see our status as of October 25, 2017
Click on the photo to see our status as of October 15, 2017
Click on the photo to see our status as of October, 10, 2017
Click on the photo to see our status as of September 26, 2017
Click on the photo to see our status as of September 17, 2017
Click on the photo to see our status as of September 7, 2017
Click on the photo to see our status as of August 10, 2017
Click on the photo to see our status as of the end of July, 2017
Click on the photo to see what we were considering as of late May, 2017
Click on the photo to see what we were considering as of late April, 2017
Click on the photo to see what we were considering in early April, 2017
Click on the photo to see what we were considering in March, 2017
Click on the photo to see the home page of Paul's railroad.
|


|

Note: Family Garden Trains?, Garden Train Store?, Big Christmas Trains?, BIG Indoor Trains?, and BIG Train Store? are trademarks of
Breakthrough Communications (www.btcomm.com). All information, data, text, and illustrations on this web site are
Copyright (c) 1999, 2000, 2001, 2002, 2003, 2004, 2005, 2006, 2007, 2008, 2009, 2010, 2011, 2012, 2013, 2014, 2015, 2016, 2017 by
Paul D. Race. Reuse or republication without prior written permission is specifically
forbidden.
Family Garden Trains is a participant in the Amazon Services LLC Associates Program,
an affiliate advertising program designed to provide a means for sites to earn advertising
fees by advertising and linking to amazon.com.
For more information, please contact us
 |  |
| Visit related pages and affiliated sites: | |||||
| - Trains and Hobbies - | |||||
 |  |
 |
 |
 |  |
 |

|

|  |
 |

|
| - Christmas Memories and Collectibles - | |||||
 |

|
 |

|
 |

|
| - Family Activities and Crafts - | |||||
 |

|

|

|

|

|
| - Music - | |||||

|
 |
 |

|

|

|

|

|

|

|

|

|

|

|

|

|

|

|