 | |||
 |
 |
 | |
 |
 | ||
 |
 | ||
 |  | ||
 |  | ||
| |||
|
|
|
| |
|
|
| ||
|
| ||
| | ||
| | ||
| Written by Paul D. Race for Family Garden Trains(tm)
and New Boston and Donnels Creek: |
 |
|
|
Framing the NEW New Boston and Donnels Creek RR, Part. 6If you've been following along with our planning, groundbreaking, and framing articles, you know that we are building a new garden railroad that will be entirely raised, not set on dirt near ground-level like I was advised to do back in the early 2000s.This is, obviously a followup to our "Framing the NEW New Boston and Donnels Creek RR, Part. 5" article, in which I decked the top layer and temporarily assembled a loop of track to check clearances and "nail down" the location of the waterfall and bridge. Where Things StoodAt the end of the last article, I had finished the carpentry on the top layer, installed vinyl underlayment, and installed and tested the loop of track there.
This Bachmann streetcar is crossing a bridge that is about 5' above ground level - it will be pretty impressive once things are "dirtscaped" and a layer or two of railroad below that are completed, to give you some perspective, don't you think? :-) I had also determined to get a little farther along with the carpentry for the middle layer before I "dirtscaped" the top layer. More Bumpouts As you may recall, I had to make the top layer a few inches longer than I had originally planned because I went from 4'-diameter to 5'-diameter curves. I'm glad I made that decision, since even short trains look better on wider curves.That said, I will need to adjust the size of the lower layer a little. Plus, I hadn't planned exactly where the little pond and waterfall will hit on the middle layer. And I think I'll need to have more framing on that part of the railroad before I'm sure. Reach ConsiderationsOne of my concerns from the beginning was that all of the Right Of Way on all three layers would be within easy reach, for considerations like maintenance and re-railing. You'll see that the track plans for the top two layers are done so that I can easily reach all of the middle layer and most of the top layer without stretching or climbing stepstools or anything of that sort.There will be times when I will need to get on a step-stool to wire buildings or some such, but that should not be a regular occurrence. The reason I mention this here is that, while I technically have "all kinds of room," to spread out the second layer, I don't want to spread it so far out that I can't re-rail a train or wipe the track clean on the top layer with both feet still on the ground.
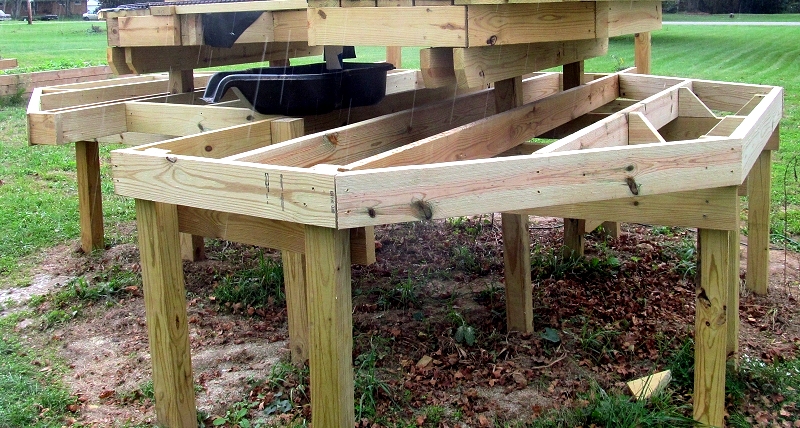
Using a "New" Track Format (For Me)Almost all preformed curves for garden train uses 12 pieces of track to complete a circle, something that several tinplate manufacturers have done in the past. So each curve of LGB 4'-diameter track circles turns 30 degrees, as God intended (says an old American Flyer fan). That format is called R1 by LGB, USA Trains, AristoCraft, Bachmann, and Piko. When people wanted a wider curve to go around the 4' circles, LGB lengthened the rails and tie strips, so that 12 track pieces would create a 5' diameter track circles. That format is called R2 by LGB, USA Trains, AristoCraft, and Bachmann. (Piko doesn't have an equivalent, though they have a 6'-diameter 12-piece circle, which almost no one else has.) But then people started demanding even wider curves. At the time, LGB had their hands full delivering other products. So instead of lengthing the rails and tie strips again, they invented a new format. They basically took the track from the 5'-diameter curves and made it turn 22.5 degrees instead of 30 degrees. So sixteen pieces would make a curve that was 8' in diameter. That format is called R3 by LGB, USA Trains, AristoCraft, and Bachmann. (Piko's "R3" track is actually the 6'-diameter, 12-piece circle I mentioned above.) Later on, other companies made wider curves, but they all used the 12-pieces-to-a-circle-standard, except some of the really wide curves, which used 24 pieces to a circle. On my first outdoor railroad, I took advantage of all those different 30-degree curves by mixing and matching curves to create smoother right of ways. (I have more information about that here - scroll down to the discussion of easements.) In fact, as long as you're using only 30-degree (12-to-a-circle) track, you can get away with a lot of mixing and matching. This leaves LGB's R3 track as sort of an "outlier." It doesn't go with ANYTHING else. But for several years, LGB R3 was the only preformed curve radius you could buy that didn't make most American-style rolling stock look just plain silly. (Remember, trains look better and run better on wider curves). Why am I bringing this up at this point in my account? Because I wanted the middle layer of my railroad to be big enough to run full-length freight cars and woodies, but small enough so I could still reach the track on the top layer. And the only preformed curves that would work for that were the R3 curves (8'-diameter, 16 pieces to a circle, 22.5 degree turns). My LGB-loving friends will not believe this, but after over 30 years involvement in Large Scale trains, this is the first time I have ever used R3 track in my life. Since I had none of this onhand, I tracked down (no pun intended) some used AristoCraft R3 track that looked like it was in pretty good shape. Why not use LGB R3, as many of my friends do? Because I am addicted to screw-on rail joiners, which make a better physical and electrical connection than slide-on rail joiners, and which keep the electrical connection longer. I could have ordered Bachman brass R3 curves or USA Trains R3 curves - they're all compatible, but I came across this set first. Note about Piko "R3" Track - By the way, Piko's R3 track is not the same as anyone else's R3. It takes 12 pieces and makes a 6'-diameter circle. That's actually a nice format for some purposes - for example, it would give more clearance going around a 4'-diameter circle than R2 (5'-diameter) curves. I may even try a set later on. But it's not R3 track by any other company's definition. About Preformed Curves and Railroad SizeSome folks who have built far more elaborate railroads than this one are wondering why I am still using pre-formed curves instead of "flex-track." The answer is that for a small railroad, it's the easiest way to go, and you know exactly what you're dealing with. And, let's face it, this is a small railroad by a lot of people's standards. The right-of-way on the layer I'm working on now will be about 37' long. The ROW on the layer I've already installed is just shy of 21'. Whereas the two loops on my previous railroad were about 131' and 65' long. And I have friends whose railroads have upwards of 500' ROWs.Yes, the two layers I'm building this year are mostly for display, and the loop I'm planning to build next year will be more like 80', plus sidings and other trackage, but it still won't be as large as what I had before. On the other hand, many of those huge railroads that were so impressive in the first couple of years are killing their owners with maintenance issues now. And I've "been there, done that." I plan to keep running trains when I'm even older and decrepiter than I am now, and a 500' mainline is not in the cards. Framing Out the Middle LayerAs mentioned earlier, I expanded my planned "top layer" to accommodate 5'-diameter curves, which meant I would probably have to expand the planned "middle layer" to provide enough clearance for the trains on that layer.I focused on expanding the eastern edge (closest to the house), where I figured things would be the "tightest." The picture at the left below shows how I added three 4'-long joists to extend the table length out past the posts (those are the pieces that are notched on the bottom). Then I toenailed in the end piece and cut the the two diagonal outside frame pieces. The picture at the right below shows the addition of the long diagonal piece and a little extra bracing. I added a couple blocks of wood to the posts so I could attach the long diagonal support there as well as on the ends. Then I added three short pieces at the frame level to better support the end piece. The decking will cover up all the "patchwork," but come to think of it, the vinyl will cover up the decking, so only people who read this article will know my secrets. :-) On the other hand, I think this part of the railroad will stand up to about anything, including me standing up on it, if it comes to that.
You'll see some redundancies, not only because I wound up adding a little length on the east end, but also because I decided to add a little more support in some other places. The black lines are 'joists' which run east and west supporting the frame. The light brown lines are the frame pieces, which sit on top of the joists. The dark brown posts, by the way, do NOT extend above the frames, so they will not interfere with the track or decking. Click for a bigger picture." By the way, when you extend joists out beyond the foundation or supporting posts, it's called a "cantilever." The foundation or last supporting post act as a fulcrum, with the long end of the joist acting as the long end of a lever, with the building or whatever is on top of it holding it down. In parts of the country, you used to see "cantilever" barns which had one end of the barn hanging out over nothing at all - a place where farmers would park equipment they didn't have room for in the barn. But after a century of use and termites, most of those barns have collapsed. Nowadays, there are strict limits on what you can and can't "cantilever' in both house and deck construction. You'll be pleased to know I'm in the legal limit for a deck, except on the east edge of the waterfall notch. but I have not one, but two 2"x6" boards supporting that bit, so I'm sure it will be okay. In retrospect, I probably should have put a post there, but I wasn't entirely how sure the waterfall bit was going to work out. I'm still not, in fact; I just left plenty of room to build things out if I need to. Of course, once I had everything where it needed to be, I took photos, walking around the railroad counterclockwise. That's rain in the first one.
One thing's for sure, it's a lot easier to do stuff like this at waist level than it is at shoulder level. It also probably helped that by the time I started framing this layer out, I had more experience visualing how thing should go and cutting some of the "dodgier" pieces. Checking The ROW Clearances I neglected to get a photo, but I took my loop of slightly-used R3 track and several straight pieces out to the railroad and fastened it together to decide on the final track plan. In part, because I wanted to paint the track and I wanted to make certain I painted all of the right pieces before I put things together. I neglected to get a photo, but I took my loop of slightly-used R3 track and several straight pieces out to the railroad and fastened it together to decide on the final track plan. In part, because I wanted to paint the track and I wanted to make certain I painted all of the right pieces before I put things together.
Once again, your track planning software probably won't let you do this, but there's enough "give" in a loop this size to get away with it. Also, remember that I'm using R-3 curves, which are easy enough to come by, but which are 16 to a circle, so this track plan, such as it is, won't work the same with any other radius. Just as the track on the top layer came out a tad over the edge, Prepping the TiesYou'll recall that in our last chapter, I painted the ties of my track for the top layer to extend their life, and made the track look better in the process. I'll be doing the same thing with the track for this level, with one exception - I'm masking off the top and inner edge of the rails first, so I can avoid all the sanding I had to do on the other track.In addition to the R3 track circle I ordered, I will be using some straight pieces I brought over from the other house. Masking and painting those as well will go a long way to helping all the track look alike. I know that may sound like a little thing, but having all of your track look alike takes visitor's attention off the track and keeps it on the trains and other things you want them to notice. For the same reason, you should try to avoid using different landscaping materials from one part of you railroad to the next. Even if they're not exactly in scale, (say railroad ties or those trapezoidal retaining wall "stones"), visitors will start ignoring them almost immediately if you're consistent. ConclusionAs of this writing, I still have to finish masking and painting the track. But with the days getting shorter and wetter, I will probably have "down time" to do the masking indoors.Then I have to deck and install the vinyl and track on the middle layer of the railroad. Then I can start installing dirt and rocks and gravel and things. I have a number of buildings I COULD set outside, but with bad weather approaching, I'll probably set out some of the bird feeders I got for half price some time back and worry about the buildings and lighting next year. I still have a number of things I'm debating on, like maybe "skirting" the table so it doesn't quite look so much like it's floating. Yes, when the next, larger and lower layer goes into place, that won't be as much of problem, but in the meantime it looks a little funny. As always, if I've helped you get any ideas at all for your next garden railroad construction, I will consider the time it took to document all of this time well spent. Best of luck, all, Enjoy your hobbies, and especially enjoy any time you can spend with your family in the coming season. Paul
Click on the photo to see our status as of October 28, 2017
Click on the photo to see our status as of October, 10, 2017
Click on the photo to see our status as of September 26, 2017
Click on the photo to see our status as of September 17, 2017
Click on the photo to see our status as of September 7, 2017
Click on the photo to see our status as of August 10, 2017
Click on the photo to see our status as of the end of July, 2017
Click on the photo to see what we were considering as of late May, 2017
Click on the photo to see what we were considering as of late April, 2017
Click on the photo to see what we were considering in early April, 2017
Click on the photo to see what we were considering in March, 2017
|


|

Note: Family Garden Trains?, Garden Train Store?, Big Christmas Trains?, BIG Indoor Trains?, and BIG Train Store? are trademarks of
Breakthrough Communications (www.btcomm.com). All information, data, text, and illustrations on this web site are
Copyright (c) 1999, 2000, 2001, 2002, 2003, 2004, 2005, 2006, 2007, 2008, 2009, 2010, 2011, 2012, 2013, 2014, 2015, 2016, 2017 by
Paul D. Race. Reuse or republication without prior written permission is specifically
forbidden.
Family Garden Trains is a participant in the Amazon Services LLC Associates Program,
an affiliate advertising program designed to provide a means for sites to earn advertising
fees by advertising and linking to amazon.com.
For more information, please contact us
 |  |
| Visit related pages and affiliated sites: | |||||
| - Trains and Hobbies - | |||||
|  |
|
 |
|  |
 |

|

|  |
|

|
| - Christmas Memories and Collectibles - | |||||
 |

|
 |

|

|
|
| - Family Activities and Crafts - | |||||
 |

|

|

|

|

|
| - Music - | |||||

|
 |
 |

|

|

|

|

|

|

|

|

|

|

|

|

|

|

|

. Then I toenailed in the end piece and cut the the two diagonal outside frame pieces. Click for bigger picture.")
. Click for bigger picture.")


 Proceed to the next article, "Decking the NEW New Boston & Donnels Creek."
 Return to "Framing the NEW New Boston and Donnels Creek RR, Part 5"
 Return to "Framing the NEW New Boston and Donnels Creek RR, Part 4"
 Return to "Framing the NEW New Boston and Donnels Creek RR, Part 3"
 Return to "Framing the NEW New Boston and Donnels Creek RR, Part 2"
 Return to "Framing the NEW New Boston and Donnels Creek RR, Part 1"
 Return to "Breaking Ground on the NEW New Boston and Donnels Creek"
 Return to "Planning the NEW New Boston and Donnels Creek, Part 4"
 Return to "Planning the NEW New Boston and Donnels Creek, Part 3"
 Return to "Planning the NEW New Boston and Donnels Creek, Part 2"
 Return to "Planning the NEW New Boston and Donnels Creek, Part 1"
 Return to the New Boston and Donnels Creek RR Page
 Return to Family Garden Trains' Home Page