 | |||
 |
 |
 | |
 |
 | ||
 |
 | ||
 |  | ||
 |  | ||
| |||
|
|
|
| |
|
|
| ||
|
| ||
| | ||
| | ||
| Written by Paul D. Race for Family Garden Trains(tm)
and New Boston and Donnels Creek: |
 |
|
|
Decking the NEW New Boston and Donnels Creek RRIf you've been following along with our planning, groundbreaking, and framing articles, you know that we are building a new garden railroad that will be entirely raised, not set on dirt or backfilled with dirt, as I was advised to do back when I started my previous "permanent" railroad.There will hopefully be three layers, eventually. This year, we're trying to complete the first two, inner layers. Next year, we plan to build another layer a little bit lower than these, which will include a much longer mainline. But we wanted to get the high part of the railroad in early, since it's a lot harder to add height to a railroad after you've built the mainline. If it helps you to visualize, the track on the highest platform is about 5' off the ground. The track on the platform we're working on in this article will be about 40" off the ground. The last railroad (next year's project, we hope) will be between 24" and 30" off the ground. Because my birds-eye plans have confused countless readers, I'm including a "side-view" diagram of the proposed railroad. In case you wondered, it is not remotely to scale. The brown and brownish parts represent the parts I have done or hope to get done shortly. The gray parts represent the lower outside layer and the integrated "storage shed" I hope to complete next year.  This is article is a followup to our "Framing the NEW New Boston and Donnels Creek RR, Part. 6" article, in which I finished framing out the middle layer of my proposed 3-layer "wedding cake" railroad. By now, I had also decked out the top layer, installed a vinyl underlayment over the decking, and installed a loop of track based on R2 curves. So, technically, this is the second "decking" article, but its the first one after this year's framing exercise is complete.
At the end of the last article, I had finished the framing and determined what track pieces to use on the middle layer. I had also made another run to the store for more 2"x6" lumber and decking screws.
|
 |
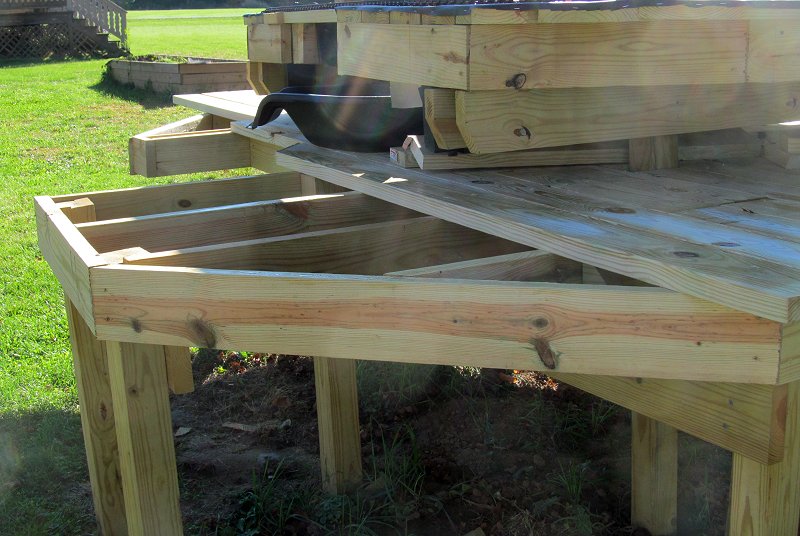
The photo below shows the south end (the left side of the drawing above). You can see where the storage area between the four posts will be.
 |
Right now, a number of readers and at least three friends are thinking, "What is he thinking?" I'm breaking a lot of "rules" for backyard railroading here, after all. They're "supposed" to be built on the ground or on big piles of dirt, or at least backfilled with loads of dirt. But I've been there, done that, and have the stiff back and callouses on my kees to prove it. Since so many people take up outdoor railroading after they've retired, why not experiment with a construction method that isn't that much more expensive in the first place, and which will be a lot lower maintenance and a lot easier on the back and knees in the long run?
In addition to the R3 track circle I ordered, I will be using some straight pieces I brought over from the other house. Masking and painting those as well will go a long way to helping all the track look alike. I know that may sound like a little thing, but having all of your track look alike takes visitor's attention off the track and keeps it on the trains and other things you want them to notice. For the same reason, you should try to avoid using different landscaping materials from one part of you railroad to the next. Even if they're not exactly in scale (say railroad ties or those trapezoidal retaining wall "stones"), visitors will start ignoring them almost immediately if you're consistent.
 I wanted the track to be ready to go, because I wanted to be able to put together some subassemblies and doublecheck everything while I was still installing the "outside" boards to check the fit. And I don't want to put those subassemblies together more than once if I can help it. The taping took a lot longer than I expected, probably as long as the sanding, to be honest. But I could do it indoors when something mindless was on television.
I was going to use spray paint this time, but the brush-on paint covered and stuck so well, I decided to use it on this bunch of track, too. (After all, I still had most of the can, and it's not like I need many other things that color.) The main danger with the taping was that the paint might "wick" underneath it and I'd have to do some sanding anyway. And that was slightly more likely with brushed-on paint, but not enough to be the deciding factor.
 One other thing - AristoCraft used to send out their track with little screws held in the corner of a bottom tie by red wax. The idea was you'd have enough screws to screw your track plan together. Of course, if you set up a temporary railroad on your patio or something, and the sun came out, the wax would melt and you'd lose all those screws anyway. Don't ask me how I know that. Most of the track I got in this order still had the screws stuck in the ties. So even though it had been used, it had never been used outdoors in warm weather. Be sure and check for this if you ever get AristoCraft track. I waited until mid-day and popped the screws over a hard surface in bright light. Because they are tricky little devils.
The photo below left shows the track masked and painted. The photo below right shows the masking removed. You'll see that the unpainted parts - the tops and inside edges of the rail heads - are still brighter on the new track than the old track, but that will change over time, and the rest of the track is consistent.
 |
 |
 |
I installed several of the other pieces using the track as a guideline, but adding a few inches at the ends of some of the boards just in case. I was also able to figure where the Marcourt Connecting Pond should go on that layer and begin cutting the gap for the waterfall appropriately. Then I ran out of daylight.
 Except for one gap on the East side that would be easy enough to fill in when I had a scrap the right size, the only part remaining to figure out was the north side, where the waterfall and bridge will be.
That said, I wanted to put my track back on to fine-tune the location of the bridge, and it rained for the next three days, so that didn't happen. I figured I'd stop the article here and post it, then have the bit on finishing the decking in the next article.
Actually, I did post it, but I managed to finish the decking a few days later so then I added a few photos and reposted it. Hope you don't find that too confusing.
 In the meantime, we had snow. Yes, snow, on October 28, 2017, in the same October when it got up to 80F more than once. Gotta love Ohio weather!
So I got a slow start. But I spent the time fastening the track together into larger "subcomponents" so when I put the back on the railroad, I'd know they were pretty much the way they were going to be.
So after the snow melted (it only got down to about 38F, after all) and things dried up a little, I put the track back on and marked where I thought it would be safe to trim the decking. As an example, here is the southeast corner, marked to be trimmed.

The photo below is the same corner after trimming.

Decking around the waterfall/bridge area was trickier, in part because I was running out of wood and didn't want to make a trip to the store if I had enough to finish. The following photo shows that area after I had finished decking, and trimming, and had removed the track for the night. If you look really close, you'll see where I used some short pieces to fill gaps. But nobody will see them after I've installed the vinyl underlayment. So it's our little secret.

You can also see the little indoor/outdoor speakers I brought over from the other railroad. They're not to scale, but no one should notice once the garden part of the railroad is installed.
I will have to get at least one more piece of lumber, for the "bridge." But the underlayment goes on before the bridge does, so that's part of my next stage.
I actually got out the "master plan" to see how much work it would take to put the "bottom" part of the lower layer in place. More work than I'll have time for before snowfall this year. I guess I'll think about the skirting after I have the top and middle layer "finished" enough to show off before Christmas.
As always, if I've helped you get any ideas at all for your next garden railroad construction, I will consider the time it took to document all of this time well spent.
Best of luck, all,
Enjoy your hobbies, and especially enjoy any time you can spend with your family in the coming season.
Paul
 Proceed to "Dirtscaping the NEW New Boston & Donnels Creek, Part 1" - Getting the existing layers ready to install gravel and dirt, including splitting and trimming fence boards to provide a little border around the edge of the layers, and beginning to dump the gravel. Also getting a few Taxus Hicksii very cheap to give me something green this winter, even if I have to move them later.
Click on the photo to see our status as of November 21, 2017
 Here's an interruption, of sorts: "New Boston Goes On the Road" - Well, the weather turned too cold too fast to get my railroad finished for my traditional mid-November Christmas-Themed open railroad. Which means all of my buildings were still in boxes when the Miami Valley Garden Railway Society set up a huge display at the Dayton Train Show and put out a call for more buildings.
Click on the photo to see our town "out on the town" so to speak.
 Return to "Framing the NEW New Boston and Donnels Creek RR, Part 6" - Modifying and finishing the framing on the second layer, cantilevering, using R3 track versus all other pre-curved track formats, finalizing the track plan, why painting the track makes old and new track blend better, and more. This will be the last bit of "framing" in 2017, and it worked out well, considering.
Click on the photo to see our status as of October 15, 2017
 Return to "Framing the NEW New Boston and Donnels Creek RR, Part 5" - Spreading the billboard-sourced vinyl underlayment on the top layer. Prepping used Aristo track for (hopefully) many more years of service. Laying the first loop of track, attaching power wires with spade terminals, and testing conductivity with a Bachmann streetcar.
Click on the photo to see our status as of October, 10, 2017
 Return to "Framing the NEW New Boston and Donnels Creek RR, Part 4" - Planning and running the decking for the top layer, testing the track plan, checking clearances, prepping used track with new railjoiners, examining the vinyl I ordered to go over the decking, and more.
Click on the photo to see our status as of September 26, 2017
 Return to "Framing the NEW New Boston and Donnels Creek RR, Part 3" -
Getting the frame finished on the top layer, ordering other things I'd need eventually, deciding on materials for the decking on the top layer (at least).
Return to "Framing the NEW New Boston and Donnels Creek RR, Part 3" -
Getting the frame finished on the top layer, ordering other things I'd need eventually, deciding on materials for the decking on the top layer (at least).
Click on the photo to see our status as of September 17, 2017
 Return to "Framing the NEW New Boston and Donnels Creek RR, Part 2" -
Once I had the overall frame relatively solid, I hooked up the underground power lines to two GFI plugs that should be in easy reach once everything is finished. I also decided to frame out the top railroad layer while I could still access the center of the railroad easily. Because I was running out of vertical space, I reconfigured that layer. Then after I got the "core" pieces on, I changed my plan again. But the whole thing is getting easier and easier to visualize, and is getting closer to complete with every board I cut and fasten on.
Return to "Framing the NEW New Boston and Donnels Creek RR, Part 2" -
Once I had the overall frame relatively solid, I hooked up the underground power lines to two GFI plugs that should be in easy reach once everything is finished. I also decided to frame out the top railroad layer while I could still access the center of the railroad easily. Because I was running out of vertical space, I reconfigured that layer. Then after I got the "core" pieces on, I changed my plan again. But the whole thing is getting easier and easier to visualize, and is getting closer to complete with every board I cut and fasten on.
Click on the photo to see our status as of September 7, 2017
 Return to "Framing the NEW New Boston and Donnels Creek RR, Part 1" -
Once I started dropping posts in the holes and screwing things together, I didn't want to stop before I had the basic frame built (for one thing, the wood warps less once it's fastened in place). Now the folks driving down the street past our house (we're on a corner lot) probably wonder if I'm building an elaborate chicken coop, but that's fine with me. I still need to make a few more lumber runs and do a lot more cutting and sawing, but having the basic frame in place should make the next bits a lot easier.
Return to "Framing the NEW New Boston and Donnels Creek RR, Part 1" -
Once I started dropping posts in the holes and screwing things together, I didn't want to stop before I had the basic frame built (for one thing, the wood warps less once it's fastened in place). Now the folks driving down the street past our house (we're on a corner lot) probably wonder if I'm building an elaborate chicken coop, but that's fine with me. I still need to make a few more lumber runs and do a lot more cutting and sawing, but having the basic frame in place should make the next bits a lot easier.
Click on the photo to see our status as of August 10, 2017
 Return to "Breaking Ground on the NEW New Boston and Donnels Creek" -
Okay, in case you wondered if we'd ever get started on the thing, we broke ground in July, using a manual post-hole digger. Well two manual post-hole diggers. But by the end of this article, we're ready for the posts to start going in.
Return to "Breaking Ground on the NEW New Boston and Donnels Creek" -
Okay, in case you wondered if we'd ever get started on the thing, we broke ground in July, using a manual post-hole digger. Well two manual post-hole diggers. But by the end of this article, we're ready for the posts to start going in.
Click on the photo to see our status as of the end of July, 2017
 Return to "Planning the NEW New Boston and Donnels Creek, Part 4" -
Well, the rented post-hole digger fell through, so we dug our vegetable garden with a manual post-hole digger (the scissors kind). In addition, I stake out where the railroad was going to be. Twice. And tweaked the plans again. Sorry about the redo's, but sometimes just walking around the yard trying to visualize things makes me reconsider something that seemed "settled" only a few days before.
Return to "Planning the NEW New Boston and Donnels Creek, Part 4" -
Well, the rented post-hole digger fell through, so we dug our vegetable garden with a manual post-hole digger (the scissors kind). In addition, I stake out where the railroad was going to be. Twice. And tweaked the plans again. Sorry about the redo's, but sometimes just walking around the yard trying to visualize things makes me reconsider something that seemed "settled" only a few days before.
Click on the photo to see what we were considering as of late May, 2017
 Return to "Planning the NEW New Boston and Donnels Creek, Part 3" -
We have still not broken ground. In part because we plan to rent a post-hole digger and dig the post holes for our raised vegetable garden and the first phase of the garden railroad at the same time, and we don't have enough lumber on hand yet. (If we didn't break it down into multiple trips, we'd be blowing out the shocks on our minivan.) In the meantime, we used a line level to see if the slope of the back yard was as bad as we thought it was (it's worse), and we did other site preparation, including planting a whole bunch of spruce tree seedlings to eventually give us some privacy in our side and back yard. Plus, I'm still wavering a little on the "where-to-start-first" issue.
Return to "Planning the NEW New Boston and Donnels Creek, Part 3" -
We have still not broken ground. In part because we plan to rent a post-hole digger and dig the post holes for our raised vegetable garden and the first phase of the garden railroad at the same time, and we don't have enough lumber on hand yet. (If we didn't break it down into multiple trips, we'd be blowing out the shocks on our minivan.) In the meantime, we used a line level to see if the slope of the back yard was as bad as we thought it was (it's worse), and we did other site preparation, including planting a whole bunch of spruce tree seedlings to eventually give us some privacy in our side and back yard. Plus, I'm still wavering a little on the "where-to-start-first" issue.
Click on the photo to see what we were considering as of late April, 2017
 Return to "Planning the NEW New Boston and Donnels Creek, Part 2" -
More plans. We've moved on from the 2"x6" roadbed-on-posts to a sort of "train-table-outside" plan. Our goals include low-maintenance, high interest, and high reliability. We're also trying to get around having a thousand dollars' worth of dirt hauled into the back yard. If you want to get some idea of what our planning process looks like, reading these through in sequence may help. Or it may drive you crazy.
Return to "Planning the NEW New Boston and Donnels Creek, Part 2" -
More plans. We've moved on from the 2"x6" roadbed-on-posts to a sort of "train-table-outside" plan. Our goals include low-maintenance, high interest, and high reliability. We're also trying to get around having a thousand dollars' worth of dirt hauled into the back yard. If you want to get some idea of what our planning process looks like, reading these through in sequence may help. Or it may drive you crazy.
Click on the photo to see what we were considering in early April, 2017
 Return to "Planning the NEW New Boston and Donnels Creek, Part 1" -
If you're subscribed to our newsletter, you know that we moved just after Thanksgiving in 2016, leaving behind most of the track, a few of the bird feeders, and one Bachmann train set for the new owners. We also left behind a high-maintenance garden that we do not intend to replicate at the new place. This is the first chapter of a new chapter in our lives, which we hope will include a lot of "lessons learned." But first, some serious landscaping had to take place.
Return to "Planning the NEW New Boston and Donnels Creek, Part 1" -
If you're subscribed to our newsletter, you know that we moved just after Thanksgiving in 2016, leaving behind most of the track, a few of the bird feeders, and one Bachmann train set for the new owners. We also left behind a high-maintenance garden that we do not intend to replicate at the new place. This is the first chapter of a new chapter in our lives, which we hope will include a lot of "lessons learned." But first, some serious landscaping had to take place.
Click on the photo to see what we were considering in March, 2017
 Return to the New Boston and Donnels Creek RR Page - This is the page describing Paul Race's progress and frequent rework on his own garden railroad, started on a shoe-string budget in 1998, later expanded, and later refurbished several times as issues arose. Issues that Paul hopes to avoid by building the next iteration above ground.
 Return to Family Garden Trains' Home Page - The home page with links to all the other stuff, including design guidelines, construction techiques, structure tips, free graphics, and more.


Note: Family Garden Trains?, Garden Train Store?, Big Christmas Trains?, BIG Indoor Trains?, and BIG Train Store? are trademarks of
Breakthrough Communications (www.btcomm.com). All information, data, text, and illustrations on this web site are
Copyright (c) 1999, 2000, 2001, 2002, 2003, 2004, 2005, 2006, 2007, 2008, 2009, 2010, 2011, 2012, 2013, 2014, 2015, 2016, 2017 by
Paul D. Race. Reuse or republication without prior written permission is specifically
forbidden.
Family Garden Trains is a participant in the Amazon Services LLC Associates Program,
an affiliate advertising program designed to provide a means for sites to earn advertising
fees by advertising and linking to amazon.com.
For more information, please contact us
 |  |
| Visit related pages and affiliated sites: | |||||
| - Trains and Hobbies - | |||||
|  |
|
 |
|  |
 |

|

|  |
|

|
| - Christmas Memories and Collectibles - | |||||
 |

|
 |

|

|
|
| - Family Activities and Crafts - | |||||
 |

|

|

|

|

|
| - Music - | |||||

|
 |
 |

|

|

|

|

|

|

|

|

|

|

|

|

|

|

|


