 | |||
 |
 |
 | |
 |
 | ||
 |
 | ||
 |  | ||
 |  | ||
| |||
|
|
|
| |
|
|
| ||
|
| ||
| | ||
| | ||
| Written by Paul D. Race for Family Garden Trains(tm)
and New Boston and Donnels Creek: |
 |
|
|
Adding a Train Shed Part 1If you've been following my articles, you know that we moved in late 2016 and I spent much of 2017 trying to get the next version of my garden railroad installed. My plan was to have a waterfall with two elevated loops of track circling it for vertical interest, then a larger loop with operating capabilities about 24" off the ground. I was also planning on building a little shed-type structure on the "back" of the railroad so I could get trains running quickly, instead of having to schlep everything out like I used to.The infrastructure for the upper two layers has been built, and we have run short trains on both of them. So as a "proof" of concept, that part is a success. I have no reason to change my design or approach when building the last, operational, layer of track.
Since the end goal is for the shed to look like an old-timey railroad building, putting a little 2' porch out the front and a little 1' fake porch out to each side. The decking isn't shown in the graphic to the right, but you get the idea. More Than a Deck - But the more I went over this, the more I realized that JUST adding the deck at this time was going to make things more complicated when I did get around to adding the shed. The posts on the front of the porch really needed to be long posts that would eventually support the roof of the shed. Otherwise, I'd have to build a clumsy little extension once I got around to building the shed. Of course, you can't stick long posts in the ground and expect them to stay where they belong until you get around to fastening them together a year, or even a month into the future. So I'd have to frame things together at least a little. And here's another thing I would do differently next time. When I chose 8' posts for the heart of my structure last year, I wasn't considering how much vertical room I would need to add a real door to the shed, or how high the rafters would have to be to keep me from cracking my head on them all the time. Even installing the shallowest deck that would be safe to install would take another 8" or so of vertical space. My 8' posts, buried 2' in the ground, only stuck out 6' above the topsoil as it was. Adding the deck (which a muddy winter and spring convinced me was necessary) would reduce the posts' effective height above the floor of the shed to just over 5'. Yes, I technically COULD work with that, depending on how I designed the rafters, etc., but it would be cumbersome to say the least. Raising the Roof - I decided that in the long run, I'd be better off if the rafters were eight feet off the ground, which meant that I needed the new posts to be 10' posts, and the posts I installed way back when would need to be extended. So a side view of the new plan is shown below. The dark lumber was installed last year. The light lumber represents the new posts and other lumber I needed to add to build out the framework I now realized I would need. 
Breaking New Ground What Not to Do - Though I'm not, technically putting up a deck, I try to somewhat respect rules of deck building even of goofy projects like this one. It's generally accepted that joists can straddle a gap as long in feet as they are wide in inches. So 2"x6" boards can theoretically straddle a 6 foot empty space - the distance between my posts going left to right in the photo. It's also generally accepted that if you're using 2"x6" decking, your deck can protrude a maximum of 12" into "open air" beyond the last support. That's called "cantilevering," and it only works at all because you're using very solid pieces of wood, and the main part of the deck is heavy enough to keep the outside "lip" from acting as a teeter-totter when someone steps on it. So I made the boards that will support the deck two foot wider than the distance between the posts. When I'm done with everything, there will be a little 1' deck on each side of the shed. No, it won't be "good" for anything, but it will hopefully contribute to the old-timey look.
More About How Not to Build a Deck - if you use 2"x6" decking, you "should" have the supports on 24" centers. (18" centers for 5/4"x6" decking). Here's where I "stretched" things a bit. The decking will go on perpendicular to the supports. Which means that the decking over the open bits will actually be straddling larger gaps than that. I wouldn't try this on a deck that multiple people were going to stand on or where I was going to put, say, a piano. But the shed will only be big enough for one person at a time, and I've got a pretty good idea how much that fellow weighs. I got away from generally-accepted decking procedures a couple of other places, so please don't use my examples for larger projects without doing further research. That said, if - against all odds - the shed floor/porch should give out, the danger of anyone getting hurt if the deck careens wildly down four inches or so to the ground is probably minimal.
The red oval indicates a supporting member I installed last year which fortunately, I didn't have to remove this year when I added the deck. However the green oval indicates a supporting member I would subsequently have to remove, because it would eventually interfere with the third, lower level of trains I plan to install. You'll notice it's missing in future photos.
I wanted to get this done to stabilize the new posts as quickly as possible. Also, if you don't screw this lumber together soon after you get it out of the store, it will warp, especially if it's exposed to the elements. It may be easier to see the new bits I added if you compare this photo to the side view near the top of the page. Please note that if I had used 10' posts last year, I would have saved myself some extra work extending those posts this year, and had a more solid installation. Just a hint for anyone else trying the same sort of thing.
I would be laying the deck perpendicular to the supports, which is easy except where the posts get in the way (and there are six posts). Between some of the posts, there would be no place to fasten the decking to. So I added a few little boards (shown by the green circles) to give support there. In addition, I wanted the front edge of the porch to protrude at least a little from the porch posts. I couldn't cantilever that part like I did on the side. So I added two more layers of 2"x6" to the front edge (to the left in the photo). The middle layer was scrap wood, so it cost me nothing. The outside layer was a single board, since it would be visible from the yard. The decking will still protrude out over it by a couple inches. Decking At Last - The photo to the right shows the first part of the decking installed If you've noticed the "back end" of the decking going off at an angle, that's because it follows the shape of the table over the that part of the deck. Once the next layer of railroad is installed, you won't see this, but in the meantime, I think it gives a better appearance. And gives me someplace to stand when weeding that part of the railroad. At the moment, the decking is protruding out by about four inches. That's to allow a margin of error. When I'm all done, I'll take it down another inch or so. ConclusionOnce again, I have confessed to not being a genius, just a person who keeps trying stuff until he hits the right combination. I wasn't going to build the shed this year, but as it turned out, I have the thing framed out already. I could let it stand the way it is another year, or I could start assembling rafter trusses.Once again, the raised parts of the railroad are 100% functional and almost zero maintenance, so I'm counting that as a success, and a "proof of concept" that will let me proceed with the larger, lower railroad I intend to build around this one. In the meantime, I've gotten a lot of interest about using this building technique from people who want a raised railroad without having to haul in tons of dirt. I've put together a page showing how I designed the top, smallest layer of my railroad with only four posts supporting it. 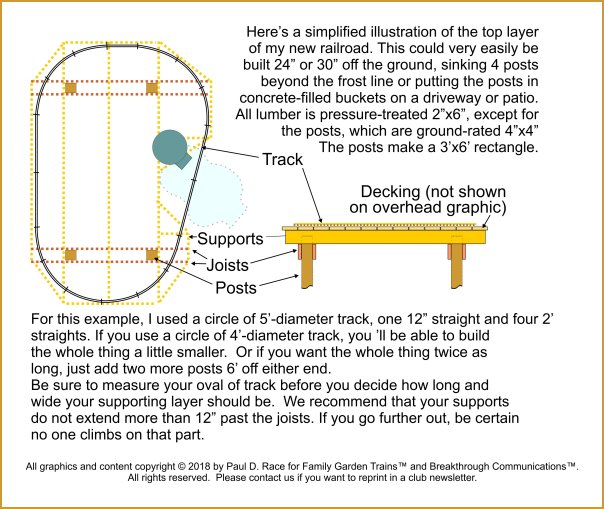
One day, I will try to put the information above together as a whole 'nudder article. As always, if I've helped you get any ideas at all for your next garden railroad construction, I will consider the time it took to document all of this time well spent. Best of luck, all, Enjoy your hobbies, and especially enjoy any time you can spend with your family in the coming season. Paul
The way we got the rafters and ridge board up wouldn't work for everybody, but it worked for us, and hopefully will help other folks to "think outside the box" - literally in this case. Click on the photo to see our progress as of July 14, 2018.
Click on the photo to see our progress as of June 13, 2018.
Click on the photo to see our status as of June 1, 2018.
Click on the photo to see our status as of February 20, 2018
Click on the photo to see our status as of February 20, 2018
Click on the photo to see our status as of November 21, 2017
Click on the photo to see our status as of October 25, 2017
Click on the photo to see our status as of October 15, 2017
Click on the photo to see our status as of October, 10, 2017
Click on the photo to see our status as of September 26, 2017
Click on the photo to see our status as of September 17, 2017
Click on the photo to see our status as of September 7, 2017
Click on the photo to see our status as of August 10, 2017
Click on the photo to see our status as of the end of July, 2017
Click on the photo to see what we were considering as of late May, 2017
Click on the photo to see what we were considering as of late April, 2017
Click on the photo to see what we were considering in early April, 2017
Click on the photo to see what we were considering in March, 2017
Click on the photo to see the home page of Paul's railroad.
|


|

Note: Family Garden Trains?, Garden Train Store?, Big Christmas Trains?, BIG Indoor Trains?, and BIG Train Store? are trademarks of
Breakthrough Communications (www.btcomm.com). All information, data, text, and illustrations on this web site are
Copyright (c) 1999, 2000, 2001, 2002, 2003, 2004, 2005, 2006, 2007, 2008, 2009, 2010, 2011, 2012, 2013, 2014, 2015, 2016, 2017 by
Paul D. Race. Reuse or republication without prior written permission is specifically
forbidden.
Family Garden Trains is a participant in the Amazon Services LLC Associates Program,
an affiliate advertising program designed to provide a means for sites to earn advertising
fees by advertising and linking to amazon.com.
For more information, please contact us
 |  |
| Visit related pages and affiliated sites: | |||||
| - Trains and Hobbies - | |||||
|  |
|
 |
|  |
 |

|

|  |
|

|
| - Christmas Memories and Collectibles - | |||||
 |

|
 |

|

|
|
| - Family Activities and Crafts - | |||||
 |

|

|

|

|

|
| - Music - | |||||

|
 |
 |

|

|

|

|

|

|

|

|

|

|

|

|

|

|

|


 Proceed to "Adding a Train Shed Part 2"
 Return to "Waterscaping the NEW New Boston and Donnels Creek Part 1,"
  Return to "Dirtscaping the NEW New Boston and Donnels Creek RR, Part 2.
 Return to "Adding Raised Roadbed to the NEW New Boston and Donnels Creek, Part 2"
 Return to "Adding Raised Roadbed to the NEW New Boston and Donnels Creek RR, Part 1"
 Return to "2018: Springing into Spring on the NEW New Boston & Donnels Creek RR."
 Return to "Dirtscaping the NEW New Boston and Donnels Creek RR, Part 1.
 Return to "Decking the NEW New Boston and Donnels Creek RR
 Return to "Framing the NEW New Boston and Donnels Creek RR, Part 6"
 Return to "Framing the NEW New Boston and Donnels Creek RR, Part 5"
 Return to "Framing the NEW New Boston and Donnels Creek RR, Part 4"
 Return to "Framing the NEW New Boston and Donnels Creek RR, Part 3"
 Return to "Framing the NEW New Boston and Donnels Creek RR, Part 2"
 Return to "Framing the NEW New Boston and Donnels Creek RR, Part 1"
 Return to "Breaking Ground on the NEW New Boston and Donnels Creek"
 Return to "Planning the NEW New Boston and Donnels Creek, Part 4"
 Return to "Planning the NEW New Boston and Donnels Creek, Part 3"
 Return to "Planning the NEW New Boston and Donnels Creek, Part 2"
 Return to "Planning the NEW New Boston and Donnels Creek, Part 1"
 Return to the New Boston and Donnels Creek RR Page
 Return to Family Garden Trains' Home Page