 | |||
 |
 |
 | |
 |
 | ||
 |
 | ||
 |  | ||
 |  | ||
| |||
|
|
|
| |
|
|
| ||
|
| ||
| | ||
| | ||
| Written by Paul D. Race for Family Garden Trains(tm)
and New Boston and Donnels Creek: |
 |
|
|
2018: Springing into Spring on the NEW New Boston and Donnels Creek RRIf you've been following my articles, you know that we moved in late 2016 and I spent much of 2017 trying to get the next version of my garden railroad installed. My plan was to have a waterfall with two elevated loops of track circling it for vertical interest, then a larger loop with operating capabilities about 24" off the ground. I was also planning on building a little shed-type structure on the "back" so I could get trains running quickly, instead of having to schlep everything out like I used to.The infrastructure for the upper two layers has been built, and we have run short trains on both of them. So as a "proof" of concept, that part is a success. I have no reason to change my design or approach when building the last, operational, layer of track. The photo below shows two Christmas trains I set out in December. I didn't run these, though. It was about 17 degrees and very windy, so I took a couple of hasty photos and went back inside. I didn't even notice until later that the pilot on the Bachmann locomotive is off the track. But I wasn't going to go back out and take more photos in THAT weather. Or any of the weather we got in December or January, for that matter. 
In case you wondered that's a '90s Lionel 0-6-0T from a Christmas set pulling an AristoCraft varnish on the top loop. The other locomotive and coach are Bachmann Big Haulers. I've accumulated a lot of Christmas-themed trains because of the Christmas-themed open railroads I did for nine years and hope to start again this year. Not necessarily the trains I'd be running if you came over, but they were Christmas-themed and near the top of the "pile" that I still don't have organized since the move. I did get a very small train running around the Christmas tree. Click here if you want to see it, but it's a big file, so it may take a minute to download. Same AristoCraft varnish, different '90s Lionel 0-6-0T. Warning: Lionel's current "G gauge line" are toys that are not compatible with garden trains even though they run very well on G gauge track. In addition, I set the Bachmann locomotive in the photo above out on the front porch around a Christmas tree we set there. Click here if you want to see that. I didn't have it running, though. It was too cold to spend much time outside anyway. That said, most of the dirt and gravel and plants I hoped to get installed on the railroad before now did not get installed. So that's near the top of the list as soon as it starts staying warm. Long-Term Goals - In the future (probably in 2019 at this point), I have two big additions planned:
Consolidating Gains - I really thought about starting on one of those two projects as soon as it got a little warmer and a little drier. But the more I planned out the "big goals," the more I realized I needed to focus on getting the top two layers finished properly, even if it takes all the spare time I have this summer (which is never all that much). Next Steps
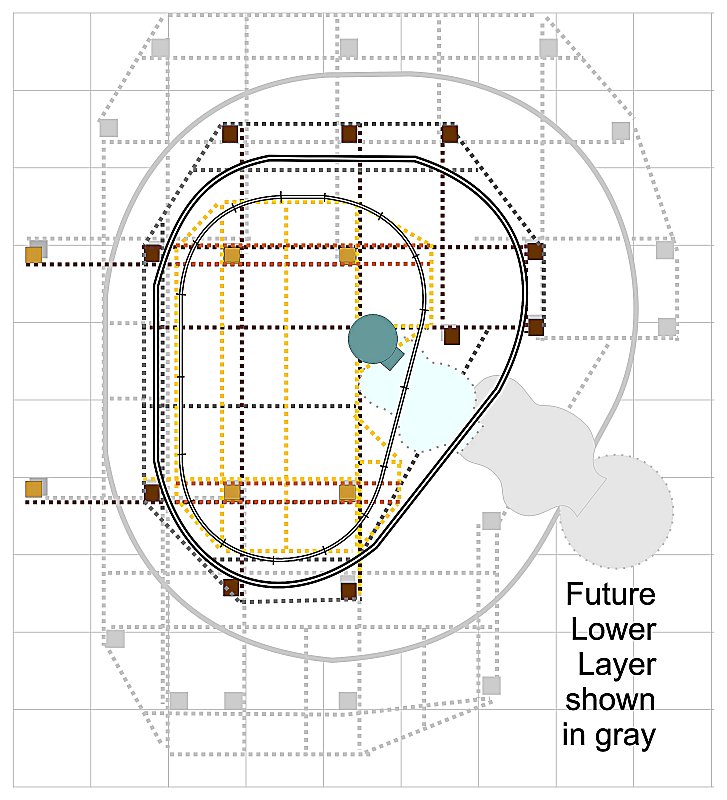
The photo to the right shows 5/4" decking cut this way to build a display railroad that I used to run Thomas on at clinics and open railroads. In some ways, it might look like I'm defeating one purpose of building an "outdoor train table" - the ability to change track plans without moving a bunch of dirt and posts. But for these two layers, I'm pretty satisfied with the track where it is, and it will still be easy to move later if I need to. I don't have to do this, and for a time I thought about putting it off until I got more of the big projects done. The track is very level, after all. If I was putting it on, say, astroturf, I would just leave things as they are. But once I've done this, I can backfill as much dirt and gravel as I want without worrying about it migrating over onto the track. If they were at an easier height to work, I wouldn't necessarily worry about that. But one of my parameters is that I want to be able to run trains at a moment's notice, even on these high layers, and this will make that far more practical. I'll publish more details as I get that work done. Other Trim Bits - Before I add the dirt, I want to add some additional wood bits that will keep the dirt in its place and make the upper table look less like it's floating in space. I was going to try to draw a picture of what I meant, but it would be more trouble to explain than it would be to do. One of the interesting parts of this mini-project will be making sure that any lumber I add now doesn't get in the way when I start to add the lower railroad layer OR the shed - I've already overlooked a couple of things I could have done that would have made those steps easier. The last thing I need to do is make those steps harder. This part will make more sense as I get it done and take photos. Adding Dirt, Plants, and Trees - Once I've done the extra lumber work described above, both layers that have been built so far are essentially big raised flower boxes that I should be able to plant just about anything in that doesn't require a really deep root. I've also dabbled with the idea of building little "flowerpots" around the two posts that are sticking up through the upper railroad and putting miniature trees in the pots to camouflage the posts a little. Starting the Waterfall - As you may recall from last year's photos and plans, I have two pieces I was going to use to set up a waterfall last year, and that didn't happen either. While I'm getting the dirt and plants under control, I'll be tweaking where those pieces go for best effect. I wil have at least two more bits to add as I flesh out the lower layer, and I still haven't settled on a final design for a pond, per se. But there's no sense waiting on the effect of a "bubbling stream" until next year when we could get started now. The "big expense" there will be a pump. I almost bought one last year, but as it turned out, I wasn't going to get even part of the waterfall operational before everything froze, anyway. Flooring the Future Shed, Sort Of - Speaking of ground-rated lumber, the place I want to put the shed is also the place I have to stand to put trains on the upper track. And it gets muddy after just a sprinkle of rain. So I'm thinking of putting a floor there, like a little mini-deck. Even if I don't get around to building the shed until next year. Once again, I'm counting on those ground-rated 2"x6" boards and 4"x4" posts. The "footprint" of this part will be a little smaller than the gray area showing the footprint of the shed in the drawing near the top of the page. ConclusionAs anxious as I am to get onto the really big tasks, I think that getting the bits I've put together so far under control will be a better use of my time. Not to mention that there are several big projects I need to do on the house we moved into. It's time to "consolidate gains" versus "breaking new ground," I think. And if I get these projects done, they will be giving me something of a head start on either of the "big projects" I have planned for the future.As I type this, our weekends have still been cold or wet, or both, so even getting small tasks done outside is, shall we say, interesting. So we'll see how it goes. And of course, as soon as I publish this, I will think of several more tweaks for every project I'm even imagining. We'll see That will be another article. As always, if I've helped you get any ideas at all for your next garden railroad construction, I will consider the time it took to document all of this time well spent. Best of luck, all, Enjoy your hobbies, and especially enjoy any time you can spend with your family in the coming season. Paul
Click on the photo to see our status as of March 30, 2018
Click on the photo to see our status as of November 21, 2017
Click on the photo to see our status as of October 25, 2017
Click on the photo to see our status as of October 15, 2017
Click on the photo to see our status as of October, 10, 2017
Click on the photo to see our status as of September 26, 2017
Click on the photo to see our status as of September 17, 2017
Click on the photo to see our status as of September 7, 2017
Click on the photo to see our status as of August 10, 2017
Click on the photo to see our status as of the end of July, 2017
Click on the photo to see what we were considering as of late May, 2017
Click on the photo to see what we were considering as of late April, 2017
Click on the photo to see what we were considering in early April, 2017
Click on the photo to see what we were considering in March, 2017
Click on the photo to see the home page of Paul's railroad.
|


|

Note: Family Garden Trains?, Garden Train Store?, Big Christmas Trains?, BIG Indoor Trains?, and BIG Train Store? are trademarks of
Breakthrough Communications (www.btcomm.com). All information, data, text, and illustrations on this web site are
Copyright (c) 1999, 2000, 2001, 2002, 2003, 2004, 2005, 2006, 2007, 2008, 2009, 2010, 2011, 2012, 2013, 2014, 2015, 2016, 2017, 2018 by
Paul D. Race. Reuse or republication without prior written permission is specifically
forbidden.
Family Garden Trains is a participant in the Amazon Services LLC Associates Program,
an affiliate advertising program designed to provide a means for sites to earn advertising
fees by advertising and linking to amazon.com.
For more information, please contact us
 |  |
| Visit related pages and affiliated sites: | |||||
| - Trains and Hobbies - | |||||
|  |
|
 |
|  |
 |

|

|  |
|

|
| - Christmas Memories and Collectibles - | |||||
 |

|
 |

|

|
|
| - Family Activities and Crafts - | |||||
 |

|

|

|

|

|
| - Music - | |||||

|
 |
 |

|

|

|

|

|

|

|

|

|

|

|

|

|

|

|

 Installing 2"x6" Roadbed - This involves getting a few 2"x6"x12' ground-rated boards and cutting them so they fit under the track I laid. In the past, I've done this to build
  Proceed to "Adding Raised Roadbed to the NEW New Boston and Donnels Creek RR, Part 1"
 Return to "Dirtscaping the NEW New Boston and Donnels Creek RR, Part 1.
 Return to "Decking the NEW New Boston and Donnels Creek RR
 Return to "Framing the NEW New Boston and Donnels Creek RR, Part 6"
 Return to "Framing the NEW New Boston and Donnels Creek RR, Part 5"
 Return to "Framing the NEW New Boston and Donnels Creek RR, Part 4"
 Return to "Framing the NEW New Boston and Donnels Creek RR, Part 3"
 Return to "Framing the NEW New Boston and Donnels Creek RR, Part 2"
 Return to "Framing the NEW New Boston and Donnels Creek RR, Part 1"
 Return to "Breaking Ground on the NEW New Boston and Donnels Creek"
 Return to "Planning the NEW New Boston and Donnels Creek, Part 4"
 Return to "Planning the NEW New Boston and Donnels Creek, Part 3"
 Return to "Planning the NEW New Boston and Donnels Creek, Part 2"
 Return to "Planning the NEW New Boston and Donnels Creek, Part 1"
 Return to the New Boston and Donnels Creek RR Page
 Return to Family Garden Trains' Home Page