 | |||
 |
 |
 | |
 |
 | ||
 |
 | ||
 |  | ||
 |  | ||
 | |||
 |
 |
 | |
 |
 | ||
 |
 | ||
 |  | ||
 |  | ||
| Written by Paul D. Race for Family Garden Trains(tm)
and New Boston and Donnels Creek: |
 |
|
|
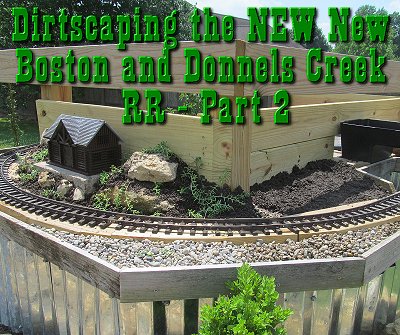
Dirtscaping the NEW New Boston and Donnels Creek RR - Part 2This is a continuation of my series on building the first two tiers of a proposed 3-level outdoor railroad, using more lumber than dirt.Apologies in Advance - Most people will never need much of the information in this article, since it relates to only one particular way of building a garden railroad, and not - so far - a very popular one. But for the sake of those few who can actually use this information, I'm capturing it as I go. After years of operating a railroad that had dirt, rocks, and plants everywhere, and consequently needed way too much weeding and other maintenance, I was attempting to build a railroad that would look just as nice to the visitor, but which would only have dirt, rocks, and plants where I could easily maintain them. If you've read the previous articles, you know that I've put little 5/8"x2.75" strips of wood around the edges of the tables so far. That way, I can pour gravel right up to the edge without worrying about it spilling over.
More Barriers Keeping with the "raised flowerbed" approach, I only want dirt in places where I also want plants. So there's no point in letting dirt slop over into, say, the underside of the top table, or the place I plan to put an enclosure to protect my power supplies and to store short trains when they're not running. Note: Hardly any of the following section would be necessary if you just had one layer of railroad. How should I fill the gap between the top and second layer of railroad? Not only to keep the dirt from going places it would do no good, but also to somewhat "seal off" a compartment I could use for temporary storage once the enclosure was in place. I wanted something pretty weatherproof, and there were very few materials that would both look nice and hold up for more than a few years with dirt up against them. More of the ground-rated 2"x6"s seemed to be a likely choice. Maybe I could split the pieces into 1"x6"s to "stretch" the lumber.
The steel panels were each about 28" too long to fit the little room, so when I was finished I had several 28" high steel panels. Each panel, by the way, is actually about 27" wide, but they have to overlap so their effective width is 24". I cut one of the "cut-off" 28"-high panels in half, and it fit almost perfectly in the corner where I was going to install the first Marcourt connecting pond.
Was this the best material? I don't know. It was available and would suit a purpose. It tends to hold up well even with dirt leaning up against it. Theoretically it could last 50 years, but I'll be happy with 20. Also, don't let the shiny nature of the stuff scare you off. For one thing it will be largely obscured by plant growth soon. Plus, Ohio's acid rain will oxidize the zinc plating in no time, giving it that unobtrusive dull gray color you see on silos and sheds throughout the Midwest. If nothing else, it will make my railroad look "rustic," and that's not a bad thing either.
By the way, if I had been building the whole railroad at once, I wouldn't have all these rocks in the way. But I put them on the "tables" last fall when I wanted to take some photos to give a general idea. As it is, they will be part of my dirtscaping, so there's no point removing them from the railroad now.
I wouldn't need the sheathing to go around the south side of the railroad, since that's where there will eventually be a shed to allow on-track-storage of short trains. Theoretically, I could have put the rocks, dirt, and plants on this layer once the steel was up, but I thought it might be easier to address the top layer first. Preparing the Top Layer for DirtscapingFrom the beginning I had planned to have some kind of landscaping or greenery on the whole top layer. And I had planned to have steps built right into the railroad (camouflaged by buildings, etc.) that would enable me to climb up there easily. But I realized that:
Note: If you ever use this approach to build a railroad of normal height, this won't be an issue. It was an issue for me because I wanted the top layer this far off the ground for vertical interest. In the drawing to the right, the fat green lines show where I installed the barriers. Yes, there is now only 12"-18" of depth between the track and the barrier for scenery, but that should be plenty of space for the rocks and sedums I plan to put there. And a structure or two - maybe a log cabin and/or a mining office. Yes, I know some of you get tired of me telling how I've changed my plans while I was in the middle of this project, but the truth is, things that look very workable and practical on paper, suddenly look a lot different when you have the solid, three-dimensional reality in front of you.
Or when you've already climbed up and down several times to get the top part of the waterfall installed where it will pour properly into the next level down. The photo to the right shows the top part of the waterfall (the spillway or "weir"), with some boards screwed down around it to keep it from wandering around. (I'll have more information on that in another article.) Yes, in the photo it looks like the weir is going to be pouring water right onto the tracks. There's really a big gap between them, but I didn't notice the photo was misleading until I got back down. If you ever come over, I'll let you climb up and take a better photo. Before I made up my mind to add wooden barriers to the top layer, I re-measured the clearance all the way around, using a trusty Bachmann coach, the Then I installed boards on the inside of the post on the side where the weir was located. I had to fudge things a little because of how the back of the weir protruded. But once the rocks and dirt and plants are there nobody would notice.The photo to the right shows the 2"x6" ground-rated boards around and behind the weir. The rocks that you see on the "inside" of the barrier were moved to the outside once the barrier was up. The barriers on the east and west ends went on the outside of the posts to leave room for whenever I add the additional supports for the planned shed. Even though there was plenty of clearance, I tapered the ends to make them look a tad more finished. The Accommodating BuildingsBuildings look better and are usually easier to maintain if they're not sitting on - or in - the dirt. On my "dirt-pile" railroad, I set many of them on those 1.75"x8"x16" concrete blocks you can get at garden centers cheap in the spring and summer.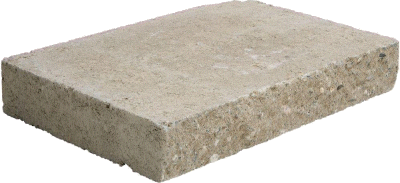
For the buildings I planned to install on the top layer, I bought some similar blocks that had a rough front edge and a buff color that I thought would fit into the 'dirtscape' better. They were 2"x8"x12", probably long enough for most of the buildings I considered using on the top layer. Home Depot calls them "buff retaining wall caps."
After I left this in place for a bit, I decided that the cabin needed to sit a little higher to give a stronger illusion of height, and to make it more visible to short people. So I wound up using two of the stones.
Rocks and DirtThe rocks for this step came from our yard after some grading and other landscaping that was necessary to fix huge problems caused by a former in-ground pool that was "filled in" with construction waste. Of course, if you're a gardener or farmer, rocks are a curse as long as they're in the garden or field, but as soon as they're stacked up out of the way, they're a resource. gardener or farmer, rocks are a curse as long as they're in the garden or field, but as soon as they're stacked up out of the way, they're a resource.
For soil, I'm using some off-brand "topsoil" that I got for about $2 a bag last year. There's a lot of sand in it, but it doesn't look bad so I'm going to go with it. On the original New Boston and Donnels Creek, I used whatever I had access to, say, from digging the pond, so this is actually an upgrade. By the way, some of the expensive $6-$8-a-bag "garden soil" you buy that has the fertilizer already mixed into it isn't topsoil at all. It's clay that's been enhanced, colored, and otherwise processed to look and behave like topsoil when you put it down. If you mostly use it to mix into existing soil it won't hurt anything, and will help until the fertilizer is gone. But if you accidentally leave a bag unopened for a year and open it later, all you'll find is big black clods of clay, since it reverts to its natural form. Just sayin'. . . . Plant ChoicesBack when I started, I imagined putting little tree starts on this layer, with the hope that they'd have enough dirt to keep going until they got big enough to move elsewhere. I still think that's feasible, as long as I'm not away during the hottest, driest months of the year. But at this moment I'm mostly planning to install a virtual sure thing - sedums.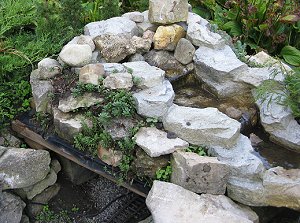
On the old New Boston and Donnels Creek, I remade a waterfull and tunnel (shown to the right) by putting a piece of vinyl pond liner over a bunch of pressure-treated boards and installing a pre-made creek on top of it with a bunch of dirt and rocks spread around it. Within a few weeks after this photo was taken, the sedums had spread out so much you couldn't see the dirt, and they quite camouflaged the edges of the creek fixture. (If you want to see the basic construction that resulted in that picture, click here and scroll down.) For this layer, I'm starting with Stubby Fingers sedum, a very low-maintenance and drought-resistant plant.
|
|
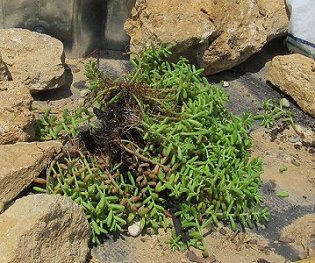 |
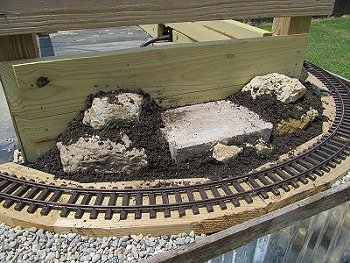
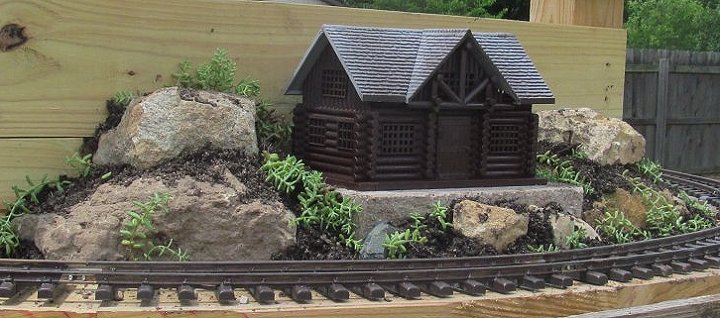
The photo below shows the east end after the sedum has been poked into place and the log cabin got a quick paint job. If the sedum takes as I expect, it should camouflage the concrete block in a couple of months.
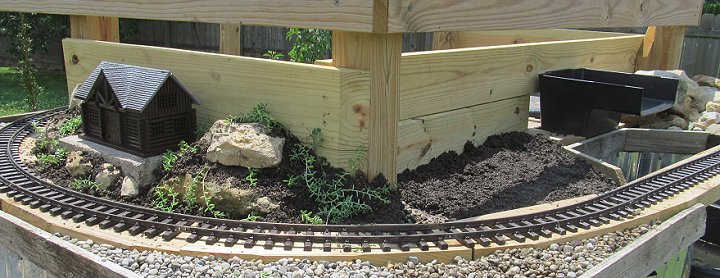
The photo below shows the northeast corner with a layer of dirt started on the north end.
Since I had a little more "front-to-back" depth on the north side, I thought I would experiment with two small trees. The deciduous-looking one to the left in the photo below is an "English Dwarf Boxwood" that I cut down to one trunk (it came with three) and trimmed to height. The Taxus toward the right is one of the Taxus Hicksii I bought last fall to give the railroad a little green. They have not all survived, but this one still looked good.
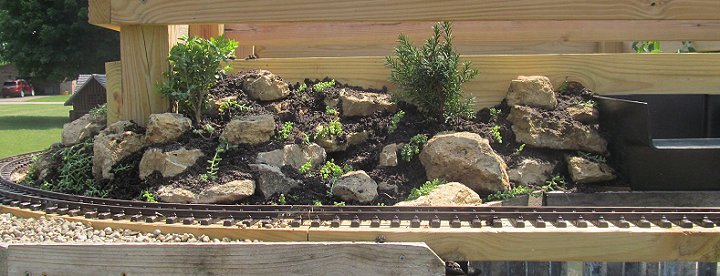
For both of the little trees, I left a little area their "root ball" would fit into, plus extra room, then I "roughed up" the roots to spread them out, backfilled with dirt, and added stones and more dirt until I was up to the level of the trees' crown. If the dirt under, between, and around the rocks stay moist, they have a fighting chance of making it through the summer. Again, I used Stubby Fingers sedum for the ground cover.
It should be a lot of fun to have the roadbed and most of the scenery in place for the top two layers of the railroad. At least when people come over, I won't have to tell them to use their imagination quite so much.
As always, if I've helped you get any ideas at all for your next garden railroad construction, I will consider the time it took to document all of this time well spent.
Best of luck, all,
Enjoy your hobbies, and especially enjoy any time you can spend with your family in the coming season.
Paul
 Proceed to "Waterscaping the NEW New Boston and Donnels Creek Part 1," our article on getting the top two layers of the waterfall on solid footing and getting the third layer framed. After we finish decking and dirtscaping the third layer, we will probably add a washbasin or something for the water to flow into, then add a pump to get the waterfall flowing. No big pond until next year at least - too many other projects.
Click on the photo to see our progress as of June 13, 2018.
 Return to "Adding Raised Roadbed to the NEW New Boston and Donnels Creek, Part 2" - Trimming the corners off the roadbed on the upper layer and cutting the pieces that will support the curves on the middle layer. We need to get the upper two tiers of the pond installed before we totally complete this step, so the article doesn't quite show the finished product. You'll see it later as part of other articles.
 Return to "Adding Raised Roadbed to the NEW New Boston and Donnels Creek RR, Part 1" - Sorting out our priorities for the spring and summer of 2018. There a lot of little chores we really should get done before we start on the next big addition. Click to see our plans as of February 27, 2018.
Click on the photo to see our status as of February 20, 2018
 Return to "2018: Springing into Spring on the NEW New Boston & Donnels Creek RR." - Sorting out our priorities for the spring and summer of 2018. There a lot of little chores we really should get done before we start on the next big addition. Click to see our plans as of February 27, 2018.
Click on the photo to see our status as of February 20, 2018
 Return to "Dirtscaping the NEW New Boston and Donnels Creek RR, Part 1. - Putting edging around the existing "layers" of the new railroad, and beginning to add gravel and rocks. There were a few test runs, but we got stopped early by bad weather before we could dump the rest of the rocks, gravel, and dirt, much less plant the plants we hoped to get in before snowfall.
Click on the photo to see our status as of November 21, 2017
 Return to "Decking the NEW New Boston and Donnels Creek RR - Decking the 'middle layer' of our proposed three-tier outdoor railroad. Prepping more track, laying out track and decking to make certain we have measurements correct, installing most of the remaining decking for this layer.
Click on the photo to see our status as of October 25, 2017
 Return to "Framing the NEW New Boston and Donnels Creek RR, Part 6" - Modifying and finishing the framing on the second layer, cantilevering, using R3 track versus all other pre-curved track formats, finalizing the track plan, why painting the track makes old and new track blend better, and more. This will be the last bit of "framing" in 2017, and it worked out well, considering.
Click on the photo to see our status as of October 15, 2017
 Return to "Framing the NEW New Boston and Donnels Creek RR, Part 5" - Spreading the billboard-sourced vinyl underlayment on the top layer. Prepping used Aristo track for (hopefully) many more years of service. Laying the first loop of track, attaching power wires with spade terminals, and testing conductivity with a Bachmann streetcar.
Click on the photo to see our status as of October, 10, 2017
 Return to "Framing the NEW New Boston and Donnels Creek RR, Part 4" - Planning and running the decking for the top layer, testing the track plan, checking clearances, prepping used track with new railjoiners, examining the vinyl I ordered to go over the decking, and more.
Click on the photo to see our status as of September 26, 2017
 Return to "Framing the NEW New Boston and Donnels Creek RR, Part 3" -
Getting the frame finished on the top layer, ordering other things I'd need eventually, deciding on materials for the decking on the top layer (at least).
Click on the photo to see our status as of September 17, 2017
 Return to "Framing the NEW New Boston and Donnels Creek RR, Part 2" -
Once I had the overall frame relatively solid, I hooked up the underground power lines to two GFI plugs that should be in easy reach once everything is finished. I also decided to frame out the top railroad layer while I could still access the center of the railroad easily. Because I was running out of vertical space, I reconfigured that layer. Then after I got the "core" pieces on, I changed my plan again. But the whole thing is getting easier and easier to visualize, and is getting closer to complete with every board I cut and fasten on.
Click on the photo to see our status as of September 7, 2017
 Return to "Framing the NEW New Boston and Donnels Creek RR, Part 1" -
Once I started dropping posts in the holes and screwing things together, I didn't want to stop before I had the basic frame built (for one thing, the wood warps less once it's fastened in place). Now the folks driving down the street past our house (we're on a corner lot) probably wonder if I'm building an elaborate chicken coop, but that's fine with me. I still need to make a few more lumber runs and do a lot more cutting and sawing, but having the basic frame in place should make the next bits a lot easier.
Click on the photo to see our status as of August 10, 2017
 Return to "Breaking Ground on the NEW New Boston and Donnels Creek" -
Okay, in case you wondered if we'd ever get started on the thing, we broke ground in July, using a manual post-hole digger. Well two manual post-hole diggers. But by the end of this article, we're ready for the posts to start going in.
Click on the photo to see our status as of the end of July, 2017
 Return to "Planning the NEW New Boston and Donnels Creek, Part 4" -
Well, the rented post-hole digger fell through, so we dug our vegetable garden with a manual post-hole digger (the scissors kind). In addition, I stake out where the railroad was going to be. Twice. And tweaked the plans again. Sorry about the redo's, but sometimes just walking around the yard trying to visualize things makes me reconsider something that seemed "settled" only a few days before.
Click on the photo to see what we were considering as of late May, 2017
 Return to "Planning the NEW New Boston and Donnels Creek, Part 3" -
We have still not broken ground. In part because we plan to rent a post-hole digger and dig the post holes for our raised vegetable garden and the first phase of the garden railroad at the same time, and we don't have enough lumber on hand yet. (If we didn't break it down into multiple trips, we'd be blowing out the shocks on our minivan.) In the meantime, we used a line level to see if the slope of the back yard was as bad as we thought it was (it's worse), and we did other site preparation, including planting a whole bunch of spruce tree seedlings to eventually give us some privacy in our side and back yard. Plus, I'm still wavering a little on the "where-to-start-first" issue.
Click on the photo to see what we were considering as of late April, 2017
 Return to "Planning the NEW New Boston and Donnels Creek, Part 2" -
More plans. We've moved on from the 2"x6" roadbed-on-posts to a sort of "train-table-outside" plan. Our goals include low-maintenance, high interest, and high reliability. We're also trying to get around having a thousand dollars' worth of dirt hauled into the back yard. If you want to get some idea of what our planning process looks like, reading these through in sequence may help. Or it may drive you crazy.
Click on the photo to see what we were considering in early April, 2017
 Return to "Planning the NEW New Boston and Donnels Creek, Part 1" -
If you're subscribed to our newsletter, you know that we moved just after Thanksgiving in 2016, leaving behind most of the track, a few of the bird feeders, and one Bachmann train set for the new owners. We also left behind a high-maintenance garden that we do not intend to replicate at the new place. This is the first chapter of a new chapter in our lives, which we hope will include a lot of "lessons learned." But first, some serious landscaping had to take place.
Click on the photo to see what we were considering in March, 2017
 Return to the New Boston and Donnels Creek RR Page - This is the page describing Paul Race's progress and frequent rework on his own garden railroad, started on a shoe-string budget in 1998, later expanded, and later refurbished several times as issues arose. Issues that Paul hopes to avoid by building the next iteration above ground.
Click on the photo to see the home page of Paul's railroad.
 Return to Family Garden Trains' Home Page - The home page with links to all the other stuff, including design guidelines, construction techniques, structure tips, free graphics, and more.


Note: Family Garden Trains?, Garden Train Store?, Big Christmas Trains?, BIG Indoor Trains?, and BIG Train Store? are trademarks of
Breakthrough Communications (www.btcomm.com). All information, data, text, and illustrations on this web site are
Copyright (c) 1999, 2000, 2001, 2002, 2003, 2004, 2005, 2006, 2007, 2008, 2009, 2010, 2011, 2012, 2013, 2014, 2015, 2016, 2017 by
Paul D. Race. Reuse or republication without prior written permission is specifically
forbidden.
Family Garden Trains is a participant in the Amazon Services LLC Associates Program,
an affiliate advertising program designed to provide a means for sites to earn advertising
fees by advertising and linking to amazon.com.
For more information, please contact us
 |  |
| Visit related pages and affiliated sites: | |||||
| - Trains and Hobbies - | |||||
 |  |
 |
 |
 |  |
 |

|

|  |
 |

|
| - Christmas Memories and Collectibles - | |||||
 |

|
 |

|
 |

|
| - Family Activities and Crafts - | |||||
 |

|

|

|

|

|
| - Music - | |||||

|
 |
 |

|

|

|

|

|

|

|

|

|

|

|

|

|

|

|