| |||
 |
 |  | |
 |  | ||
 |  | ||
 |  | ||
 |  | ||
| |||
|
|
| | |
| | ||
| | ||
| | ||
| | ||
| Written by Paul D. Race for Family Garden Trains(tm)
and New Boston and Donnels Creek: |
 |
April, 2010: Landscaping Rehab and Idiot Tools A friend who recently e-mailed me through our contact page complained that I didn't have a check box for "After months of back-breaking labor, I'm finally ready to start running trains again." That describes the experience of most garden railroaders at some time or another. In my case, it is an understatement. Some folks who read our planning and construction articles are a bit surprised how insistent I am that you do things right the first time or avoid certain obvious "quick and dirty" methods that come back to haunt you in a few years. But I write from experience as a person who's made just about every possible mistake in my garden railroad, and had all of them come back to haunt me. I've even had things I did right come back to haunt me, come to think of it. Add that to the regular maintenance needs of ANY garden railroad, and you'll see why I'm so insistent on designing maintenance issues OUT of the garden from the start.
By April, 2010, several more pieces of infrastructure needed refurbishment, including one bit, a neighbor's privacy fence, that I can honestly say wasn't my fault. But several other bits, including the original streetcar ties giving out, could be traced back to inadequate installation on my part. So here's an account of my attempt to make at least a few things right after all these years. Note about planning, or lack thereof: - When I first read down through a draft of this article, it sounded like I picked up a bunch of materials and tools and went to the back yard, started working with clear goals in mind, and accomplished all sorts of things in record time. Nothing could be further from the truth. In the first place, I had some of the materials on hand, like a set of solar lamps I bought on closeout years ago with the idea of using them to hide the landscape timbers my neighbor used as posts on his privacy fence and neglected to bury deep enough to hold the fence in place (or to cut off the part that stuck out above the fence line and looks dumb from my side). For almost two years, I thought about ways to mount the things and have them look right from my side. Then Mother Nature solved the problem for me, in a sense, by bringing down part of the fence. The way I solved that problem also solved the problem of how to mount the lamps, as you'll see. Now it looks like I knew what I was doing all along, but there is more madness to my method than the other way around. The "creek-like" fixture I used to update my waterfall has a similar "bought-on-closeout-then-took-three-years-to-get-around-to-installing" story. In addition, when I'm doing any task in the garden that requires aesthetic considerations, I usually do a bit, walk around, think about it, do something else, come back and make an adjustment, go work on something else, come in and write an article, go back and try to look at it with fresh eyes, etc. Once I've decided on a particular tack, I can usually work fairly linearly, if you don't count frequent breaks to unkink my back. But when I'm setting up something like a simple waterfall and trying to figure out why it doesn't look right, I may start and stop a hundred times before I'm satisfied enough to stick with a setup long enough to finish the job. If the article below seems to jump around, its because that's what I do, and I actually did a lot more going back and forth among tasks than this article would imply. So I didn't want anyone to get the idea that I head out into the back yard armed with preformed ideas and all the tools I needed. Rather, I have to overthink and rethink even the most obvious tasks. Anyone watching me work in my back yard would swear I was seriously ADD or something. Well, actually I am, but that's another story. Why expose my "weaknesses" in this way? Because the vast majority of my readers are still in the planning or beginning stages of their garden railroads, and even less confident about charging out into the back yard with a pile of tools and materials than I am. I just want to reiterate, as I have since I started the Family Garden Trains resource in 1996, that you don't have to have all the answers to enjoy setting up a garden train, and that you will learn as you go, as I am still doing. So here, presented in a more organized way than the tasks were actually done, are the major rehab activities that I did for my railroad in the spring of 2010 before I could even start working on my railroad proper.
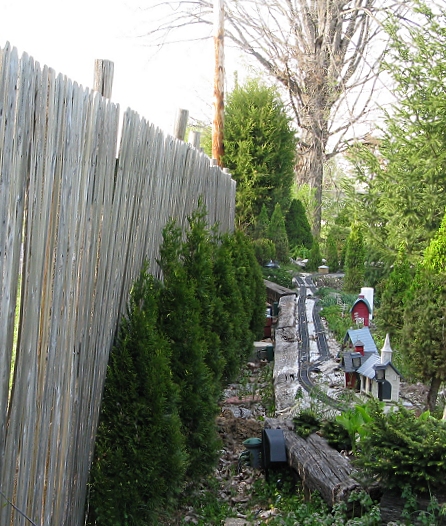
Okay Fences Make Okay NeighborsIn 2004, I planted a row of little arborvitas between our railroad and the property line to hide the trash piles in my neighbor's back yard. By 2006, they actually started to do the job. The neighbor then put up the cheapest possible privacy fence. Instead of buying ground-rated posts, he "saved money" by using those "landscaping timbers" people buy to line gravel walks, etc.By 2008, those posts were rotting off at the ground, and the only things holding part of the fence up were my arborvitas.
I also installed some solar lanterns to obscure the top of the "landscaping timbers" that my neighbor used as posts, and which look a little weird from my side. At the time, though, I only had time to install three of these, which left part of the fence a bit wobbly. So part of 2010's reconstruction included installing more fence posts. The upside to this, I suppose, is that if his fence fell apart, I would already have an excellent start on a decent privacy fence of my own. This brings me to the "idiot tool." The Idiot Tool In 2006, I needed to dig some post holes, for a deck, a raised garden, and other projects. I saw that the Sears hardware store had a Craftsman post-hole digger on sale, so I nipped over on my lunch hour to buy one. As I was leaving the store with my purchase, a slightly older man (and that's saying something) was coming in. He pointed to the post-hole digger and laughed. He said, "That there's an idiot tool." When I gave him the look that his comment deserved, he said, "Any idiot knows that you can get a Bobcat owner with an auger to drill you all the holes you need in an hour." Actually, I have experience with one local Bobcat owner whom I made the mistake of paying for two days' work after he had finished the first day's, but that's not the issue here. Some of the holes would need to go in places where a Bobcat couldn't. And some of the holes would be in places where I wasn't ready to start digging just yet. So owning a tool designed for that purpose seemed like a good investment to me. In 2006, I needed to dig some post holes, for a deck, a raised garden, and other projects. I saw that the Sears hardware store had a Craftsman post-hole digger on sale, so I nipped over on my lunch hour to buy one. As I was leaving the store with my purchase, a slightly older man (and that's saying something) was coming in. He pointed to the post-hole digger and laughed. He said, "That there's an idiot tool." When I gave him the look that his comment deserved, he said, "Any idiot knows that you can get a Bobcat owner with an auger to drill you all the holes you need in an hour." Actually, I have experience with one local Bobcat owner whom I made the mistake of paying for two days' work after he had finished the first day's, but that's not the issue here. Some of the holes would need to go in places where a Bobcat couldn't. And some of the holes would be in places where I wasn't ready to start digging just yet. So owning a tool designed for that purpose seemed like a good investment to me.
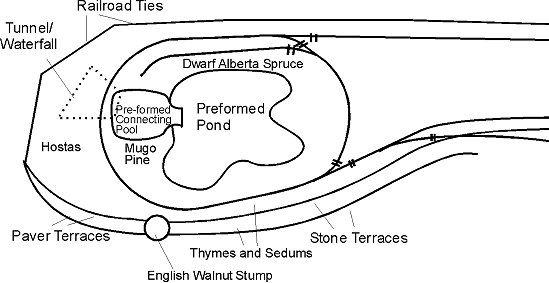
For the first few years I owned this tool, Of course, now that I have an "idiot mark" on my "idiot tool," I can't use measuring the hole depth as an excuse for taking a break every few minutes. One reason my unsolicited advisor called it an "idiot tool" probably relates to the fact that when you use one of these, you exercise muscles you seldom use for anything else (unless you're a gymnast or speed swimmer). Most of the effort invoves pulling the handles apart to bring up dirt you've pinched between the little shovel blades. Unless the top of the hole you dig is a little wide, this gets even harder once you're past 18", because you can't spread the handles far enough apart to pinch the soil, unless you put in some extra effort. Needless to say, after installing five new fence-posts, my shoulders hurt in places I didn't know I had places. Of course, I need the exercise anyway. I could install one more on this end, but after that, there's no room to dig proper holes, even with an "idiot tool," much less an auger. The railroad ties supporting the "back edge" of that end of the railroad just come too close to the fenceline. If that part of the fence goes, I'll have to get my neighbor's permission to fix it from the other side. On the other hand, the posts I've installed so far spread out across 56 feet (one more post would go to 64 feet). And the fence they're holding could use some horizontal bracing as well. Maybe a row of 2"x6" pressure treated lumber going across the top of the posts. That might help keep the posts from twisting (as a couple of the older posts have already done). And it's just a coincidence that 6" is wide enough to run a back-and-forth railroad of some sort. Of course, that would be overkill. Plus by the time I'm ready for that, 64' of track will probably require a second mortgage. A Note About "Yard Stuff" Versus "Train Stuff" - Some folks who read my columns get impatient when I'm describing back yard stuff that doesn't seem to have that much to do with trains. But any tools and materials you use outdoors can be used to build or enhance your garden railroad (as you'll see further down in this article). And the truth is that the environment our trains run in is as much a part of garden railroading as the trains, roadbed, tracks, and accessories. Imagine how much differently "indoor" model railroading books would read if the first thing you had to do was to design and build an adequate shelter for your trains. Most indoor railroaders establish the environment for their trains by taking on a mortgage and maybe waterproofing the basement. Yet many outdoor railroaders tend to plan and operate as if the environment they're putting their trains in isn't part of the equation. In this case, ignoring the environment would mean having the neighbor's fence laying on top of my railroad. So I've been busy. A few days later, I added more of the solar lamps. When I figure out why one of them isn't lighting, it'll look pretty good, I think. Water Feature Redux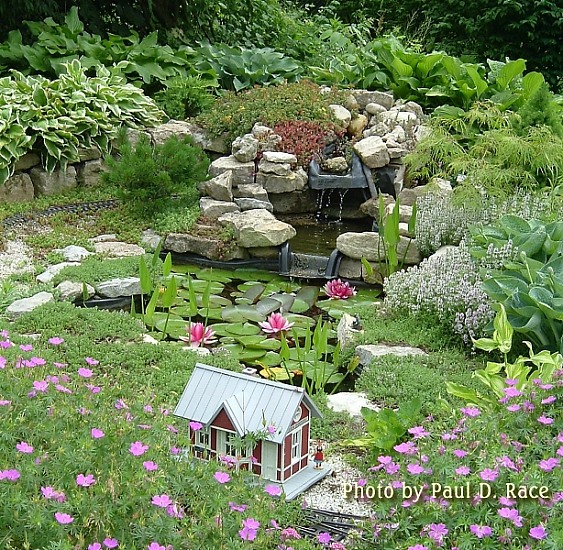 When I installed my pond, tunnel, and waterfall in 1998-1999, there weren't as many products available as there are now, and I knew a lot less. As you can see in the little drawing at the top of this article, I installed a 100-gallon preformed pond and a small connecting pond. I lined the "tunnel" with solid concrete blocks. Then I found a weird little "creek-shaped" piece that would serve as the top of my "waterfall." I supported this by pressure-treated 2x12s running over the track. Later I expanded the boards to make the "tunnel" a little bigger. I also put pond liner material on top of the boards and installed rocks, dirt and sedum. The sedum took hold and mitigated the "pile of rocks" appearance. When I installed my pond, tunnel, and waterfall in 1998-1999, there weren't as many products available as there are now, and I knew a lot less. As you can see in the little drawing at the top of this article, I installed a 100-gallon preformed pond and a small connecting pond. I lined the "tunnel" with solid concrete blocks. Then I found a weird little "creek-shaped" piece that would serve as the top of my "waterfall." I supported this by pressure-treated 2x12s running over the track. Later I expanded the boards to make the "tunnel" a little bigger. I also put pond liner material on top of the boards and installed rocks, dirt and sedum. The sedum took hold and mitigated the "pile of rocks" appearance.
Unfortunately, forces of nature kept raising the right-of-way under the "tunnel," so that I had to keep shimmying the top part of the waterfall upward to maintain clearance. And shimmying up eighty pounds of rock and dirt every spring isn't as easy as it sounds. So I've had the idea of refurbing the waterfall/tunnel whenever the time was right. Unfortunately, another issue was a bit more urgent this year - the fact that the water lily roots had taken over the bottom of the pond. Water Lily RedoOur old Marcourt "Jamaica" pond has a "bump-out" that is 18" deep mostly surrounded by shelves that are 9" deep. The extra depth of the bump-out is supposed to provide the goldfish with someplace to hang out when the top part freezes, as well as someplace to hide when the raccoons come calling. In the past, it's also given the goldfish babies a place to hide until they could get big enough not to be eaten by their parents. By late 2009, there wasn't a bump-out any more. The water lily roots had filled the bottom part of the pond to the point that, for all intents and purposes, it was only 9" deep. I couldn't even get the pump under the waterline. So this April, I thought I'd see if I could thin the water lilies out a little. I pulled up the whole root clump with an insane idea of lifting it out of the pond to separate. Turns out that 30 gallons-worth of water-saturated water lily root was too heavy for me to lift. So I got an old bread knife and sawed it into manageable pieces, something that would have been a lot more dangerous if I had a flexible liner.
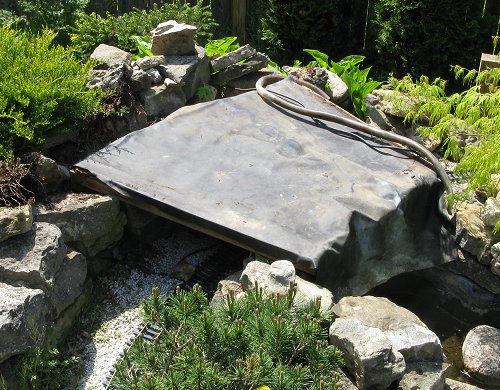
After getting the root mass out, I cut it down further. I put about half of the parts with lily plants sticking out it back in, laying bricks on it to hold it down (it wants to float). I discarded some of the root mass. I put some of the parts with lily plants in a fountain I put together for Shelia last year. And I left a few small clumps "loose" in case I could find a home for them. Waterfall RedoBack in 2007, I came across a "creek-shaped" piece that had fake resin-and-fiberglass rocks that matched the kind of rocks I was already using on my railroad. After using the new piece for clinics and other temporary railroads, I decided I would incorporate it into my "permanent" railroad when I got a chance. This April, I removed the rocks and sedum, and the first "creek-shaped" piece. This wasn't as easy as it sounds - turns out I had created the perfect environment for a huge anthill. They were little brown ants, whose bite didn't sting, but when several dozen swarm up your arm every time you move a rock, it still gets old. In the blowup of the photo to the left below, all of the little white specs are ant pupae. You can see that the "hill" was three feet across. What you can't see in the photo, was that half of the hill was furiously trying to move the ant pupae to safety, and the other half was swarming up my pants legs. Why didn't I just get out the Raid? Because all of this is uphill from the pond, and I'm very careful about any kind of poisons near the pond. Finally, I was able to remove the "creek-shaped" piece and the boards supporting it. I used a level and a measuring tape to see how much clearance there was, so I'd know how might height to add when I rebuilt the tunnel support.
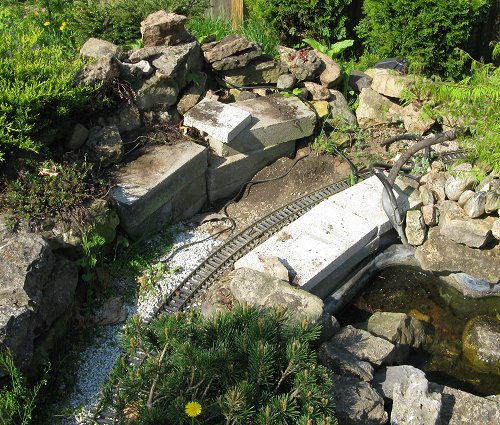
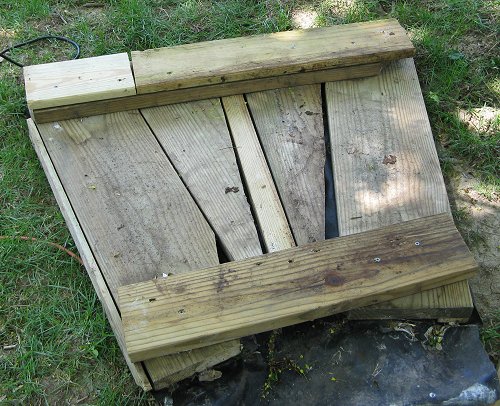
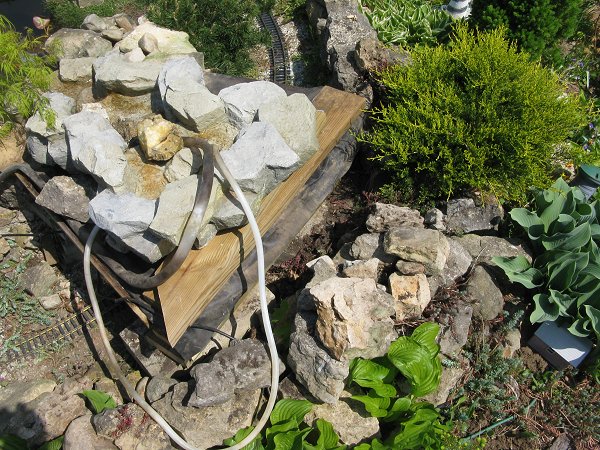
The pressure-treated boards I had originally used to bridge the "tunnel" were still in decent shape. They weren't fastened together before, because the old "creek-shaped piece" bulged out in a funny place that I had to accommodate. I was going to mount the new "creek-shaped" piece higher, so that wouldn't be an issue. I also wanted the whole mess to be a bit more solid than it used to be. So I added some scrap lumber and built a single solid framework, still keeping the old piece of pond liner on the top. I "installed" it by setting it on the concrete bocks that made up the tunnel walls. If the old version had stayed stable (with the help of a bunch of rocks and dirt), this one would, too.
The connecting pond wasn't actually attached to anything, so I moved the rocks that were surrounding and camouflaging it (somewhat) to see how much trouble it would be to raise it a few inches. Turned out that it was sitting in a base of sand (I'm sure you would have remembered after ten years, but I didn't). In fact, the base of the connecting pond was a couple inches lower than the rim of the "big' pond. I did the math and figured that if I added about two square feet of sand or gravel, I could raise the thing about four inches. Off to the store. I chose pea gravel, something I almost never use because it has too much give for most purposes. But in this case, I wanted it to have a little give, so the connecting pond could settle in like it did into the sand. When I returned from the store, I had another encounter with nature. Turns out that the ants weren't the only wildlife that my rockpiles had sheltered. In the lower left photo, you can see the depression left by the connecting pond as well as a 30"-long resident I must have dispossessed. In the lower right photo, you can see the effect of 1.5 cubic feet of gravel. I felt that any more would be "pushing it," so I left it at that level, raising the connecting pond 3" above its previous spot. "Junior" dove into the pond and swam a bit while I was working. He kept coming up to see if I was done, and eventually got tired of waiting on me and went off in another direction. I haven't seen him since, and the harmlessness of garter snakes notwithstanding, that's okay with me.
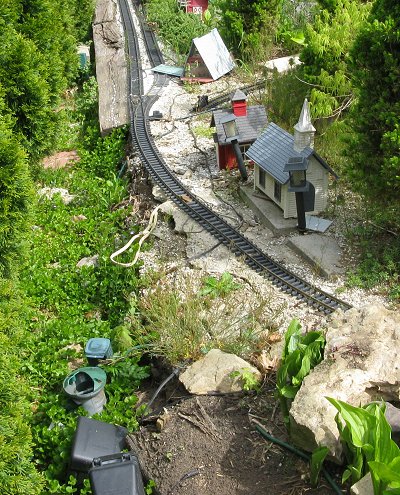
One other problem with the waterfall remains to be solved. The "creek" comes out of nowhere - it doesn't look like it "springs" from nature. Even my old sedum-covered pile of rocks didn't camouflage that very well. I can't really build a mountain in the 3' or between the top of the waterfall and the south edge of the raised garden. But I think a few trees could fill in visually.
Something There is that Doesn't Love a WallA few years ago, when I was writing about retaining walls, a friend who does a lot of landscaping told me that a retaining wall built with railroad ties needed to have a "wedge" of gravel separating them from the dirt - otherwise they'll rot out from the inside out. Of course, he told me that several years after I built my railroad. The ties I used for the first part were old streetcar ties that had been buried in the ground under Springfield, Ohio's East Main Street for over a century. But like those "treated landscape timbers," railroad ties don't like to be wet on one side and dry on the other. At any rate, my century-old ties are giving out after about six years of retaining wall use.The photo to the left below shows what was left of two stacked RR ties after most of them rotted off and I chipped away anything that was loose. It also shows a piece of UV-resistant "Romex" I buried in the garden back in 1999, when I thought I was going to be running power directly from the house any day now . . . In the bottom of the photo you can also see an adjacent bit of railroad tie that the top has come off of, so it's time has almost come as well. Fortunately, the bottom tie rotted out enough that I was able to make use of the "idiot tool" again. (See, I told you I was going to get around to how this affected my railroad!) I installed three pieces of scrap 4"x4" ground-rated post, then attached pieces of pressure-treated 2"x6" and 2"x4" to them. One goal was to avoid moving the wall "outward," since with the arborvitae and privacy fence there, I'm running out of working space "behind" the railroad anyway. This solution, which I originally documented in my article about retaining walls, allowed me to keep the same "footprint." In addition, the setup will be much more stable than the ties, which kept shifting even when they were solid. And, perhaps best of all, the posts are ground-rated. So even if the 2"x4" and 2"x6" pieces rot out, I can just put new ones back on and not have to worry about digging more holes. The post in the middle sticks up because I plan to eventually put an outlet on it to serve that part of the railroad, about the same time I run a line from the house (a plan I started during the last millennium). The southernmost post is even higher, because I have some ideas for another feature or two on that end of the railroad for which a solid "anchor" would come in useful.
Now to Get DirtyAt this point, the retaining wall repair and the waterfall upgrade have converged into something called "bring in more dirt." I'm fortunate in a sense because we still have a big dirt pile left over from back when the afore-mentioned Bobcat driver leveled out an area for our above-ground swimming pool. If you have to buy dirt for a garden railroad, don't kill yourself to get the best possible dirt - that will just encourage everything to grow faster, including trees you want to stay small and weeds you don't want to grow at all. The dirt I plan to move over when the weather clears again is mostly clay, with a little bit of topsoil and broken glass mixed in (the previous homeowner's kids apparently amused themselves by breaking bottles on the wall of a barn that is no longer here). It will do for my purposes since it's not good enough to encourage ridiculous growth (and, yes, I pull out the broken glass when I come acros it). I may also pour some more concrete under the "right of way" to keep that part more stable, especially since the moles and voles love tunneling through freshly-packed dirt.What remains as of this writing, is:
ConclusionAfter I'm done with all of that, all I have to do is weed my railroad, refurbish the track pieces I haven't got to yet, reballast the right of way, clean the track, and run trains. Piece of cake, huh? At least this last list actually has to do with trains. :-) If you think you might be coming through southwest Ohio and you want to stop by, or if you want to be put on our mailing list for future open houses, please contact us and let us know. Here's hoping you have many great days outdoors in your near future, Paul
Note: If you arrived at this article by clicking on the "Next" link in our New Boston and Donnels Creek series of chronological articles about our garden railroad, you can continue the series using the links below.
Previous - Return to our article "2009 Christmas-Themed Open House on the NB&DC," which presents the rest of our plans and preparations for our 2009 Christmas-themed open railroad, as well as a description of the day itself. Note:The following articles are listed in reverse chronological order, so if you want to start at the beginning and work your way through, please jump to the "About New Boston and Donnels Creek" article near the bottom of this list. Return to our article "Fall Has Fell," which outlines our early plans for our 2009 Christmas-themed open railroad. Return to our article "Refurbishing Garden Railroad Track." Return to our article "Planning a Christmas Open House, Part 5." This is the last in a sequence of articles that describe our preparation and eventual execution of our first Christmas-themed open railroad in 2008. Return to our article "Planning a Christmas Open House, Part 4." Return to our article "Planning a Christmas Open House, Part 3." Return to our article "Planning a Christmas Open House, Part 2." Return to our article "Planning a Christmas Open House, Part 1." Return to our article "Refurbishing Garden Railroad Roadbed," which describes how we used cement roadbed to addressed the massive burrowing animal and weed growth problems caused by following the track-over-gravel-on-a-dirt-pile instructions of the desert-dwelling garden railroad experts and GR editors. Return to our article "About the Owner/Author/Lead Editor," which describes Paul's circumstances and approach to garden railroading in the early 2000s Return to our article "NB&DC Rolling Stock," which lists the sorts of cars I was running on my railroad in the early 2000s. Return to our article "Motive Power, which was written in 2003, and updated in 2008. It describes the locomotive we were using most of the time to pull trains on the New Boston and Donnels Creek. Return to our article "June, 2003 Photos, to see what our railroad looked like four years after we broke ground, and one year after the 2002 convention. Return to our article "Layout So Far," which describes the track plan, plants, etc. of our garden railroad as of the early spring of 2003. Return to our "January, 2003" article, which includes photo of our railroad caught in a 6"-8" snow right after running trains at Christmas. Return to our "June, 2002 Photos article, which contains photos of our garden railroad as it was set up for the 2002 National Garden Railway Convention in Cincinnati. Return to "What to Do When a Tree Eats Your Railroad." To return to our article "Stress Testing on the NB&DC RR," click here. To return to our NBDC 1998-2000 Pictures page, click here. To return to Landscaping and Pond Construction, 1998-1999, click here, To return to our page About New Boston and Donnels Creek" click here. To return to the New Boston and Donnels Creek Index Page, click here To return to the Family Garden Trains Home Page, click here
|


|
Reuse or republication without prior written permission is specifically forbidden. Family Garden Trains is a participant in the Amazon Services LLC Associates Program, an affiliate advertising program designed to provide a means for sites to earn advertising fees by advertising and linking to amazon.com. For more information, please contact us |
 |  |
| Visit related pages and affiliated sites: | |||||
| - Trains and Hobbies - | |||||
|  |
|
 |
|  |
 |

|

|  |
|

|
| - Christmas Memories and Collectibles - | |||||
 |

|
 |

|

|
|
| - Family Activities and Crafts - | |||||
 |

|

|

|

|

|
| - Music - | |||||

|
 |
 |

|

|

|

|

|

|

|

|

|

|

|

|

|

|

|