 | |||
 |
 |
 | |
 |
 | ||
 |
 | ||
 |  | ||
 |  | ||
| |||
|
|
|
| |
|
|
| ||
|
| ||
| | ||
| | ||
| Written by Paul D. Race for Family Garden Trains(tm)
and New Boston and Donnels Creek: |
 |
|
|
Adding a Train Shed Part 2If you've been following my articles, you know that when I designed our new 100% raised railroad, I also planned to built a little shed-type structure on the "back" of the railroad so I could get trains running quickly, instead of having to schlep everything out like I used to.The previous article describes how I started framing in the proposed shed, including several things I had to do to make up for bad decisions I made earlier (like using 8' posts when I should have used 10' posts). Once again, I'm trying several things I've never tried before, but over the years, I've learned that telling the whole truth encourages readers more than pretending I never make mistakes. Many hundreds of readers have gone out into the back yard with a shovel and a train set, figuring that "If that guy can do it, I can do it." Exactly. By the time I published the previous article on the train shed, I had finished the deck and framed in the side walls of the shed. But a bigger question was, how was I going to get the rafters in place? I wanted the roof to be supported lengthwise by three 2"x6" boards. And the top, ridge-line board would sit into slots on the rafter assemblies. Something like the drawing I made below:  There were three potential problems with this design:
After some consideration, I decided to take my chances on the third issue, and to address the first two issues by assembling the trusses without the joist. I also added 3" to the rafter length to give me some room for error.  To get the angles for the ends of the rafters, I read up on roof pitches and a lot of related topics. I finally decided that I'd try to pitch the roof at a 24 degree angle. So I cut the ends of the rafters 66 degrees (90-24). That would hopefully make the rafters meet the ridge at the right angle. And it should make the lower edge of the board perpendicular to the ground, which would allow me to add nice trim boards. In the photo below, I have assembled one pair of rafters with a cross-piece that would both:
The 2"x6" board that's sticking up in the air isn't fastened to anything - I just used it to provide the correct spacing and angle for the assembly. I used six 3" screws to fasten the collar ties firmly to the rafter boards without bothering to cut the angle of the slope ahead of time. After things were fastened together, I used my circular saw to cut the corners of the tie down to the slope of the rafters.  Once I had the first assembly done, my priority was to make certain that all of the other rafter assemblies were built to the same angle - even if it wasn't exactly 24 degrees. So I flopped the first assembly over, put some scrap 2"x6" pieces under each end, and built the next assembly over the top of it to make certain it was as close as reasonably possible to the same angle.  I'll be honest - I'm so used to doing things wrong that I was afraid to do the rest of the assemblies until I tried out the first two to make certain I was on the right track. But I gritted my teeth and did the other three to make certain all five had the same angle. As it turned out, that was the right thing to do. Bracing Issues - At first I was all for finding a metal bracket I could slide the rafters into to hold them in place. Several nice products are available. However, none of them are really suitable for the four gable ends of the building. I bought a bunch with the idea of using them for the inside 3 rafters at least, but wound up not using them at all, since the system I worked out for the end rafters worked out for the middle rafters, too. Installing the End Rafters - I cut my 109" 2"x6" ridge board and got it ready to go. What I worked out for installing the end pieces with the rafters at the outside edge was this: I laid a 2"x4" I was planning to use as a joist across one end of the frame. Using that as a "spacer," I screwed in a little angled piece of wood that I would be able to screw the joist to (below left). Then I added the brace at the other end, and turned the joust upright (below right). Using my trusty 3" screws, I fastened the joist to the braces and toenailed it into the horizontal "plate."
In retrospect, I could have made my little braces longer - they would have been more solid, so if you try this, do as I say, not as I do. That said, the resulting assembly seemed strong enough to fasten the first rafter to. The rafter was light enough to set into place on the outside edge of the joist (below).
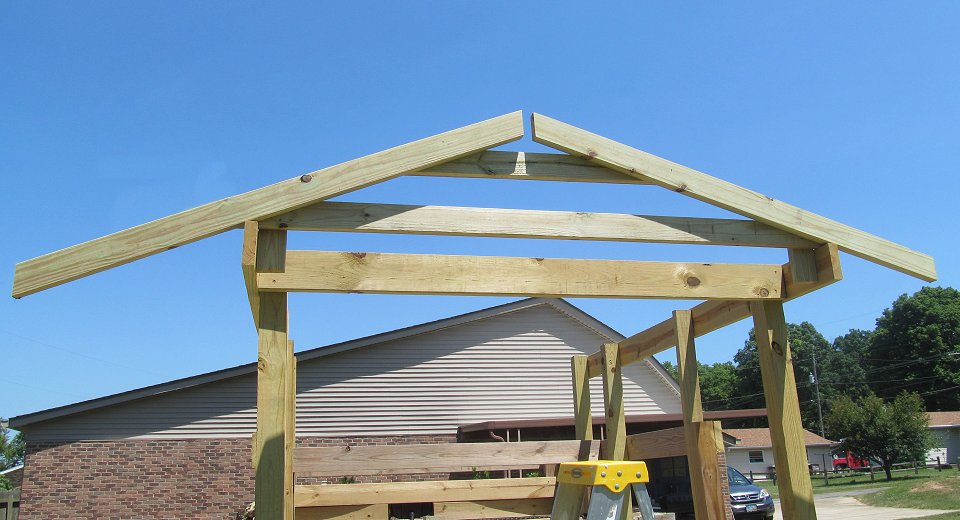 What is not shown (because I only have two hands): I put a bit of 2"x6" board into the slot at the top to keep it from scissoring closed while I was centering the rafter. Then I went back and forth measuring the amount of overhang on each end of the rafter. When they were the same (within 1/8" or so), I screwed the rafter to the joist and toe-nailed it into the plate. The whole assembly seemed very solid and very vertical. Leaving the little 2"x6" block in place, but an inch or below the tips at the top end of the rafters, I went to the other end of the shed and did the same thing. This was much, much easier, because I could stand on the top platform of my railroad while I worked. Installing the Ridge Board - Now came the "acid test" would I be able to drop the ridge board into the slots I had left in the rafters, or would they scissors closed when I popped out the spacers I had left there? I picked up one end of my ridge board and climbed to the end with the platform. Steering a 9' 2"x6" from one end isn't easy, but I was able to leverage it so that the far end sat in the top of the slot where it would eventually drop into place. Then I knocked the spacer out of the end I was working on and dropped the ridge board there.  Admittedly, if the roof was 12 feet long instead of 9 feet, I wouldn't have attempted doing it by myself. But so far, so good. I went to the other end, knocked out the spacer, and encouraged the end of the ridge board to drop into place there. Then I shot screws from each rafter into the ridge board - one from the top and one toe-nailed in from the side. Both rafter assemblies seemd very solid. Moving Forward - The other rafters were fairly easy to install. I pulled each one up so that the legs were sticking out each side of the shed, then rotated the thing upward until the slot was just under the ridge board. Because they had all scissored slightly, I had to use a hammer to get them started, but once the slot in the rafters began to accept the ridge board, bringing them into an upright position was not hard. Once they were in place, I screwed 3" screws into the ridge board, one from the top and one "toenailed" in from the side. Then I added the little vertical braces I had started with on the end assemblies. The photo below shows the shed and railroad from an upstairs window with three of the rafters installed. It also explains why the neighbors haven't complained about the noise my project has generated - getting an in-ground pool installed is much noisier and dirtier.  As of this writing, all of the rafters are in place. Because the roof is just over 9' long, the best way to sheath it will be with three 4'x10' plywood sheets. Strangely, no one in town has those in stock. So they are on order.  ConclusionWhile I'm waiting for the sheathing to come in, I will be adding a few other pieces and deciding on materials for the roof and walls. I'm leaning toward an old-fashioned, dark red metal roof and board-and-batten siding. The metal roofing is available from several sources, but the lumber for authentic-looking board-and-batten siding will be a little harder to find for a reasonable cost. We'll see. As always, if I've helped you get any ideas at all for your next garden railroad construction, I will consider the time it took to document all of this time well spent. Best of luck, all, Enjoy your hobbies, and especially enjoy any time you can spend with your family in the coming season. Paul
Click on the photo to see our status as of August 5, 2018.
Click on the photo to see our status as of July 9, 2018.
Click on the photo to see our progress as of June 13, 2018.
Click on the photo to see our status as of June 1, 2018.
Click on the photo to see our status as of February 20, 2018
Click on the photo to see our status as of February 20, 2018
Click on the photo to see our status as of November 21, 2017
Click on the photo to see our status as of October 25, 2017
Click on the photo to see our status as of October 15, 2017
Click on the photo to see our status as of October, 10, 2017
Click on the photo to see our status as of September 26, 2017
Click on the photo to see our status as of September 17, 2017
Click on the photo to see our status as of September 7, 2017
Click on the photo to see our status as of August 10, 2017
Click on the photo to see our status as of the end of July, 2017
Click on the photo to see what we were considering as of late May, 2017
Click on the photo to see what we were considering as of late April, 2017
Click on the photo to see what we were considering in early April, 2017
Click on the photo to see what we were considering in March, 2017
Click on the photo to see the home page of Paul's railroad.
|


|

Note: Family Garden Trains?, Garden Train Store?, Big Christmas Trains?, BIG Indoor Trains?, and BIG Train Store? are trademarks of
Breakthrough Communications (www.btcomm.com). All information, data, text, and illustrations on this web site are
Copyright (c) 1999, 2000, 2001, 2002, 2003, 2004, 2005, 2006, 2007, 2008, 2009, 2010, 2011, 2012, 2013, 2014, 2015, 2016, 2017 by
Paul D. Race. Reuse or republication without prior written permission is specifically
forbidden.
Family Garden Trains is a participant in the Amazon Services LLC Associates Program,
an affiliate advertising program designed to provide a means for sites to earn advertising
fees by advertising and linking to amazon.com.
For more information, please contact us
 |  |
| Visit related pages and affiliated sites: | |||||
| - Trains and Hobbies - | |||||
|  |
|
 |
|  |
 |

|

|  |
|

|
| - Christmas Memories and Collectibles - | |||||
 |

|
 |

|

|
|
| - Family Activities and Crafts - | |||||
 |

|

|

|

|

|
| - Music - | |||||

|
 |
 |

|

|

|

|

|

|

|

|

|

|

|

|

|

|

|


 Proceed to "Waterscaping Part 2"
 Return to "Adding a Train Shed Part 1"
 Return to "Waterscaping the NEW New Boston and Donnels Creek Part 1,"
  Return to "Dirtscaping the NEW New Boston and Donnels Creek RR, Part 2.
 Return to "Adding Raised Roadbed to the NEW New Boston and Donnels Creek, Part 2"
 Return to "Adding Raised Roadbed to the NEW New Boston and Donnels Creek RR, Part 1"
 Return to "2018: Springing into Spring on the NEW New Boston & Donnels Creek RR."
 Return to "Dirtscaping the NEW New Boston and Donnels Creek RR, Part 1.
 Return to "Decking the NEW New Boston and Donnels Creek RR
 Return to "Framing the NEW New Boston and Donnels Creek RR, Part 6"
 Return to "Framing the NEW New Boston and Donnels Creek RR, Part 5"
 Return to "Framing the NEW New Boston and Donnels Creek RR, Part 4"
 Return to "Framing the NEW New Boston and Donnels Creek RR, Part 3"
 Return to "Framing the NEW New Boston and Donnels Creek RR, Part 2"
 Return to "Framing the NEW New Boston and Donnels Creek RR, Part 1"
 Return to "Breaking Ground on the NEW New Boston and Donnels Creek"
 Return to "Planning the NEW New Boston and Donnels Creek, Part 4"
 Return to "Planning the NEW New Boston and Donnels Creek, Part 3"
 Return to "Planning the NEW New Boston and Donnels Creek, Part 2"
 Return to "Planning the NEW New Boston and Donnels Creek, Part 1"
 Return to the New Boston and Donnels Creek RR Page
 Return to Family Garden Trains' Home Page