 | |||
 |
 |
 | |
 |
 | ||
 |
 | ||
 |  | ||
 |  | ||
| |||
|
|
|
| |
|
|
| ||
|
| ||
| | ||
| | ||
| Written by Paul D. Race for Family Garden Trains(tm)
and New Boston and Donnels Creek: |
 |
|
|
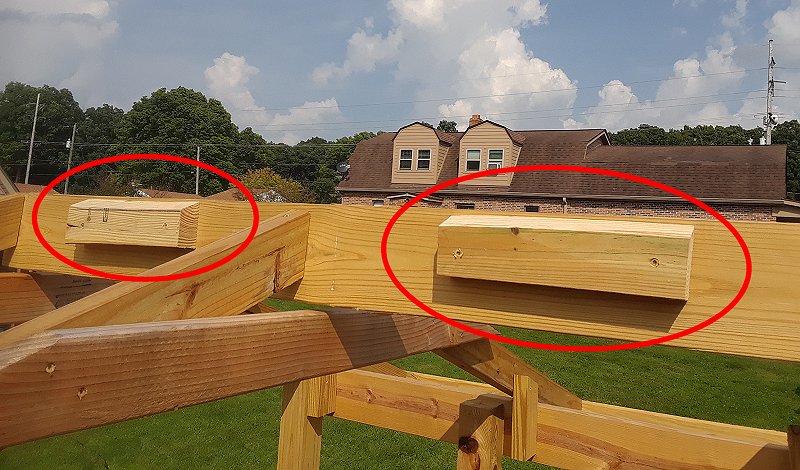
Adding a Train Shed Part 3If you've been following my articles, you know that when I designed our new 100% raised railroad, I also planned to built a little shed-type structure on the "back" of the railroad so I could get trains running quickly, instead of having to schlep everything out like I used to.The previous articles described how I had to build last year's framework up and out to accommodate a shed big enough to walk into. Part 2 described how I put on the rafters. By the way, during my research for these parts of the project, I discovered that there are about a thousand "only right ways" to build a shed of any kind. I chose approaches that would work for me and also produce a building that would be in code (not that the county inspects sheds that are under 100 square feet, but just in case). Then I ordered plywood for the roof and worked on other things. I also researched steel roofs, and saw about fourteen different ways to install them, each "expert" saying his was the only right way. For a time, I thought I had screwed up by ordering plywood, because some folks just use boards, the way they did in barns and houses up until about 1940. Also, I want to install a roof vent, and several articles preached vociferously about how leaving a gap between the sheathing and the ridge board would weaken the roof and cause problems later. Since my roof slope is 24 degrees and there wouldn't be any gutters, I'm not worried too much about snow build up, but I'll take reasonable precautions. Installing the FasciaI had cut the ends of my rafters at a 66 degree angle so that the ends would be vertical. During my research, I kept coming across people who said to have cut them off at a 90 degree angle and attach 2"x4"s to the end, a so-called "ladder" construction. But I've seen countless examples of what I was trying to do, so I decided that a 5/4"x6" pressure treated board made for decking would serve just fine as a "fascia" board and look way more finished. And after all, the profile of the 5/4 board has almost exactly the same amount of wood as the 2"x4" board (about 6 square inches), so it shouldn't be any weaker.One "expert" whose advice I took explained a good way for a single person to get a sheet of plywood to stay where it belongs while nailing it in place. This involved screwing temporary brackets to the fascia, to allow the long edge of the plywood board to sit right above the fascia while you're taking care of business. So I figured putting the fascia board up would be the next step. Of course fastening a 9'-long board horizontally by yourself can be problematic.
Then I rested one end of the fascia board on that while I attached the other end by a single screw. After that, it was no trouble at all to move the ladder back to the other end, remove the brace, and fasten that end of the fascia in place. Then I screwed the fascia to all of the rafters, which included putting a second screw in the one I had first attached. The photo below shows the south end of the shed frame with both fascia boards attached.  Sheathing ConsiderationsDid you know that "1/2"-plywood is really 7/16? I think I knew that. Most "authorities" who discuss using plywood or MDF for the roof sheathing recommend 1/2", but I'm going to go with what they call 1/2" since that was probably what they were thinking about when they made the recommendation.If I had made the shed 8' long instead of 9', my life would probably have been easier. But my 10' sheets will work just fine. Each rafter is a little under 6' long so I can trim the first two sheets to 9' lengths and lay them sideways. They'll take up all but about 19" of the rafter lengths and be sturdy enough to walk on. The third sheet will be cut into strips to fill the gap. Venting ConsiderationsI want to add a roof vent, which is generally no problem on a roof this size. For it to work, there has to be a gap between the sheathing and the ridge board, though.Though most sources seemed to think that would be fine, a few resources mentioned that leaving such a gap would weaken the roof there. One recommended running the sheathing all the way to the ridge board, then drilling a bunch of big holes there. It occurred to me I could get a similar effect by cutting a few angled blocks and mounting them on the ridge board so the sheathing would have a little more support. Again, this was probably not necessary with a fairly steep roof and no rain gutters, but it cost me almost nothing since I already had more short pieces of 2"x6" than I'll need for a while.
Preparing to SheathI was concerned that the roof wouldn't be quite square, and as a result, the edge of the sheet wouldn't align with the rafters on the end. I could do what I've done on other parts of this shed, and installed the thing, and then trimmed it if it wasn't right. But how would I avoid messing up the trim boards?Frankly, at this point, anything I could do to get the big pieces of sheathing on the roof would be worth considering. I was also concerned about how I would get that 55-pound 1/2"x4'x10' piece over my head onto the rafters. Then it occurred to me that if I cut it in half so that I could join the pieces along one of the rafters, it would not weaken the roof. But that would make it even harder to To improve my chances of the sheathing aligning properly with the ends of the roof, I temporarily added some pieces of 5/4" decking - the same sort of wood I planned to use to trim out the end once the sheathing was attached. This way, if I needed to trim sheathing to "square up" with where the end trim was going to be, I could do it without the danger of carving up the final trim. The next step was to add vertical pieces of wood to the fascia boards so the sheathing will stay in place while I fasten it down.
If I had a crew and the building was entirely square, I wouldn't need some of these preparations at all. But most of my friends' backs are in worse shape than mine. In addition, a reader who has been tracking my progress on Facebook thanked me for showing how a person could do this sort of thing without any help whatsoever. So I could hardly bring in a ringer or a crew now. In case the section above is confusing, I added a drawing that shows where I added wood pieces in preparation for putting the sheathing on. 
What isn't shown on the drawing are the "H clips" that will be installed between the lower panels and the upper panel on each side. During installation, H clips keep upper sheathing pieces from slipping down over or - worse yet - behind lower sheathing pieces. They also add a very small gap to allow for expansion. They're very inexpensive, and they add a little bit of strength to the roof a little, too. SheathingAs mentioned earlier, I had ordered 4'x10' sheathing plywood with the notion that there would be less waste than if I used 4'x8' sheathing. By the time I was done, though, I'm not sure that saved me any actual money. Just saying. . . .The sheathing write-up said that it could stand a limited amount of weather before it was covered. The side with fewer bad knotholes had a pinkish sheen that I suppose was a rudimentary sealant. So I installed it with that side up. Nails or Screws - By the way, most of the experts mentioned owning or renting or buying a nail gun for this part. But because this is a small roof, it was cheaper to buy a couple boxes of 2.5" decking screws and much less likely to set the neighbors' dogs barking incessantly. Yes, for a whole house roof, a nail gun is probably the answer. The 4'x10' sheathing from Menards was 7/16" thick (what they used to call 1/2"). Each piece weighed 55lbs. To lift it to the roof without throwing my back out for good, I cut each board in two, starting with the 54.5" length shown on the left end of the photo below. (I left the other part long since I was going to be trimming the end in place anyway.) As it turned out, the roof was off square enough that if the pieces were aligned to the rafters, they wouldn't be aligned to the eaves or the rakes (gable ends). Again, if I'd done all this with a crew in one weekend, things might not have shifted as much as they did. But no real harm was done. . Click for bigger photo.") As you can see, where the boards joined, they were out of alignment by almost two inches. So I had to cut the upper boards in half before I put them on, as well. To see a photo of the upper and lower boards joined by H clips, click here. When I was fastening the upper boards, I made a point of fastening them to the horizontal bits I had screwed to the ridge boards as well as to the rafters. This was just to provide a little extra strength at the roofline. I have no photo of this, sorry. Warning - The sheathing is more slippery than you would think. Once I got onto the roof to start screwing things in place, I had to more-or-less stay on all fours to keep from sliding off. And that was just with a 24-degree slope. If you're used to clambering around on 30-degree roofs with asphalt shingles (as I am), Once the upper two sheathing boards were in place, they were overlapping the ridge board, which meant there would be no ventilation. So I set my circular saw to 1/2" depth and sliced a little off the boards until there was about a 1/2" - 3/4" gap between the sheathing and the ridge board. This may have been overkill, and I didn't exactly cut in a straight line, but the ridge vents I've looked at so far are so wide they'll cover the gap nicely. Leaving the circular saw set at 1/2", I trimmed the edges all the way around, then removed all the temporary boards I had attached to help align things. To be honest, it's not as "clean" as it looks from the ground, but the drip edge would eventually straighten out the appearance. 
Apparently, the roof isn't quite at a 24 degrees slope, so there is a slight gap between my end trim pieces. When all is said and done, I may put a little bit of trim or gingerbread there to hide the gap. Because the fascia is mounted vertically and the trim pieces are cut at an angle, they don't exactly align on the lower corners, but that's not a problem. ConclusionOnce the sheathing was on, I had only a few weeks (depending on the weather) to get it covered before the rain started swelling the edges or some such. So the next stage was getting the underlayment on. As of this writing, I actually have the underlayment and drip edges installed, but this article is long enough, so I'm going to stop it here. As always, if I've helped you get any ideas at all for your next garden railroad construction, I will consider the time it took to document all of this time well spent. Best of luck, all, Enjoy your hobbies, and especially enjoy any time you can spend with your family in the coming season. Paul
Now the roof is waterproof enough to get us through the next couple of months at least, maybe more.
Click on the photo to see our status as of August 5, 2018.
The way we got the rafters and ridge board up wouldn't work for everybody, but it worked for us, and hopefully will help other folks to "think outside the box" - literally in this case. Click on the photo to see our progress as of July 14, 2018.
Click on the photo to see our status as of July 9, 2018.
Click on the photo to see our progress as of June 13, 2018.
Click on the photo to see our status as of June 1, 2018.
Click on the photo to see our status as of February 20, 2018
Click on the photo to see our status as of February 20, 2018
Click on the photo to see our status as of November 21, 2017
Click on the photo to see our status as of October 25, 2017
Click on the photo to see our status as of October 15, 2017
Click on the photo to see our status as of October, 10, 2017
Click on the photo to see our status as of September 26, 2017
Click on the photo to see our status as of September 17, 2017
Click on the photo to see our status as of September 7, 2017
Click on the photo to see our status as of August 10, 2017
Click on the photo to see our status as of the end of July, 2017
Click on the photo to see what we were considering as of late May, 2017
Click on the photo to see what we were considering as of late April, 2017
Click on the photo to see what we were considering in early April, 2017
Click on the photo to see what we were considering in March, 2017
Click on the photo to see the home page of Paul's railroad.
|


|

Note: Family Garden Trains?, Garden Train Store?, Big Christmas Trains?, BIG Indoor Trains?, and BIG Train Store? are trademarks of
Breakthrough Communications (www.btcomm.com). All information, data, text, and illustrations on this web site are
Copyright (c) 1999, 2000, 2001, 2002, 2003, 2004, 2005, 2006, 2007, 2008, 2009, 2010, 2011, 2012, 2013, 2014, 2015, 2016, 2017, 2018 by
Paul D. Race. Reuse or republication without prior written permission is specifically
forbidden.
Family Garden Trains is a participant in the Amazon Services LLC Associates Program,
an affiliate advertising program designed to provide a means for sites to earn advertising
fees by advertising and linking to amazon.com.
For more information, please contact us
 |  |
| Visit related pages and affiliated sites: | |||||
| - Trains and Hobbies - | |||||
|  |
|
 |
|  |
 |

|

|  |
|

|
| - Christmas Memories and Collectibles - | |||||
 |

|
 |

|

|
|
| - Family Activities and Crafts - | |||||
 |

|

|

|

|

|
| - Music - | |||||

|
 |
 |

|

|

|

|

|

|

|

|

|

|

|

|

|

|

|


, to hold the sheathing in place while it is fastened down. Click for bigger photo.")


 Proceed to "Adding a Train Shed Part 4"
 Return to "Waterscaping Part 2"
 Return to "Adding a Train Shed Part 2"
 Return to "Adding a Train Shed Part 1"
 Return to "Waterscaping the NEW New Boston and Donnels Creek Part 1,"
  Return to "Dirtscaping the NEW New Boston and Donnels Creek RR, Part 2.
 Return to "Adding Raised Roadbed to the NEW New Boston and Donnels Creek, Part 2"
 Return to "Adding Raised Roadbed to the NEW New Boston and Donnels Creek RR, Part 1"
 Return to "2018: Springing into Spring on the NEW New Boston & Donnels Creek RR."
 Return to "Dirtscaping the NEW New Boston and Donnels Creek RR, Part 1.
 Return to "Decking the NEW New Boston and Donnels Creek RR
 Return to "Framing the NEW New Boston and Donnels Creek RR, Part 6"
 Return to "Framing the NEW New Boston and Donnels Creek RR, Part 5"
 Return to "Framing the NEW New Boston and Donnels Creek RR, Part 4"
 Return to "Framing the NEW New Boston and Donnels Creek RR, Part 3"
 Return to "Framing the NEW New Boston and Donnels Creek RR, Part 2"
 Return to "Framing the NEW New Boston and Donnels Creek RR, Part 1"
 Return to "Breaking Ground on the NEW New Boston and Donnels Creek"
 Return to "Planning the NEW New Boston and Donnels Creek, Part 4"
 Return to "Planning the NEW New Boston and Donnels Creek, Part 3"
 Return to "Planning the NEW New Boston and Donnels Creek, Part 2"
 Return to "Planning the NEW New Boston and Donnels Creek, Part 1"
 Return to the New Boston and Donnels Creek RR Page
 Return to Family Garden Trains' Home Page