Adding a Train Shed Part 4
Our new railroad is being built with the goal of being able to run trains any time visitors come over (I used to need a week's notice to pull weeds from between the rails, plus a half hour of schlepping trains out to the railroad).
One of our solutions is putting a little shed on one end of the railroad so I can keep the power supplies hooked up and keep trains on the track and ready to go.
This is the fourth installment of a series of articles specifically about the shed.  The previous articles described how I had to build last year's framework up and out to accommodate a shed big enough to walk into.
Part 3 described how I put on the sheathing and end trim boards. This article describes how I put on the underlayment and drip edge.
Underlayment Choices
As mentioned in Part 3, once the sheathing was on, I had only a few weeks (depending on the weather) to get it covered before the rain started swelling the edges or some such. So the next stage was getting the underlayment on.
I had planned to eventually install a metal roof, so I read all sorts of articles, some of which said I didn't need an underlayment (or even sheathing) to install a metal roof, and some of which said only certain kinds of underlayment would work under a metal roof.
Sorry, I have no once-and-for-all conclusion on this subject. There is SO much contradictory information. All I can tell you is what I chose to use and how I used it. And, maybe months or years from now I can tell you if it caused any problems.
The truth is I was half tempted to use roll-on asphalt roofing that sticks to the sheathing (in addition to being nailed down) and hope it would be okay to put something over it later. But most folks agreed that you shouldn't put metal roofing over that product.
 Eventually, after reading all the pros and cons of dozens of products, I picked up some GAF underlayment that theoretically would stick to my sheathing. It was called Weatherwatch and was supposedly recommended to install along the fascia edge of the roof to prevent - or at least discourage - ice dams from allowing water to wick up under the roofing and rot the sheathing. Sometimes materials used for this purpose are called "ice guards," so that's a term I'll be using below.
"Ice dams" are almost always associated with rain gutters, which I wasn't going to install. Heavy snowfalls bridge the gap between the gutter and the edge of the roof, and when the snow starts to melt, the water runs into that gap and subsequently freezes, allowing later melt-offs to back up into the shingles, where freezing and thawing will subsequently damage the roof in several nasty ways. Ice dams are a bad thing, but they're usually not a problem if you don't have rain gutters. In my case, I was interested in the product as an easy-to-apply underlayment that also would work as an ice guard if necessary. I took my cue for that by the fact that some folks in extremely cold climates use it as an underlayment over the entire roof.
Though I was not planning on adding rain gutters, nothing I read discouraged me from using this product as underlayment all the way over the roof. Several reviews and some of the marketing materials implied that it would be okay, and would, in fact, be a better choice than some of the similar products on the market. A roll also advertised that it would cover 150 square feet, which was more than the size of my roof (about 9'x 12' of sheathing materials).
In the Weatherwatch materials, it says you need to cover it with real roofing within 60 days, so I hoped it would serve until I settled on and applied a roofing material. Some reviewers say it has held up much longer than that, so if the roof doesn't happen soon, I'm keeping my fingers crossed.
The materials also said that the "mineral surface improves footing." When I made my choice, I was keeping in mind the fact that I had to stay on all fours to keep from sliding off the sheathing of my fairly shallow shed roof. As it turns out, that part is not exactly true. More below.
To summarize this section, I am not necessarily recommending this product - it has shortcomings that I'll discuss presently. But it's what I used, so at least it should give you a starting point once you start considering your own options.
Drip Edge Choices
Drip edging is mostly recommended to keep water from seeping under the shingles at the edge of the roof. Though I was considering metal roofing, some of which includes its own way of protecting the edges, I thought I'd go ahead and install drip edging now.
 I bought the cheapest drip edge that Home Depot had, since I wasn't exactly planning to protect the family manse with it. I chose the "clay" color since the lower part would be visible over the "rake" and fascia, and I thought it would blend in with the weathered wood better than any of the other color choices.
I only mention Home Depot because the price on the bin was about a dollar a piece lower than what the cashier tried to charge me. Apparently the price went up and the employees never bothered to change the labels on the bins. So I walked all the way to the other end of the store, took a photo with my smart-phone and walked back to the front. The cashier adjusted the price.
Since this is about the third or fourth time this has happened at Home Depot, you'd link I'd learn to take a photo of the label on the bin every time and save a few steps.
 Getting Started
According to various materials, the "ice guard" is supposed to go underneath the drip edge on the eaves. And the underlayment is supposed to go OVER the drip edge at the eves and under the drip edge at the "rakes" (the sloping edges over the gables). I was going to use the GAF Weatherwatch for both.
Though I shouldn't technically need an ice guard, I figured, "better safe than sorry," I split a length of the Weatherwatch into two, lengthwise and put it over the eaves on both sides of the roof. The instructions give you some useful tips, but let me say I'm glad I started small. It's a lot like peeling the backing off a nine-foot, thirty-pound sticker and trying to get it placed right the first time. Yes, they say you can remove and replace it once without any ill effects. They also say it doesn't wrinkle once you've installed it according  to the instructions.
Next, I installed drip edge over the eaves, on top of the ice guard. They say you can use a tinsnips to do this, but I have a garden "nipper" that worked just fine. Following instructions I found elsewhere, I tried to fold the corners so that water running down the edge of the rake wouldn't get sucked into the wood. Basically, it involves slitting the part that is overhanging the rake, folding the lower part under and folding the top part over. Sorry I don't have a closeup photo.
Then I began rolling the underlayment across the entire roof.
I cut the pieces to length on the ground before I raised them to the roof and left a couple inches overhang on both ends. That made them fairly easy to lift and get into place. I overlapped the drip edge and the "ice guard" layer, so the edge of each eave actually has two layers. 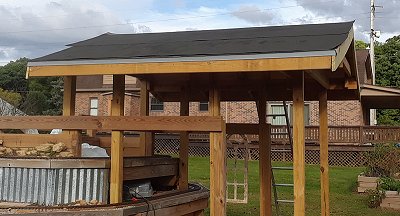
I was disappointed to discover that the GAF Weatherwatch material was even more dangerous to move around on than my unadorned sheathing. The gritty bits that are glued to the surface aren't glued on very well, so they give way if there's any lateral or downward pressure at all, like loose gravel on a steep hillside. I had to stay on all fours throughout this stage, to keep from sliding right off the roof. Again, the angle of my roof was slightly less than 24 degrees. This product should not have been this dangerous to work on.
The sheets on both sides overlapped at the peak of the roof, where I plan to put a vent some day. In the meantime, I was hoping that the sticky edges would stick to each other enough to stay in place for now, which would keep the roof from leaking there for now. They barely stuck at all. So I wound up screwing them down to the ridge board. When the roof vent gets installed, I will remove the screws and cut away enough material to allow air to vent, so that's not a long term problem, just an inconvenience.
 Finally, I installed the drip edge on the rakes (the sloping parts of the edge over the gables). That will be all that gets done one the roof until there are walls.
BTW, the windowframes you see hanging in a few of the photos are decorations I picked up at a flea market with the idea of trying to give a Victorian-era station look to my train shed. There will be more about them in articles to come.
Conclusion
Having the roof keep out rain is a big help. Of course the rain sometimes comes sideways, so having walls will help, too. And windows and doors. More to come!
As always, if I've helped you get any ideas at all for your next garden railroad construction, I will consider the time it took to document all of this time well spent.
Best of luck, all,
Enjoy your hobbies, and especially enjoy any time you can spend with your family in the coming season.
Paul
 Proceed to "Adding a Train Shed Part 5" - Planning the doors, walls, and windows of our garden train shed.
Includes installing the door, painting the windowframes, and adding crosspieces to support the vertical siding boards.
Click on the photo to see our progress as of mid-October, 2018.
 Return to "Adding a Train Shed Part 3" - Adding fascia, sheathing, and end trim to the in-progress train shed.
I thought about bringing in helpers for this part, but a reader commented on how helpful it was to see how one person could do this sort of thing by himself, so I just kept plugging away.
Click on the photo to see our progress as of September 13, 2018
 Return to "Waterscaping Part 2" - Getting this year's waterscaping project done (for now at least). Installing and dirtscaping the third level of the waterfall. Installing pump and filter, adding an extra container and modifying the ones we already had installed to keep the water running smoothly. And lots of other tweaking. Includes tips about introducing fish and plants, as well as other information about water features in general that you may find helpful.
Click on the photo to see our status as of August 5, 2018.
 Return to "Adding a Train Shed Part 2" - Adding rafters to the frame of the in-progress train shed. Now it's starting to look like it might actually be a structure and not just a crazy collection of posts.
The way we got the rafters and ridge board up wouldn't work for everybody, but it worked for us, and hopefully will help other folks to "think outside the box" - literally in this case.
Click on the photo to see our progress as of July 14, 2018.
 Return to "Adding a Train Shed Part 1" - What started out as a simple addition of a deck to stand on when putting trains on the track got a little more ambitious when I realized that JUST installing the deck this year would require more work next year. So we framed out what we planned to be a train shed attached to the railroad. If it ever gets finished, I can easily put trains on the track at a moment's notice instead of schlepping them out from the garage.
Click on the photo to see our status as of July 9, 2018.
 Return to "Waterscaping the NEW New Boston and Donnels Creek Part 1," our article on getting the top two layers of the waterfall on solid footing and getting the third layer framed. After we finish decking and dirtscaping the third layer, we will probably add a washbasin or something for the water to flow into, then add a pump to get the waterfall flowing. No big pond until next year at least - too many other projects.
Click on the photo to see our progress as of June 13, 2018.
 Return to "Dirtscaping the NEW New Boston and Donnels Creek RR, Part 2. - Adding barriers to keep the rocks, dirt, and plants where they're supposed to go, placing platforms and running wiring for buildings, adding rocks, dirt, and plants to the upper level of the railroad.
Click on the photo to see our status as of June 1, 2018.
 Return to "Adding Raised Roadbed to the NEW New Boston and Donnels Creek, Part 2" - Trimming the corners off the roadbed on the upper layer and cutting the pieces that will support the curves on the middle layer. We need to get the upper two tiers of the pond installed before we totally complete this step, so the article doesn't quite show the finished product. You'll see it later as part of other articles.
 Return to "Adding Raised Roadbed to the NEW New Boston and Donnels Creek RR, Part 1" - Sorting out our priorities for the spring and summer of 2018. There a lot of little chores we really should get done before we start on the next big addition. Click to see our plans as of February 27, 2018.
Click on the photo to see our status as of February 20, 2018
 Return to "2018: Springing into Spring on the NEW New Boston & Donnels Creek RR." - Sorting out our priorities for the spring and summer of 2018. There a lot of little chores we really should get done before we start on the next big addition. Click to see our plans as of February 27, 2018.
Click on the photo to see our status as of February 20, 2018
 Return to "Dirtscaping the NEW New Boston and Donnels Creek RR, Part 1. - Putting edging around the existing "layers" of the new railroad, and beginning to add gravel and rocks. There were a few test runs, but we got stopped early by bad weather before we could dump the rest of the rocks, gravel, and dirt, much less plant the plants we hoped to get in before snowfall.
Click on the photo to see our status as of November 21, 2017
 Return to "Decking the NEW New Boston and Donnels Creek RR - Decking the 'middle layer' of our proposed three-tier outdoor railroad. Prepping more track, laying out track and decking to make certain we have measurements correct, installing most of the remaining decking for this layer.
Click on the photo to see our status as of October 25, 2017
 Return to "Framing the NEW New Boston and Donnels Creek RR, Part 6" - Modifying and finishing the framing on the second layer, cantilevering, using R3 track versus all other pre-curved track formats, finalizing the track plan, why painting the track makes old and new track blend better, and more. This will be the last bit of "framing" in 2017, and it worked out well, considering.
Click on the photo to see our status as of October 15, 2017
 Return to "Framing the NEW New Boston and Donnels Creek RR, Part 5" - Spreading the billboard-sourced vinyl underlayment on the top layer. Prepping used Aristo track for (hopefully) many more years of service. Laying the first loop of track, attaching power wires with spade terminals, and testing conductivity with a Bachmann streetcar.
Click on the photo to see our status as of October, 10, 2017
 Return to "Framing the NEW New Boston and Donnels Creek RR, Part 4" - Planning and running the decking for the top layer, testing the track plan, checking clearances, prepping used track with new railjoiners, examining the vinyl I ordered to go over the decking, and more.
Click on the photo to see our status as of September 26, 2017
 Return to "Framing the NEW New Boston and Donnels Creek RR, Part 3" -
Getting the frame finished on the top layer, ordering other things I'd need eventually, deciding on materials for the decking on the top layer (at least).
Return to "Framing the NEW New Boston and Donnels Creek RR, Part 3" -
Getting the frame finished on the top layer, ordering other things I'd need eventually, deciding on materials for the decking on the top layer (at least).
Click on the photo to see our status as of September 17, 2017
 Return to "Framing the NEW New Boston and Donnels Creek RR, Part 2" -
Once I had the overall frame relatively solid, I hooked up the underground power lines to two GFI plugs that should be in easy reach once everything is finished. I also decided to frame out the top railroad layer while I could still access the center of the railroad easily. Because I was running out of vertical space, I reconfigured that layer. Then after I got the "core" pieces on, I changed my plan again. But the whole thing is getting easier and easier to visualize, and is getting closer to complete with every board I cut and fasten on.
Return to "Framing the NEW New Boston and Donnels Creek RR, Part 2" -
Once I had the overall frame relatively solid, I hooked up the underground power lines to two GFI plugs that should be in easy reach once everything is finished. I also decided to frame out the top railroad layer while I could still access the center of the railroad easily. Because I was running out of vertical space, I reconfigured that layer. Then after I got the "core" pieces on, I changed my plan again. But the whole thing is getting easier and easier to visualize, and is getting closer to complete with every board I cut and fasten on.
Click on the photo to see our status as of September 7, 2017
 Return to "Framing the NEW New Boston and Donnels Creek RR, Part 1" -
Once I started dropping posts in the holes and screwing things together, I didn't want to stop before I had the basic frame built (for one thing, the wood warps less once it's fastened in place). Now the folks driving down the street past our house (we're on a corner lot) probably wonder if I'm building an elaborate chicken coop, but that's fine with me. I still need to make a few more lumber runs and do a lot more cutting and sawing, but having the basic frame in place should make the next bits a lot easier.
Return to "Framing the NEW New Boston and Donnels Creek RR, Part 1" -
Once I started dropping posts in the holes and screwing things together, I didn't want to stop before I had the basic frame built (for one thing, the wood warps less once it's fastened in place). Now the folks driving down the street past our house (we're on a corner lot) probably wonder if I'm building an elaborate chicken coop, but that's fine with me. I still need to make a few more lumber runs and do a lot more cutting and sawing, but having the basic frame in place should make the next bits a lot easier.
Click on the photo to see our status as of August 10, 2017
 Return to "Breaking Ground on the NEW New Boston and Donnels Creek" -
Okay, in case you wondered if we'd ever get started on the thing, we broke ground in July, using a manual post-hole digger. Well two manual post-hole diggers. But by the end of this article, we're ready for the posts to start going in.
Return to "Breaking Ground on the NEW New Boston and Donnels Creek" -
Okay, in case you wondered if we'd ever get started on the thing, we broke ground in July, using a manual post-hole digger. Well two manual post-hole diggers. But by the end of this article, we're ready for the posts to start going in.
Click on the photo to see our status as of the end of July, 2017
 Return to "Planning the NEW New Boston and Donnels Creek, Part 4" -
Well, the rented post-hole digger fell through, so we dug our vegetable garden with a manual post-hole digger (the scissors kind). In addition, I stake out where the railroad was going to be. Twice. And tweaked the plans again. Sorry about the redo's, but sometimes just walking around the yard trying to visualize things makes me reconsider something that seemed "settled" only a few days before.
Return to "Planning the NEW New Boston and Donnels Creek, Part 4" -
Well, the rented post-hole digger fell through, so we dug our vegetable garden with a manual post-hole digger (the scissors kind). In addition, I stake out where the railroad was going to be. Twice. And tweaked the plans again. Sorry about the redo's, but sometimes just walking around the yard trying to visualize things makes me reconsider something that seemed "settled" only a few days before.
Click on the photo to see what we were considering as of late May, 2017
 Return to "Planning the NEW New Boston and Donnels Creek, Part 3" -
We have still not broken ground. In part because we plan to rent a post-hole digger and dig the post holes for our raised vegetable garden and the first phase of the garden railroad at the same time, and we don't have enough lumber on hand yet. (If we didn't break it down into multiple trips, we'd be blowing out the shocks on our minivan.) In the meantime, we used a line level to see if the slope of the back yard was as bad as we thought it was (it's worse), and we did other site preparation, including planting a whole bunch of spruce tree seedlings to eventually give us some privacy in our side and back yard. Plus, I'm still wavering a little on the "where-to-start-first" issue.
Return to "Planning the NEW New Boston and Donnels Creek, Part 3" -
We have still not broken ground. In part because we plan to rent a post-hole digger and dig the post holes for our raised vegetable garden and the first phase of the garden railroad at the same time, and we don't have enough lumber on hand yet. (If we didn't break it down into multiple trips, we'd be blowing out the shocks on our minivan.) In the meantime, we used a line level to see if the slope of the back yard was as bad as we thought it was (it's worse), and we did other site preparation, including planting a whole bunch of spruce tree seedlings to eventually give us some privacy in our side and back yard. Plus, I'm still wavering a little on the "where-to-start-first" issue.
Click on the photo to see what we were considering as of late April, 2017
 Return to "Planning the NEW New Boston and Donnels Creek, Part 2" -
More plans. We've moved on from the 2"x6" roadbed-on-posts to a sort of "train-table-outside" plan. Our goals include low-maintenance, high interest, and high reliability. We're also trying to get around having a thousand dollars' worth of dirt hauled into the back yard. If you want to get some idea of what our planning process looks like, reading these through in sequence may help. Or it may drive you crazy.
Return to "Planning the NEW New Boston and Donnels Creek, Part 2" -
More plans. We've moved on from the 2"x6" roadbed-on-posts to a sort of "train-table-outside" plan. Our goals include low-maintenance, high interest, and high reliability. We're also trying to get around having a thousand dollars' worth of dirt hauled into the back yard. If you want to get some idea of what our planning process looks like, reading these through in sequence may help. Or it may drive you crazy.
Click on the photo to see what we were considering in early April, 2017
 Return to "Planning the NEW New Boston and Donnels Creek, Part 1" -
If you're subscribed to our newsletter, you know that we moved just after Thanksgiving in 2016, leaving behind most of the track, a few of the bird feeders, and one Bachmann train set for the new owners. We also left behind a high-maintenance garden that we do not intend to replicate at the new place. This is the first chapter of a new chapter in our lives, which we hope will include a lot of "lessons learned." But first, some serious landscaping had to take place.
Return to "Planning the NEW New Boston and Donnels Creek, Part 1" -
If you're subscribed to our newsletter, you know that we moved just after Thanksgiving in 2016, leaving behind most of the track, a few of the bird feeders, and one Bachmann train set for the new owners. We also left behind a high-maintenance garden that we do not intend to replicate at the new place. This is the first chapter of a new chapter in our lives, which we hope will include a lot of "lessons learned." But first, some serious landscaping had to take place.
Click on the photo to see what we were considering in March, 2017
 Return to the New Boston and Donnels Creek RR Page - This is the page describing Paul Race's progress and frequent rework on his own garden railroad, started on a shoe-string budget in 1998, later expanded, and later refurbished several times as issues arose. Issues that Paul hopes to avoid by building the next iteration above ground.
Click on the photo to see the home page of Paul's railroad.
 Return to Family Garden Trains' Home Page - The home page with links to all the other stuff, including design guidelines, construction techniques, structure tips, free graphics, and more.


