 | |||
 |
 |
 | |
 |
 | ||
 |
 | ||
 |  | ||
 |  | ||
| |||
|
|
|
| |
|
|
| ||
|
| ||
| | ||
| | ||
| Written by Paul D. Race for Family Garden Trains(tm)
and New Boston and Donnels Creek: |
 |
|
|
Adding a Train Shed Part 5Between 1999 and 2016, we built and operated an extensive garden railroad that was installed according to conventional methods of the time, with retaining walls and lots of dirt hauled in. Unfortunately, the dirt attracted weeds and burrowing animals. Planning a train run often included several hours of backbreaking weeding and related work. It also required schlepping the trains out of the garage, some 80 foot away.So when we moved, the plan was to eliminate the backbreaking maintenance tasks by raising the railroad entirely, to reduce the weeding by putting dirt only where we wanted specific plants, and to reduce the schlepping by building a little train shed on one end. One motivation for doing almost everything differently than most folks recommend was to model an outdoor railroad that the average person can operate well into retirement. This is the fifth installment of a series of articles specifically about the shed. Part 4 described how I put on the underlayment and drip edge. This part describes installing the door and how I planned to install siding and windows. Siding Choices From the beginning, I've wanted the shed to look something like a nineteenth-century country station. For the siding, I've gravitated toward the look of board-and-batten, a typical Western look that you'd see in the East more often if the wooden buildings hadn't been torn down and replaced with bricks and concrete in the late 1800s and early 1900s. The principle is simple - you nail fat boards vertically to supports, leaving a slight gap between them to allow for expansion, then you nail skinny boards over the gaps. From the beginning, I've wanted the shed to look something like a nineteenth-century country station. For the siding, I've gravitated toward the look of board-and-batten, a typical Western look that you'd see in the East more often if the wooden buildings hadn't been torn down and replaced with bricks and concrete in the late 1800s and early 1900s. The principle is simple - you nail fat boards vertically to supports, leaving a slight gap between them to allow for expansion, then you nail skinny boards over the gaps.
Today, many panel-based "siding" solutions, like T1-11 sheets (below left), use "reverse board-and-batten" patterns, which are a lot easier to fake than board and batten, since you only have to thin out the panel here and there. A popular manufactured product, LP SmartSide (below right) also mimics reverse board and batten.
Most backyard sheds you see use either T1-11 panels or LP SmartSide. Certainly no one would have been put off if I had chosen either product. But I wanted something that looked more old-timey. And, frankly, less like a typical backyard shed. Not only that, The problem with my plan to use real board-and-batten is that the real old-timers used wide hardwood lumber boards. Hardwood boards like that would have cost me a great deal of money. Even pressure-treated pine boards that wide would be prohibitive in overall cost. At the extremely low end of the quality scale, I've used pressure-treated 5/8"x5.5"x6' fencing boards (shown right) on enough projects to recognize their strengths and weaknesses. One strength is that they actually hold up pretty well to the weather, as long as you install them properly and keep them from standing in water often. Another "strength," for this project at least, is that they gray up fast, so my shed should have the weathered look I wanted quickly. If they start deteriorating too fast, I can always stain them a translucent gray to help preserve them. I talked it over with my brother-in-law Roy Howard, a master carpenter who has built some amazing buildings. His chief concern about using cheap lumber is that it wouldn't contribute to the stability of the building like hardwood or even T1-11 paneling does. He recommended angle braces at the corners as a safety measure. I haven't done that (yet), but since I overengineered nearly every other aspect of the thing, I'm probably safe. Another concern was that the classic board-and-batten structures usually used 8" or 10" boards. If I used 5.5"-wide fence boards, only about 4" of board would be exposed between the battens. Would that be enough to give the effect?
Most pressure-treated dog-eared fence boards are only 6' long, but Lowes had them in 8' lengths as well, so length wouldn't be a issue, either. I decided to forge ahead with the fence boards. BTW, lots of "git-er-done" types in my areas use boards rescued from shipping skids for similar projects, so - say what you will - my fencing boards will be a step up from that. Plus these boards are pressure treated and more consistent in dimension than skid boards. But if you want to use repurposed skid boards for a similar project, don't let me stop you. Door ChoicesInitially I had considered using an old coal-cellar door we brought from the old house, but eventually, I decided the shed needed a more substantial door. Fortunately, we had one on hand. When we put our old house on the market, the windows on the old steel back door had clouded up, so it looked bad. We replaced that door with a new steel door in the same configuration. Of course, the new steel door came "pre-hung," but I reworked the old, installed frame to accept the new door. That left us an old door with a new frame. We brought both to the new house with the notion that they may come in handy. The old kitchen door had opened inward, but on the shed it would need to open outward. So I decided to turn the frame backwards when I installed it. I added a little framing around it to attach the whole thing more securely to what would become the south wall of the shed, and did a lot of skootching things around to try to make it open and close reasonably well. As you can see, one advantage of having the roofing underlayment on by the time I did this was that I could do at least some of the work while it was sprinkling outside.
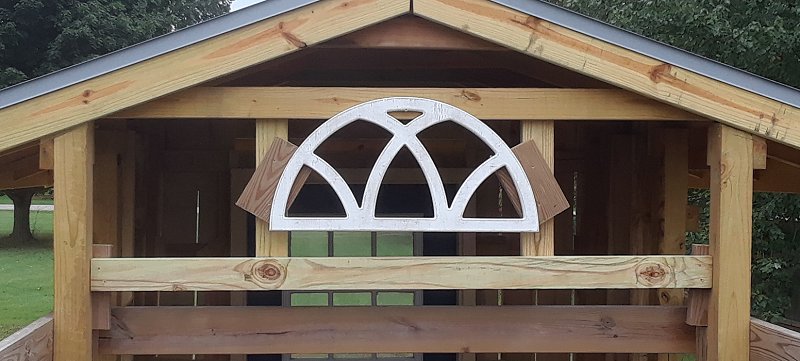
In case you wondered, the blue side used to face outward, and the white side faced the kitchen. I will probably paint at least the white side eventually - it's too bright compared to the rest of the structure. Window ChoicesBecause I wanted the shed to resemble a 19th century country station, I had been looking for arched windows I could afford. Unfortunately, "real" arched windows that are made to put in houses cost a great deal of money. And even at that, they were all far too large for the scale of my building (about half as high and a sixth as long as the real stations I was emulating).I had often seen fake windowframes used as decorations. Hobby Lobby sells them from time to time. But the ones that caught my eye this year were made in Mexico and sold by a vendor who comes twice a year to the big "Springfield Extravaganza" antique flea market held in the fairgrounds of Clark County, Ohio. When I brought them home, I put a spike in the existing framing just so I could hang them about where they would go, and get a general idea whether they would work for me or not. I liked the look. My family liked the look. My Facebook followers liked the look. Okay, I'd figure out how to make it work. The north end of the train shed overlaps the railroad itself, so the wall is only about 4' high at its peak. I had a small 6-pane rectangular window that I considered using - I had actually pulled it from the house we live in now when I renovated the back entrance and thought it would be cool to use on this structure. But when I held it in place, the rectangle just looked wrong compared to the windows that would go on the side.
Except for the overly bright white color, I liked the look. My family liked the look. My Facebook followers liked the look. Okay, I'd figure out how to make it work. Preparing to SideThe truth is, I held off selecting siding material until I couldn't wait any longer, hoping something better, but affordable, would turn up. But one thing was certain, the boards would need to be supported every 30" or so. The siding was going to go up and down, and most of my framing was also up and down, so I needed to add something to nail the boards to.In typical pole barn installations, which this construction resembled, they need to support sheet metal siding running up and down. So they nail several rows of boards horizontally all around the outside of the frame, meeting up at the corners. That would have worked for me, but I had an abundance of scrap 2"x4"s and other wood on hand and didn't want to spend a bunch more money on wood this week. So I braced a bunch of 2"x4" pieces in between the existing frame posts.
In the photo, you'll also be able to tell that the post to the right of the door had seriously warped since I installed it last year. Another reason to do everything in one season if possible. I added similar cross-pieces to the other three sides of the structure as well. Windowframe Installation Considerations"Real" windows you buy are designed to be set into the wall, even if part of the frame seems to be flush with or protruding from the wall surface. At first I thought about trying to set these into the walls of my shed, trimming the boards around them. But I finally decided that it would make more sense to cut a gap just big enough for the open part of the window and screw the windowframes over the boards. So I did a little more framing where the windows would go so there would be something to sink the screws into besides the siding boards.
If you compare this photo to the second photo above this one, you'll see one of the cross-pieces I added here as well. Windowframe PaintingNot only did I need to have all three windowframes the same color, I wanted them to have a weathered look that would look right with the pine boards as they grayed up.I lightly sanded all three windowframes by hand. The "paint job" on the skinny windows almost completely disappeared with just a couple minutes' sanding. Again, the colors had been applied lightly to look weathered, and the white had been chalking off on everything it touched anyway. Shelia uses Annie Sloan "chalk paint" for some of her projects, and I thought the brownish-gray look of the Annie Sloan "French Linen" (below left) would make a good base for the repaint. After the second coat had dried, I went looking for an off white that I could dry-brush over the gray to give a weathered look. As it turned out, Shelia had a dab of Annie Sloan "Old Ochre" left over from a project. It looks like faded yellow paint, but could stand in for white paint that had dulled. I dry-brushed it over the windowframes (below right).
Walling Off the "Fourth Wall" By the way, opposite the door on the shed, there was a gap below the right of way open to the area under the railroad itself. With all the wildlife we have currently living under our house's porch, I didn't want wildlife moving into the train shed, too. By the way, opposite the door on the shed, there was a gap below the right of way open to the area under the railroad itself. With all the wildlife we have currently living under our house's porch, I didn't want wildlife moving into the train shed, too.
By now, I had accumulated a bunch of short lengths of 2"x6" ground-rated boards. So I cut them to fill the gap in the wall. By the way, that hasn't deterred a very determined vole from taking up residence under the porch itself. Every time I walk out to the train shed, I see a little black shadow running from the garden to take shelter under the shed's porch. As opposed to the massive groundhog that runs from the garden to take shelter under our house's porch. Along with the foxes. But that's another story. ConclusionAs of this writing, I have the board-and-batten siding installed, and more. But this article was getting long enough. The next article will give you an idea of how things came together, so stay tuned.As always, if I've helped you get any ideas at all for your next garden railroad construction, I will consider the time it took to document all of this time well spent. Best of luck, all, Enjoy your hobbies, and especially enjoy any time you can spend with your family in the coming season. Paul
By the way, going over lumber receipts in early 2019, I couldn't believe I was still siding the train shed in late October, 2018 and managed to have an open railroad in mid-November. It is a little crazy how fast things can go together if you have a deadline and a lot of gift cards.
Now the roof is waterproof enough to get us through the next couple of months at least, maybe more.
I thought about bringing in helpers for this part, but a reader commented on how helpful it was to see how one person could do this sort of thing by himself, so I just kept plugging away. Click on the photo to see our progress as of September 13, 2018
Click on the photo to see our status as of August 5, 2018.
The way we got the rafters and ridge board up wouldn't work for everybody, but it worked for us, and hopefully will help other folks to "think outside the box" - literally in this case. Click on the photo to see our progress as of July 14, 2018.
Click on the photo to see our status as of July 9, 2018.
Click on the photo to see our progress as of June 13, 2018.
Click on the photo to see our status as of June 1, 2018.
Click on the photo to see our status as of February 20, 2018
Click on the photo to see our status as of February 20, 2018
Click on the photo to see our status as of November 21, 2017
Click on the photo to see our status as of October 25, 2017
Click on the photo to see our status as of October 15, 2017
Click on the photo to see our status as of October, 10, 2017
Click on the photo to see our status as of September 26, 2017
Click on the photo to see our status as of September 17, 2017
Click on the photo to see our status as of September 7, 2017
Click on the photo to see our status as of August 10, 2017
Click on the photo to see our status as of the end of July, 2017
Click on the photo to see what we were considering as of late May, 2017
Click on the photo to see what we were considering as of late April, 2017
Click on the photo to see what we were considering in early April, 2017
Click on the photo to see what we were considering in March, 2017
Click on the photo to see the home page of Paul's railroad.
|


|

Note: Family Garden Trains?, Garden Train Store?, Big Christmas Trains?, BIG Indoor Trains?, and BIG Train Store? are trademarks of
Breakthrough Communications (www.btcomm.com). All information, data, text, and illustrations on this web site are
Copyright (c) 1999, 2000, 2001, 2002, 2003, 2004, 2005, 2006, 2007, 2008, 2009, 2010, 2011, 2012, 2013, 2014, 2015, 2016, 2017, 2018 by
Paul D. Race. Reuse or republication without prior written permission is specifically
forbidden.
Family Garden Trains is a participant in the Amazon Services LLC Associates Program,
an affiliate advertising program designed to provide a means for sites to earn advertising
fees by advertising and linking to amazon.com.
For more information, please contact us
 |  |
| Visit related pages and affiliated sites: | |||||
| - Trains and Hobbies - | |||||
|  |
|
 |
|  |
 |

|

|  |
|

|
| - Christmas Memories and Collectibles - | |||||
 |

|
 |

|

|
|
| - Family Activities and Crafts - | |||||
 |

|

|

|

|

|
| - Music - | |||||

|
 |
 |

|

|

|

|

|

|

|

|

|

|

|

|

|

|

|


 neither T1-11 nor LP are as maintenance-free as their manufacturers would have you believe. (Go onto Craig's List and look at those 10-year-old backyard sheds if you don't believe me.) So investigating materials that might also require maintenance didn't exactly put me off.


 Proceed to "Adding a Train Shed Part 6"
 Return to "Adding a Train Shed Part 3"
 Return to "Waterscaping Part 2"
 Return to "Adding a Train Shed Part 2"
 Return to "Adding a Train Shed Part 1"
 Return to "Waterscaping the NEW New Boston and Donnels Creek Part 1,"
  Return to "Dirtscaping the NEW New Boston and Donnels Creek RR, Part 2.
 Return to "Adding Raised Roadbed to the NEW New Boston and Donnels Creek, Part 2"
 Return to "Adding Raised Roadbed to the NEW New Boston and Donnels Creek RR, Part 1"
 Return to "2018: Springing into Spring on the NEW New Boston & Donnels Creek RR."
 Return to "Dirtscaping the NEW New Boston and Donnels Creek RR, Part 1.
 Return to "Decking the NEW New Boston and Donnels Creek RR
 Return to "Framing the NEW New Boston and Donnels Creek RR, Part 6"
 Return to "Framing the NEW New Boston and Donnels Creek RR, Part 5"
 Return to "Framing the NEW New Boston and Donnels Creek RR, Part 4"
 Return to "Framing the NEW New Boston and Donnels Creek RR, Part 3"
 Return to "Framing the NEW New Boston and Donnels Creek RR, Part 2"
 Return to "Framing the NEW New Boston and Donnels Creek RR, Part 1"
 Return to "Breaking Ground on the NEW New Boston and Donnels Creek"
 Return to "Planning the NEW New Boston and Donnels Creek, Part 4"
 Return to "Planning the NEW New Boston and Donnels Creek, Part 3"
 Return to "Planning the NEW New Boston and Donnels Creek, Part 2"
 Return to "Planning the NEW New Boston and Donnels Creek, Part 1"
 Return to the New Boston and Donnels Creek RR Page
 Return to Family Garden Trains' Home Page