| |||
 |
 |  | |
 |
 | ||
 |  | ||
 |  | ||
 |  | ||
| |||
|
|
| | |
|
|
| ||
| | ||
| | ||
| | ||


|
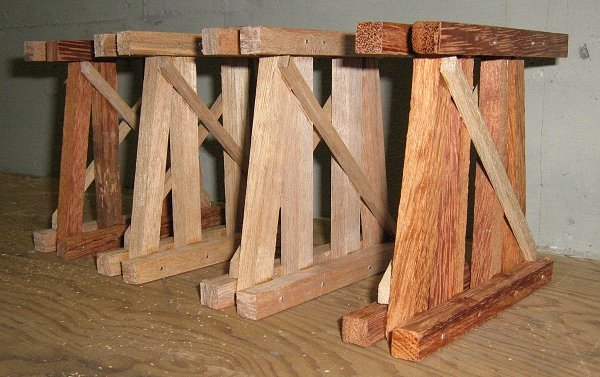
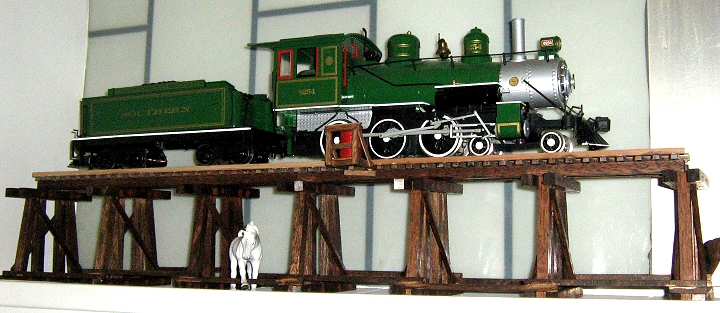
Editor's Note: Rod is an Australian currently stranded in the godforsaken wilderness of Middletown, RI. He got interested in Large Scale about the time he headed "up over." So he's diverting his energies to things he can display indoors now and may be able to use outside one day. - Paul Rod Horsburgh's Windowsill TrestleI have spent many an hour sitting on my porch imagining a garden railway in my front yard. Although I model in N gauge, I get sidetracked easily. I wanted to enter the Garden Railroading hobby by constructing a trestle which would serve as a diorama, similar to that advertised in Garden Railways Magazine by St. Aubin Trains. The trestle would sit in my office while I was in the US on a three year overseas military posting.I conducted an Internet search for trestles and found Paul�s excellent website and "Trestles 101" article. After repeated readings of the article, I decided to stop procrastinating and jump straight in. Planning and Making the Bents
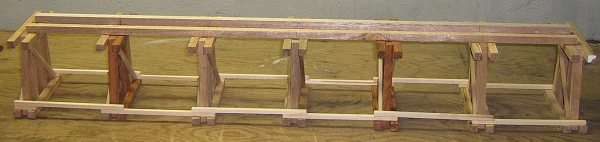
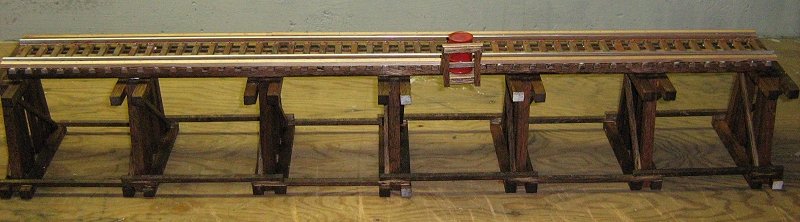
I had some more garden stakes and I wanted to use them for the bents. In hindsight, this is not a good idea because even though it makes a good story, the wood was not straight. When these ran out, I subsequently used �� by �� hardwood dowel purchased from The Home Depot. I started with the cap and the posts. Ensuring the posts were 45mm apart, When I finally got into a routine, I found I could manufacture one bent in three nights spending no more than 10 minutes per night. To make the sway braces I used �� by �� dowel. I glued these to the uprights based on the photo on the article. I subsequently went back to Paul�s article to find that this was not prototypical. I figured not too many people would realize it anyway, so I completed all subsequent bents like this. On completion of every bent, I used a torpedo level to ensure that the bent was level. With the bents assembled I drilled holes with a small drill and hammered in #17 x 1� wire brads. I was worried about the wood splitting but had few instances of this, none of which were serious. Attaching the StringersI purchased some aluminium flextrack from Sunset Valley Railroad. I based the length of the trestle around this length (3 ft) as the size fit well with a window ledge where I would eventually display the model. I had previously used the calculations from the website to determine spacing of the bents (equal to the height of the bent) and hence the number required. The dowel I bought from Home Depot was exactly the length of the flextrack. I spaced the two end bents apart then glued the stringer to the caps of the bents.
When the glue had dried I filled in the gaps with the other bents, using the torpedo level and machinist square to ensure that the structure was square, level and had no tilt. When this was complete, I glued cross connections to the bottom sills of the bents.
Staining the TrestleI bought a spray bottle and filled it with MINWAX Walnut Wood Finish. I figured the spray bottle would penetrate the joints and provide good protection if the trestle ever found itself outside. Over four nights I would spray the entire model then turn it 90 degrees and do it again the following evening.
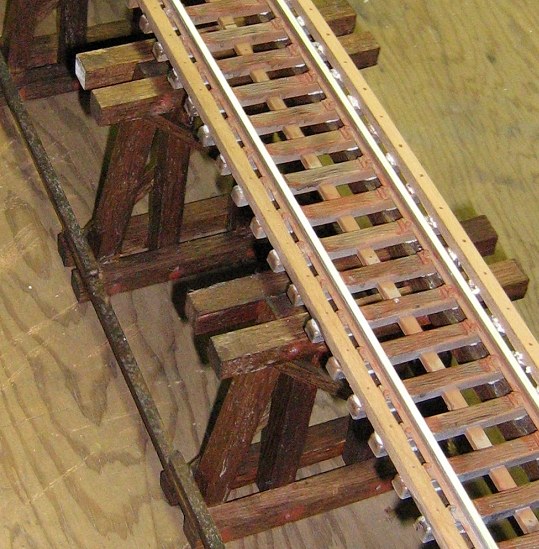
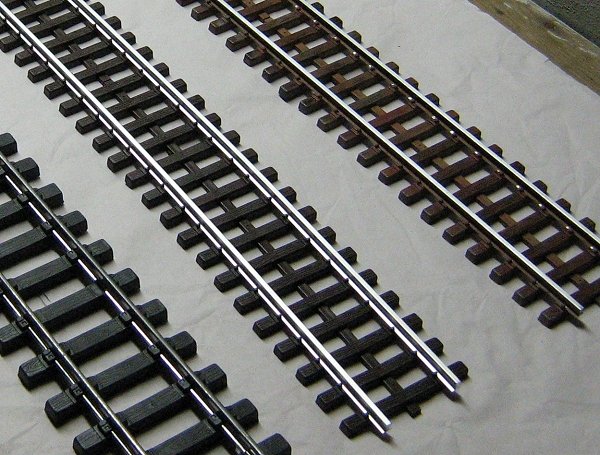
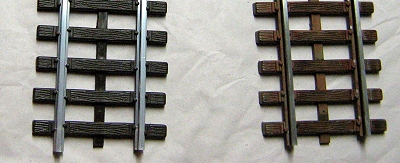
Weathering and Attaching TrackFew things look worse to me in a "diorama setting" than unweathered track. Yet few things are as easy to do as weathering track. The flextrack from SVRR was the mainline version as I thought it looked better on the trestle with the ties spaced closer than the narrow gauge version. I started by washing the track with dishwashing liquid in our kitchen sink (much to my wife�s disapproval) to remove any grime that may affect the paint job. [Editor's note: Virtually all plastic and vinyl products arrive with an imperceptible oil film from the manufacturing process, plus oil and acid from the fingerprints of anyone who handled the product for shipping, so you should always clean plastics with a grease-cutting product before painting. I use Fantastic and a soft cotton dishtowel myself, but the principle is the same. - Paul] The following evening, I used a spray can of Testor�s Primer to coat the track. I did one sweep on one side at an angle of about 30 degrees, one sweep on the other side at 30 degrees, then one directly sweep over the top. I tried using Windex on a cotton bud to clean the top of the rail but found that the paint dried too quickly. The following evening, I covered the track with a spray can of Testor�s Light Earth using the same method as described above. Then, using a technique that George Sellios described in an article in Model Railroader, I painted individual ties Burnt Sienna and Dark Sienna - alternating at random. Noticing that the ties had lines moulded into them, I mixed black with thinner and brushed it onto the ties.
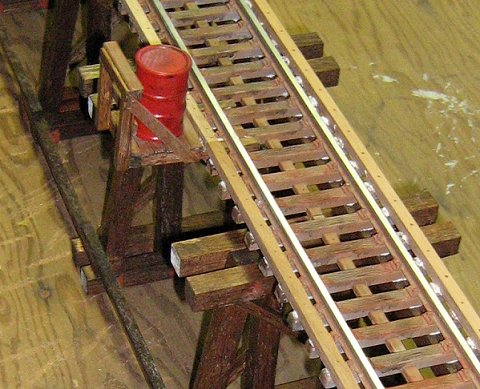
Water Barrel PlatformNo trestle seems to be complete without one of those little platforms with the barrel on it. The barrel, I believe, was full of water in case the creosote soaked wood caught fire. It also provided a refuge for anyone caught on the trestle when a train came along. I figured that the platform would measure around one metre all around. I used �� by � � dowel to make the frame. I then cut strips out of Forster�s Skinny Sticks which I purchased from Michaels and used this for the deck of the platform and the supports, scraping the ends with a hobby saw to get that rotted look. I purchased some 44 gallon drums off ebay, primed them, painted them Chrysler Engine Red and gave them a good weathering by drybrushing them with black paint. I glued the ends onto the ties and the stringers and glued an offcut perpendicular to the stringer for added strength. Be careful about how far out the platform sits. Narrow gauge rolling stock overhangs the track significantly and you should check for adequate clearance before attaching this part of the structure.
ConclusionNone of the methods used here are particularly sophisticated and many are the result of years of �armchair modelling�. This project has allowed me to use techniques I have used in the past, plus new techniques such as working with wood. Whilst the finished product has taken some time to complete, it represented no more than about 10 minutes per evening � not enough time for my family to take umbrage at the commitment - and allowed me to exercise my creative talents but still leave me eager to continue with the project the following evening.
If you have any comments or questions about this project, contact Paul and he will forward me your comments.
|

|

| 
|
 |
 |
|
 |
 |
Note: Family Garden TrainsTM, Garden Train StoreTM, Big Christmas TrainsTM, BIG Indoor TrainsTM, and BIG Train StoreTM are trademarks of Breakthrough Communications (www.btcomm.com). All information, data, text, and illustrations on this web site are Copyright (c) 1999, 2000, 2001, 2002, 2003, 2004, 2005, 2006, 2007, 2008, 2009, 2010, 2011, 2012, 2013 by Paul D. Race. Reuse or republication without prior written permission is specifically
forbidden.
Family Garden Trains is a participant in the Amazon Services LLC Associates Program, an affiliate advertising program designed to provide a means for sites to earn advertising fees by advertising and linking to amazon.com.
For more information, please contact us

 |  |