You Are Here.
Jump to other pages.
Almost-Free Building lighting Garden Railroading Primer Articles: All about getting a Garden Railroad up and running wellGarden Train Store: Index to train, track, and other products for Garden Railroading
Large Scale Starter Sets: Begin with a train you'll be proud to runBest Choices for Beginning Garden Railroaders: a short list of things you're most likely to need when starting out
Large Scale Track order Form Sturdy buildings for your garden railroad.
Large Scale Christmas Trains: Trains with a holiday theme for garden or professional display railroads.Free Large Scale Signs and Graphics: Bring your railroad to life with street signs, business signs, and railroad signs
Garden Railroading Books, Magazines, and Videos: Where to go to learn even more
Collectible Trains and Villages: On30 Trains and accessories designed by Thomas Kinkade and others

Written by Paul D. Race for Family Garden Trains

Click to sign up for the 'Trains-N-Towns<sup><small>TM</small></sup>' newsletter, with articles about display villages, indoor railroading, and much more


Almost-Free Building Lighting

Click or scroll down for bigger photo.
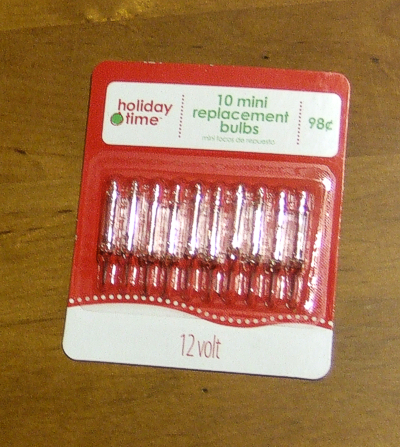
This project uses inexpensive and salvaged supplies to create 12-volt lighting options for your buildings. The only part you have to buy is a package of 12-volt replacement bulbs for Christmas lighting strands. I got mine at WalMart near the shelves with the Christmas lights. They are also available online, although shipping costs will far exceed the cost of the bulbs.

Click or scroll down for bigger photo.Click or scroll down for larger photo.Other supplies are: a discarded Christmas light strand, and - possibly - a 12-volt power supply from a discarded electronic device.

I started using 12-volt garden lighting to light my garden railroad buildings some years back, but many folks had trouble finding the "wedge" sockets they needed to follow my example. This solution is better in several ways:

  • The materials are even cheaper, especially if you use discarded Christmas light strands and power supplies.

  • Because the lights are so cheap, you can distribute lighting throughout a large building for more even lighting.

  • The lights aren't as bright as the garden lighting bulbs, so your buildings are less likely to have a radioactive glow.

By the way, if you're using this for indoor buildings (with a recycled 12volt power supply), this solution will tend to be cheaper and require less power than either the 18-volt solutions sold to model railroaders or the 110-volt night-light-style bulbs sold to ceramic village owners.

What You Need
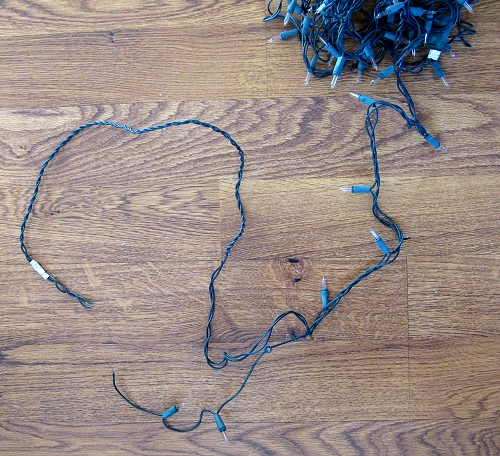
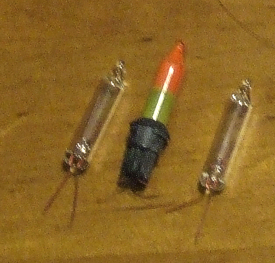
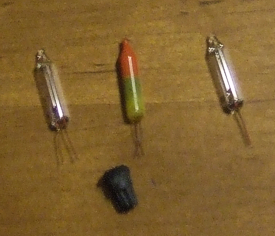
  • Click for bigger photo.12-volt Replacement Christmas Lamps - I got mine at WalMart for 99 cents a pack just before Christmas. They also sell 1.5, 3, 4.5, 6, and 9-volt versions, so be sure to get the voltage you need. I am used to 12-volt lighting circuits and have a good collection of 12-volt power supplies, so that's what I use. But if you have some other consideration, such as a Lemax indoor building lighting system that uses a 3-volt power supply, you may want to choose a different voltage. Just remember, you can't mix-and-match voltages the way you can wattages. A 3-volt lamp on a 12-volt circuit will burn out so fast, you'll be lucky if it doesn't explode.

    Note - Because these are considered seasonal merchandise, this may be the hardest part to find most of the year, so, when you see them, stock up.

  • Click for bigger photo.Defective Christmas Incandescent Light Strand - This is the kind almost everybody used for most of the last 40 years, with 12, 24, 35, 50, 60, 75, or 100 little lights wired in series and the false claim on the package that "if one goes out the others stay lit." LED strands will not work for this project.

    We've already published an article on how to get free project wiring from these strands. For this project, we'll use some of the sockets as well.

    Note: For this project it doesn't matter how many lights were on the original strand - you're replacing the lights anyway. If you had a strand with only 10 lights though, those are twelve-watt bulbs already, so you don't even need to replace the bulbs.

  • Honestly, do you really need to see a bigger picture of this?12-Volt Power Supply - You don't have to have one for this project, especially if you're planning to light outdoor buildings using a Malibu-style 12-volt lighting system. But it makes testing your circuits easier, and it lets you use 12-volt lighting for indoor display and model buildings instead of, say 110volt night-light-style lighting.

    By the way, never throw away a power supply, especially a 12v DC power supply. You know what I mean, those heavy black things you get with every elecronic device you purchase. Most of them are "wall warts," which means that they consist of a box with plugs sticking out for plugging directly into the wall socket (like the photo to the right). The other end is always some sort of goofy plug that never fits anything else you own (or if it fits, it's polarity is wrong so it will blow things up anyway). But that's okay, for lighting buildings you don't need the plug anyway.

    Most of these are marked with warnings not to use them outside. I don't usually, but I've came across a few that were meant to be used out of doors, including recharging units for battery-powered grass clippers and the like. The "inside only" versions get used indoors 99% of the time. But for special, temporary setups, one or more that don't have vents may get plugged in in a sheltered location (like the garage) and the 12-volt DC line run outside to wherever the power is needed.

About the Shapes of the Bases and Bulbs

You'll notice that the base shape of the lights varies among brands, or even year-to-year in the same brand. But the shapes of the lamps are usually more-or-less the same, as you can see in the pictures below. Yes, for this project I cut up a defective Halloween light strand, but the principle is the same as long as it's an indcandescent strand.

Click for bigger photo. Click for bigger photo.

How to Do It

  1. Select a socket to start with from your light strand. You want the leads from each socket to be as long as possible, so cut the wires off at the next socket on either side.

  2. Remove the light from the socket.

  3. Find the little wires sticking up on each side of the base. Fold them down and pull the lamp out of the base.

  4. Replace the lamp by making sure the little wires from the new lamp feed through the holes in the base.

  5. Fold the little wires up the way the other ones were, and stick the light back into the socket. To have both hands free to take this photo, I used electrical tape to hold the wires in contact with the plug on my power supply.  Click for bigger photo.

  6. If you want, you can test the assembly with a 12-volt power supply.

  7. After installing your lights, you can connect them to your power supply by using project wire (or lamp cord) and Twist-on wire connectors will work fine for most low-voltage lighting applications.
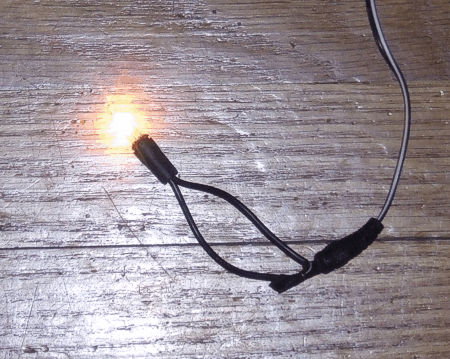
twist-on connectors (like the ones in the photo at the right).

    If you want to make a more permanent connection, you can solder the leads from each socket to longer wires. Our article on 12 Volt Street Lamps from Specialty Light Strands has some tips on soldering lamp or project wire for 12 volt system.

Notes on Series Versus Parallel Wiring

Though you started with a light strand designed for series wiring, the lighting system you will be creating in this project will need parallel wiring to work with your 12-volt power supplies. In case they forgot to teach this in your elementary school science class, here's a quick breakdown of the differences.

Click for bigger photo.Series Wiring - On the original light strands, electricity has to pass through more than one light. On most Christmas light strands under 50 lights, the electricity has to pass through every light in the strand.* Each light you add to the circuit adds more resistance, reducing the voltage available to each light. This is series wiring. The advantages of series lighting circuits include:

  • Series wiring uses less wire than parallel wiring.

  • Series wiring lets manufacturers use cheap, low-voltage bulbs on a 110/120-volt circuit without requiring a transformer. To figure the voltage each bulb in a series Christmas light strand can handle, divide 120 by the number of bulbs in the circuit. For a 35-light strand, the voltage is 120/35 or about 3.4 volts.**

    For this kind of project, a friend used to look for 10-light strands, which used 12-volt bulbs already (120/10). But with the availability of cheap 12-volt replacement bulbs, this isn't necessary.

The most important disadvantage of series wiring is that if one bulb is removed, all the lights go off. Another disadvantage for model railroading or similar uses is that you can't add or remove lighting without having an effect on the rest of the lights in the system. If you add an extra light by splicing it into a series system, it adds more resistance and every bulb in the system gets less electricity than it did before. Conversely, if you remove a light and splice the gap back together(maybe because you're moving a bulding), there is now less resistance in the circuit, and every bulb gets a bit more electricity - potentially more than it was designed to handle.

Click for bigger picture.Parallel Wiring - In parallel wiring, electricity only passes through one light before it returns to the power supply. Both lines from each socket must find their way to twelve-volt service for the lights to work properly.

Advantages of parallel lighting circuits include:

  • If one light is removed, the rest stay lit.

  • The amount of voltage to each bulb remains the same, no matter how many lights you have in the circuit, unless you're beginning to strain the power supply (not recommended).

Disadvantages might include the fact that you need a low-voltage power supply, since you can't rely on a bunch of lights in a series to bring 110/120 volt current down to a safe level for your bulbs. Of course, if you have lighting in your garden, you probably already have a 12-volt power supply anyway. And if you don't, they're easy to come by.

What About The Accessory Line on My Model Train's Power Supply?

Most model railroad power supplies have terminals you can use to power things like street lamps. Unfortunately, you can't use this kind of system with those, since the power supplies typically give off 18 volts, and the highest voltage bulbs you can get for this kind of Christmas lighting are 12 volts. You could wire two nine-volt bulbs in a series, which would enable the pair of them to survive an 18-volt system, but that gets complicated in a hurry.

How Do I Mount the Bulbs?

Since you're dealing with a low-voltage bulb that isn't going to get very hot, the main thing is to keep it from laying right against something flammable. One method, if your building is wood, would be to staplegun the wires to a wall or ceiling in such away that the socket holds the bulb out away from the wood. For temporary applications, I suppose you could use duct tape the same way, but I wouldn't trust that to hold up long-term, especially outside.

Other Uses

Once you have figured out how to get a boatload of 12-volt lighting circuits for only a few dollars, you will come up with other applications. For example, my friend Wil Davis adds external lighting to his buildings using bulbs similar to these (though smaller),

Personally I like the approach of each building having internal and external lights if possible. The lights are wired in parallel, with the wires spliced together to a single line that you can route back to the power source (or a 12-volt garden lighting circuit). Long before I wrote this article, I did this by using buildings with attached sidewalks that I could add lampposts to, as well as fastening a socket inside the building. One friend makes plexiglass bases for his buildings that include "sidewalks" he can fasten his lampposts. By lighting a building at a time, you create a system that allows you to hook up or unhook a building by connecting a single pair of wires. The extra lighting will make your railroad or Christmas village look that much more magical, and you will stay saner during installation and brea kdown.

Conclusion

In past years, one big holdup to properly lighting buildings was the cost of the little bulbs and sockets made for the purpose - a $3 setup to add one 12 volt light is typical. When I found a source for wedge sockets so I could use garden lighting bulbs, that was better, but not everybody has access to those builbs. The solution in this article uses mostly scrap materials and cheap supplies that, with a little imagination, can be as flexible as you would like.

If you try out something similar and have any feedback at all, please get in touch and let us know what works and what doesn't work for you.

Above all, enjoy your trains, and any time you have with your family in the coming months.

*Strands over 50 lights often have two sets of series wiring - that's why half of the strand can go out while the other half is still going.

*Strands over 50 lights often have two sets of series wiring. So a strand of 60 might have two discrete circuits that handle 30 bulbs each. That's why replacement lamps for a 60-bulb strand might be the same as the replacement lamps for a 30-bulb strand - the strand is electrically equivalent to two 30-lamp strands.


Visit our Garden Train Store<sup><small>TM</small></sup> Starter Set Buyer's Guide


TM Buyer's Guide Pages">


Click to see sturdy, weather-resistant buildings for your garden railroad.


Home Pages
Reading Index Pages
Buyer's Guide Pages
Return to Family Garden Trains Home page Return to Big Indoor Trains Home page Garden Railroading Primer Articles: All about getting a Garden Railroad up and  running well Big Indoor Trains Primer Articles: All about setting  up and displaying indoor display trains and towns. Garden Train Store: Index to train, track, and other products for Garden Railroading Big Christmas Trains: Directory of Large Scale and O Scale trains with holiday themes
On30 and O Gauge trains to go with indoor display  villages and railroads


Note: Family Garden TrainsTM, Garden Train StoreTM, Big Christmas TrainsTM, BIG Indoor TrainsTM, and BIG Train StoreTM are trademarks of Breakthrough Communications (www.btcomm.com). All information, data, text, and illustrations on this web site are Copyright (c) 1999, 2000, 2001, 2002, 2003, 2004, 2005, 2006, 2007, 2008, 2009, 2010, 2011, 2012, 2013 by Paul D. Race. Reuse or republication without prior written permission is specifically forbidden.
Family Garden Trains is a participant in the Amazon Services LLC Associates Program, an affiliate advertising program designed to provide a means for sites to earn advertising fees by advertising and linking to amazon.com.


For more information, please contact us

Click to see exclusive, licensed Major League  Baseball(r) train and village collections!

Click to see new and vintage-style Lionel  trains.
Click to see new and vintage-style  Lionel trains

Click to see collectible  Christmas villages and trains.