Into the Woods - A Garden Railroad in a Public Forest
When my sister asked if I wanted to see a garden railway built by one of her friends, I jumped at the opportunity and the only question I asked was �When can we go?�. I live in Idaho, and I wanted to see what a garden railway in New England looked like, so when I went to visit her I had my chance. My sister made the arrangements with her friends and railroad barons, Jim and Evelyn Metcalf, to see their layout right after my wife and I were scheduled to arrive in Boston. As it so happened, a close railfan friend of mine came up to visit me the same day, so we all went into the Metcalf�s house in Needham and immediately went down into a spacious basement workshop and then out into their back yard. The problem was, there was no railroad in their well-manicured lot, and I didn�t see any signs of railroad tracks as we walked to the edge of the back yard and into the city-owned forest preserve.
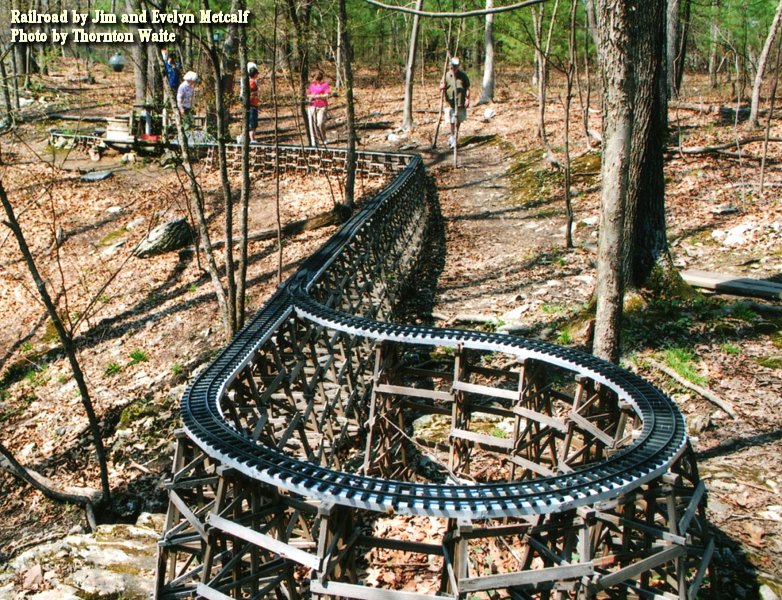
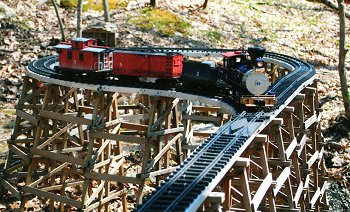
 We went through the forest along a path marked by small birdhouses mounted on the trees along the path. After a short walk, during which I wondered how and where there could possibly be a garden railway, we came to elevated tracks in the middle of the forest. Built on a trestlework with loops at both ends, the tracks extended over 150' over the trestles. There were also a table, benches, some wooden boxes, and other accessories near one end of the layout. We had reached The Depot at Martini Junction. We went through the forest along a path marked by small birdhouses mounted on the trees along the path. After a short walk, during which I wondered how and where there could possibly be a garden railway, we came to elevated tracks in the middle of the forest. Built on a trestlework with loops at both ends, the tracks extended over 150' over the trestles. There were also a table, benches, some wooden boxes, and other accessories near one end of the layout. We had reached The Depot at Martini Junction.
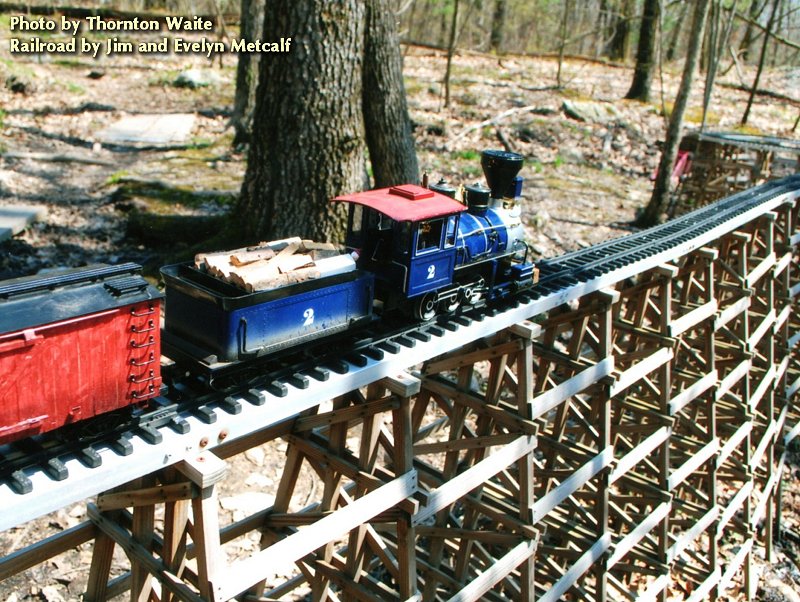
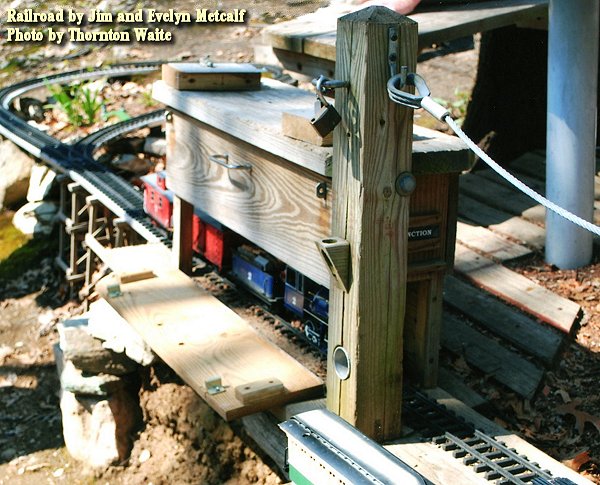
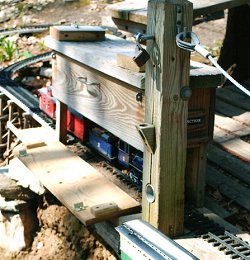 Jim unlocked the wooden box on the tracks to reveal the locomotive in service at the time, and unlocked another wooden box above the tracks to take out a freight car and caboose which he placed on the tracks behind the locomotive to make up the train. Since he is in the middle of a forest, there is no electrical power and the train is battery-powered. He slipped the final battery, which he always removes, into place in the tender, turned on the locomotive light with his radio control, and the train was off. The train made a full loop, traveling through the spring switches on both of the loops, ending up in the starting position after running the full length of the layout. Jim unlocked the wooden box on the tracks to reveal the locomotive in service at the time, and unlocked another wooden box above the tracks to take out a freight car and caboose which he placed on the tracks behind the locomotive to make up the train. Since he is in the middle of a forest, there is no electrical power and the train is battery-powered. He slipped the final battery, which he always removes, into place in the tender, turned on the locomotive light with his radio control, and the train was off. The train made a full loop, traveling through the spring switches on both of the loops, ending up in the starting position after running the full length of the layout.
The Scientific Toys locomotive is inexpensive, travels at only one speed, and is reliable. The radio-controlled locomotive also makes the appropriate sounds and puffs out smoke. The cars are kitbashed, and can be rotated from the cars stockpiled in Jim's basement workshop. Jim's current interest is in making cars using wood coffee stirrers. Since the train runs in Needham, Massachusetts, it is only logical that one of his favorite freight cars is one with the New Haven logo on it.
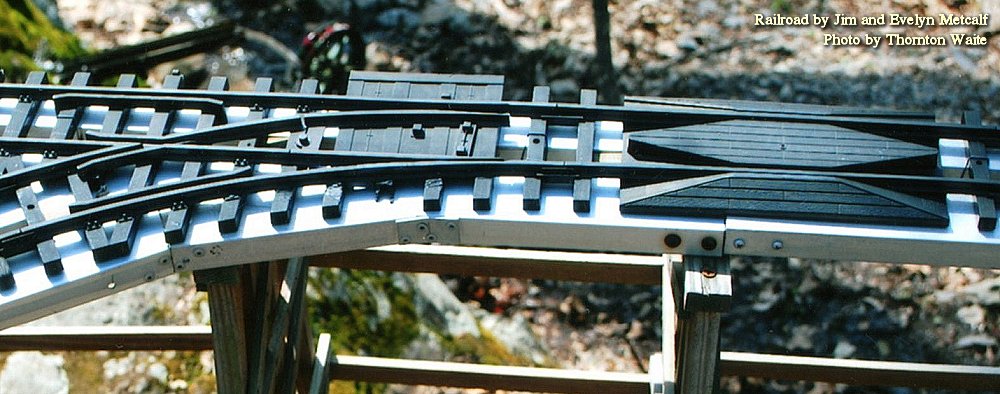
 The train is elevated, on wooden bents forming a long trestle supporting the track. This allows the tracks to remain level while running over the rough terrain and so that he doesn�t always have to bend down to work on the track and train. The bents are made using treated wood, with legs about 5/8" square, and they are sturdy enough to withstand the snow and trains. Jim has treated the wood with water seal every few years to help preserve it. The train is elevated, on wooden bents forming a long trestle supporting the track. This allows the tracks to remain level while running over the rough terrain and so that he doesn�t always have to bend down to work on the track and train. The bents are made using treated wood, with legs about 5/8" square, and they are sturdy enough to withstand the snow and trains. Jim has treated the wood with water seal every few years to help preserve it.
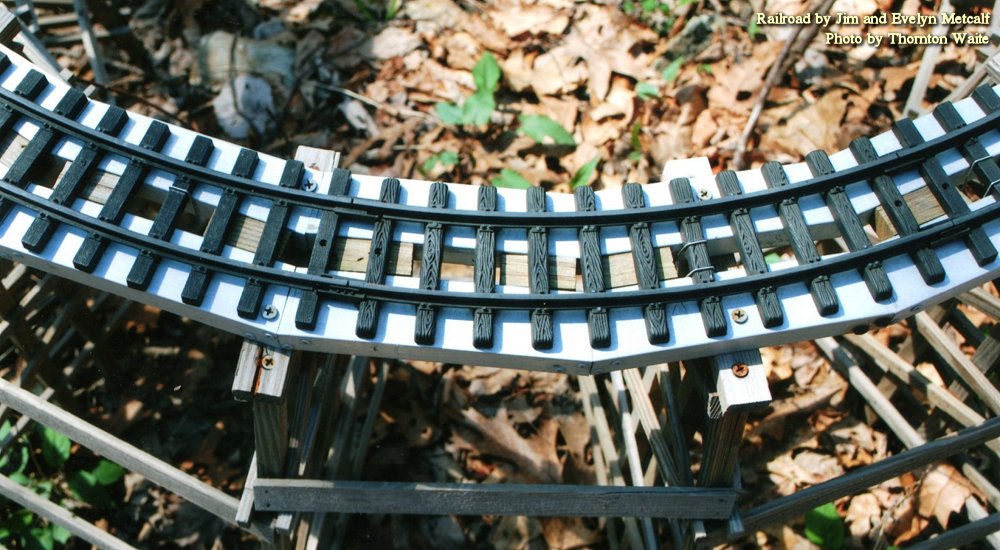
When the line was being built Jim happened to have some metal wall studs, which he cut and used (below) to both join the wood bents together and to support the track. He cut the bents to adjust to the rocky ground, and they provide a sturdy support, keeping the layout off the ground and easily accessible. Self-tapping screws secure the rail to the metal walls studs, and the metal wall studs to the bents.
 He uses plastic track, such as the kind that came with his locomotive. After all, a battery-powered radio-controlled locomotive doesn't require clean, non-oxidized rails. The only problem that he has had with the rails occurred a while ago when some squirrels decided they liked the taste of the plastic, and ended up chewing two sections of rail. It hasn�t happened since then, and, hopefully, won�t happen again. Jim did develop a tool which is able to spread the rail ends apart without breaking them, so that he was able to replace the damaged rails without any problem. This tool is a piece of aluminum about 1" x 1-1/2" x 0.5" with a �T�-bar. He is able to lever the rails apart by putting the aluminum piece in the rail joint and rotating it with the �T�-bar without damaging the rails. He uses plastic track, such as the kind that came with his locomotive. After all, a battery-powered radio-controlled locomotive doesn't require clean, non-oxidized rails. The only problem that he has had with the rails occurred a while ago when some squirrels decided they liked the taste of the plastic, and ended up chewing two sections of rail. It hasn�t happened since then, and, hopefully, won�t happen again. Jim did develop a tool which is able to spread the rail ends apart without breaking them, so that he was able to replace the damaged rails without any problem. This tool is a piece of aluminum about 1" x 1-1/2" x 0.5" with a �T�-bar. He is able to lever the rails apart by putting the aluminum piece in the rail joint and rotating it with the �T�-bar without damaging the rails.
 The switches on each loop are spring switches, modified from the stock manual switches. With a little work and effort Jim was able to modify the manual mechanism using springs so that they return to their original direction after the train travels through them after going around the loop. The switches on each loop are spring switches, modified from the stock manual switches. With a little work and effort Jim was able to modify the manual mechanism using springs so that they return to their original direction after the train travels through them after going around the loop.
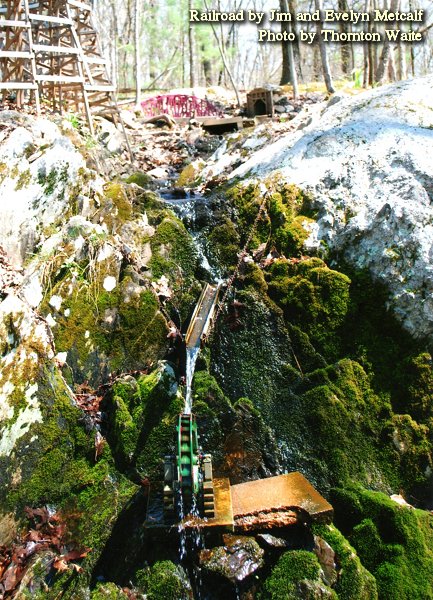
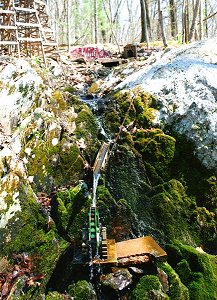 In addition to the elevated track, there is an ill-fated spur line to Wellesley, which had a truss bridge and tunnel built before the construction ended. The bridge crosses over a small lake created by a dam. The dam spillway is funneled onto a water wheel which could be tapped to provide electrical for the train, or so Jim says. The truss bridge on the branch line was used as a template for the bridge on the railroad, which was made from plastic structural pieces and painted. The reason for the end of construction of the Wellesley line may be the fact that the line was headed south, while Wellesley is to the north. Management won�t say what happened, but the line is not connected to his main line, and the tunnel has collapsed. In addition to the elevated track, there is an ill-fated spur line to Wellesley, which had a truss bridge and tunnel built before the construction ended. The bridge crosses over a small lake created by a dam. The dam spillway is funneled onto a water wheel which could be tapped to provide electrical for the train, or so Jim says. The truss bridge on the branch line was used as a template for the bridge on the railroad, which was made from plastic structural pieces and painted. The reason for the end of construction of the Wellesley line may be the fact that the line was headed south, while Wellesley is to the north. Management won�t say what happened, but the line is not connected to his main line, and the tunnel has collapsed.
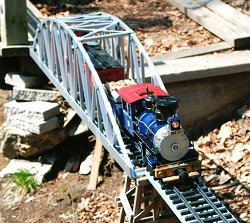 Still in operation is the truss bridge to the left, which Jim built. Still in operation is the truss bridge to the left, which Jim built.
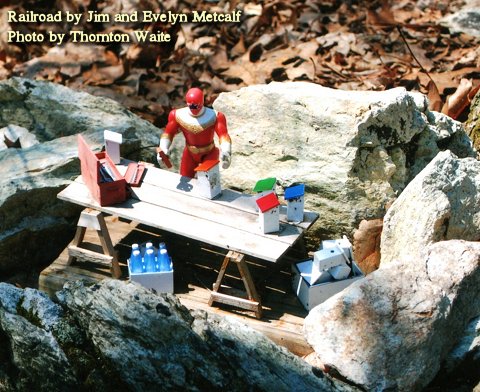
There is a table and benches for visitors who don�t want to walk around with the train and who would prefer to see it from a distance. Drinks at the table are optional, but help provide a relaxing atmosphere. This table was the impetus for the name of The Depot at Martini Junction as well as for the railroad itself, which has been in existence for about ten years.
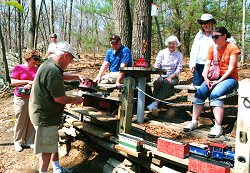 The idea for the layout came from the time Jim and Evelyn set up a table and benches so they could relax from life and the world with a drink in the forest. This idea managed to expand into this forest railway. Jim had always wanted a model layout showing the seasons, and what better way to do it than have one in New England, where all four seasons regularly change the color and weather for the layout. It took several years to complete, but it is a pleasant walk from his workshop and provides a good way to combine the outdoors with his interest in model railroads. The Metcalfs can both go out and enjoy the train in the snow in the winter, in the fall with the fall foliage, in the warm spring weather, and in the summer when the trees provide shade. The idea for the layout came from the time Jim and Evelyn set up a table and benches so they could relax from life and the world with a drink in the forest. This idea managed to expand into this forest railway. Jim had always wanted a model layout showing the seasons, and what better way to do it than have one in New England, where all four seasons regularly change the color and weather for the layout. It took several years to complete, but it is a pleasant walk from his workshop and provides a good way to combine the outdoors with his interest in model railroads. The Metcalfs can both go out and enjoy the train in the snow in the winter, in the fall with the fall foliage, in the warm spring weather, and in the summer when the trees provide shade.
 There are also numerous details and whimsical touches alongside and near the railroad, ranging from a penguin in the pond to a superhero making some more birdhouses for trail markers. Jim has also modified a Playskool caboose which children can use to push over the tracks. The birdhouses used for trail markers are also made by Jim, and since there are several trails in the city-owned forest, each trail is identified by the color of the roof of the birdhouse. There are also numerous details and whimsical touches alongside and near the railroad, ranging from a penguin in the pond to a superhero making some more birdhouses for trail markers. Jim has also modified a Playskool caboose which children can use to push over the tracks. The birdhouses used for trail markers are also made by Jim, and since there are several trails in the city-owned forest, each trail is identified by the color of the roof of the birdhouse.
After our visit to the railroad we went back to Jim�s basement to look over his well-equipped shop. In addition to the spare cars being modified and built, there are several locomotives and the sections of damaged track. Since his train sets are not expensive, he doesn't worry too much about leaving them in the woods away from his house.
Jim has been featured on the local television and in the newspaper. Another of his interests is geo-caching. The site also has more photographs of the railroad.
The visit was enjoyable for all of us, since the railroad management was pleased to show off their line operations and for the author and his wife to see a unique garden railway in the forest.
Note: A visitor has also published a short video of a "run" of the train at http://youtube.com/watch?v=0d3I-RmC5j8. Turn the volume down a little before you start the video - that Scientific Toys locomotive puts out more sound than you'd think.
Here are other articles with tips and tricks about running battery-powered toy trains outside.

Garden Railroading on a Shoe String - Our lead article on "Shoe-String Garden Railroads," with many ideas and links to helpful articles.

Garden Railroading with Toy Trains - For more information about garden railroading with toy trains, including brand descriptions, buying advice, etc., click on the little picture to the right.

Budgeting for a Shoe-String Garden Railroad - Lists potential expenses most folks don't think about ahead of time, along with ways to reduce or skirt them with planning.
Evan Morse's Shoestring Railroading Tips - Things that work for one Shoestring Railroader, mostly about track.

Converting Lionel's "Ready to Play" Trains to 45mm - Lionel's current line of battery-powered toy trains run on 2" track. But they don't have to.

Lionel's G Gauge Toy Trains - All about the battery-powered G gauge toy trains Lionel made in the 2011-2015 period. Most are a great choice for a "shoe-string" railroad.
 remote. Click to go to article.")
New Life for a Battery-Powered Bachmann Ten-Wheeler - Lose the remote?
You can use these tips to add directional switching to battery-powered locomotives.

Into the Woods - a Geo-cacher builds an elaborate trestle-based dogbone railroad in a forest, then locks up a Scientific Toys/Ez-Tec train set with clues that fellow geocachers can use to get the train out and run it.
|