| |||
 |
 |
 | |
 |
 | ||
 |
 | ||
 |  | ||
 |  | ||
| |||
|
|
|
| |
|
|
| ||
|
| ||
| | ||
| | ||
Written by Paul D. Race for Family Garden Trains(tm)
 |


|
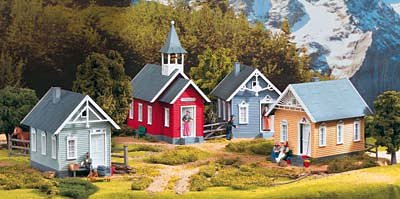
Painting a Piko Gingerbread HouseThis article is a supplement to the Family Garden Trains(tm) Painting Plastic Structures Note About the Level of Detail - Please don't be put off by all the little steps in our kit-painting/assembling articles. Most kit instructions assume an experienced user, so they leave out minor, but important steps that experienced kit-builders do without even thinking about them. We just want to make sure you have a painless experience, especially if this is the first building kit you've ever painted and assembled. We also want you to be very satisfied with the finished result. If if we left out a bunch of steps to make you think that kitbuilding is a breeze, you will not be as satisfied as you could be - if nothing else, your finished kit would look exactly like everyone else's. Once you've done a couple kits according to our instructions and seen the results, you'll be doing all of those minor, but important steps automatically, too, whether we have specific instructions or not. Like all garden railroad structures, this building needs to be primed, painted, and glazed before you set it out.* But if you're careful, you'll have a result you can be proud of for years to come. Piko has made model railroad accessories (and sometimes trains) for years. In Large Scale, they have chiefly made sturdy plastic kits with UV-resistant plastic. Most of their buildings have finishes that look good right out of the box, so 99 Piko structures out of 100 you see on garden railroads have the original finish. Unfortunately, I don't find Piko's finish on the frame houses such as the house in this project completely convincing. Also, a few years of direct sunlight do take their toll. Besides, who wants their structures to look JUST like everyone else's? Some of Piko's similar models literally snap together. The Gingerbread line doesn't quite. You will need glue. (Back when I put this together, I used up a three-pack of "superglue" - cyanoacrylate. Today I am using FixAll, which takes longer to set but doesn't get as brittle.) Also, on a few pieces, you will need to file, trim, or sand an edge slightly to get the best fit. Mostly this is where the piece joins the "sprue" (the tree-shaped gizmo that the pieces are attached to in the mold). Every plastic model has this, so it's not a "problem" really. How to Get This BuildingOur Buildings for Garden Railroads buyer's guide on our Garden-Train-Store.com site lists several of the most popular Piko building kits, along with similar kits from other manufacturers. These instructions will work for the Piko storefronts as well, if you like those structures. The Buildings for Garden Railroads page has links to the pages you need to see and order these kits. Buildings for Garden Railroads buyer's guide on our Garden-Train-Store.com site lists several of the most popular Piko building kits, along with similar kits from other manufacturers. These instructions will work for the Piko storefronts as well, if you like those structures. The Buildings for Garden Railroads page has links to the pages you need to see and order these kits.
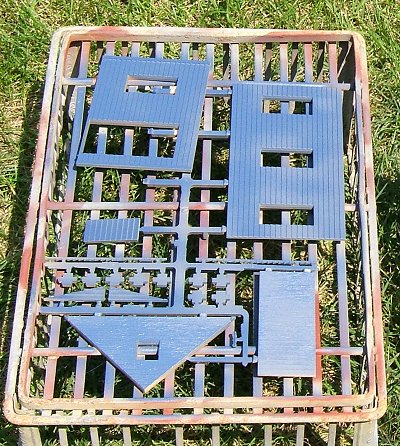
Deciding on a Paint SchemeThis model I chose represents a building with yellowish-tan "clapboard" siding, wooden trim, and a roof that is covered with sheets of roofing material. I was fine with a gray roof and white trim. But I wasn't thrilled with the base color. In addition, most of my buildings so far have rather plain colors, and I thought it would be nice to use a stronger color for a change. The next time I was in the paint department at WalMart, I picked a royal blue indoor/outdoor satin spray for the base coat. You might wonder why I just didn't buy the blue house. The answer is that I was going to paint it anyway, and I preferred the trim on the yellow "Adams" house.In fact, I planned from the start to paint every surface, even the gray roof and white trim pieces, since unpainted plastic yellows eventually, even with molded-in UV protection, and painting cuts down on the shiny plastic look. The resulting building looks rather like it belongs in New England's coastline, but I'm sure it will fit in on the New Boston and Donnels Creek somewhere. When you plan to paint white plastic, you might consider using white primer. It's harder to come by than gray or rust-colored primer, but it may save you a step. For this project, I used white primer on the trim, which generally worked out, but it DID leave the white plastic door a little translucent, so if I light the building, the door may look radioactive. If I'd primed it gray first, then finished with a white top coat, that wouldn't be a problem. Cleaning the PartsWhen you've picked out your primer and your paint, lay out a clean, dry, low-lint dishtowel and place the parts next to it, along with another towel. Then wash your hands with dish soap and warm water to remove any excess oils from getting back to the parts. Locate some Glass Plus or Fantastic or a similar cleaning agent that doesn't require rinsing and leaves no residue.Clean each piece carefully, handling it by the edges or by the sprue so you don't leave "fingerprints" on it. Then dry it as well as you can and leave it on the clean dishtowel to dry out completely. By the way, this step is necessary on any model you plan to paint. They all have invisible fingermarks or oils left over from the manufacturing and packaging processes. Priming the Parts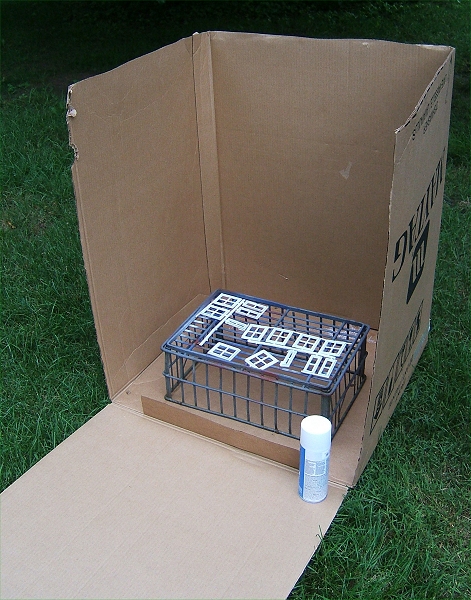 Take the parts in a shallow box or something (so you don't have to handle them except by the edge) to wherever you're going to paint. As the Painting Plastic Structures article points out, I like to paint outside on warm calm days, using a wire framework that allows the air to circulate around the parts. I have also been known to convert an oversize box into a "paint booth" to cut down on breeze if I'm outside, or to cut down on overspray if I'm inside. Take the parts in a shallow box or something (so you don't have to handle them except by the edge) to wherever you're going to paint. As the Painting Plastic Structures article points out, I like to paint outside on warm calm days, using a wire framework that allows the air to circulate around the parts. I have also been known to convert an oversize box into a "paint booth" to cut down on breeze if I'm outside, or to cut down on overspray if I'm inside.
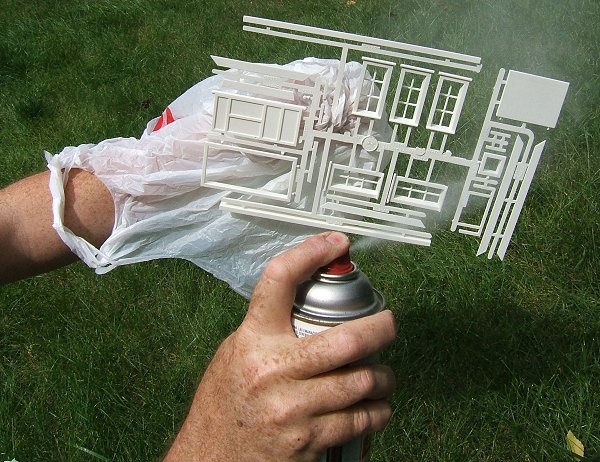
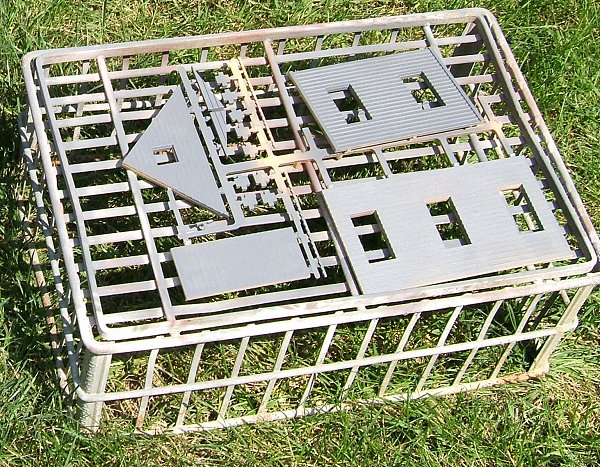
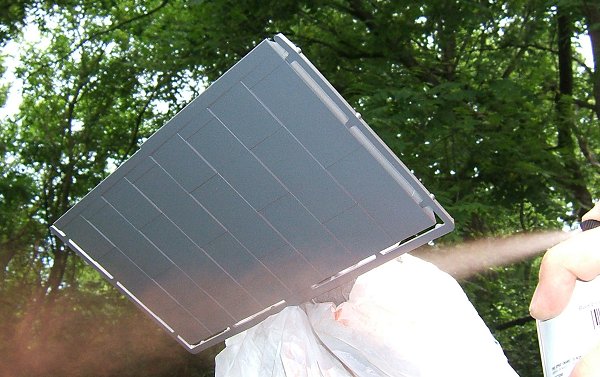
Because the white parts sprues on this kit were so complex, I went another way for them - I put a plastic grocery bag over my left hand and painted the parts mid-air. The positive side is that it helped me be sure I hit every part from ever angle. The downside is that I had to wait until the sprue dried before I could set it down. Somebody does make a clamp to help with that sort of thing, but I don't have one at the moment. In this case, I chose a gray primer for the roof and walls, and a white primer for the windowframes and trim. Shake the first paint can you plan to use thoroughly, until the little ball inside has been rolling freely for a few minutes. You might want to test the paint on a piece of scrap plastic. Sometimes when it is very humid or the can of paint is too cool, the paint comes out in tiny chunks, making your building look a little fuzzy, so you want to know if it's going to do this before the paint goes onto your structure parts. When you are ready to spray the parts, bring the paint can so that it fires down at an angle (paint won't spray properly going straight down). With the can aimed to one side of the parts, press the button until you get an even flow (usually a second), then bring the can past the parts in an even motion and release the button when the spray has gone over the other side. If you've done it right, the parts should be 50% or more covered and the paint should be almost dry by the time you examine the results. Rotate the parts and repeat this process, always giving the paint time to dry a little between sprays.
Note: Since I painted this house, I have gotten in the habit of giving the building's insides at least one good coat of gray primer as well. This reduces the likelihood that your building will have a radioactive glow if and when you illuminate it. When all the parts are painted, move them to a safe place with decent ventilation and allow them to dry overnight.
|
| Figure Out What Parts You Really Need - First lay the parts out and try to figure out what parts go with with line drawings. The parts sprues that go into these kits are used for lots of other kits as well. So there may be parts on each sprue that you don't need. Sometimes there are a whole class of pieces you don't use at all. It's easy to figure out the door and windowframes, of course, but some of the other pieces are a tad trickier. | 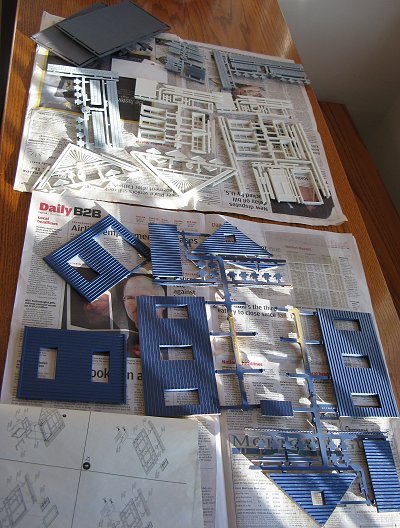 |
| Don't panic if you can't figure everything out at first. Work with the pieces you know for sure, and eventually you'll figure out which pieces don't really go on this building. This kit had over sixty unused pieces, as shown in the photo to the right. The extra windowframe is nice, since these look good on homemade buildings. Save the unused pieces - you'll never know what you might find a use for later. | 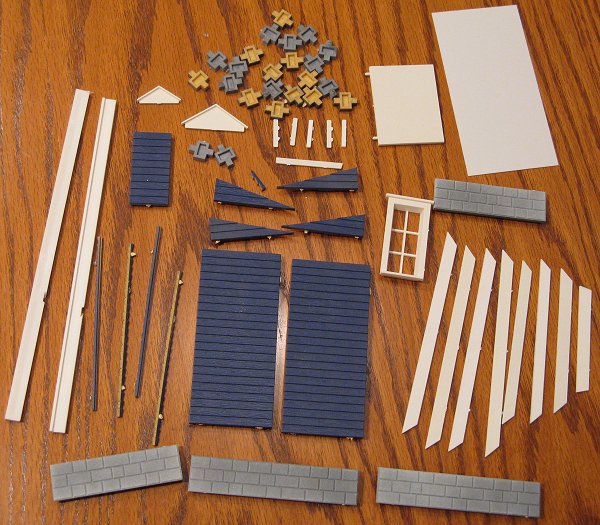
|
| The kit showed the front of the house going together first. The foundation and gable are fastened to the bottom using those little crosspieces that I painted already. Oops. I had to scratch the paint off one side of the crosspieces so the glue would hold. By the way, the inside of the walls looks pretty gross, but that's okay. It's really a thin grey wash of paint meant to emphasize the grain on the outside of the walls (the part I've painted over). I actually tried scrubbing it off one building before I realized with it was and that it wasn't going anywhere or hurting anything. Next time, I will prime the inside as well, though. The extra layer of paint helps keep the walls from "glowing" when you light the buildings. | 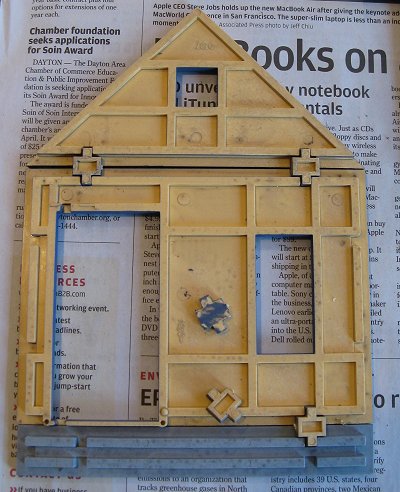
|
I tried very hard to keep the gable and foundation from separating from the wall too much as I glued them together. With the trim in place, you really wouldn't notice the gap they left, but any interior lighting would shine through the gaps if I didn't take care of them somehow. Putting the windowframes and door frame on the front is easy, since they just lay in place. The kit provides a sheet of "window" material, something like you'd get if you'd cut up a two-liter bottle. You're supposed to cut it into rectangles and glue it to the windowframes from the "inside." Some kits also include curtains to finish off the look. This kit included a piece of translucent plastic that was supposed to keep you from seeing inside, I suppose. I left both parts out, since I planned to use Lucite glazing to provide a cleaner, more permanent effect. | 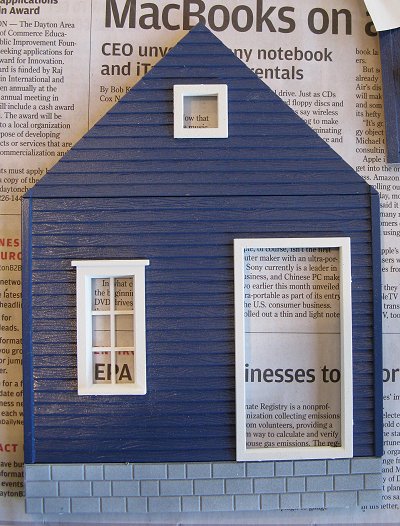
|
Note: When you cut the windows from the parts sprues, be certain to file or trim off any rough spots the sprue leaves. In the "blowup," you can see I missed a bit on the top window. That's okay in this case, since the gingerbread trim will hide it anyway. If I had painted the windowframes another color, I would have had to touch them up after I cut them off the sprue.
On this kit, there's a little platform inside the door. I suppose it's so if you have the door open, you don't see the ground underneath. The platform rests on a u-shaped piece that provides "legs." There was an extra u-shaped piece, so I glued it against the wall as an extra support. I also angled the platform a tiny bit so it wouldn't be so likely to get broken off if I set the building on rough ground. In retrospect, I angled it too much, since the door doesn't open very well. But I probably won't leave it open anyway, since I don't like giving paper wasps and yellow jackets easy access. | 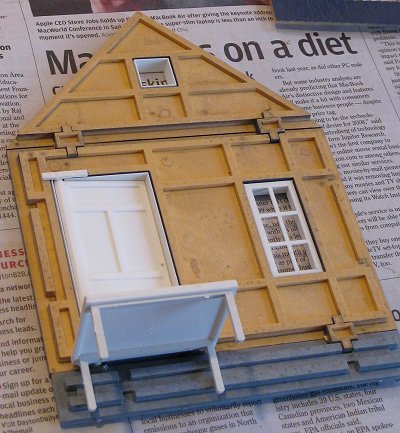
|
Next, I assembled the side walls and back wall. They were easier since there wasn't a little platform to futz with. Still I made a point of getting a "bead" of glue to go into each place where each wall attached to a foundation or gable. I did it from the "inside," of course, and tried to make certain that it didn't flow all the way through (I missed one bit that got through and made one corner shiny). This way, I can hit that area with a dark paint later and keep light from filtering through the cracks from inside. By the way, these wall pieces and the windowframes that go with them are used in countless Piko kits. That's one reason this kit is a good starting point, most of their other small building kits will look very familiar after you've done one of these. | 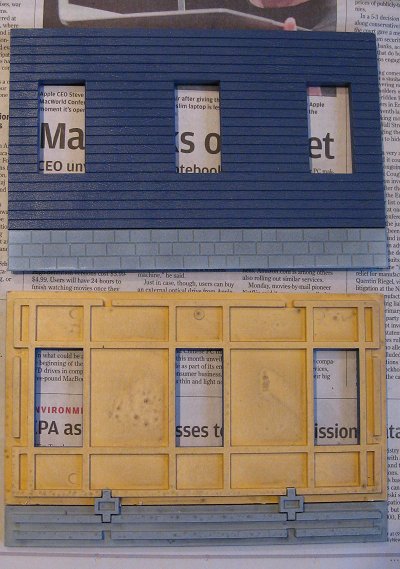
|
| This kit has little trim pieces that go over each window, and stickers that attach to the trim pieces. The instructions show you putting on the stickers after you've got the whole building together. Right. | 
|
| Before I glued the chimney together, I cut off the sprue residue, then sponged some acrylic "brick red" paint onto the bricks, trying not to cover the mortar lines too much. | 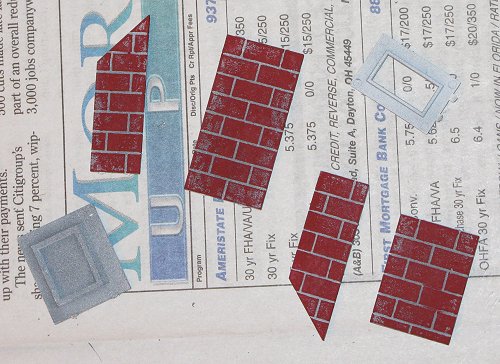
|
| At this point, I had to stop working because real life was about to intrude. By now I had figured out what pieces I wouldn't need and put them into a zip-lock bag for storage elsewhere. Then I put the subassembles up until I had the chance to cut out the Lucite windows. See our article on Glazing Windows with Lucite for more information on that process. The photo at the right shows most of the window panels in place. I mostly applied glue where it wasn't likely to get down into the window part. | 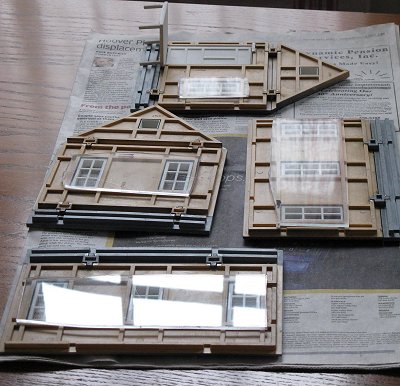
|
| Finally, I got my old carpenter's square out of the garage and lined up the front and one wall. I started with the front since it already almost stood by itself, so I could concentrate on making sure the pieces were together and solid. Afterwards, I put the square on the other corner of the front, and put the other side and the back of the house in position, then glued the second side. Finally I glued on the back and the roof, following instructions for once. | 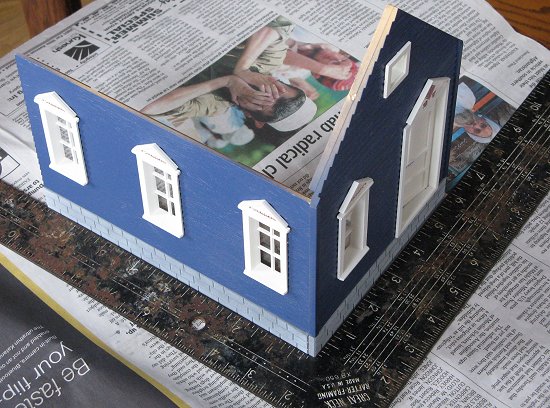
|
| At the very last, the gingerbread trim goes on the ends of the roof, and the steps go together and get glued to the front.
Some of the original tan still showed through at the corners, so I needed to touch that up. To do that, I brought the blue paint can outside, got a very cheap brush, sprayed some of the paint into the lid, and dabbed it onto the exposed corners. After I took this photo, I installed paper curtains, but those don't hold up to the weather, so I'll install some color-laser-printed on overhead projector film curtains soon. (For tips on printing your own curtains, click here | 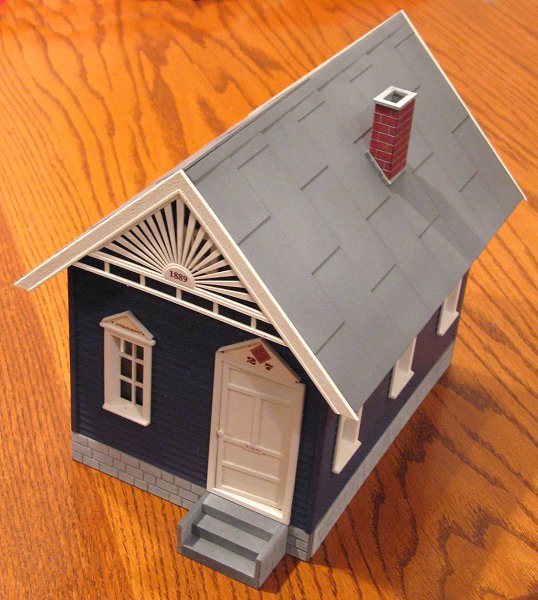 |
After all is said and done, I probably have about 6 1/2 hours into painting and building this kit.
In addition, I have another half-hour's worth of touching up to do when I get back to it, which may be after it has sat out for a season, since it's usable now. (I'm not including the twenty or so additional hours I have into writing this article, of course.)
Based on my experience with similar models, this little house will hold a nice appearance three or four years longer than a similar kit left unpainted. Plus it will always be unique, and it will never look like plastic.
When the weather gets a little nicer, I'll try to set it out and get a photo or two in context of other buildings and of the outdoors. In the meantime, if you get one of these or a similar kit, you don't have to do it the way I said. This was just to give you some ideas and help you think about all the details and alternatives that the kit instructions leave out. If you customize (or have customized) one of these buildings in any way, please send a photo and describe your customizations, and I'll try to put it online for other readers. Best of luck, Paul
In addition, hints for painting and examples of customer painting and kitbashing projects are provided on the Colorado Model Structures web site.


| 
|
|
 |
|
 |
 |
Note: Family Garden Trains?, Garden Train Store?, Big Christmas Trains?, BIG Indoor Trains?, and BIG Train Store? are trademarks of Breakthrough Communications (www.btcomm.com). All information, data, text, and illustrations on this web site are Copyright (c) 1999, 2000, 2001, 2002, 2003, 2004, 2005, 2006, 2007, 2008, 2009, 2010, 2011, 2012, 2013 by Paul D. Race. Reuse or republication without prior written permission is specifically
forbidden.
Family Garden Trains is a participant in the Amazon Services LLC Associates Program, an affiliate advertising program designed to provide a means for sites to earn advertising fees by advertising and linking to amazon.com.
For more information, please contact us

 |  |