The old conductor's call of "Fort Wayne, Elkhart, and all points beyond" sums it up - a train can take you anywhere.

|
Planning Your Garden Railroad for Watchability
Some garden railroads hold viewer interest longer than others. Many factors contribute, including attractive landscaping, effective use of plants and accessories, and so on. This article focuses on one major factor: whether the railroad is fun to watch. A garden railroad should differ from a garden or a diorama in that it should be different from one moment to the next, in some fashion that compels viewers to stick around, either to see what happens next, or to see some particularly interesting event repeat. What are the issues you should consider while planning a railroad that works well, not only in three dimensions (width, length, height), but also in four (time)?
Why Trains Are Fun to Watch
Deep in the psyche of every industrialized culture is the sense that a train represents more than wheels and rails. It represents potential, a link to the rest of the world, perhaps, even, escape to a more exotic locale. The old conductor's call of "Fort Wayne, Elkhart, and all points beyond" sums it up - a train can take you anywhere. Your garden train may not fool people into thinking they're going to get to Quincy, but it will be more interesting if it at least like it's going somewhere.
On a more prosaic level, your railroad should also look like it serves a function. What stations does it connect; what industries does it serve, what freight does it haul? Or will it look like it is circling the pond because that was the easiest place to put the track?
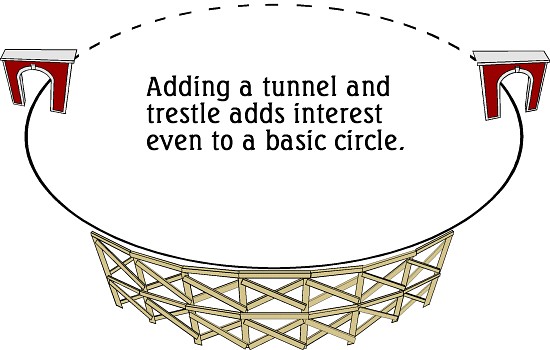
 In other words, what makes your trains worth watching for more than a few minutes? The least interesting railroad in the world is probably the circle of track that came with your starter set. Viewers can take in everything they need to know about the operations of that railroad in about a millisecond. But what if you added something, say a tunnel or row of trees, that allows the train to disappear from view, even for just a moment? You can almost imagine that it's going somewhere you can't see, which makes it much more interesting than if you can see it all the way around the track. What if you raise the circle and put a trestle under part of it? For some reason, people have the sense that a train crossing a trestle is accomplishing something. In both cases, you have added interest, without doing anything to change the operation. And now you may have raised the average visitor's attention span, say, from 2 seconds to 2 minutes. But if you want to get beyond that, it will take more than good scenery; it will take a plan to make the operation of your railroad seem more interesting. In other words, what makes your trains worth watching for more than a few minutes? The least interesting railroad in the world is probably the circle of track that came with your starter set. Viewers can take in everything they need to know about the operations of that railroad in about a millisecond. But what if you added something, say a tunnel or row of trees, that allows the train to disappear from view, even for just a moment? You can almost imagine that it's going somewhere you can't see, which makes it much more interesting than if you can see it all the way around the track. What if you raise the circle and put a trestle under part of it? For some reason, people have the sense that a train crossing a trestle is accomplishing something. In both cases, you have added interest, without doing anything to change the operation. And now you may have raised the average visitor's attention span, say, from 2 seconds to 2 minutes. But if you want to get beyond that, it will take more than good scenery; it will take a plan to make the operation of your railroad seem more interesting.
Note that this article is about making your railroad worth watching, not making your railroad worth running. Many garden railroaders believe that the most rewarding railroads to operate are those that demand hands-on-operation, such as the "Point-to-Point" railroads described below. But such railroads may not be much fun for visitors to watch if no one is actually operating them at the moment, or if, worse yet, the operator must stand between the visitors and the trains.
In other words, the most interesting railroads to operate may not be the most interesting to watch and vice versa. It is possible to design a railroad that is good for both, but this article focuses, by default, on designing your railroad so that the train's operation (even if it's basically going in circles) is as interesting as possible to the viewers.
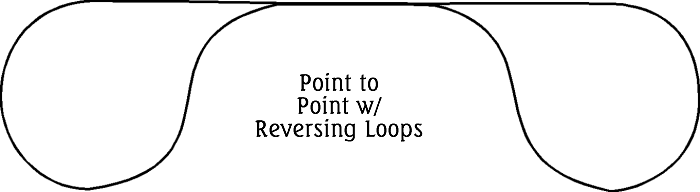
As you can probably discern, the first big decision you will make is the decision between a "point-to-point" railroad, which demands more on-hands operation, and a "loop" railroad, which may seem repetitive if visitors feel that the locomotive is just chasing the caboose.
Topics included in the following discussion are:
|
The good thing about a railroad that uses point-to-point architecture is that you operate it the same way the real trains operate, using remote control as you follow your train along the track

A point-to-point railroad is an exceptionally good choice if the best location for your railroad is the perimeter of your back yard

|
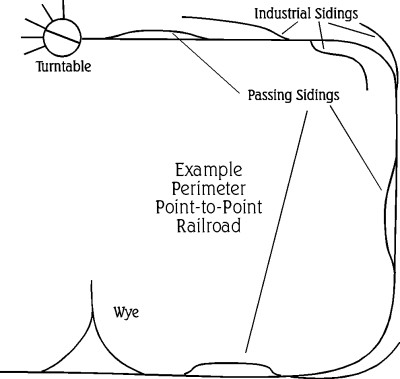
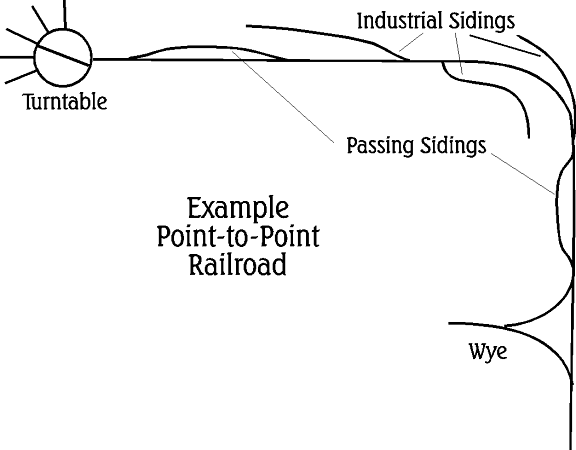
Most trains in the real world go from one point to the other, then return along the same track. On a traction or small industrial line, the train may simply go back and 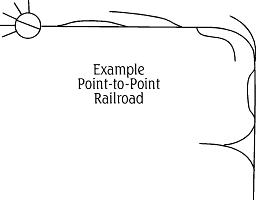 forth without turning the locomotive or even moving it from one end of the train to the other. For longer trains, various methods are used to allow the locomotive to turn around (if necessary) and to get it from one end of the train to the other. Turntables can turn locomotives, of course. So can a Wye (a three-way set of turnouts that allows a locomotive to back around the same way you turn around in someone's driveway with a car). You'll also need passing sidings to allow the locomotive to get around the train. (Of course, if you use cabooses, you'll need to sort that out, too.) forth without turning the locomotive or even moving it from one end of the train to the other. For longer trains, various methods are used to allow the locomotive to turn around (if necessary) and to get it from one end of the train to the other. Turntables can turn locomotives, of course. So can a Wye (a three-way set of turnouts that allows a locomotive to back around the same way you turn around in someone's driveway with a car). You'll also need passing sidings to allow the locomotive to get around the train. (Of course, if you use cabooses, you'll need to sort that out, too.)
The figure at the right shows a sample point-to-point railroad that uses a Wye at one end and a turntable at the other, with passing tracks to allow you to get your locomotive to the other end of your train for the trip back. It also shows sidings where you could put industries for the railroad to serve. Of course, your railroad may have as many additional sidings as you want it to, including a bunch of sidings called a "freight yard" for building up trains at either or both ends. Note: To keep the illustrations below simple, I haven't shown sidings in most of the following figures, but you would want sidings on those as well, to give you options on the days you do have time for "hands-on" operation. If you click on the illustrations you'll get a bigger version, suitable for printing. But you'll still have to fill the sidings in yourself.
The good thing about a railroad that uses point-to-point architecture is that you can operate it the same way the real trains operate, using remote control as you follow your train along the track, stop for passengers, pick up cars at industries and so on. If you have a starter set with remote control (such as the newer AristoCraft starter sets), try setting your railroad up this way along a sidewalk or the inside of a fence, and operating in "back-and-forth" mode for a while. Set up some concrete blocks or something to represent industries and stations and imagine how it would feel to "engineer" your train down a finished point-to-point railroad, stopping at each industry to pick up and drop off cars. You may find that it makes you rethink how you want to run your trains.
Even if you decide on a loop railroad, you may want to incorporate a branch line that is totally point to point. Alternatively, you could design a loop railroad that has all the features necessary to operate as a point-to-point railroad, if you just set a brick on the track to interrupt the "loop" on the days you want to do hands-on operation. (An example of such a railroad is shown in the Continuous Operation on a Point-to-Point Railroad section below.)
 What do Visitors See? What do Visitors See?
A well-designed, properly operated point-to-point railroad can be quite fun to watch, as long as people watching the trains are watching something besides your back as you follow the train along. This could involve remote-control turnouts and automatic uncouplers, or it could involve you having a path for operators only that is on the other side of the railroad from the viewing positions.
What do Visitors do?
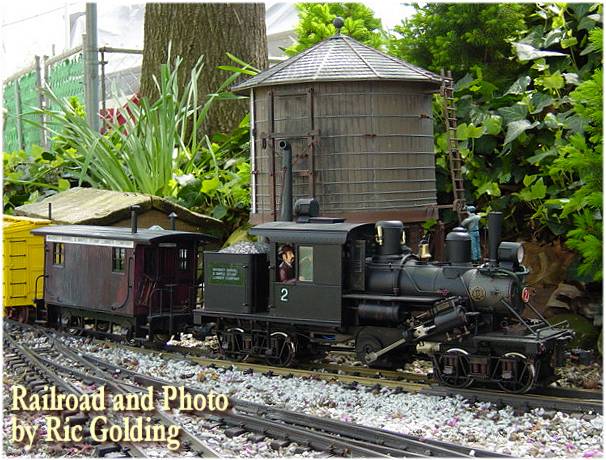
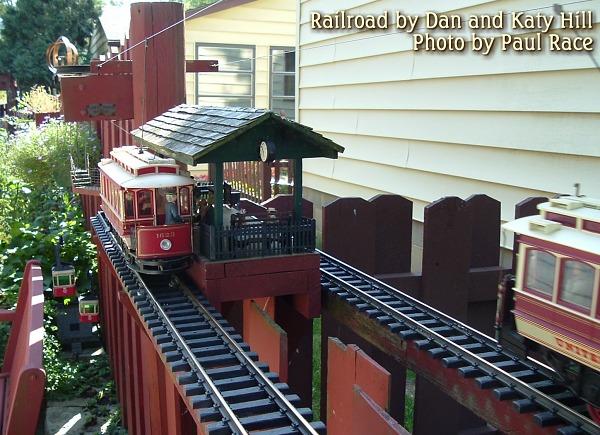
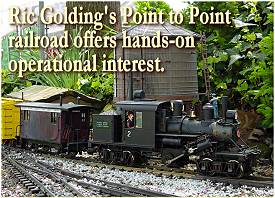
On the other hand, a point-to-point railroad that gets visitors involved can create a memorable experience. One such railroad is Ric Golding's KVRwy in central Illinois. Ric's railroad has many industrial spurs and a switch yard, and he runs several short, remote-controlled trains so several people can operate trains at once. Ric says, "A perfect session is the equipment coming out of the sheds, running its schedule and going back to the storage shed without a derailment, uncoupling or hand touching the equipment. "
 A point-to-point railroad is an exceptionally good choice if the best location for your railroad is the perimeter of your back yard, or if you want your train to run from the side yard to your back yard, etc. Perimeter railroads are also relatively easy to maintain because you can design them to be only a few feet deep, so no part of the railroad is significantly out of reach. A point-to-point railroad is an exceptionally good choice if the best location for your railroad is the perimeter of your back yard, or if you want your train to run from the side yard to your back yard, etc. Perimeter railroads are also relatively easy to maintain because you can design them to be only a few feet deep, so no part of the railroad is significantly out of reach.
Perimeter railroads also leave the center of your back yard open for badminton or whatever. There's also a special pleasure in being surrounded by the railroad. (It's possible to build a loop railroad along the perimeter, but then you have to figure how you are going to get people and lawnmowers and wheelbarrows into the middle - a big problem if your railroad is raised more than a few inches off the ground, as we generally recommend).
Note: If you build a perimeter railroad, avoid the temptation to landscape right up to the fenceline. Most folks recommend leaving a 24" or more path around the "outside" of the railroad if you have room.
 Despite the benefits of hands-on point-to-point railroad operation, most garden railroaders like to see their trains running even on the days that they don't have time to follow them around the track. For this purpose, many owners of point-to-point railroads devise some form of continuous running. Despite the benefits of hands-on point-to-point railroad operation, most garden railroaders like to see their trains running even on the days that they don't have time to follow them around the track. For this purpose, many owners of point-to-point railroads devise some form of continuous running.
Again, some folks who want to have point-to-point operation but also want to have continuous running have been known to build a railroad with a "return" line that they block off on operating days, but which allows them to simply "watch the trains go around" on days they don't have time to operate them directly. Some "purists" may insist that such a railroad is just a track circle with a bunch of turnouts and a brick on the track, but you need to find the solution that works for you. Also, you may use the example at the right to give you ideas about adding point-to-point-type operation to any of the loop railroads described below.
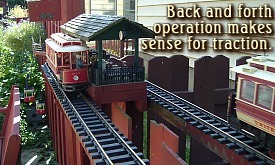 Timed Back-and-Forth Operation - This, simplest kind of continuous running on a point-to-point line is especially useful on a traction (trolley) or small industrial line. There, continuous running may be accomplished simply by putting an auto-reverse system such as the AristoCraft 11090 into the track. No one expects a trolley or a dinky industrial switcher hauling (or pushing) three cars to turn around anyway, so the back-and-forth may be all you need. One garden railroading family in Columbus, Ohio, who has a very elaborate loop railroad also has a separate back-and-forth trolley line along one fence row in a narrow spot where hardly anything else would fit. Timed Back-and-Forth Operation - This, simplest kind of continuous running on a point-to-point line is especially useful on a traction (trolley) or small industrial line. There, continuous running may be accomplished simply by putting an auto-reverse system such as the AristoCraft 11090 into the track. No one expects a trolley or a dinky industrial switcher hauling (or pushing) three cars to turn around anyway, so the back-and-forth may be all you need. One garden railroading family in Columbus, Ohio, who has a very elaborate loop railroad also has a separate back-and-forth trolley line along one fence row in a narrow spot where hardly anything else would fit.
Many automatic reversing circuits allow you to control how long your trolley or train waits for the "return trip." You may need to tweak this depending on the size of your railroad and what else, if anything, is going on at the same time. You want visitors to have the sense that there is time to load and unload people and goods, without having long periods of inactivity that become boring.
What if the Train Must Turn? Back-and-forth operation is okay for traction and short industrial trains; but what if you're modeling mainline trains, and you need the locomotive facing the correct direction and at the front of the train, each time it goes out on the "mainline"?
Automating Wyes and turntables would be far too complicated to discuss in this article, even if we thought it was advisable. One alternative is a reversing loop (or two). Reversing loops, though, cause complications.
 First of all, a reversing loop takes over a lot of real estate. As an example, you might be able to use big, broad curves to make a nice point-to-point perimeter railroad, without using up that much of your back yard (or creating too much "garden" to keep under control). But if you introduce a reversing loop, your railroad will need to jut out into the yard at some point. And those big, broad curves can take up a bunch of room. As an example, if you're modeling U.S. standard gauge you'll need a minimum of a 10'-diameter reversing loop (15' is better). By the time you've added six inches on either side for clearance, each loop will demand a 95-to 200-square foot area that you will have to landscape or garden, and you won't be able to reach the center without climbing into the loop - in other words, you've introduced at least two of the "problems" of a loop railroad: reach and real estate. First of all, a reversing loop takes over a lot of real estate. As an example, you might be able to use big, broad curves to make a nice point-to-point perimeter railroad, without using up that much of your back yard (or creating too much "garden" to keep under control). But if you introduce a reversing loop, your railroad will need to jut out into the yard at some point. And those big, broad curves can take up a bunch of room. As an example, if you're modeling U.S. standard gauge you'll need a minimum of a 10'-diameter reversing loop (15' is better). By the time you've added six inches on either side for clearance, each loop will demand a 95-to 200-square foot area that you will have to landscape or garden, and you won't be able to reach the center without climbing into the loop - in other words, you've introduced at least two of the "problems" of a loop railroad: reach and real estate.
- In addition, if you're using track power, reversing loops can be a pain to wire (if you don't use special wiring, the "loop" causes a direct short). Many Garden Railroaders use the LGB 1015U/1015T reversing kit, which has most of the parts you need. If you really want to delve into the subject, take a look at George Schreyer's Reversing Tips page.
- Finally, using reversing loops for continuous running makes you depend on your turnouts working properly all of the time, something that is easier said than done outdoors, where pebbles, grit, and twigs work their way into the frogs and mechanisms. Yes, I have used both manual and remote turnouts on garden railroads, but I prefer only to "switch" them for operations' sake when I'm near enough to make certain they're operating properly. Murphy's law really has it in for garden railroad turnouts. Note: After I wrote this paragraph, my friend Wil Davis reminded me of a local railroad that uses all sorts of LGB automatic reversing and switching technology, with continuous apparent success. So it can be done, but I haven't been doing it, in case you wondered.
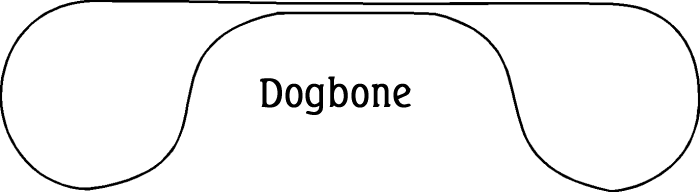
 On the other hand, there's very little difference visually (and a world of difference operationally) between a point-to-point railroad with two reversing loops and a "dogbone" railroad, in which the trains goes "out," turns around, and comes back on an adjacent track, not the same track. The "out and back" effect is the same, but the wiring is a whole lot easier, and you don't have to depend on your turnouts so much. More information about dogbone railroads is provided in the section on loop railroads below. On the other hand, there's very little difference visually (and a world of difference operationally) between a point-to-point railroad with two reversing loops and a "dogbone" railroad, in which the trains goes "out," turns around, and comes back on an adjacent track, not the same track. The "out and back" effect is the same, but the wiring is a whole lot easier, and you don't have to depend on your turnouts so much. More information about dogbone railroads is provided in the section on loop railroads below.
|
No visitor is surprised by a loop railroad, of course. . . . But if you want to hold visitor interest, you need to make the train look like it's serving a purpose and going somewhere, and not just chasing its own caboose.
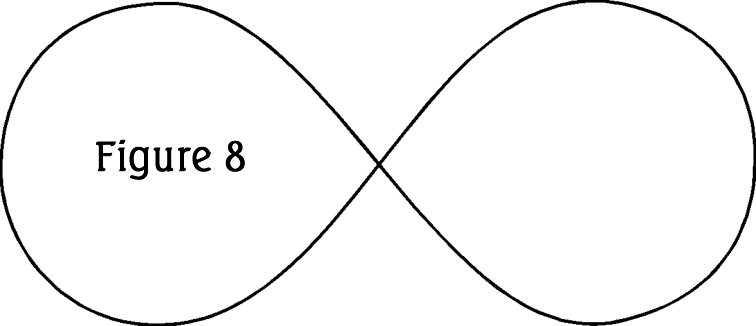
. . . a figure eight does let the trains look like they're changing direction and provide a little more interest than a simple oval in the same amount of space.
If you have the right kind of space, you can use a dogbone to give the sense that your train really is going somewhere else and coming back.
|
Although point-to-point railroads are most common in the real world, they are far outnumbered in Garden Railroading by loop railroads, on which the train travels the  same path repeatedly in the same direction without stopping. No visitor is surprised by a loop railroad, of course. They've seen them on tabletops and around Christmas trees since they were little. But if you want to hold visitor interest, you need to make the train look like it's serving a purpose and going somewhere, and not just chasing its own caboose. Ric Golding (whose point-to-point railroad was used as an example above) points out that even a train going in circles can "have a function" if there are industries and stations to serve. But I like it if the circles are slightly less obvious. same path repeatedly in the same direction without stopping. No visitor is surprised by a loop railroad, of course. They've seen them on tabletops and around Christmas trees since they were little. But if you want to hold visitor interest, you need to make the train look like it's serving a purpose and going somewhere, and not just chasing its own caboose. Ric Golding (whose point-to-point railroad was used as an example above) points out that even a train going in circles can "have a function" if there are industries and stations to serve. But I like it if the circles are slightly less obvious.
In other words, there are three disadvantages (if not dangers) of loop railroads:
- Repetitive Motion - Your track plan and operations need to camouflage the fact that the same train is coming the same way every few minutes.
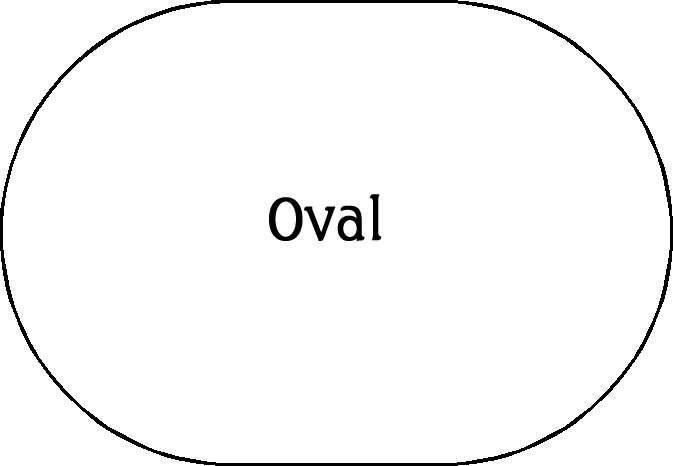
- Real Estate - If you are modeling modern North American trains with 80' cars, you'll want your curves to be a minimum of 15' in diameter (some long cars will operate on curves that are 10' in diameter, but they won't look great). Adding 6" of clearance on either side, this means that a simple circle of track (which, despite its size will still be "just" a track circle to viewers) will require a 16'x16' area. That same circle will enclose a 200 square foot area that you need to fill with something, be it a pond, a town, or a "forest." If you install a thirty-foot-long oval (using the same diameter track, your railroad may convert over 480 square feet of back yard from easily mowed lawn to less-easily-maintained garden or water features. And the shape of that new, relatively high-maintained garden leads to another disadvantage:
- Reach - When you create big new gardens for your trains to run around, you are also creating areas that can only be weeded or otherwise maintained by reaching across or climbing over your track.
To compensate for the real estate and reach problems when you're first starting out, I recommend using a lot of landscape fabric and mulch and only a few plants and accessories at first, so that the "wasteland" inside your track circles stays very low maintenance until everything else is under control.
That said, most garden railroads use some sort of a loop plan. And loop plans don't necessarily mean reduced opportunity for hands-on operation. Ric Golding also reminds me that any properly-designed loop railroad can be converted to point-to-point by temporarily decommissioning part of the loop, as shown in the Continuous Operation on a Point-to-Point Railroad section above.
In an earlier example, a simple circle railroad was made more interesting by adding a tunnel and a trestle. But even in that scenario, the poor train is still coming past you every so many seconds. Aside from the hypnoptic effect of repetitive motion (like a dangling pocketwatch), how long can that hold anyone's active interest? The more you can make it look like your train is not just circling aimlessly, the more convincing (and interesting) your railroad will be. Of course indoor railroaders have faced this problem for generations. They've come up with a wide variety of solutions, some of which apply very well to Garden Railroads as well.
Obviously an oval is better than a circle. You can have a slightly stronger sense that that the train is going from one place to some place else. Your train also gets a chance to straighten out a little, so it doesn't just look like a "starter set" layout. If you use 10'-diameter curves (the recommended minimum for a "standard gauge" train such as CSX or UP), you can fit an oval into an 11'x14' area if you have to, but you'd want to use a tunnel or something to allow the train to disappear from view, as mentioned before. If you have room to introduce some zigs and zags so it doesn't look quite so much like an oval, it can be pretty effective. Alternatively, if you have a lot of room and can figure out how to get people and lawn mowers into the center of your railroad, you can use an oval to make a perimeter railroad that runs around the perimeter of your back yard.
On my railroad, the New Boston and Donnels Creek, I started with a sort of oval, around the pond, which later became the south loop of my "dogbone" railroad. I used railroad ties and stacked stones to raise the whole thing to an average of 18" off the ground, plus I added a "tunnel" that eventually had a waterfall running over it. I planted Dwarf Alberta spruce and carefully trimmed Mugo pine, and a bunch of miniature sedums and thymes, and within a year it was very charming. That (relatively dinky) oval gave me some place to run trains while I spent the next three years building the rest of my railroad. For more photographs of those early efforts, please see the New Boston and Donnels Creek 1998-2000 Picture pages. A diagram and description of that construction is contained in the Landscaping and Pond Construction, 1998-1999 page. pond, which later became the south loop of my "dogbone" railroad. I used railroad ties and stacked stones to raise the whole thing to an average of 18" off the ground, plus I added a "tunnel" that eventually had a waterfall running over it. I planted Dwarf Alberta spruce and carefully trimmed Mugo pine, and a bunch of miniature sedums and thymes, and within a year it was very charming. That (relatively dinky) oval gave me some place to run trains while I spent the next three years building the rest of my railroad. For more photographs of those early efforts, please see the New Boston and Donnels Creek 1998-2000 Picture pages. A diagram and description of that construction is contained in the Landscaping and Pond Construction, 1998-1999 page.
 Later I added an irregular groundlevel oval literally underneath the raised north loop, so two trains could run at the same time. That oval uses fairly narrow curves (5'-diameter at some points), but it is nearly 30' long and is divided into two irregular portions by the raised railroad. This gives the short trains I run on it a chance to get "away" from the viewer visibly, and audibly as well. I also planted a four-tree "forest" for the thing to travel though on its otherwise prosaic journey. Maybe it's time for a few more trees, though. For a not-to-scale diagram of my track plan, click here. Later I added an irregular groundlevel oval literally underneath the raised north loop, so two trains could run at the same time. That oval uses fairly narrow curves (5'-diameter at some points), but it is nearly 30' long and is divided into two irregular portions by the raised railroad. This gives the short trains I run on it a chance to get "away" from the viewer visibly, and audibly as well. I also planted a four-tree "forest" for the thing to travel though on its otherwise prosaic journey. Maybe it's time for a few more trees, though. For a not-to-scale diagram of my track plan, click here.
When space is limited, but you want a little more interest than a simple oval, see if you have room for a figure eight. Jack Verducci, author of How to Design and Build Your Garden Railroad, recommends them for just about everyone with space problems. If you are using very tight curves (such as those that came with your train), your figure eight will have to use a crossing; if you want to have an over-and-under figure eight, you should know that even using 10' diameter curves (if you don't add any straight pieces), you won't be able to run anything besides short trains. (Medium-length trains require a 2% grade or less. If your right of way has to climb 10" between the lowest and highest point of the figure eight, you need 500" of track, about 42 feet, between your low and high point to keep the grade below 2%. [10"/500"=.02, or 2%].) If you use only curves on each loop, this means that your curves should have a track diameter of about 13' (of course you could use a combination of curves and straights to achieve the same 42' length for each loop). So an oblong figure eight  railroad that used an over-and-under crossing and allowed you to run medium-length trains would probably require a minimum of a 15' x 30' area. That said, a figure eight does let your train look like it's changing direction, providing a little more interest than a simple oval in the same amount of space. railroad that used an over-and-under crossing and allowed you to run medium-length trains would probably require a minimum of a 15' x 30' area. That said, a figure eight does let your train look like it's changing direction, providing a little more interest than a simple oval in the same amount of space.
Irregular Figure Eight - If you need an L-shaped railroad, or if you want to disguise the figure-eight aspect of your railroad, you may make the "loops" uneven as shown in the next picture. This looks more natural than two even-sized loops, and gives the train a chance to "stretch out" a little on the larger loop. If you camouflage the tighter loop somehow, say with a tunnel or a row of trees, you can give the impression that the whole railroad is "broad sweeping curves," the kind you see in real life. This gives you the advantages of a figure eight while disguising it enough to keep it from looking toy-like to visitors.
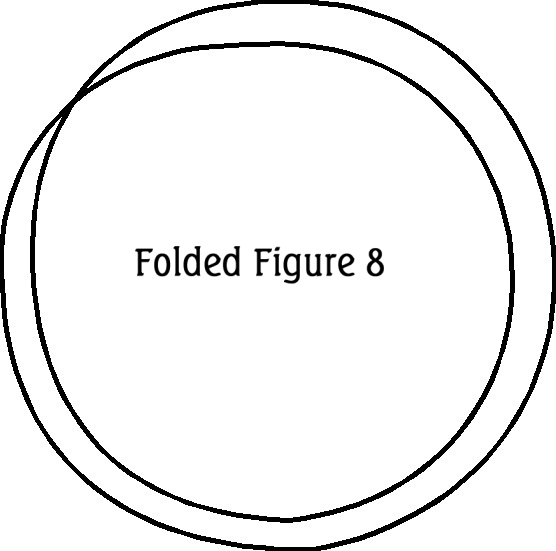
Folded Figure Eight - If you're limited on space, but you like the complexity a figure eight brings to a railroad, you might 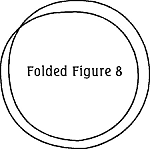 consider a "folded" figure eight. The physics are basically the same as they are for a "regular" figure eight, but very few people will "take in" the whole railroad at a glance the same way. Rather, most people will think of the railroad as two concentric circles, and be pleasantly surprised when the train runs on one circle, then on the other one. This works best when you have an over-and-under crossing, though - if you use a grade-level crossing and the railroad really is just going from the "inner" loop to the "outer loop," few folks will even notice the difference. (I've actually see two Large Scale railroads where the proud designer pointed out that, this time the train is coming around a loop that's six inches over from the other loop - the problem is that if someone has to point it out, the effect on the average visitor is nil.) consider a "folded" figure eight. The physics are basically the same as they are for a "regular" figure eight, but very few people will "take in" the whole railroad at a glance the same way. Rather, most people will think of the railroad as two concentric circles, and be pleasantly surprised when the train runs on one circle, then on the other one. This works best when you have an over-and-under crossing, though - if you use a grade-level crossing and the railroad really is just going from the "inner" loop to the "outer loop," few folks will even notice the difference. (I've actually see two Large Scale railroads where the proud designer pointed out that, this time the train is coming around a loop that's six inches over from the other loop - the problem is that if someone has to point it out, the effect on the average visitor is nil.)
While a folded figure eight may look like a circle or oval, your train has to circle your garden twice, not once, before it gets back exactly where it started. So a 16x16' area that would hold a 47' circle of track, will hold a 95' folded figure eight railroad. As elementary as it sounds, you might try clicking on the picture to get a "blowup," then use your finger to trace around the railroad one time. For some reason this "M?bius strip" railroad just seems more complex and interesting than just about anything else you can fit into the same space.
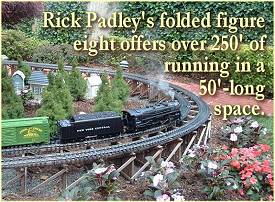
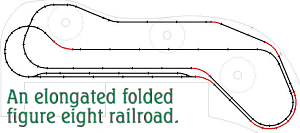 Elongated, Folded Figure 8 - If you have enough space, you can make a folded figure eight even more interesting by making the loops irregular. Rick Padley's railroad, which is used as an example in the Raising a Groundlevel Railroad article, uses an oblong folded figure-eight that was especially designed for the space he had by fellow members of the Long Island Railway Society. Elongated, Folded Figure 8 - If you have enough space, you can make a folded figure eight even more interesting by making the loops irregular. Rick Padley's railroad, which is used as an example in the Raising a Groundlevel Railroad article, uses an oblong folded figure-eight that was especially designed for the space he had by fellow members of the Long Island Railway Society.
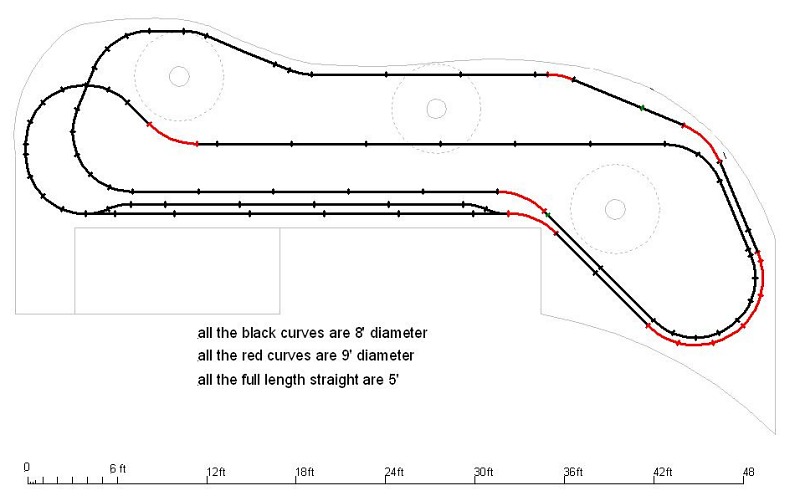
 Note: because Rick's railroad had to fit a predetermined space, the track design uses 8'-diameter curves in a couple of tight spots, although Rick would have preferred to use 10'-diameter minimum throughout. Still, Rick's MTH Hudson can get where it needs to go, and that was one of Rick's main concerns. Note: because Rick's railroad had to fit a predetermined space, the track design uses 8'-diameter curves in a couple of tight spots, although Rick would have preferred to use 10'-diameter minimum throughout. Still, Rick's MTH Hudson can get where it needs to go, and that was one of Rick's main concerns.
A favorite of indoor railroaders who have room to build long relatively narrow railroads with a turning loop at each end is the "dogbone." This is something like a point-to-point railroad with two reversing loops, except that the train doesn't come "back" on the same track that it went "out" on. If you have the right kind of space, you can use a dogbone to give the sense that your train really is going somewhere else and coming back. In addition, depending on the relative proportions you settle on, a dogbone railroad can surround the optimum viewing position on three sides, making the viewer feel more "a part of" the railroad. Nobody says that the loops have to be the same size, or that they both have to be circles. This graphic is just to give you a general idea of one pattern you can start from, just as Rick Padley's railroad above "started out" as a "folded figure eight" that was "stretched" to fit the available space.
Note that the minimum "depth" of a dogbone railroad will be determined by your track diameter. If you use, say, 15'-diameter track circles, a "dogbone" railroad must be at least 16' deep to provide the right clearance. What may be less intuitive is that the minimum length of a dogbone railroad is also determined by track diameter. If your loops connect to the dogbone by "S-curves" as shown in the diagram (not recommended, but possible), each loop will be half again as "long" as the track diameter. Using 15'-diameter curves, the loops shown in this diagram would each be 22.5' "long." So the total length of this railroad would be 45' plus whatever length of straight track you can squeeze between the S-curves. Remember Real Estate and Reach: In addition, using this sort of plan with 15' -diameter curves would give you two 180-square-foot-areas inside the track loops that you will have to landscape and maintain. One possibility might be to put amountain/waterfall area that is mostly stone and trees into one loop and a pond into the other, and keep all the stuff you have to weed or tinker with frequently within a couple feet of the outer boundary of the railroad.
My New Boston and Donnels Creek started out with the idea that it would be a dogbone. I built the loop at the south end, then started the loop at the north end. But it took a long time for the north loop to get finished. By that time, I had decided that the "returning" path wouldn't have to parallel the "outbound" path the whole way to give the same impression. Of course I had a 60' x 14' area to work with and I was still thinking in "indoor railroader" terms when I made my original plans - if I ever build another garden railroad, it may not be a dogbone at all - it might be a very oblong folded figure eight or perhaps a folded dogbone. Still, at the moment it works very well, when the sedum isn't growing over the track. If I run a train shorter than, say, 25 feet (about 12 freight cars and a locomotive and tender), you really do get the sense that the train is going away and coming back. For a not-to-scale diagram of my track plan, click here.
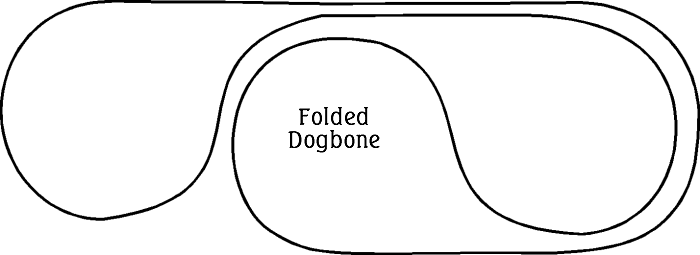
 Folded Dogbone - Remember that all of the sample track plans in this article are just to give you some ideas. One popular variation of the dogbone is the folded dogbone. This has a similar effect as the folded figure eight - you get the effect of the train going away and coming back twice for each time it actually covers the route. This version shows the loops not overlapping. If I was building this railroad, I think I would try to make the left loop a foot or more higher than the "center" loop to keep it from looking as though the train was just coming back to the starting place when it was really only half-way around the route. Note that a railroad built according to the diagram above will require room for more than one "track circle" deep and three "track" circles" across, so if you're using, say 15'-radius track, your railroad will be at least 17' deep and 47' wide. On the other hand, you will get nearly 200' of mainline into that space, without things looking particularly crowded, if your landscaping is appropriate. Folded Dogbone - Remember that all of the sample track plans in this article are just to give you some ideas. One popular variation of the dogbone is the folded dogbone. This has a similar effect as the folded figure eight - you get the effect of the train going away and coming back twice for each time it actually covers the route. This version shows the loops not overlapping. If I was building this railroad, I think I would try to make the left loop a foot or more higher than the "center" loop to keep it from looking as though the train was just coming back to the starting place when it was really only half-way around the route. Note that a railroad built according to the diagram above will require room for more than one "track circle" deep and three "track" circles" across, so if you're using, say 15'-radius track, your railroad will be at least 17' deep and 47' wide. On the other hand, you will get nearly 200' of mainline into that space, without things looking particularly crowded, if your landscaping is appropriate.
Overlapped Folded Dogbone - Many folks who use a folded dogbone overlap the loops, using a tunnel or trestle or a combination of the two to fit the maximum length of railroad into the space available. If you're tempted to try this, you might also consider an idea used by John Allen on one incarnation of the Gorre and Daphetid Railroad (the most famous HO railroad ever built). Rather than building two "big-city" scenes, build one that serves the purpose of both the raised and the lower loops. Since the loops don't actually connect, you can operate as though the raised part is serving one community and the lower part is serving another. You can even give them different names and different stations and industries to serve, as long as you can separate your stations visually (by a "wall of trees") or something.
|


 forth without turning the locomotive or even moving it from one end of the train to the other. For longer trains, various methods are used to allow the locomotive to turn around (if necessary) and to get it from one end of the train to the other. Turntables can turn locomotives, of course. So can a Wye (a three-way set of turnouts that allows a locomotive to back around the same way you turn around in someone's driveway with a car). You'll also need passing sidings to allow the locomotive to get around the train. (Of course, if you use cabooses, you'll need to sort that out, too.)
 same path repeatedly in the same direction without stopping. No visitor is surprised by a loop railroad, of course. They've seen them on tabletops and around Christmas trees since they were little. But if you want to hold visitor interest, you need to make the train look like it's serving a purpose and going somewhere, and not just chasing its own caboose. Ric Golding (whose point-to-point railroad was used as an example above) points out that even a train going in circles can "have a function" if there are industries and stations to serve. But I like it if the circles are slightly less obvious.