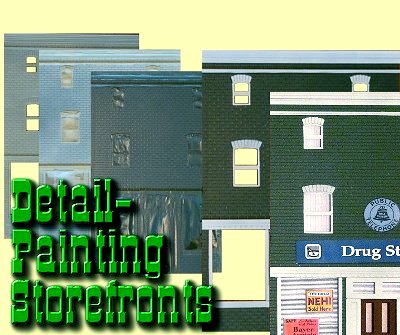
Detail Painting Storefronts
Before 1960, most railroads served communities, and most of those communities had a row of stores, what used to be called the "shopping district" (remember those?). The storefronts of most "shopping districts" built between 1880 and 1930 followed certain patterns that have become iconic in American culture - including big ground-floor windows for displaying products to window-shoppers, smaller windows upstairs where there were living quarters, stock rooms, or walkup offices, all capped by fancy cornices that crowned the facade.
I've scratchbuilt, trashbuilt, and kitbuilt these in most scales. I also can't help noticing that in certain scales, the same seven or eight buildings, color schemes, signage and all, reappear on every railroad. How do you bring your own tastes and preferences to your little communities? One way is with custom painting. In fact, if you're a garden railroader, you need to paint your buildings anyway - anyone who tells you otherwise is just trying to sell you more buildings in a few years.
Painting your storefronts gives you the chance to make your "shopping districts" truly unique. It also helps you create attractive custom models from inexpensive kits.
For this project, I'm using Large Scale buildings from Colorado Model Structures. The store fronts I'm using in my examples are from their new line of city buildings, sold under the name  Market Street. These kits are designed to give Large Scale railroaders a city block's worth of residential, commercial, or industrial buildings for less than $50. They also have molded-in detail that doesn't really show up unless you paint them carefully. Though these buildings are twice the size of most O scale buildings, and I take extra steps to make certain they will stand up to harsh weather conditions, the principles of masking and spraying apply to any scale. (In my indoor railroading days, my Plasticville structures benefitted greatly from this approach, but I gave those to a collector friend when I went into Large Scale, so I don't have any to show you.) Market Street. These kits are designed to give Large Scale railroaders a city block's worth of residential, commercial, or industrial buildings for less than $50. They also have molded-in detail that doesn't really show up unless you paint them carefully. Though these buildings are twice the size of most O scale buildings, and I take extra steps to make certain they will stand up to harsh weather conditions, the principles of masking and spraying apply to any scale. (In my indoor railroading days, my Plasticville structures benefitted greatly from this approach, but I gave those to a collector friend when I went into Large Scale, so I don't have any to show you.)
One other caveat - if you buy any of the Market Street kits, you get three or four different building facades. But for a recent clinic, I used several of the same building - so I could show all of the steps at the same time. Also, I only show the building fronts, but the same techniques can be used on the backs and sides.
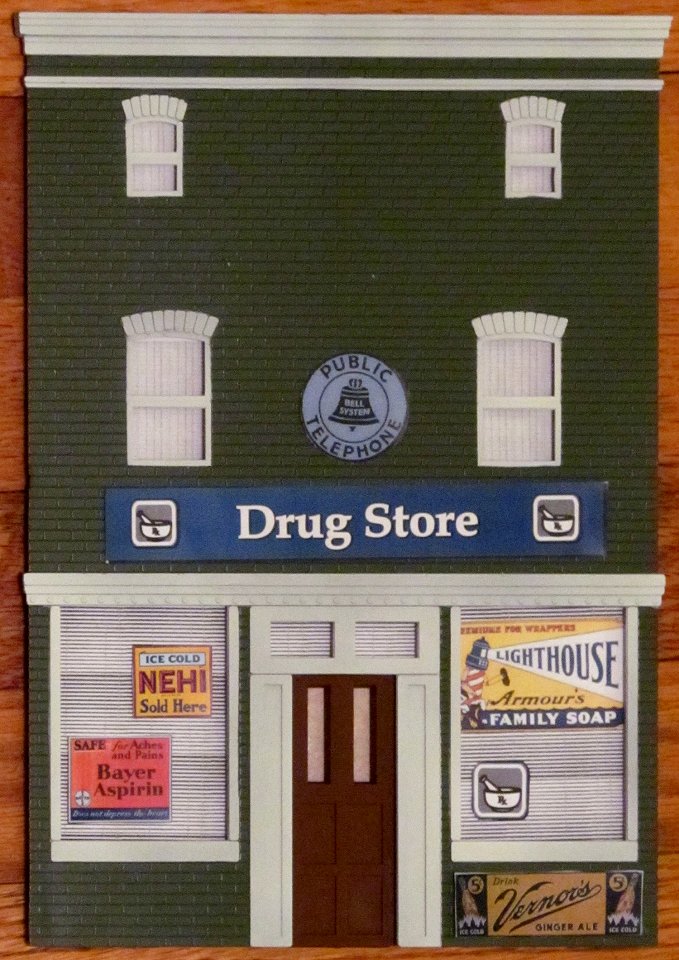
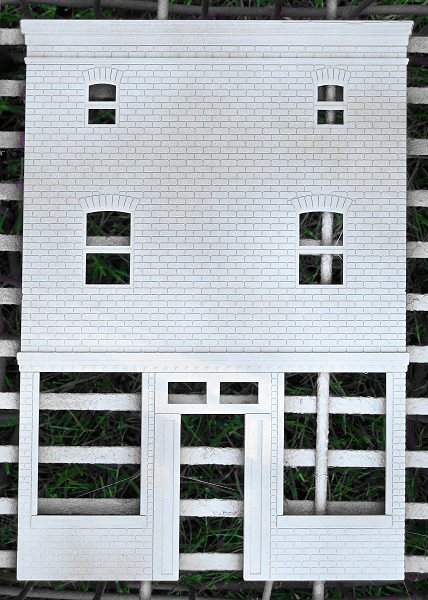
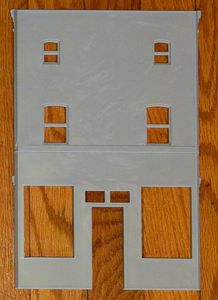
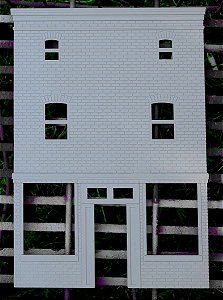
This is a preview of the "before" and "after" of our project.

|

|
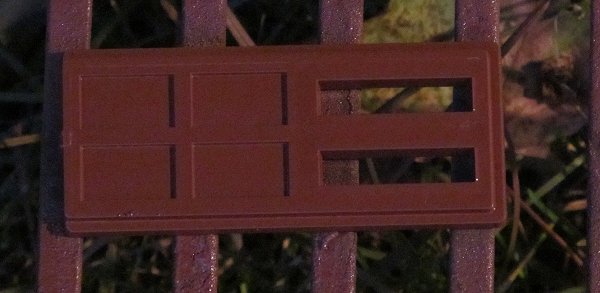
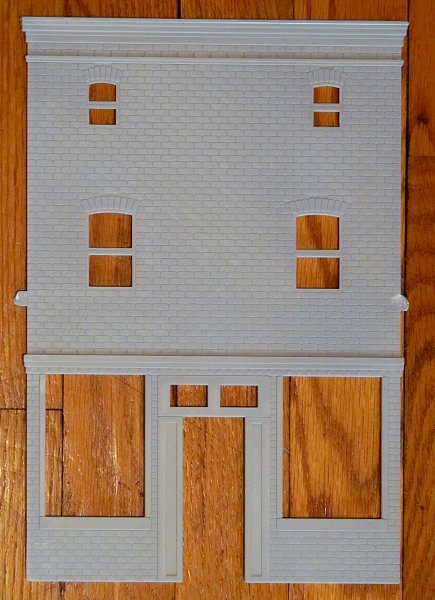
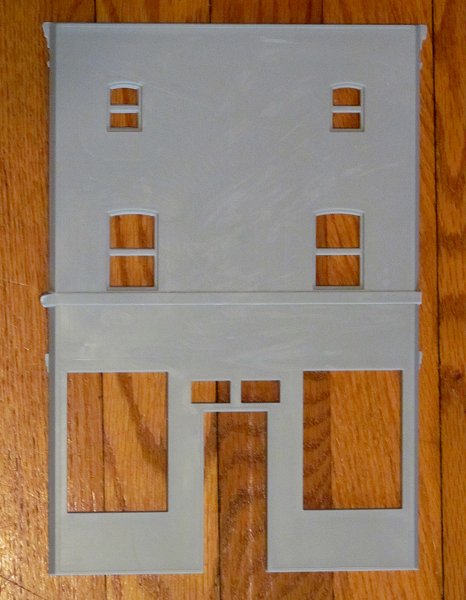
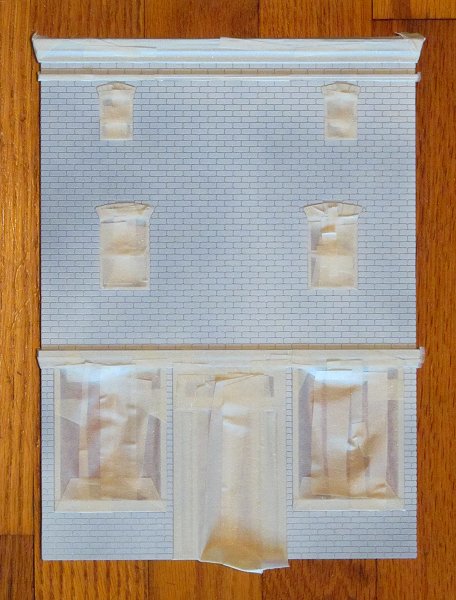
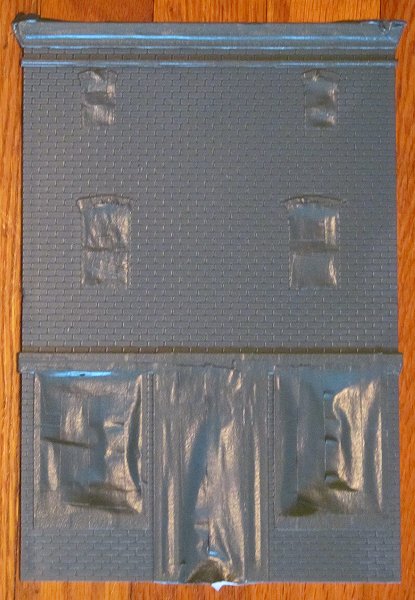
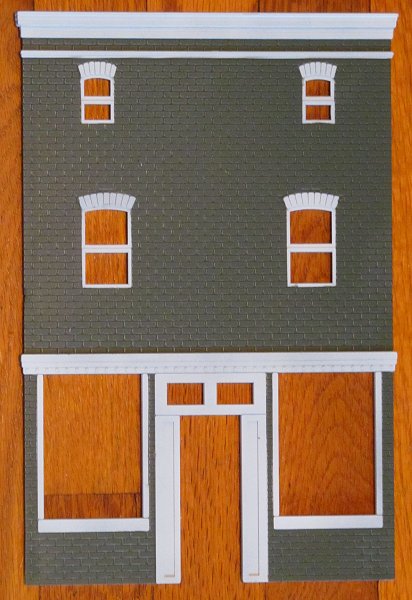
| Market Street Store Front as delivered |
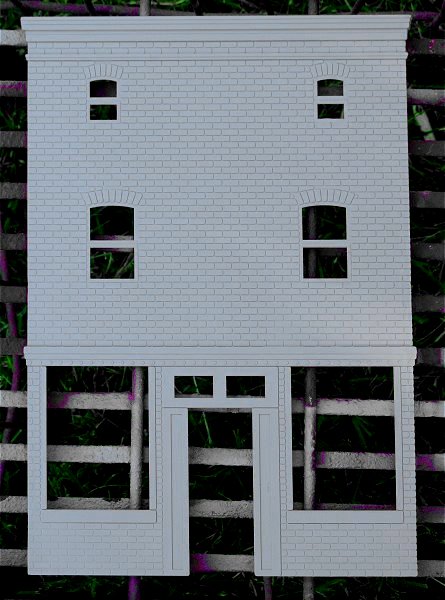
Market Street Store Front trimmed, primed, frosted, masked, painted, unmasked, touched up, door and signage added. |
As a garden railroader who frequently suffers sticker shock, I have to confess I get a charge out of getting a $20 or $40 building to look as good and hold up better than an out-of-the-box $120 building.
Though we describe the whole process of prepping a storefront for attractive outdoor installation, this article will largely focus on one aspect of the process that applies to indoor and outdoor buildings both: careful masking. You'll also see how a few basic tricks can turn an apparently "flat wall" into an attractive, realistic, "three-dimensional" surface.
What You Need
In addition to the kit you are going to prep, paint, assemble and glaze, you should have the following tools and supplies onhand. (My guess is that you already have almost everything you need.)
- Gray primer spray paint (the cheap stuff from Walmart does fine)
- Flat white spray paint (the cheap stuff from Walmart does fine)
- Colored flat or satin spray paint to make the "base" color of the building. Try not to use gloss unless you want your building to look plastic.
- A flat file and a knife you can use to carve plastic. A "razor saw" or something with serrated edges, like an old steak knife, works great.
- Masking tape (cheap stuff is fine)
- Scissors that will cut masking tape
- A cleaning solution like Glass Plus or Fantastic that cuts grease and leaves very little residue
- Soft, absorbent cotton dishtowels - not terrycloth or anything else that will leave lint
- Some place you can spray paint without asphyxiating yourself or accidentally spraying your spouse's car. On calm, warm days, I set my projects on antique milk cartons outside. On cool or windy days, I may use an appliance box with the top and one side cut out in the garage.
- Super-cheap little paint brushes, the kind you buy in bulk for elementary school projects.
- A couple hours' worth of DVDs that you can listen to without having to watch closely, to give you something to do while you are masking your models. Downton Abbey or anything based on Jane Austen work great. Alternatively, you can use an action flick you have memorized so well that you only need to glance up at the "good parts."
Prime, Mask, and Paint Before You Assemble
In their excitement at having a new kit to put together, many hobbyists get out the files and glue, assemble the building, then start wondering how they should "finish" it, meaning paint, signage, and details. But to get the most precise, attractive, and durable "finish" on your buildings, you need to do a complete and careful painting job before you put it together.
Examine the Sprues
Every plastic model has places where the bit you need was attached to little "trees" or "pipes" that you don't need. These are called the "sprues," and you will eventually need to remove them. However, if you have many parts on one sprue, like the photo to the lower right, it's usually easier to clean and paint the little parts before you separate them, then touch up anywhere they need it.  The photo to the right is a Piko example from our Painting Plastic Structures article. If your kit has fine parts on sprues, please refer to that article for "best practices" regarding such parts. The photo to the right is a Piko example from our Painting Plastic Structures article. If your kit has fine parts on sprues, please refer to that article for "best practices" regarding such parts.
Note about CMS Buildings: Because some of Colorado Model Structures' customers over the years have complained about having too many parts to glue together, many of the details on CMS buildings are now molded right onto the main structure pieces. For that reason, most newer CMS kits do not have separate sprue trees like the Piko example below, but you still need to file off any places where the sprues were attached.
In the CMS Market Street storefronts we used for this project, there are no sprues. But there are remnants of sprues - big semicircular shapes that obviously connected the parts inside the mold.
The first two photos below show a Market Street storefront as it comes in the kit. You can see that the remnant of the sprue would keep the edges of the walls from butting up against the adjacent wall. The third photo shows the back of the wall with the sprue carved and filed off.
|
|

|
|
| Market Street Store Front as delivered |
Market Street Store Front back, showing sprue remnants |
Market Street Store Front back, showing sprue removal |
I use an old knife with a serrated edge, like a steak knife. Don't use your good steak knives for this if you want to stay married. Other folks use more elaborate tools like "razor saws" or small hacksaws. Whatever you use, be careful not to carve too deeply. You want to make the area you're working on flush with the rest of the edge of the wall, without cutting away so much you can see a gap on the other side. I try to carve away all but the last 1/16" or so, then finish up with a flat file. 
Test Fit and File Trim As Necessary
When you've cut away the remnants of the sprue, try setting the wall adjacent to the wall you will be gluing it next to in the final model. On the CMS Market Street storefront models, you'll see that the bits of trim along the edges will keep the walls from fitting snugly against each other. If you aren't entirely sure what your "end game" is with this piece, you can file the trim later, but you may need to touch up the paint afterwards.
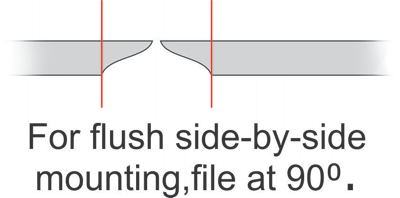
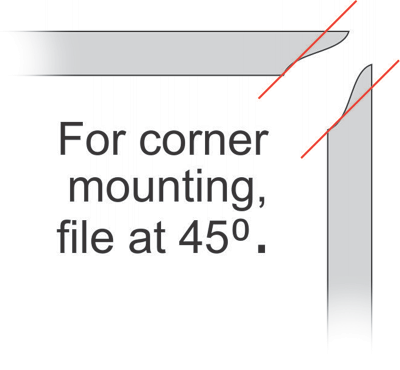
The following illustrations show suggestions for trimming the trim bits on the CMS storefronts depending on how you eventually want to use this piece with other pieces.
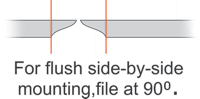 Side-By-Side Fit Side-By-Side Fit
If this piece will be fitting side-by-side with a similar wall piece, you'll need to cut and or file the trim pieces off flush.
Corner Fit
 If this piece will be on a corner, very carefully file the trim so that it sticks out at exactly the same angle as the angle of the rest of the wall edge (45 degrees). If this piece will be on a corner, very carefully file the trim so that it sticks out at exactly the same angle as the angle of the rest of the wall edge (45 degrees).
Freestanding
If this piece will be freestanding, the trim may remain just as it is.
Get Ready for Prime Time
Primer is a flat neutral color that may be formulated to stick to the surface better than colored paints. Its flat finish helps most "top-coat" colored paints to stick better than if you tried to use them directly.
I use Walmart's Gray Primer, usually available for $1.30 or so a can. You can use more expensive primer if you want, but this does the job for me. If the final building is going to be "brick-colored," I may use a "rust primer" instead. I've tried "white primer" on pieces that I was going to finish in white and discovered that it made no difference in how many topcoats I would need anyway. And it didn't protect provide nearly as much longterm UV protection as gray or "red/rust" primers.
I actually prime almost every model I paint, even pieces that technically may not need it. There is an admittedly subjective aspect to this. Priming not only "preps" the piece for the decorative layers of paint; it also:
- Removes the "plastic" look and feel and helps me start visualizing the pieces as a building component instead of a hunk of plastic.
- Creates a sort of "blank canvas," so I can plan my project's final look without being distracted by whatever color the manufacturer chose. As an example, one Piko Gingerbread house I built started out with a sickly yellow color. Once I primed it, I could think more objectively about whether the blue and white scheme I had chosen would look right on the thing.
Before you paint any plastic model piece, use Glass Plus, Fantastic, or some other cleaner that doesn't leave any residue to speak of to wipe it down carefully. Then use a clean, lint-free cotton towel without nap (no flannel or terry cloth) to dry the pices off thoroughly, getting into all the cracks. Then let the piece dry for a half hour or so just to be sure (more on a muggy day). This process does two things:
- Removes oils that accumulate on the plastic during the manufacturing process, and
- Removes fingerprints that could keep your paint from adhering properly to the plastic.
Once you have cleaned the plastic, treat it as you would a photograph (remember those?), handling it only with clean hands, and only by the edge. If you have pieces that are still on a sprue tree, handle them only by the sprue.
Prime
By the way, priming is something that takes a bit of time to do right, but most of the work is "hurry up and wait." So if you can prime several pieces at the same time, that's not a bad thing. I would encourage you to keep "extra" gray primer on hand. There's no precise measurement, but I would say I tend to get about four of the CMS Market Street wall pieces per can of primer. You might get less, especially when you're starting out, so save yourself a trip to the store and pick up more cans than you expect to need while you're there.
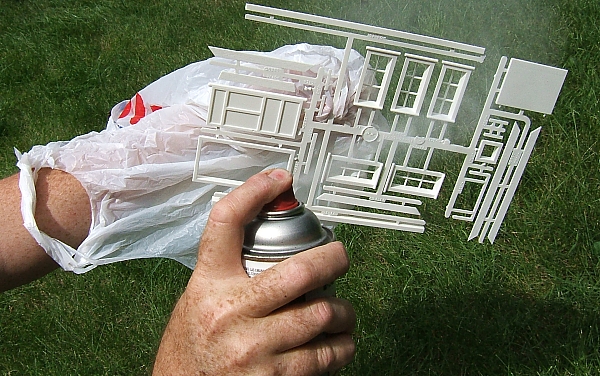
Most spray paints work best over 60 degrees Farenheit. Start with the back side of each piece (you want to practice a bit, plus this will help your piece not glow in the dark if you add lighting eventually).
If possible, arrange your piece at a slope (most spray cans can't spray well straight down). Shake the primer can until you can hear the little ball rolling freely. Do NOT aim the can at your piece until after you've pressed the button. Instead hold the can off to one side about 8" away from your piece. Press the button and bring the spray pattern all the way across the piece and off the other side before you release the button. Otherwise, you'll wind up with a circle of extra paint where you started or stopped spraying. The whole process should last two or three seconds. By the time you've bent over to take a look at the surface of your piece, the paint should already be drying or dry. If there are any drips or even any shiny spots, you moved too slowly.
Make several quick, light passes, allowing a few seconds in between. This helps you avoid the danger of drips or runs and helps provide a more even coverage in the long run.
You don't need perfect coverage of the back, but it helps if you get the inside of the windowframes from a couple angles - as long as you don't saturate or cause drips or runs. Once you feel like your coverage is "pretty good," let the back dry for an hour or so, then turn the piece over and start on the front, using the same technique to avoid oversaturating or creating drips or runs.
You may not have 100% coverage from your first coat of primer. Don't try to "fix that" by saturating the paint on the piece. Even if you don't get any drips or runs, you'll create areas with uneven coverage, and possibly fill the mortar lines between the "bricks" with paint. Walk away.
 In twenty or thirty minutes, come back and repeat the same pricess from another angle. Then walk away again. By now you've figured out why priming multiple pieces is almost as easy as priming one. In twenty or thirty minutes, come back and repeat the same pricess from another angle. Then walk away again. By now you've figured out why priming multiple pieces is almost as easy as priming one.
In twenty or thirty more minutes, come back and look closely at the piece to see if you need to hit it from another angle. If so, hit it again. The detail on these pieces is not molded very deeply, but it's still possible to get just, say, the top and left edge of each brick and, and not hit the bottom and right edge until you come at it from another angle. Again, take "baby steps" so you don't accidentally leave so much paint that you hide the details.
At the end of this process, let the pieces dry overnight, or at least a couple hours, if you have dry, warm weather. (If you worked outside, and you need to bring them in, lay them out somewhere that wet paint won't damage, and be certain the "face" of the piece is completely exposed.)
Even after the primer coat is thoroughly dry, continue handling these pieces like photos - only with very clean hands and only by the edges.
If the building is going to be installed outside, and the primer color is going to be part of the paint scheme, I make certain to get two full coats of primer. This may seem like overkill. But in cases like the CMS storefront project, the primer is also a "top coat" for the windowframes and doorposts. So you if your building is going to be sitting outside, you will want the extra UV protection.
Decide which Parts to Paint Next
On large scale buildings, I usually painting the "trim" color, then mask those parts off and spray the base coat. However, on O scale buildings, you may decide that it will be easier to spray the base coat first, then mask that part off and paint the "trim" pieces. The question is, will it be easier to mask the trim, or to mask around the trim? If you think it will be easier to mask the trim, follow the rest of the sequence in this article the same way I have it. On the other hand, if you think it will be easier to mask around the trim, spray your base coat, then mask everything but the trim and spray that.
Frost
Because I tend to model heartland America in the 1920s-1940s, most of my storefronts represent brick buildings, many of which had limestone doorsills, windowsills, lintels, and cornices. By making those "trim" pieces look stone-like, I establish a date range for the building, plus I bring out detail that would otherwise be hidden, if I just painted the whole building the same color.
To achieve a "stone" look on surfaces I've already hit with gray primer, I frost the building with a faint spray of flat white. It lightens the "trim" areas that will eventually represent concrete or stone, but it also gives them a textured appearance.
Once your primed pieces are thoroughly dry, set the pieces up again as you did before. Shake the flat white paint can until the ball rolls freely.
This time, work from a greater distance and make faster passes. You're not looking for complete, even coverage, just for a slightly lighter appearance. Also, you won't get the exact same shade on all the windowsills, etc. Once the contrasting coat is added, the frosted part will all look the same to other folks anyway. If you try to get every windowsill exactly the same shade, you'll just wind up painting everything white, and that's not nearly as effective as a "frosted" appearance.
Mask
This is the part that some people think seems like too much work. But it's the part that separates the craftspeople from the hacks. Best of all, anybody can do it, and do it well, if they're willing to take the time.
Some folks are afraid of this step because they think it must demand fine precision. Nothing could be further from the truth. Take a look at the closeup of our masked sample piece if you want some reassurance. You'll see all shapes and sizes of tape applied on the building's trim and openings. At first it may look fairly "willy-nilly," though we do follow a process. The main thing to realize is that it doesn't matter how many little bits of tape you use or what shape the individual pieces are, as long as the parts you need covered get covered, and nothing else does.
For this stage you need a roll of masking tape. You also need a pair of scissors and a comfortable place to sit with good lighting. Your piece should have dried overnight, at least - the last thing you want to do is pull the paint back off when you remove the masking tape later.
Once you've got the hang of this, you may be able to do it while you're watching television, as long as it's something like a sitcom or chick flick that you don't have to keep your eyes on every second to follow the plot.
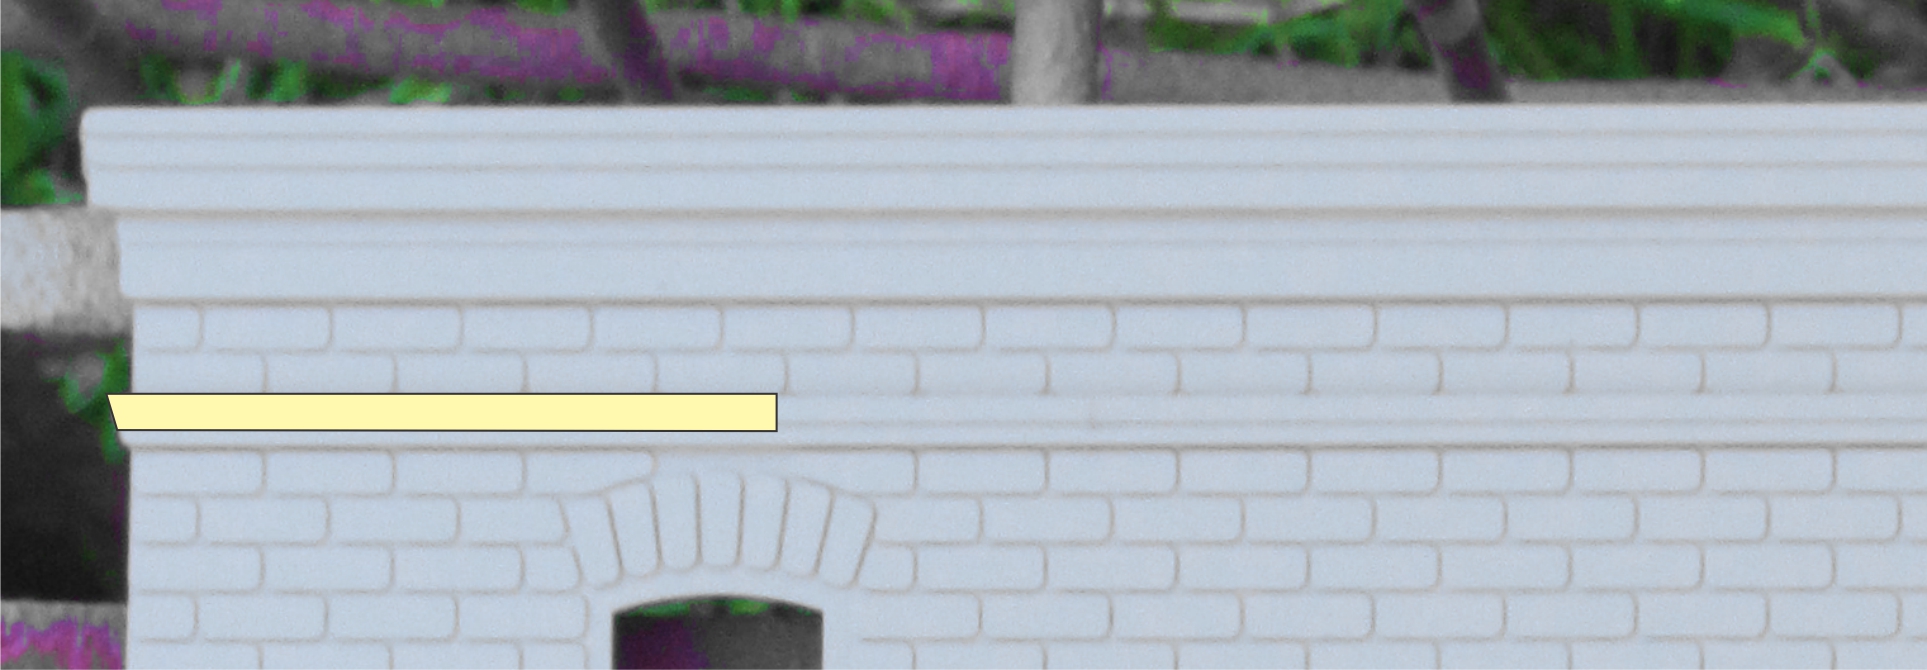
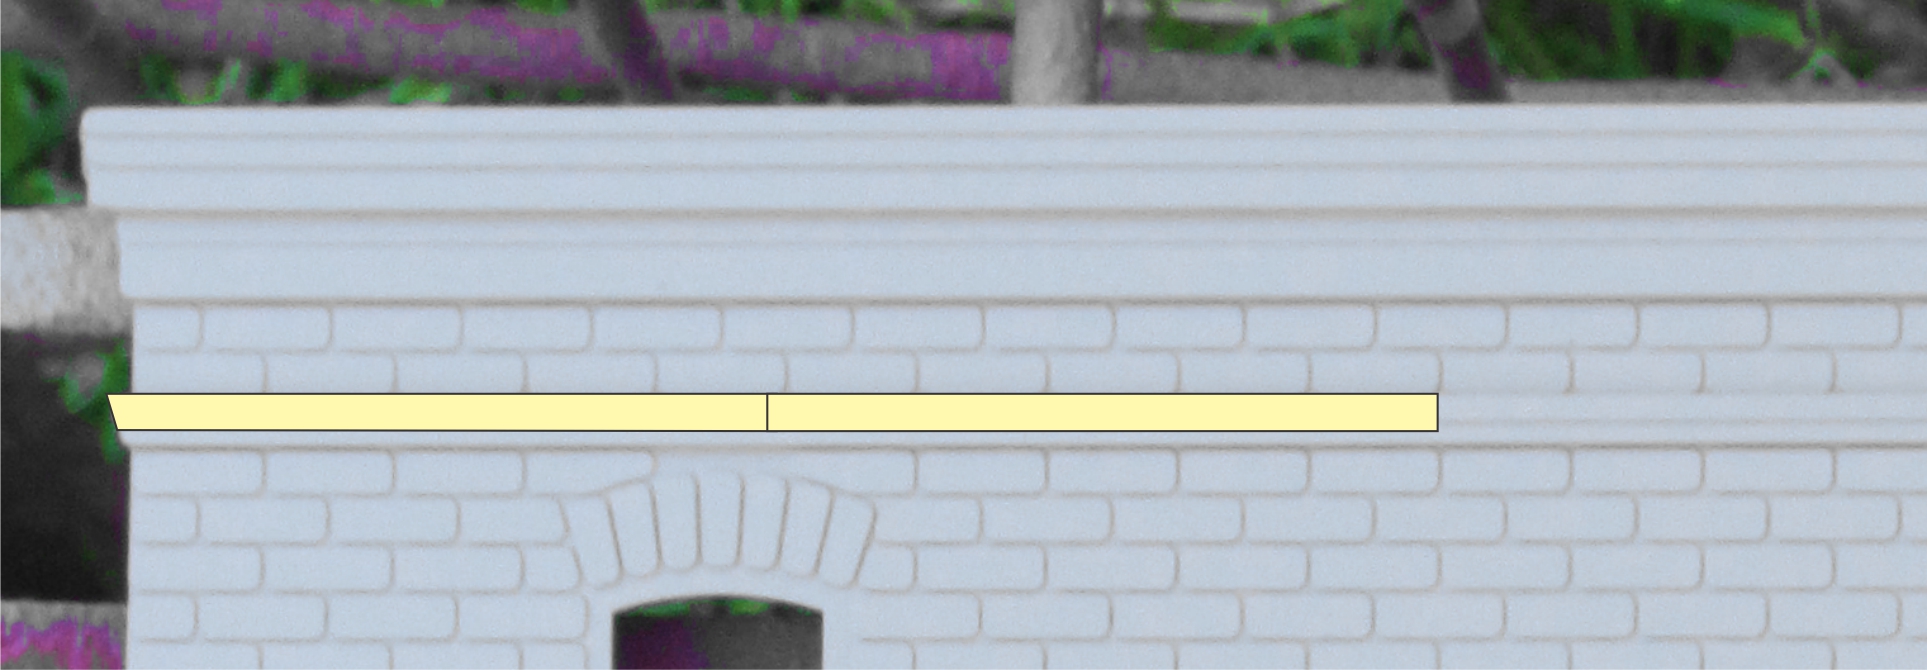
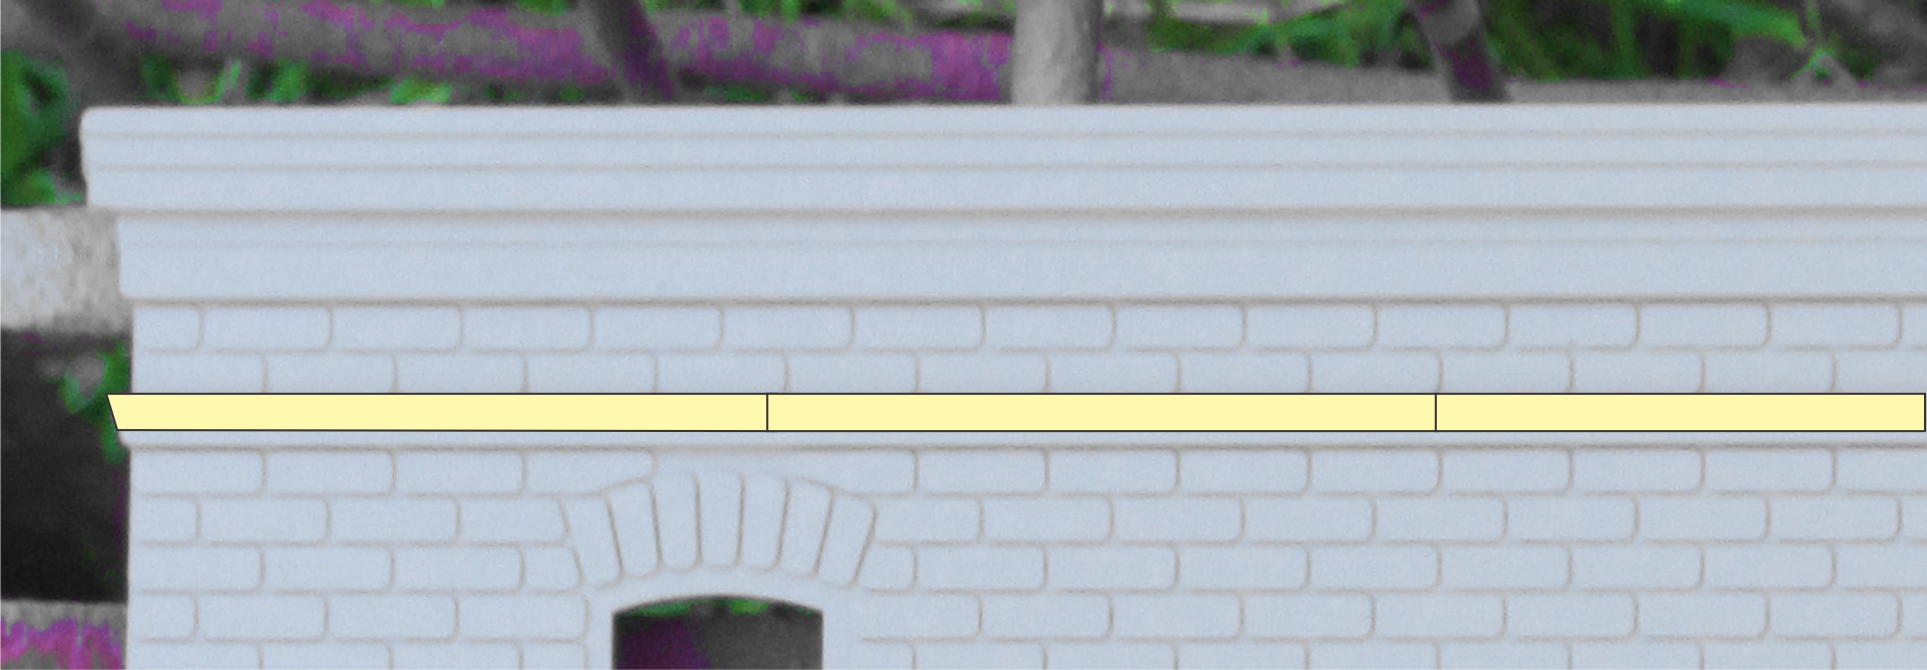
Masking Skinny Trim Bits
The hardest part of masking these buildings is probably the little skinny line of trim that's about an inch down from the top. For that:
- Cut very skinny strips of tape, making no attempt to get the the right width.
- Starting on one end, align the top edge of the first strip of tape along the top of the trim piece, leaving just a tiny bit overhanging the top edge.
- Put the tape on, then use a fingernail to force the overhanging bit against the slender top edge of the trim piece.
- Do that again and again, until you have the top edge masked
- Do the same thing on the bottom edge of the trim piece. That isn't quite as demanding, since the edge isn't quite as deep. Besides, folks won't really notice as much if you mess up the bottom edge.
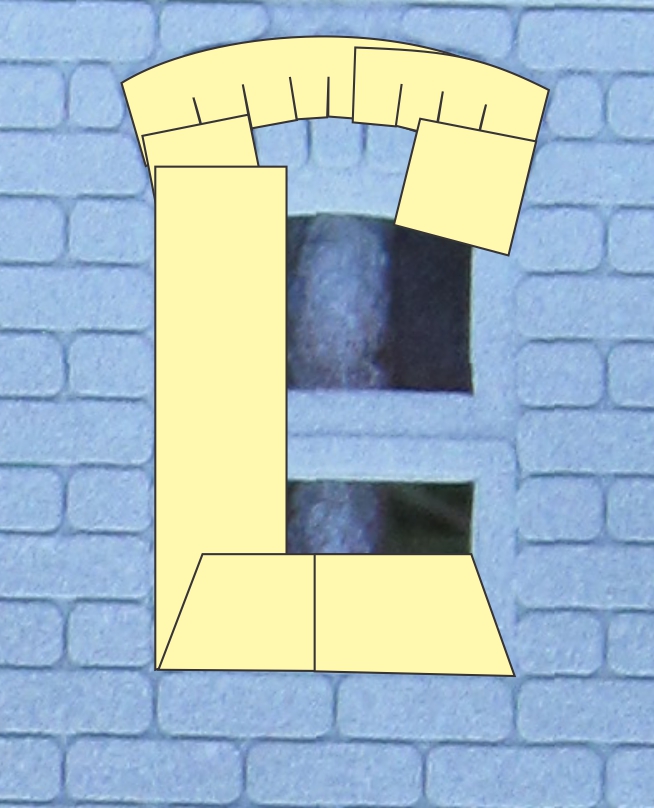
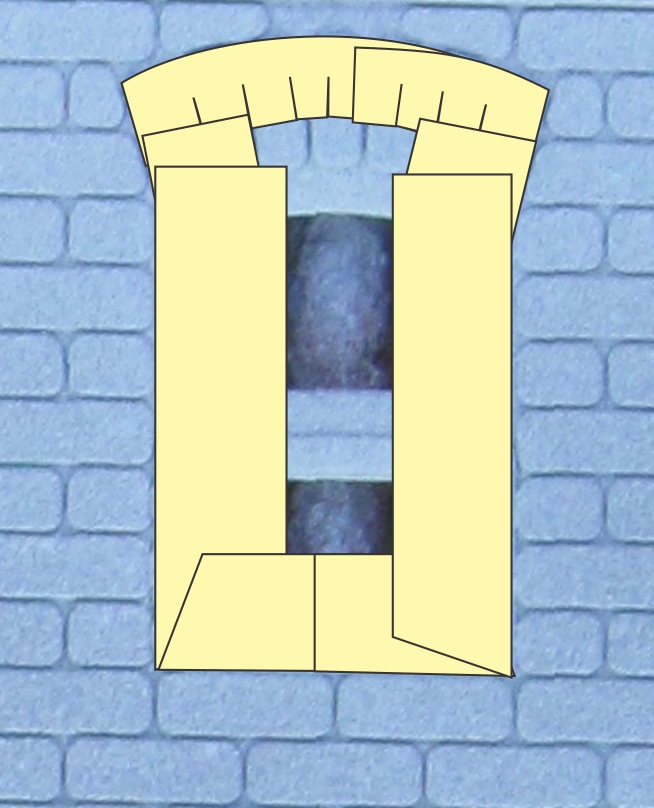
The series of graphics below tell the visual progression of this process. I used a combination of drawings and photos because the photos of real masking tape were just too difficult to see.
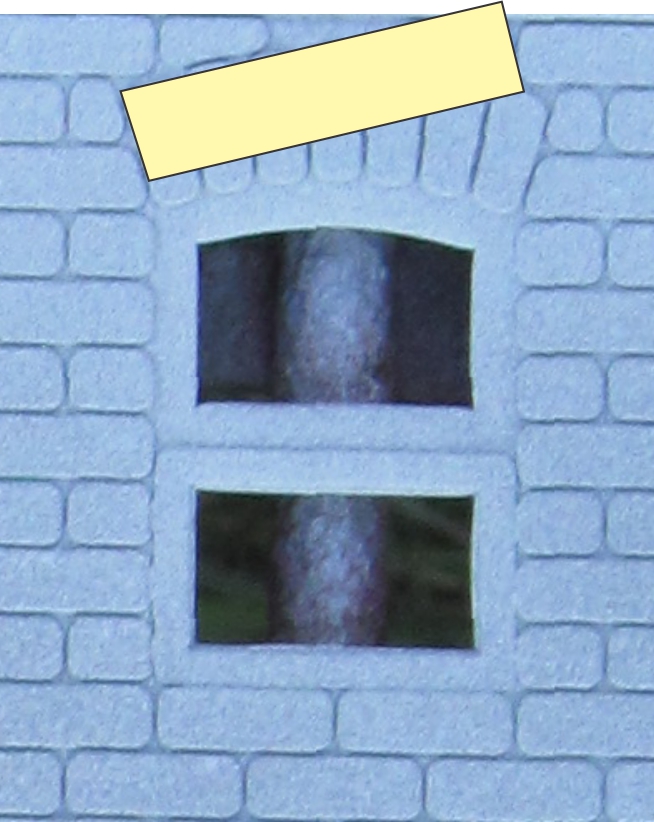
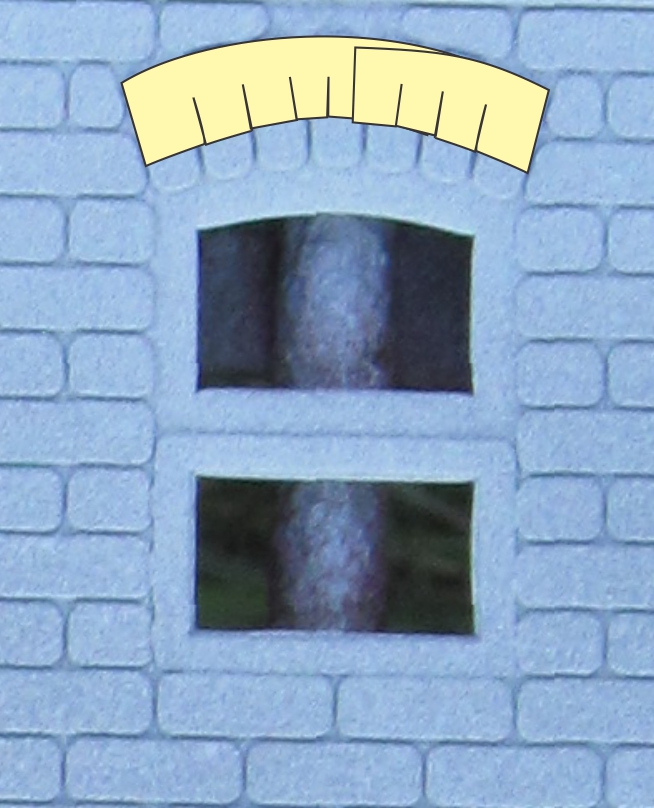
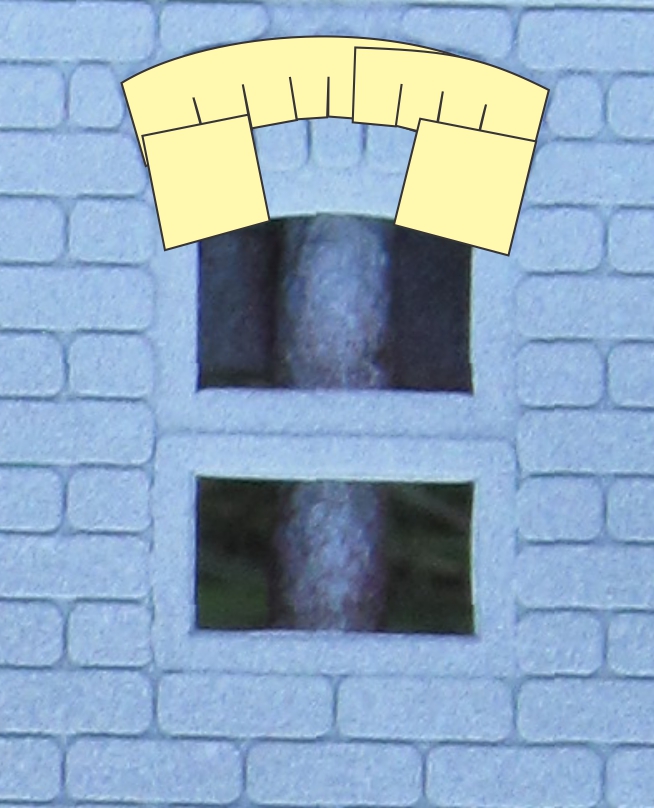
Masking Arched Windows
On the building I chose for this example, the small arched windows may also seem a bit daunting to first-timers. Here's how I do them.
- Cut a strip of tape no wider than the height of the arched bricks and slightly shorter than the width of the windows. Align one corner of the tape with the first brick, protecting the top and one side of that brick.
- Align the top edge of the tape along the outside, top edge of the arched bricks, curving the tape as you go. When you fasten the tape down all the way, you'll get a sort of "pleated" effect on the inside of the curve. That's exactly what is supposed to happen.
Also, don't worry about the inside of the arch being ragged or too short. You'll be adding more tape in a later step.
- When you have used up the first strip of tape, cut another, shorter piece, start with the other end of the arch, and work your way back.
- Use a couple little rectangles of tape to protect any part of the outside bricks that your curved pieces don't cover.
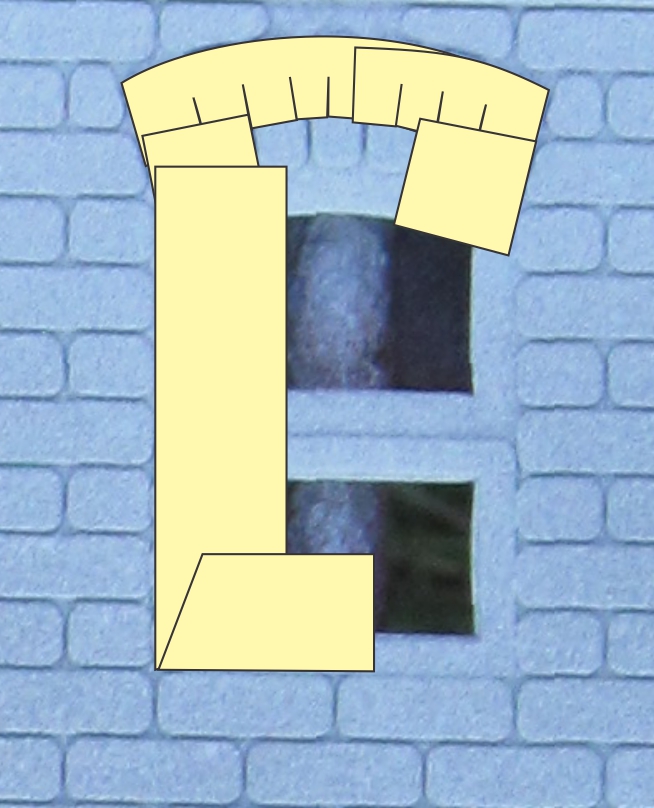
On some of the walls that go with this set, the windows aren't arched at all, but if they are arched, I like to do the arches first. Then everything you have left is square.
- Cut a piece of tape with an oblong corner that you can align along the first long edge of the window. The pointy corner of the tape goes with the tip at a corner of the window.
- Cut another piece of tape with an oblong corner and put the pointy tip into the same corner you have already half covered. Now the whole corner is masked with more precision than if you'd tried to cut an exact 90-degree angle and get it exactly into place.
- Repeat the process for the next corner.
- Use random lengths of tape to fill in the rest of the window.
As above, the series of graphics below tell the visual progression of this process. Again, I used a combination of drawings and photos because the photos of real masking tape were just too difficult to see.
 Did you notice that you didn't have to measure one piece of tape? That wasn't really that hard was it? And no professional I know gets a sharper edge or better corner than I get using this technique. Did you notice that you didn't have to measure one piece of tape? That wasn't really that hard was it? And no professional I know gets a sharper edge or better corner than I get using this technique.
Once you've done the skinny trim and the arched windows, the square windows and fatter trim should be relatively easy. Remember, don't try to cut pieces that exactly cover the area you need to cover - you'll lose your sanity. Build up coverage by combining little pieces that don't have to be precise.
When you're done, your wall should look something like the photo to the right. Don't be frustrated if the first one seemed to take a long time. Now that you know what you're doing, you should realize that you can do this when you're watching a dialog-heavy television show or otherwise relaxing. (Nobody complains when Grandma brings her knitting into the living room.)
Painting the Last Coat
 Unless you have a really complicated color scheme in mind, the next color you paint will usually be the last for this building. I would recommend lightly dampening a lint-free cotton cloth with Glass Plus or Fantastic or similar cleaning solution, then wiping off the areas that you will be painting, in case you've left fingerprints. Then let it dry thoroughly. Unless you have a really complicated color scheme in mind, the next color you paint will usually be the last for this building. I would recommend lightly dampening a lint-free cotton cloth with Glass Plus or Fantastic or similar cleaning solution, then wiping off the areas that you will be painting, in case you've left fingerprints. Then let it dry thoroughly.
The spraypainting process is exactly the same as the priming process was - multiple light coats from different angles. Do not try to get the whole thing covered the first time - you'll create runs, drips, splotches, and missed edges.
Once the top coat seems dry, you may be tempted to rip the masking tape off and see the final result. Don't. The paint needs to be completely dry, including any tiny "pools" of paint that take extra time to dry. Otherwise, any undried paint will get where you don't want it. I always wait overnight, which is one reason I bring several pieces in different stages to my clinics. (Think of it as the equivalent of the cooking shows where the chef shows the recipe going into the oven, then pulls out a previously-prepared example to show what it will look like when it comes out of the oven.)
Unmask
 In my clinics I call this the "magic trick." When the group is small enough, I pass around the masked-and-topcoated piece and let each person tear off a little bit of tape. By the time it's done, I have a two-color building front that looks almost as good as any model you can buy. I say almost, because there is inevitably some little place where the last color leaked through or under the tape, or where the last color didn't cover, or - very rarely - where the masking tape took off the under coat. In my clinics I call this the "magic trick." When the group is small enough, I pass around the masked-and-topcoated piece and let each person tear off a little bit of tape. By the time it's done, I have a two-color building front that looks almost as good as any model you can buy. I say almost, because there is inevitably some little place where the last color leaked through or under the tape, or where the last color didn't cover, or - very rarely - where the masking tape took off the under coat.
Touch Up
A decade ago, I bought one of those kids' paintbrush packages where I got 30 brushes for a dollar or two. I'm still using those.
You are going to be using a super-cheapy brush to apply "spray paint" manually, then throwing it away, since it's not worth the cost of paint thinner to clean the brush.
Determine which color or colors you need to touch up. Take those spray cans outside or to a very-well-ventilated spray-paint safe location. Wear old clothes or roll up your sleeves.
When you're ready to start, take the cap off of the first color you want to use, hold it upside down at arm's length, and spray some of the color right into the cap. Overspray will go everywhere when you do this, which is why want to do it at arm's length in a safe, well-ventilated location.
You'll notice that the paint you sprayed into the cap stays liquid for a few seconds. Set the can down, dip the cheap brush into the paint, and touch up any areas that need this color. You may have to repeat the "spraying into the cap" move more than once if there is a lot of touchup to do.
Light colors (like white) will need to be hit two or three times. This is one case where you don't necessarily have to wait until the area you're painting is completely dry before you hit it again - if you wait too long, your brush will dry out and you'll have to start another one.
The touched-up areas may not blend pefectly. That's okay, as long as the "goof" isn't obvious from more than a few inches away.
In the cases where I had to touch up "frosted" trim areas, a single touch-up with flat white usually gets it "close enough," since flat white spray paint applied this way is never opaque in the first coat anyway.
When you're done, be sure to handle the building fronts carefully (usually by the edges) because spray paint applied this way may take a while to dry completely.
If you have any pieces that are still attached to sprues, this is a good time to cut them apart. Use the cheap-brush-and-spraypraint-in-the-cap trick to touch up any places you need to.
Dispose of the brushes, and put everything away.
Tomorrow you can get out the glue. But that's another story.
The Doors
You may like your doors to be the same color as the walls. In this case, I like a contrasting color to add a bit more interest. The photos below show the door for this storefront before and after painting. I used a Rustoleum rust primer, cleaned it with Fantastic to get rid of fingerprints, and gave it two good coats, since experience proves that one coat won't protect it indefinitely from UV. You'll notice that the door has a flange around it that allows it to be "dropped" right into the finished wall once you're ready to install it.
Finishing touches
I have two more of these to finish painting before I move on to the next step. But once they're all three ready, I will:
- Add glazing - probably 1/8" Lucite or the like, using the procedures in our article on Glazing with Lucite. The door sticking out the back will keep me from glazing the whole wall with one piece of Lucite, which would be my preference - it adds serious strength to the building. But it will get glazed.
- When all three storefronts are done, I'll add curtains or shades, decide what signage to use, and attempt to come up with something that will stand in for "interiors" on the bottom windows.
In the meantime, I've attached some graphics temporarily to the storefront in our example, just to give an idea o what the finished version might loook like.
Tell us about your projects
At a recent clinic, I used CMS storefronts like the ones in my photos to demonstrate the various stages of sprue-trimming, priming, frosting, masking, painting, and unmasking. Bruce, the owner of CMS and designer of these structures had a booth set up just around the corner. Unfortunately his painted examples weren't as detailed as mine, which caused one of the attendees to claim that she hadn't seen the pieces I was using. To her, Bruce's examples had looked "flat" and void of detail.
I explained that A: Bruce doesn't have the time to detail-paint his example buildings as carefully as I do mine and B: when he does take the time to get a really nice-looking example, someone inevitably makes him a really good offer on the finished piece, so he winds up starting over.
I showed her the before, during, and after pieces again. When it really "sank in" that the detailed-looking "after" piece was really just the "before" piece with a good paint job, she said, "I'll be back," ran out to Bruce's booth, and bought three sets of buildings. Hopefully, she'll see this article and be able to follow our examples.
In case you wondered, I not a master of these techniques. Once these buildings have been out for a while, Bruce's "gallery" section will include examples from the real masters, and I'll drool over them along with the rest of you. But following these basic steps will get you started on a making your own, truly unique communities.
If you have a structure tip or project you'd like to tell other garden and model railroaders about, please contact me with the details, and I'll be glad to pass them on, giving you full credit, of course.
|


|


 and
and  BIGIndoorTrains.com


 Did you notice that you didn't have to measure one piece of tape? That wasn't really that hard was it? And no professional I know gets a sharper edge or better corner than I get using this technique.
 Unless you have a really complicated color scheme in mind, the next color you paint will usually be the last for this building. I would recommend lightly dampening a lint-free cotton cloth with Glass Plus or Fantastic or similar cleaning solution, then wiping off the areas that you will be painting, in case you've left fingerprints. Then let it dry thoroughly.
 In my clinics I call this the "magic trick." When the group is small enough, I pass around the masked-and-topcoated piece and let each person tear off a little bit of tape. By the time it's done, I have a two-color building front that looks almost as good as any model you can buy. I say almost, because there is inevitably some little place where the last color leaked through or under the tape, or where the last color didn't cover, or - very rarely - where the masking tape took off the under coat.