| |||
 |
 |  | |
 |
 | ||
 |
 | ||
 |  | ||
 |  | ||
| |||
|
|
| | |
|
| ||
|
| ||
| | ||
| | ||
| Written by Paul D. Race for Family Garden Trains(tm) |
 |


|
Clinic Report - 2013 National Garden Railway ConventionIn eary June,2013, the National Garden Railway convention came to Mason, Ohio, about 55 miles from my house. We were delighted to participate, both by holding open railroads on the New Boston and Donnels Creek and by delivering clinics at the convention.One complication was that we also committed to hold two open railroads the same week, so while we were preparing for the clinics we were also preparing for the open railroads. That account begins with our article Prepping for the 2013 Open Railroads, Part 1. These commitments meant that we were working twice as hard as we usually do for this sort of thing - we never do multiple clinics and open railroads the same week. However there was one benefit - some of the work we did for the open railroad also gave us examples for the clinics. Clinic SchedulingEarly on, I gave the convention organizers a list of topics I could present. So did other folks. After a lot of sorting and negotiating, the organizers had me signed up for the following presentations:
For a PDF list of everyone's topics that were scheduled to be presented, please click here. When I've done these clinics in the past, I've usually done them outside. So I've been known to bring circular saws, spray paint, nail guns, pond liners, garden hoses, and shovels. In this case, though, I'd be inside a banquet or meeting room of a nice hotel-like facility. So sawdust and spraypaint and garden hoses were out of the question. Consequently, I put a lot of effort into making presentations I could show on the screen and preparing examples I could pass around. For our readers, I also put together a schedule of our planned clinics, with "recommended reading" for each set of topics we planned to cover. Prepping Building ExamplesOne topic I like to emphasize is ways to save money on structures. I planned early to bring in examples of buildings that I had made by "trashbashing" - converting toys, bird feeders, etc. to scale model buildings. But I have also become aware of a new line of buildings from Colorado Model Structures. Bruce's new line of city buildings makes it possible to build a whole city block in the $40 range. There are residential, storefront, and warehouse districts, plus almost all of the components are available separately, in case you need to break the individual buildings out differently from the standard kit.I'm a huge fan of "due diligence" when you're getting any kit ready to put outside, even the expensive ones that look good out of the box, but break down after a few years if you don't prep them properly. That includes carefully trimming, cleaning, priming, and painting the building before assembly, as well as using Lucite(r) glazing instead of the plastic windows enclosed with most kits. Such preparations will significantly increase the lifespan of your buildings, even those that are supposedly UV-resistant. In past outdoor, clinics, I've demonstrated proper spray-painting techniques real-time with components from Piko clapboard storefronts. But spraypainting wasn't going to happen in the banquet room. So I got Bruce to send me five of the same storefront from his new line of buildings, so I could show a progression of the steps I use to prep buildings for assembly. Once I was done updating buildings for my open railroad, I started prepping the CMS storefront examples, showing each stage of painting:
In the table below, I also included an example of an "unmasked" storefront, but I didn't unmask them until I was doing that part of the presentation.
I wanted to get one of the last ones glazed as well, but ran out of time. As it was, I was able to do the "magic trick" on Thursday and again on Saturday. The "magic trick" is when you peel off the masking tape that protected the gray "trim" color while you sprayed the "base color." The audience can see your "flat," one-color building suddenly reveal all of its detail. Frankly, the detail doesn't always show up that well on Bruce's buildings - it doesn't stick out very far, compared to, say, the expensive European kits. But when you isolate the details with a careful paint job, they look pretty nice. I wanted attendees to get the idea of what they could accomplish with a few dollars and about the same amount of work as they should be putting into all of their buildings anyway. Prepping Figure ExamplesSince we had been toying with some cheap chinese figures we got through eBay, I thought it would be worthwhile to bring a few examples of A: what you can get for .50@ or less if you buy in quantity, and B: how to make them useful on your railroad.A couple of years ago, I ordered a bunch of cheap Chinese-made figures from eBay dealers, just to see what they were like. At any given time, several eBay vendors are usually offering these. The "collections" overlap - that is to say, certain figures show up in each vendor's assortments. But the assortment and prices vary wildly. For our comments on these figures, check out our article More About Scrounging Figures. Here are two photos from that article. On the left is a photo of some of the unpainted 1:25 figures from EverydayGoodz being painted. On the right is a photo of the prepainted versions getting clear plastic bases. (I salvaged a clear PETE "recycle #1" lid from a salad container, cut it into pieces, sanded the figures' feet to make them stand straighter, and used cyanoacrylate to glue them together. Cyanoacrylate is not a permanent solution for buildings that I'm going to leave out all year long, but I don't usually leave my figures out all year long, so we'll see. I will hit both sets with clear, flat uv-resistant acrylic before I set them out for the summer as well.
|
 |
 |
 I attended Nancy's clinic on conifers and took several photos to send her after the show.
I helped a couple other clinic presenters set up, but I didn't have time to sit through anyone else's clinics. Again, there were several I would have liked to attend.
When it was getting time for me to set up, I went to the car and brought back several loads of stuff. I got a friend from the club to help me on one run. Then it was time to move stuff into the room. I set up the buildings I had brought, hooked up my laptop and got started.
 I started out by describing general planning principles, including basic landscape design issues that most garden railroaders don't think about until after they've done to much work to go back and do it right. In the photo to the right, I'm describing how a friend's relative brought a backhoe in and carved a terrace in a steep hillside, giving the friend both a flat spot for locating towns, and a vertical drop for a very impressive waterfall. Most of the information for that part of the presentation is in our Landscaping Hints for Garden Railroaders article, with additional tips from our other Planning articles.
Next, I went over the principles in our Building a Garden Railway on a Budget article. As I wound up that presentation, I introduced my demo buildings:
 |
 I also showed the various stages of the CMS storefronts to explain how a little care up front can produce an attractive, durable structure. Sorry, I don't have any photos of the "magic trick," where I pulled the masking tape off the CMS storefront that had received its base color.
An attendee had demanded that I demonstrate how to use the trestle jig I had brought in. I was saving that for the end, but about 7 minutes before the end of the hour, some staff people came in and made it clear that I was to shut down now. In retrospect, I have no idea what that was about. Nothing like that happened at the same time on Saturday.
Within a few minutes, I had everything back in the car. When I got home, I put back the buildings that I had "borrowed" from my railroad to use as examples and got busy getting ready for Friday's open railroad. The story of that is here.
 Finally, I interrupted as graciously as I could and asked two questions: Was the 0-4-0 on the table the same version that would be in the new starter sets, whenever they arrived, and when would the new starter sets arrive? The answer to the first question was "yes," and the answer to the second question was "September."
I know that a reengineered version of a locomotive that has been around for decades may not seem like news. But I have run the wheels off of three of the older versions - they are often the "workhorses" of my demos and open railroads. So I have a lot of respect for them. I've also spent about twenty years recommending the sets they came with to newbies. Frankly, the hobby has been worse for their absence. Having them reappear with the same kind of gearing that drives Aristo's bigger engines (Mikados, Mallets, etc.), will make their reappearance even more noteworthy.
Other folks have remarked that they were disappointed that Aristo sent only one rep and a handful of samples. But only one other train manufacturer sent anyone at all - HLW, who is always very supportive of these shows. The other manufacturers were absent altogether. So I'll forgive the limited display and single rep and keep my fingers crossed. The Polks have made huge investments in the hobby over the years, and they've taken a lot of flack from would-be competitors who have never shown either commitment or leadership. Stay with us, guys!
By then it was 1:30, time to set up. There were a few minor hassles, but the hotel staff was helpful getting the banquet rooms unlocked and the projectors turned on. (Apparently someone had to go to another part of the complex and flip a switch, an engineering concept obviously borrowed from the first Jurassic Park movie.)
The first hour was a quick summary of Thursday's presentation followed by some other planning tips. We stuck pretty close to our originally scheduled topics. The following list shows the web articles related to the topics we reviewed.
The second hour included additional landscaping tips and information on water features, including information gleaned from:
The last hour focused on accessories including buildings, figures, and bridges:
During the presentation, I described and passed around the sample people I brought as well as the Colorado Model Structures storefronts that I had prepped.
After I passed the storefronts around, I "unmasked" one that had been primed, masked, and oversprayed. One attendee was confused by the "final" version. She said, "I looked at those buildings and they don't have nearly as much detail as this." I passed the samples back to her again and said, "Look, the detail is there - you just need to bring it out by the way you paint them." She gave me the samples back, jumped up and said, "I'll be back - I want to get some of these before he packs up." Later Bruce told me that she had bought several kits and told him it was "my fault." As George Peppard used to say "I love it when a plan comes together."

|

|
We have an article in the works that will show how to get from the first picture to the last one with inexpensive, easy-to-find supplies and no appreciable skills. Stay tuned.
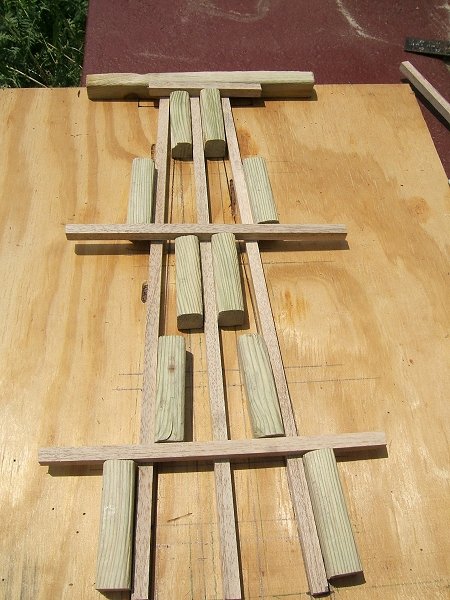
 I did get a chance to show how the trestle jig worked, using an electric nail gun and some lumber scraps. I also explained that trestles in the real world were usually 4-legged or 5-legged, but on public or demo layouts they're often 3-legged to save lumber.
Once we banged a single bent together, several folks responded along the lines of "Is that all there is to that? I could do that!" Which is exactly the response I want people to have. I gave the link to the instructions on our web page. Then I went on to explain that, impressive as they looked, trestles are really one of the cheapest ways to landscape your railroad, especially if you can "rip" the lumber yourself. I had built my jig from scrap lumber, but if you bought the lumber new, you'd have maybe $15 into it. If you rip the lumber yourself, say, from pressure-treated dog-ear fencing planks, you can probably get a bent out of .50 worth of lumber.
Then I showed some bents and remarked that an acquaintance used to sell them for $10 each to fellow club members. I asked, "Now that you know how to do this, would you pay $10 each for these?" Folks said things like "No way," and one lady gave a funny laugh. It turned out that someone in the vendor hall was selling trestle jigs for $100 apiece.
By the way, if you want a trestle jig, let me know whether you want to make 3-, 4-, or 5-legged bents, and I'll gladly build you one for $100. I'll even split shipping. :-) Better yet, go to our Trestles 101 article and build your own for a few dollars.
As the last session "broke up," I hung around to answer questions for another twenty minutes or so. For some reason, the folks that shut us down early Thursday were nowhere in sight. Molly, in the meantime, sneaked out long enough to get several great photos of the Applied Imagination display as it was being disassembled, and to pick up a miniature Sea Pink which she later gave me for Father's day.
After all of that, we packed the car, with a little help from an MVGRS member friend. We also helped an MVGRS member friend get her stuff into the car.
On my way out, I gave Bruce the two Colorado Model Structures storefronts that were completely painted, on the off chance that he could use them to show - as I had - just how much detail is there waiting to be brought out with a careful paint job. I kept the three that weren't finished with the idea that I'd use them in an article eventually. (I did forget to ask him for three more doors.) Then we headed home and set out the buildings that needed to be ready for Sunday's open railroad.
One sign that our presentations were well received by those who did attend is that a few families who were in the clinics made a point of coming out to our open railroad on Sunday. One of them, in fact, was going well out of their way. But the story of the open railroads is here.
In fact, I have some ideas for other things I can present, given the chance.
If you were in ANY of the clinics, please let us know what you got out of them, and if you've been able to apply anything you learned to your railroad. I know it's easy to come home from such events with a combination of enthusiasm, exhaustion, and "information overload." But I'm hoping that enough will "stick with you" to help jump-start the next stage of your hobby involvement. And we're always here to answer your questions or point you to resources that will.
Warning: Editorial Content - By the way, some folks may wonder at my unabashed promotion of companies like Colorado Model Structures, AristoCraft, and (though I didn't say much about them in this article) Hartland Locomotive Works. Although their situations are entirely different, each company's owners have made huge sacrifices to help the hobby grow, often diverting resources that could have given them a better return on investment.
Nowadays the owners of AristoCraft and HLW are trying to keep their garden train business going on a trickle of income, and Colorado Model Structures wouldn't exist if the owner didn't have a "day job" and his own private factory. I view the fact that those manufacturers (and several mom-and-pop companies) showed up for the convention as a sign that they still have hope for the future of garden railroading. I also view the enthusiastic attendance of so many people from so many parts of the world as a sign that our fellow hobbyists have hope for the future as well. But hope alone won't get it; we need to work for the future as well, and we need to support those who have made a tradition of supporting us.
Paul Race


| 
|
 |
 |
|  |  |
Note: Family Garden Trains?, Garden Train Store?, Big Christmas Trains?, BIG Indoor Trains?, and BIG Train Store? are trademarks of Breakthrough Communications (www.btcomm.com). All information, data, text, and illustrations on this web site are Copyright (c) 1999, 2000, 2001, 2002, 2003, 2004, 2005, 2006, 2007, 2008, 2009, 2010, 2011, 2012, 2013 by Paul D. Race. Reuse or republication without prior written permission is specifically
forbidden.
Family Garden Trains is a participant in the Amazon Services LLC Associates Program, an affiliate advertising program designed to provide a means for sites to earn advertising fees by advertising and linking to amazon.com.
For more information, please contact us