 | |||
 |
 |  | |
 |  | ||
 |  | ||
 |  | ||
 |  | ||

| Please Read: How to Help Our Site at No Cost to You - Some of our articles contain recommendations for products we like and vendors we personally trust. Some of those vendors may pay us a very small commission if you click on a link and buy their products. This costs you nothing at all and helps offset the costs of what we do. So if we point you to something you decide to buy later, please make certain you come back through our site and click on the link directly. Thanks. |


|
Waterscaping the NEW New Boston and Donnels Creek RR - Part 4This is a followup to Part Three of our series "Waterscaping the NEW New Boston and Donnels Creek Rail Road," being written in conjunction with other construction and planning articles that tell the story of our "new" railroad in chronological sequence, beginning with planning efforts in early 2017.
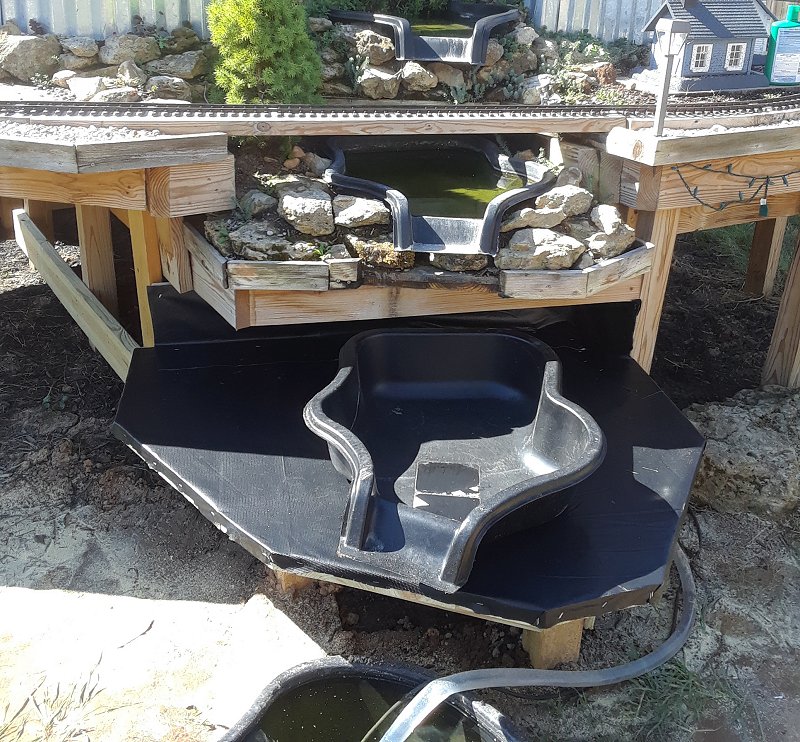
If you've been following my efforts, you know that my overall plan was to have three layers of railroad and four layers of waterfall. The drawing to the right is a not-to-scale cross section showing my overall plan for the water feature. By mid-September of 2019, I had the weir, the top two connecting pools and the big ground-level pond installed. However, I didn't have the third connecting pool (the last level of the waterfall) installed, nor - due to a need for some hose and connectors - did I have the pump and filter hooked up in the big pond yet. The round and oval tubs in the photo below are temporary substitutes, so I could have an operating waterfall before the last bits were installed.  Wildlife Welcome - or at Least Tolerated - In our previous location, raccoons and other critters frequently visited the pond. I expect the same here, which is one reason I got a deeper pond. No matter how much of a mess they make - and they can make a lot - raccoons almost never bother anything too far down to reach without falling in. Wasps of all sorts have been swarming around the railroad while I worked on this project. They need water to make their nests, and it's been far too dry for them to get any naturally. Brown wasps and yellow jackets will viciously guard their nests, but when they're just collecting water droplets far from their nests, they usually aren't a problem.
While I was digging the hole for the pond, I saw a mud dauber struggling to get out of the water in one of the connecting pools. I stuck the end of a short board underneath her and she climbed on it, then I set it on the ground. In a few minutes she dried off and flew away. To be honest, I'm not sure I would be as merciful to the brown wasps or yellow jackets both of which have stung me in other circumstances.
After about twelve weeks with very little rain, I wouldn't be surprised to see other animals coming to drink. If we get coyotes, though, any photos will be from inside the house. To my knowledge, no animals were harmed during the production of this garden railroad. Extending the Pump Reach - I visited Lowes and picked up some fittings and a 6' piece of hose that would allow the pump to reach to the bottom of the new pond. I also picked up a 2' piece of 1" ID vinyl hose to go between the filter and the pump - that way the filter would be more-or-less at the opposite end of the pond from the waterfall. The 6' piece of hose, also vinyl, would allow me to move the regulator valve out of the pond - otherwise I'd have to reach down 16" inches or so to tweak the flow of the waterfall. If, when all is said and done, I don't need it at all, that's fine, I'll just leave it open all the way. By the way, I used vinyl tubing for the waterfall return on my old pond, and it was still working fine 16 years later. Flushing the New Pond - Then I moved the pump over to the new pond and pumped as much water out of it onto the ground as I could without causing the pump to "bottom out." While the pump ran, I kept churning the water with an old broom. Mostly, I wanted to get rid of some of the dirt that had gone into the pond while I was backfilling. But it would also reduce the chance that any contaminants acquired in manufacturing, shipping, etc., would cause problems. If you don't get your water free (well water, for example), you can skip this step. It says something about how dry our land is in that pumping over 150 gallons of water out onto the soil did not even cause a puddle to form, or to wet the ground more than a few inches in each direction. I was pleased to note that after refilling the new pond to the point of running over, the edge of the pond was within 1/4" of the water surface all the way around. It could still shift, of course, but hopefully it will stay close enough not to require reinstalling. Checking Pump - Most pond pumps have a magnetic drive that turns a little propeller-shaped object they call an "impeller." Unlike electric motors, the rotating bits aren't fastened in place. They spin within a chamber that holds the moving parts more or less in place. But that way if something jams them, they won't burn out immediately. You don't want to run them dry, though, or run them indefinitely with any obstacles. This pump has been used, off and on, for many months. I unscrewed the philips screws holding my pump together to make certain nothing was impeding the impeller before I put the pump back to work. The left photo below shows the face of the pump removed. You can see the "propeller" part of the impeller sticking out of the body. The right photo shows the other end of the impeller, including the long cylinder that contains the magnet that makes it work.
I was also concerned that if I wasn't careful, I could be building something that would make building the next level of my railroad more difficult. My plans include a lower outer loop that will cross in front of the water spilling from the second connecting pool, and the frame for that layer will have to connect to the existing posts and frames. As it stands, the long board that runs between one of the new posts and two of the old posts is more-or-less underneath the long cantilevered board supporting the second connecting pool. So I added a vertical member between the two to give the second connecting pool a little more support. You can see this more clearly if you click on the photo then click on the "blowup" to make it even bigger. I was wondering just how I would run the decking for this level as I proceeded, but I figured it out about the time I needed to put my tools away. Because I hadn't put the last board into the frame, I could still squeeze the "wine barrel filler" into its old position. I turned it toward the new, in-ground pond this time and started the pump. As you can see, the water went where it was supposed to. Finishing and Decking the Frame - Studying the distance the water was falling into and out of the wine barrel liner, I decided that the lower connecting pond should sit a bit higher than I had originally projected. So I decided to build the frame up just a bit before I decked it out. Before that happened, though, we got a 30-minute rainstorm that I would estimate gave us a quarter of an inch of rain - not enough to replenish the aquifer or anything like that, but a nice break from the desert conditions we've endured since late June. When things dried up a little, I resumed. I ran the decking out at an angle, so the third connecting pool could turn slightly toward the east compared to the other two. This was part of my original plan, but you'd be surprised how often things don't work out exactly. :-) In the photo to the right, the decking for the third connecting pool has been installed. The outer edges still needed trimmed, obviously, but I wanted to make certain I had the connecting pool in the right position. I positioned the connecting pool where it needed to sit and trimmed the decking. Then I lined the deck and the back of the new platform with "billboard tarp," a material provided by people who peel vinyl off of billboards and sell it for about 7 cents a square foot. (If this sounds familiar, I first introduced this material in Framing the NEW New Boston and Donnels Creek page 4".) I had used up my first order and reordered some new material for the next stage of the railroad.
They say that the vinyl sometimes has little holes, from peeling it off the billboards. But the material I've received so far has been in better-than-advertised condition. In fact, it's mostly been misprints or the end of rolls, or some such - it's never been applied, and some of it has never been printed on. It makes a great lining for planters, flowerboxes, etc. You could probably use an unused piece for a pond liner, but you can't guarantee you get an unused piece unless you pay extra. Also, they recommend thicker pieces for that. I ordered 7 mil (.07/sqft) for my project, but the pieces they recommend for pond liners are much stronger at 22 mil (.33/sqft). If you want to try your luck - I make no guarantees and have no relationship to these people except as a customer, their site is here.
If you click on the photo, you'll see a bigger version. If you click on that version, you can see more details. The waterfall starts just to the right of the trolley on the top level of tracks. A short freight train is passing in front of the second level of the waterfall. When the third and lowest level of the railroad is completed, a bridge should cross in front of the next level down. I say should, because my plans often change once I get the next part of the project started and get a better idea of how it is really going to go together. The day after the last connecting pool went in, I found several enormous raccoon footprints on the inside edge of the pond. So the wildlife certainly isn't waiting for an invitation. To my knowledge they haven't gotten any of the goldfish yet, but I'll be glad when the water lily branches out next year and gives the fish more cover. Keep in TouchFinally, please let us know about your ongoing projects. Ask questions, send corrections, suggest article ideas, send photos, whatever you think will help you or your fellow railroaders. In the meantime, enjoy your trains, and especially enjoy any time you have with your family in the coming weeks, Paul Race
Click on the photo to see our plans for the next addition, as of late September, 2019.
Click on the photo to see our progress as of mid-September, 2019.
Click on the photo to see a lot of last-minute preparations and some photos of the November 10, 2018 event itself.
By the way, going over lumber receipts in early 2019, I couldn't believe I was still siding the train shed in late October, and managed to have an open railroad in mid-November. It is a little crazy how fast things can go together if you have a deadline and a lot of gift cards. Click on the photo to see our progress as of late October, 2018.
Includes choosing the siding and windows, installing the door, painting the windowframes, and adding crosspieces to support the vertical siding boards.
Now the roof is waterproof enough to get us through the next couple of months at least, maybe more.
I thought about bringing in helpers for this part, but a reader commented on how helpful it was to see how one person could do this sort of thing by himself, so I just kept plugging away. Click on the photo to see our progress as of September 13, 2018
Click on the photo to see our status as of August 5, 2018.
The way we got the rafters and ridge board up wouldn't work for everybody, but it worked for us, and hopefully will help other folks to "think outside the box" - literally in this case. Click on the photo to see our progress as of July 14, 2018.
Click on the photo to see our status as of July 9, 2018.
Click on the photo to see our progress as of June 13, 2018.
Click on the photo to see our status as of June 1, 2018.
Click on the photo to see our status as of February 20, 2018
Click on the photo to see our status as of February 20, 2018
Click on the photo to see our status as of November 21, 2017
Click on the photo to see our status as of October 25, 2017
Click on the photo to see our status as of October 15, 2017
Click on the photo to see our status as of October, 10, 2017
Click on the photo to see our status as of September 26, 2017
Click on the photo to see our status as of September 17, 2017
Click on the photo to see our status as of September 7, 2017
Click on the photo to see our status as of August 10, 2017
Click on the photo to see our status as of the end of July, 2017
Click on the photo to see what we were considering as of late May, 2017
Click on the photo to see what we were considering as of late April, 2017
Click on the photo to see what we were considering in early April, 2017
Click on the photo to see what we were considering in March, 2017
Click on the photo to see the home page of Paul's railroad.
To read more, or to look at recommended Garden Railroading and Big Indoor Train products, please click on the index pages below.
|

 
|
 The black wasps we have around here are "mud daubers." They build their nests from mud, not paper, and they almost never sting. I like them because they kill harmful insects like carpenter bees.
 The morning after I first filled the pond, I found two toads drifting in it. Toads like sitting in puddles once in a while - it helps them rehydrate. But they can't jump up out of a pond like frogs can. When I startled them, they started scratching furiously - and fruitlessly - at the plastic liner. Relieved to see that they were alive, I got my fishnet and fished them out. Once they were on the ground, I told them, "Thanks for all you do; keep up the good work." Then I went back into the house and they found their way elsewhere. Now my morning routine includes a toad check.


 Proceed to "Planning the NEW New Boston and Donnels Creek RR - Part 5"
 Return to "Waterscaping, Part 3"
 Return to Christmas Train Day, 2018
 Return to "Adding a Train Shed Part 6"
 Return to "Adding a Train Shed Part 5"
 Return to "Adding a Train Shed Part 4"
 Return to "Adding a Train Shed Part 3"
 Return to "Waterscaping Part 2"
 Return to "Adding a Train Shed Part 2"
 Return to "Adding a Train Shed Part 1"
 Return to "Waterscaping the NEW New Boston and Donnels Creek Part 1,"
  Return to "Dirtscaping the NEW New Boston and Donnels Creek RR, Part 2.
 Return to "Adding Raised Roadbed to the NEW New Boston and Donnels Creek, Part 2"
 Return to "Adding Raised Roadbed to the NEW New Boston and Donnels Creek RR, Part 1"
 Return to "2018: Springing into Spring on the NEW New Boston & Donnels Creek RR."
 Return to "Dirtscaping the NEW New Boston and Donnels Creek RR, Part 1.
 Return to "Decking the NEW New Boston and Donnels Creek RR
 Return to "Framing the NEW New Boston and Donnels Creek RR, Part 6"
 Return to "Framing the NEW New Boston and Donnels Creek RR, Part 5"
 Return to "Framing the NEW New Boston and Donnels Creek RR, Part 4"
 Return to "Framing the NEW New Boston and Donnels Creek RR, Part 3"
 Return to "Framing the NEW New Boston and Donnels Creek RR, Part 2"
 Return to "Framing the NEW New Boston and Donnels Creek RR, Part 1"
 Return to "Breaking Ground on the NEW New Boston and Donnels Creek"
 Return to "Planning the NEW New Boston and Donnels Creek, Part 4"
 Return to "Planning the NEW New Boston and Donnels Creek, Part 3"
 Return to "Planning the NEW New Boston and Donnels Creek, Part 2"
 Return to "Planning the NEW New Boston and Donnels Creek, Part 1"
 Return to the New Boston and Donnels Creek RR Page
 Return to Family Garden Trains' Home Page
Note: Family Garden TrainsTM, Garden Train StoreTM, Big Christmas TrainsTM, BIG Indoor TrainsTM, and BIG Train StoreTM are trademarks of
Breakthrough Communications (btcomm.com). All information, data, text, and illustrations on this web site are
Copyright (c) 1999, 2000, 2001, 2002, 2003, 2004, 2005, 2006, 2007, 2008, 2009, 2010, 2011, 2012, 2013, 2014, 2015, 2016, 2017, 2018, 2019 by
Paul D. Race. Reuse or republication without prior written permission is specifically
forbidden.
Family Garden Trains is a participant in the Amazon Services LLC Associates Program,
an affiliate advertising program designed to provide a means for sites to earn advertising
fees by advertising and linking to amazon.com.
For more information, please contact us
 |  |
| Visit related pages and affiliated sites: | |||||
| - Trains and Hobbies - | |||||
|  |
|
 |
|  |
 |

|

|  |
|

|
| - Christmas Memories and Collectibles - | |||||
 |

|
 |

|

|
|
| - Family Activities and Crafts - | |||||
 |

|

|

|

|

|
| - Music - | |||||

|
 |
 |

|

|

|

|

|

|

|

|

|

|

|

|

|

|

|