 | |||
 |
 |  | |
 |  | ||
 |  | ||
 |  | ||
 |  | ||

| Please Read: How to Help Our Site at No Cost to You - Some of our articles contain recommendations for products we like and vendors we personally trust. Some of those vendors may pay us a very small commission if you click on a link and buy their products. This costs you nothing at all and helps offset the costs of what we do. So if we point you to something you decide to buy later, please make certain you come back through our site and click on the link directly. Thanks. |


|
Planning the NEW New Boston and Donnels Creek RR - Part 5This is a followup to Part Four of our series "Waterscaping the NEW New Boston and Donnels Creek Rail Road," being written in conjunction with other construction and planning articles that tell the story of our "new" railroad in chronological sequence, beginning with planning efforts in early 2017.At the end of the last article, I had installed the last planned portion of our four-stage waterfall. Now it was time to start finalizing plans for the last and lowest layer of the planned right-of-way. If you've been following us from the start, you know that we have installed two elevated layers and plan to install a lower layer of the railroad that will wrap completely around the right-of-ways we've built so far. However, the way it is designed, it can be built in two parts. The only things connecting them will be a storage track running through the shed and a bridge across the third connecting pool. So I should be able to build the extension on the east side of the railroad now and build the other extension later,
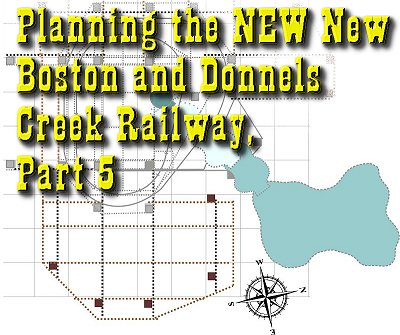
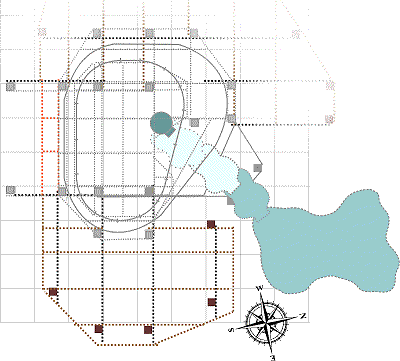
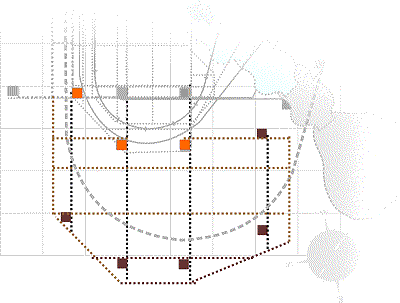
The brown squares in the lower half of the drawing indicate five new posts that will support the eastern extension, which will jut out toward the house. The black lines indicate the joists, and the brown dotted lines indicate the framing bits that will support the decking. In the drawing, I "faded out" the top part of the plan (the western extension) because I already have revisions in mind for that, but I want to get the eastern extension built first. I call this a preliminary plan, because I know very well I will have to make minor adjustments once I have the posts in place and start installing the other bits. What you can't tell in any birds-eye view is that I may have to adjust the vertical location of the pieces as well, to make sure the train will clear the pool it's supposed to pass over, but also fit where it needs to when it eventually enters the storage shed. Thinking Ahead, Short-Term and Long Term - When the entire lower layer is complete, there will (hopefully) be a large, relatively flat area that will support curves with a minimum 10' radius, allowing me to run my longer cars. But when the extension shown here is complete, it should be large enough to support a 4' or 5' loop of track and several of our better-detailed buildings, just in time for the Christmas Train Day this November.
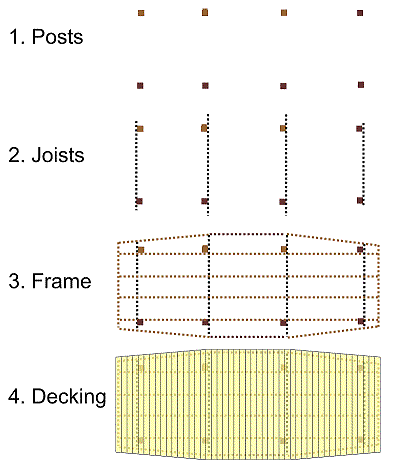
In this case, the two posts that are closest to the bottom of the picture are a little less than 6' from the existing posts that the joists connect them to. I use 6' as my maximum for that sort of thing, because in most states, that is the maximum joist span for 2"x6" deck joists, and I want this addition to be strong enough to walk on if necessary. That said, you can run the joists past the posts supporting them from 10"-12" (depending on your state's requirements/recomendations for cantilevering deck edges). That gives you up to an extra 2' of "table" in each direction. I run the frame pieces 2' apart, since that's the maximum recommendation for frame that will be supporting 2"x6" decking. The decking will run perpendicular to the long frame pieces, of course. It will also hang out over the end a bit. If you use ordinary "5/4" decking you should consider running the frame boards 16" apart. Again your state may have different recommendations. The Same Plan, Freestanding - To simplify matters, I have "dummied" up a plan using the same maximum directions and eight posts for a raised railroad that could conceivably be up to 20' long and 8' wide. Again, no 2"x6" board should run farther than 6' between posts, and the framing boards should be no more than 24" apart for 2"x6" decking or 16" apart for "5/4" decking. If you are planning on having several people stand on the thing or supporting a piano or some such, I would reduce the spans accordingly. In fact, the building recommendations in some states would require you to have more joists or double the joists up into "beams." 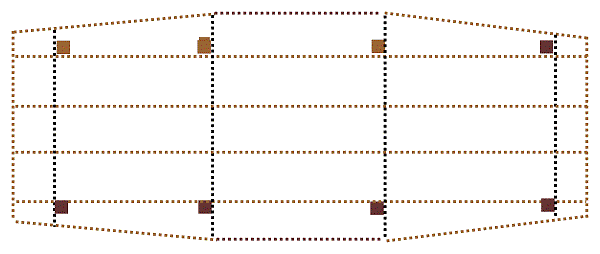 Even more confusing, many of the plans and some of the standards call what we're calling "frame" the "joists." So when they say the joists shouldn't be more than 24" apart, they're really addressing what we're calling the "frame." And our frame boards ARE 24" apart (or less). Sorry for any confusion, but - as I said - refer to your state's recommendations for this sort of structure. I have posted the simplified diagram just to help you relate to the way the tasks in the upcoming chapters would relate to you building your first raised railroad in your own back yard using this method. Again, it's more work up front, but you will significantly reduce maintenance in the long run. For a quick review, the graphic to the right shows the sequence of operations for installing a free-standing 8-post raised-platform railroad. Technically, you could use the same plan to make an oval-shaped deck as well, but you'd need to attach the joists to the posts with carriage bolts to be legal in most states. If you adjusted the design so that the joists went lengthwise and the frame went "crossways," the decking would run lengthwise, and you'd have to adjust the frame accordingly. But the sequence of installation would be the same. Height is up to you, of course. My "lowest" right-of-way will be about 24" of the ground on the east side of the railroad. Because the ground slopes, when the lowest platform is completed, it will be more like 35" off the ground on the west side. Both are comfortable working heights for most people. Of course, the highest platform of this railroad was built on a 4-post framework and averages 28" higher than the platforms I'm building now, so there's no set rule. That said, if I had ONLY built the top platform, I would have included some diagonal bracing to keep it from wobbling.
Also, if you do a deck that sits almost on the ground, try to find decking that is "ground-rated." Even if you're just building a deck per se and don't want to cover it with dirt and plants, most pressure-treated decking requires more ventilation than it gets if it's too close to the ground. Again, as with all of the drawings, compare them with what is legal or recommended in your city, state, or region. We are not responsible if you build an inadequate structure and it falls down to the hurt of person or property.
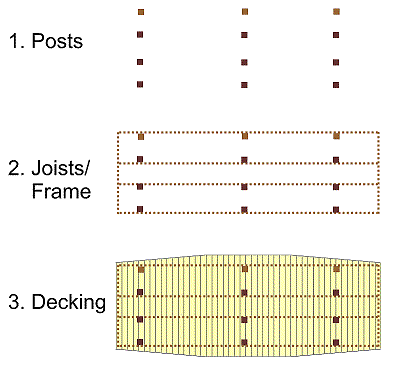
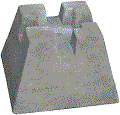
The following not-to-scale drawing shows how you might build one of these using the 4'x4' grid of Dek Blocks that some manufacturers recommend. Since you can't have a 6' joist span, I added another row of the Dek Blocks and increased the width of the platform by 2'. 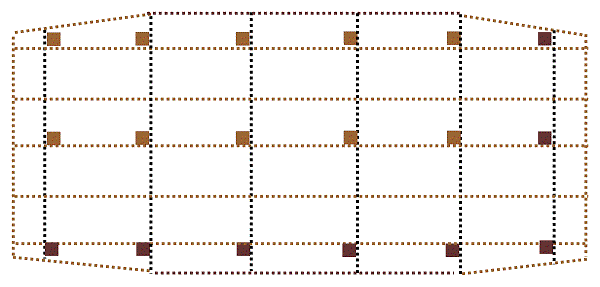 This is just to give you a general idea, however. Be sure to follow the manufacturer's recommendations. Also, you can't even buy these in certain states like New Jersey, because early adopters created some wobbly catastrophes with the things. ConclusionThough it may seem like I writing a lot about my own efforts, my goal is to encourage potential garden railroaders to think about using materials and methods that are proven to work outdoors - whether you do things my way or not. But any approach that significantly reduces maintenance and makes it easier to run trains any time you want to is bound to give you more enjoyment of the hobby. And if you enjoy it, people will notice.That's how hobbies grow, you know, one enthusiast at a time. Keep in TouchFinally, please let us know about your ongoing projects. Ask questions, send corrections, suggest article ideas, send photos, whatever you think will help you or your fellow railroaders. In the meantime, enjoy your trains, and especially enjoy any time you have with your family in the coming weeks, Paul Race
Click on the following link to see our progress of early October, 2019.
The process included checking the pump, extending the hoses, rescuing toads, building the platform, trimming the platform, testing the pool's location, etc. Click the photo to go to the article.
Click on the photo to see our progress as of mid-September, 2019.
Click on the photo to see a lot of last-minute preparations and some photos of the November 10, 2018 event itself.
By the way, going over lumber receipts in early 2019, I couldn't believe I was still siding the train shed in late October, and managed to have an open railroad in mid-November. It is a little crazy how fast things can go together if you have a deadline and a lot of gift cards. Click on the photo to see our progress as of late October, 2018.
Includes choosing the siding and windows, installing the door, painting the windowframes, and adding crosspieces to support the vertical siding boards.
Now the roof is waterproof enough to get us through the next couple of months at least, maybe more.
I thought about bringing in helpers for this part, but a reader commented on how helpful it was to see how one person could do this sort of thing by himself, so I just kept plugging away. Click on the photo to see our progress as of September 13, 2018
Click on the photo to see our status as of August 5, 2018.
The way we got the rafters and ridge board up wouldn't work for everybody, but it worked for us, and hopefully will help other folks to "think outside the box" - literally in this case. Click on the photo to see our progress as of July 14, 2018.
Click on the photo to see our status as of July 9, 2018.
Click on the photo to see our progress as of June 13, 2018.
Click on the photo to see our status as of June 1, 2018.
Click on the photo to see our status as of February 20, 2018
Click on the photo to see our status as of February 20, 2018
Click on the photo to see our status as of November 21, 2017
Click on the photo to see our status as of October 25, 2017
Click on the photo to see our status as of October 15, 2017
Click on the photo to see our status as of October, 10, 2017
Click on the photo to see our status as of September 26, 2017
Click on the photo to see our status as of September 17, 2017
Click on the photo to see our status as of September 7, 2017
Click on the photo to see our status as of August 10, 2017
Click on the photo to see our status as of the end of July, 2017
Click on the photo to see what we were considering as of late May, 2017
Click on the photo to see what we were considering as of late April, 2017
Click on the photo to see what we were considering in early April, 2017
Click on the photo to see what we were considering in March, 2017
Click on the photo to see the home page of Paul's railroad.
To read more, or to look at recommended Garden Railroading and Big Indoor Train products, please click on the index pages below.
|

 
|
Note: Family Garden TrainsTM, Garden Train StoreTM, Big Christmas TrainsTM, BIG Indoor TrainsTM, and BIG Train StoreTM are trademarks of
Breakthrough Communications (btcomm.com). All information, data, text, and illustrations on this web site are
Copyright (c) 1999, 2000, 2001, 2002, 2003, 2004, 2005, 2006, 2007, 2008, 2009, 2010, 2011, 2012, 2013, 2014, 2015, 2016, 2017, 2018, 2019 by
Paul D. Race. Reuse or republication without prior written permission is specifically
forbidden.
Family Garden Trains is a participant in the Amazon Services LLC Associates Program,
an affiliate advertising program designed to provide a means for sites to earn advertising
fees by advertising and linking to amazon.com.
For more information, please contact us
 |  |
| Visit related pages and affiliated sites: | |||||
| - Trains and Hobbies - | |||||
 |  |
 |
 |
 |  |
 |

|

|  |
 |

|
| - Christmas Memories and Collectibles - | |||||
 |

|
 |

|
 |

|
| - Family Activities and Crafts - | |||||
 |

|

|

|

|

|
| - Music - | |||||

|
 |
 |

|

|

|

|

|

|

|

|

|

|

|

|

|

|

|
 Proceed to "Framing the NEW New Boston and Donnels Creek RR - Part 7"
 Return to "Waterscaping Part 4."
 Return to "Waterscaping, Part 3"
 Return to Christmas Train Day, 2018
 Return to "Adding a Train Shed Part 6"
 Return to "Adding a Train Shed Part 5"
 Return to "Adding a Train Shed Part 4"
 Return to "Adding a Train Shed Part 3"
 Return to "Waterscaping Part 2"
 Return to "Adding a Train Shed Part 2"
 Return to "Adding a Train Shed Part 1"
 Return to "Waterscaping the NEW New Boston and Donnels Creek Part 1,"
  Return to "Dirtscaping the NEW New Boston and Donnels Creek RR, Part 2.
 Return to "Adding Raised Roadbed to the NEW New Boston and Donnels Creek, Part 2"
 Return to "Adding Raised Roadbed to the NEW New Boston and Donnels Creek RR, Part 1"
 Return to "2018: Springing into Spring on the NEW New Boston & Donnels Creek RR."
 Return to "Dirtscaping the NEW New Boston and Donnels Creek RR, Part 1.
 Return to "Decking the NEW New Boston and Donnels Creek RR
 Return to "Framing the NEW New Boston and Donnels Creek RR, Part 6"
 Return to "Framing the NEW New Boston and Donnels Creek RR, Part 5"
 Return to "Framing the NEW New Boston and Donnels Creek RR, Part 4"
 Return to "Framing the NEW New Boston and Donnels Creek RR, Part 3"
 Return to "Framing the NEW New Boston and Donnels Creek RR, Part 2"
 Return to "Framing the NEW New Boston and Donnels Creek RR, Part 1"
 Return to "Breaking Ground on the NEW New Boston and Donnels Creek"
 Return to "Planning the NEW New Boston and Donnels Creek, Part 4"
 Return to "Planning the NEW New Boston and Donnels Creek, Part 3"
 Return to "Planning the NEW New Boston and Donnels Creek, Part 2"
 Return to "Planning the NEW New Boston and Donnels Creek, Part 1"
 Return to the New Boston and Donnels Creek RR Page
 Return to Family Garden Trains' Home Page