 | |||
 |
 |  | |
 |  | ||
 |  | ||
 |  | ||
 |  | ||

| Please Read: How to Help Our Site at No Cost to You - Some of our articles contain recommendations for products we like and vendors we personally trust. Some of those vendors may pay us a very small commission if you click on a link and buy their products. This costs you nothing at all and helps offset the costs of what we do. So if we point you to something you decide to buy later, please make certain you come back through our site and click on the link directly. Thanks. |


|
Creating a Railroad Timetable.
In those articles we began tranforming one end of our garage that the previous owner left looking like a bomb had gone off into something resembling a 1900ish rural train station. We patched huge holes, painted, moved electrical outlets, installed wainscotting and baseboards, and painted backgrounds for three window frames. Also in our plans was a railroad timetable. I would need to build it and letter it. So the first part of this article is about painting and rudimentary carpentry, and the second half is about using an ancient Cricut with obsolete software to cut out the lettering for the headers.
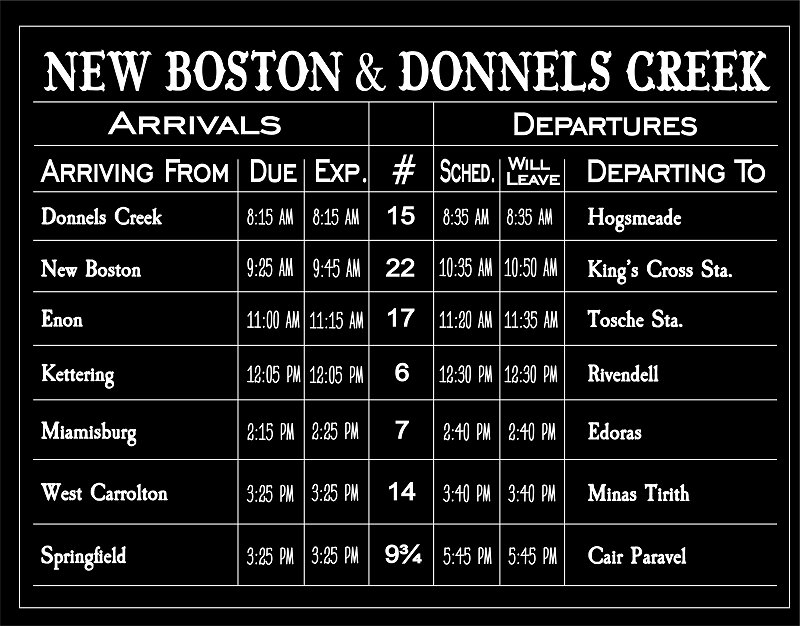
The picture to the right is a computer mockup I created to guide me through the rest of the steps. In the end product, the destinations, times, and train numbers would be written in chalk, so the main thing I needed was a big black board, framed, with three or four lines of text on the top and a bunch of lines. The shallow shelving unit I wanted to conceal was 48" wide and 46" high. I had been planning to use it this way for months, but I didn't bother picking up materials until the wall it was going to go on started looking like an actual wall. Then, on a trip to pick up some lumber for my outdoor railroad expansion, I came across a piece of 48"x48" underlayment that had been dropped so one corner was busted off - but there was still enough "good" for my project (below let). I got it for about $3. So patience paid off, as it often does.
When I was ready to start the project, I lightly sanded the better side of the underlayment board and painted it with two coats of Krylon chalkboard paint that Shelia had bought for another project (above right). It would need some sort of frame to help camouflage the shelving unit and give me something to attach the hinge. The frame wouldn't have to be pretty, since I was going for a rustic look anyway. But none of the scrap lumber pieces I had thought about using were long enough to give me the 16' of material that I would need. Then I came across two pressure-treated fencing boards I had bought for another project. (Original cost: about $3). They were green and rough-cut, but I thought I could use them. I sliced them lengthwise, cut them to size, and sanded them. Then I stained them with some old Pecan-colored Minwax that I bought years ago to refinish our dining room table.
I did have to buy 5/8" wood screws to attach the boards to the chalkboard. At ~$6, they doubled the cost of the project so far. I laid the chalkboard face-down, arranged the frame boards underneath the edges, and shot the screws through the chalkboard into the frame boards. When you do this, you'll use a more professional method, I'm sure.
The boards worked out nicely. If the pressure-treating chemical ever leeches through the stain, I can always touch them up with more stain. Dusting off my CraftcutterI'm not a carpenter or woodworker, so I was a little nervous about that part of the project, but relieved when it seemed to be working out.I was also a little more nervous about the next part of the project - using an obsolete Cricut to create the lettering for the "headers" on the chalkboard. From the start my plan was to use an old Cricut Expression I had bought years ago at a thrift shop. But both it and the software I had for it were hopelessly obsolete, and I wasn't sure it would work at all. I dug it out of storage and tested it on a winter snowflake project for Shelia. I tested it used a variety of approaches, including:
Note about Craftcutters for Your Sign Projects - If you don't have an early Cricut already, don't rush out and try to find a pre-lawsuit copy of SCAL2. Silhouette's line of Cameos will give you far more features and flexibility with far less hassle. Their software is free to Cameo owners and supports even their first generation machines. Any old used, but working first-generation Cameo will give you what you need for less than $100 on auction sites. Just sayin' . . . . The image to the left below shows the Sure-Cuts-a-Lot2 work window with the snowflake designs I printed through that program. The image to the right shows snowflakes from both processes.
Attacking the LetteringOkay I proved that the thing worked. In the meantime, I aso visited a craft store to pick up two rolls of white adhesive vinyl and one roll of transfer tape (on sale, fortunately). I also ordered a roll of 1/4" pinstriping tape online. Now my project was running into "real money," like $35 all told, for those keeping track. I'm not counting the Cricut or software, which I already owned.
The typeface in the Cricut "Storybook" font cartridge (right) could have stood in for an Old Western typeface. But I went ahead and used the more flexible tools at my disposal. I designed the printout in CorelDraw, exported an SVG file, and imported it into SCAL2 (below right). That also allowed me to squeeze a little more text on the page in a different typeface. I used CF Wild West for the top line and Engravers Gothic BT for the "Arrivals" and "Departures" text. The "personal" version of CF Wild West is a free downloadable font. Engravers Gothic BT came with a set of vintage graphic resources, but if you want something similar, Copperplate Condensed Bold is close, and free downloadable versions are available.
The picture to the right shows SCAL2 after importing the file. I also tested the file with Silhouette's "Studio 4.4" software and it works about the same. I got out my white, 12" wide, adhesive vinyl and rolled it out on the 12"x24" mat. Then I let the SCAL2 software and the Cricut Expression do their thing, using recommended settings for adhesive vinyl.
Next I rolled out a sheet of transfer tape and used it to bring the vinyl away from the backing, leaving as much of the excess on the backing as possible. The process of separating the stuff you want from the stuff you don't want is called "weeding" for some reason, and it can be a little tedious. I cut the vinyl and transfer tape apart and "weeded" a word or two at a time. The photos below show the text after it has been picked up by the transfer tape and "weeded." At this point, these pieces are more-or-less "stickers" that you can deposit wherever you want, rub the lettering a lot to make sure it will stick, and peel back the transfer tape (carefully).
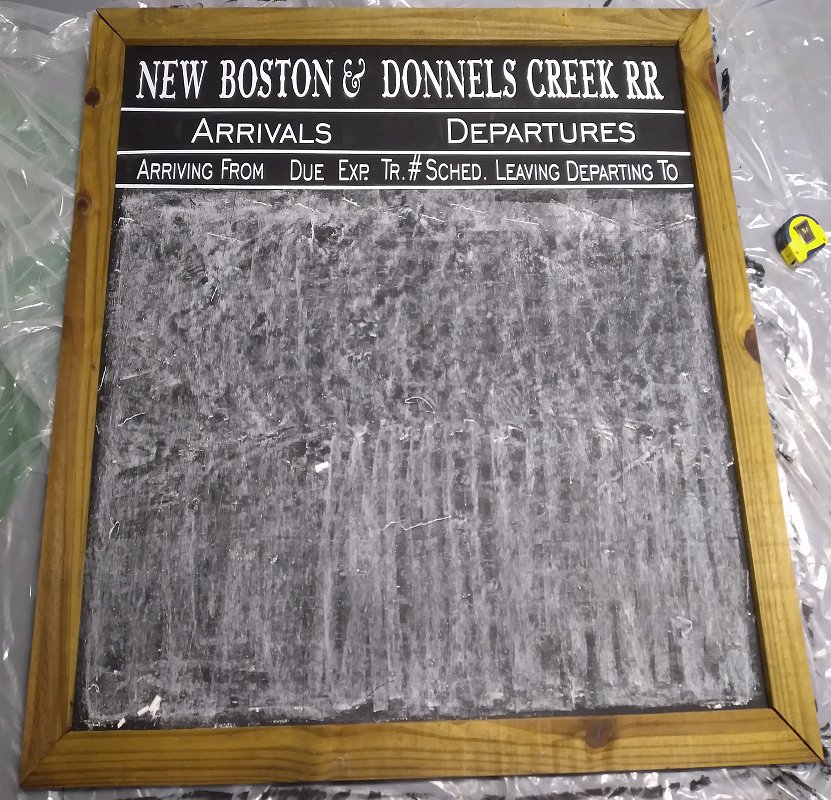
I used a straightedge to align the letters as they went down. If you look closely, you'll see some goofs. If I was doing this for a living, I'd feel worse about it. That said, I think it looks pretty good for my purposes.  "Seasoning" the ChalkboardAll home-made chalkboards need "seasoned" or "primed" before you start writing on them. That's because they're porous (especially mine), and if you don't season them, the first thing you write on them will be enshrined in the thing forever.You do this by rubbing a piece of chalk sidways over the whole thing then rubbing it and wiping off the excess with a dry rag. Turns out my chalkboard was very porous so most of the "seasoning" chalk stayed in place. That's okay, I've seen at least one photo of an old-timey timetable that was "worse." So it's authentic. The lower left photo shows the chalkboard after I rubbed the chalk on it but before I rubbed it with a rag, For simplicity's sake, I didn't put the striping on the lower 3/4 of the chalkboard until it was seasoned (lower right). The pinstriping tape doesn't stick quite as well over the chalky part, but it holds well enough for my purposes.
Attaching the Storage Shelves and HangingThe photo to the left below shows the shallow storage shelving unit I was going to attach my chalkboard timetable to. I decided to use a piano hinge, since that would support the weight of the thing reasonably well without being obtrusive.The photo to the right shows the timetable face-down on the floor with the shelving unit on top of it and a piano hinge placed where it would go.
Then I lifted the thing in place with the "door" open and shot screws where there should have been a stud. Finally I hit one, which allowed me to shoot eight more screws into the studs. To my delight and surprise, everything seemed to have stayed in place. And it looked good when it was there. Don't laugh, my projects don't always work out the way I think they will.  In the photo above, I have moved the window closest to the timetable over three inches, because it was just too close, and it was a lot easier to move the windowframe than to rehang the shelf/timetable combination. I will have to move the next one over 1.5" so they remain evenly spaced, but there's no rush on that. Some time in the future, I hope to put a little closet sort of thing on the other end of the wall, disguised as a ticket stand/post office. (I will use it to hide my gardening tools.) I also need to sort out the edge of the flooring I've installed (there wasn't quite enough to square it off), and I'd like to paint a carpet roll black to stand in as a stovepipe for the stove. In the meantime, though, I'm pretty satisfied with the appearance of things. More later. Keep in TouchIf you're headed toward or past Springfield, Ohio, please let me know, and I'll see if we can work out a quick visit. To the railroad, that is. The train room is still not very presentable. Finally, please let us know about your ongoing projects. Ask questions, send corrections, suggest article ideas, send photos, whatever you think will help you or your fellow railroaders. In the meantime, enjoy your trains, and especially enjoy any time you have with your family in the coming weeks, Paul Race Note: The following page is a detour to show what we've been working on inside when the weather was too brutal to work outside.
Click on the picture to see our status as of late March, 2021.
Click on the picture to see our status as of late December, 2020.
Click on the picture to see our status as of late December, 2020.
Click on the picture to see our status as of early December, 2020.
The next "permanent" improvements will wait for now. In the meantime, we will set out buildings and a temporary loop or to entertain visitors between now and Christmas. Click on the picture to see our status as of mid-November, 2020.
We also added one last tweak to the frame design to make it easier to extend this platform to its originally planned size, if and when we get a chance to do so.
We were hoping to get the lumber we need to finish the platform before cold weather set in. Click on the link to see our status as of late September, 2020.
Click on the following link to see our status as of late January, 2020. https://familygardentrains.com/newbost/20_1_19_shelves/shelves.htm
Click on the photo to see the options we were reviewing for the next and last expansion.
Click on the following link to see our status as of early December, 2019. https://familygardentrains.com/newbost/19_11_24_winter_prep/19_11_24_winter_prep.htm
Click on the photo to see a brief record of our busiest weekend in November, 2019.
Click on the following link to see our progress of mid-November, 2019.
Click on the photo to see our status as of late October, 2019.
Click on the following link to see our progress of early October, 2019.
Click on the photo to see our plans for the next addition, as of late September, 2019.
The process included checking the pump, extending the hoses, rescuing toads, building the platform, trimming the platform, testing the pool's location, etc. Click the photo to go to the article.
Click on the photo to see our progress as of mid-September, 2019.
Click on the photo to see a lot of last-minute preparations and some photos of the November 10, 2018 event itself.
By the way, going over lumber receipts in early 2019, I couldn't believe I was still siding the train shed in late October, and managed to have an open railroad in mid-November. It is a little crazy how fast things can go together if you have a deadline and a lot of gift cards. Click on the photo to see our progress as of late October, 2018.
Includes choosing the siding and windows, installing the door, painting the windowframes, and adding crosspieces to support the vertical siding boards.
Now the roof is waterproof enough to get us through the next couple of months at least, maybe more.
I thought about bringing in helpers for this part, but a reader commented on how helpful it was to see how one person could do this sort of thing by himself, so I just kept plugging away. Click on the photo to see our progress as of September 13, 2018
Click on the photo to see our status as of August 5, 2018.
The way we got the rafters and ridge board up wouldn't work for everybody, but it worked for us, and hopefully will help other folks to "think outside the box" - literally in this case. Click on the photo to see our progress as of July 14, 2018.
Click on the photo to see our status as of July 9, 2018.
Click on the photo to see our progress as of June 13, 2018.
Click on the photo to see our status as of June 1, 2018.
Click on the photo to see our status as of February 20, 2018
Click on the photo to see our status as of February 20, 2018
Click on the photo to see our status as of November 21, 2017
Click on the photo to see our status as of October 25, 2017
Click on the photo to see our status as of October 15, 2017
Click on the photo to see our status as of October, 10, 2017
Click on the photo to see our status as of September 26, 2017
Click on the photo to see our status as of September 17, 2017
Click on the photo to see our status as of September 7, 2017
Click on the photo to see our status as of August 10, 2017
Click on the photo to see our status as of the end of July, 2017
Click on the photo to see what we were considering as of late May, 2017
Click on the photo to see what we were considering as of late April, 2017
Click on the photo to see what we were considering in early April, 2017
Click on the photo to see what we were considering in March, 2017
Click on the photo to see the home page of Paul's railroad.
To read more, or to look at recommended Garden Railroading and Big Indoor Train products, please click on the index pages below.
|

 
|


 Proceed to "New Right-of-Ways on the New Boston and Donnels Creek RR"
 Return to "Christmas Preparations and Operations"
 Return to "Westward Expansion, 2020, Part 3"
 Return to "Westward Expansion, 2020, Part 2"
 Return to "Westward Expansion, 2020, Part 1"
 Return to "Train Storage Solutions, 2020"
 Return to "Expansion Planning, 2020"
 Return to "Winter Preparation, 2019"
 Return to "Christmas Train Day, 2019"
 Return to "Preparing for Christmas Train Day 2019"
 Return to Decking the NEW New Boston and Donnels Creek Part 2
 Return to "Framing the NEW New Boston and Donnels Creek RR - Part 7"
 Return to "Planning the NEW New Boston and Donnels Creek RR - Part 5"
 Return to Waterscaping Part 4.
 Return to "Waterscaping, Part 3"
 Return to Christmas Train Day, 2018
 Return to "Adding a Train Shed Part 6"
 Return to "Adding a Train Shed Part 5"
 Return to "Adding a Train Shed Part 4"
 Return to "Adding a Train Shed Part 3"
 Return to "Waterscaping Part 2"
 Return to "Adding a Train Shed Part 2"
 Return to "Adding a Train Shed Part 1"
 Return to "Waterscaping the NEW New Boston and Donnels Creek Part 1,"
  Return to "Dirtscaping the NEW New Boston and Donnels Creek RR, Part 2.
 Return to "Adding Raised Roadbed to the NEW New Boston and Donnels Creek, Part 2"
 Return to "Adding Raised Roadbed to the NEW New Boston and Donnels Creek RR, Part 1"
 Return to "2018: Springing into Spring on the NEW New Boston & Donnels Creek RR."
 Return to "Dirtscaping the NEW New Boston and Donnels Creek RR, Part 1.
 Return to "Decking the NEW New Boston and Donnels Creek RR
 Return to "Framing the NEW New Boston and Donnels Creek RR, Part 6"
 Return to "Framing the NEW New Boston and Donnels Creek RR, Part 5"
 Return to "Framing the NEW New Boston and Donnels Creek RR, Part 4"
 Return to "Framing the NEW New Boston and Donnels Creek RR, Part 3"
 Return to "Framing the NEW New Boston and Donnels Creek RR, Part 2"
 Return to "Framing the NEW New Boston and Donnels Creek RR, Part 1"
 Return to "Breaking Ground on the NEW New Boston and Donnels Creek"
 Return to "Planning the NEW New Boston and Donnels Creek, Part 4"
 Return to "Planning the NEW New Boston and Donnels Creek, Part 3"
 Return to "Planning the NEW New Boston and Donnels Creek, Part 2"
 Return to "Planning the NEW New Boston and Donnels Creek, Part 1"
 Return to the New Boston and Donnels Creek RR Page
 Return to Family Garden Trains' Home Page
Note: Family Garden TrainsTM, Garden Train StoreTM, Big Christmas TrainsTM, BIG Indoor TrainsTM, and BIG Train StoreTM are trademarks of
Breakthrough Communications (btcomm.com). All information, data, text, and illustrations on this web site are
Copyright (c) 1999, 2000, 2001, 2002, 2003, 2004, 2005, 2006, 2007, 2008, 2009, 2010, 2011, 2012, 2013, 2014, 2015, 2016, 2017, 2018, 2019 by
Paul D. Race. Reuse or republication without prior written permission is specifically
forbidden.
Family Garden Trains is a participant in the Amazon Services LLC Associates Program,
an affiliate advertising program designed to provide a means for sites to earn advertising
fees by advertising and linking to amazon.com.
For more information, please contact us
 |  |
| Visit related pages and affiliated sites: | |||||
| - Trains and Hobbies - | |||||
|  |
|
 |
|  |
 |

|

|  |
|

|
| - Christmas Memories and Collectibles - | |||||
 |

|
 |

|

|
|
| - Family Activities and Crafts - | |||||
 |

|

|

|

|

|
| - Music - | |||||

|
 |
 |

|

|

|

|

|

|

|

|

|

|

|

|

|

|

|