Tunnel Framing on the New Boston and Donnels Creek, Part 1
This is a follow-up to our article "New Right-of-Ways on the New Boston and Donnels Creek RR". In that article, we connected the two lower platforms (built in 2019 and 2020 respectively) with a single wide-radius loop of track and two smaller loops that will allow streetcars or railcars to serve the communities I plan to put there. 
This article describes our efforts to build small tunnels on the smaller loops (shown in green in the drawing to the right). The dotted red rectangles show the approximate position of the new tunnels.
We started this project at this time because:
- We wanted to add a bit of interest to those loops.
- We wanted a place to give the streetcars or railcars a place to shelter temporarily in case of rainstorms, etc.
- We needed to complete those tunnels before we added the rocks, dirt, and plants that would complete the "garden" part of these platforms.
The photo to the left below shows the inner loop on the east platform after the roadbed has been screwed into place and the corners trimmed. This loop uses 5'-diameter curves.
The photo to the right above shows the inner loop on the west platform after the roadbed has been screwed into place and the corners trimmed. This loop has two 1' straights, four 5'-diameter curves, and eight 4'-diameter curves. The 5' curve pieces are attached to the straight pieces and act (somewhat) as "easements" into the smaller curves. To cut the roadbed, I had to cut two different lengths of "trapezoids."
In both photos, you can see where the loops come close to the walls underneath the next higher platform.
Not shown are the sidings I added later to make switching operations possible.
Sharp-eyed folks will notice that both photos, taken in March, 2021, show the bird feeders I keep on my railroad in the winter so it doesn't look "naked." Those will be removed and replaced with more realistic buildings as the platforms are "dirtscaped."
Framing the Tunnels
I actually took more time figuring this step out than I usually do. In part, there were three long trips out of town in May and June, including a national garden railways convention that I had to prepare for. But in part, it was because I didn't have a clear vision of how they should go together.
- They needed to provide good sideways clearance and maximum height clearance, in case I wanted to put an electric with pantographs or a steamer with a big smokestack on one of those tracks.
- They needed to be rock-solid, since they would be supporting - among other things - rocks.
- They needed to be installed in relatively tight corners where I had, frankly, not planned for them.
 Having mostly blistering hot days this spring and early summer didn't help my enthusiasm either. Finally on one rare cool day in July, I took out a bunch of pieces of 4"x4" posts, 10"-24" leftovers from building the platforms. I just kept setting them up in different combinations until I could get a vision of where they should go and how they might be built. Having mostly blistering hot days this spring and early summer didn't help my enthusiasm either. Finally on one rare cool day in July, I took out a bunch of pieces of 4"x4" posts, 10"-24" leftovers from building the platforms. I just kept setting them up in different combinations until I could get a vision of where they should go and how they might be built.
The photo to the right shows the solution I finally came up with for the east platform. I cut two pieces of the 4"x4"s and toenailed them through the vinyl to the decking beneath them.
Then I cut a piece of 2"x6", screwed it to the posts, and toenailed it (from beneath) into the decking of the next platform up.
All the while, I made certain I was allowing enough clearance for the longest equipment I could imagine running on that loop, represented by a Bachmann coach.
 Once I had my first pair of portals to try out (see below), I added vertical members on the other side of the track to support the other "leg" of the portals. Once I had my first pair of portals to try out (see below), I added vertical members on the other side of the track to support the other "leg" of the portals.
Again, I tried the clearance with a Bachmann coach. As long as the track is centered, it's perfectly fine. I may have to break one of my "rules" and tack the track down there just to keep it from wandering enough to mess up clearances.
The track loop on the west platform was a little more complicated, in part because it wasn't so close to the "wall."
Also, there was about an inch less vertical clearance on this side. Yes, I tried to keep things level, but the two tunnels are over 10' apart, separated by a waterfall and supported by frameworks that don't attach to each other, so "level" was more of a goal than an achievement.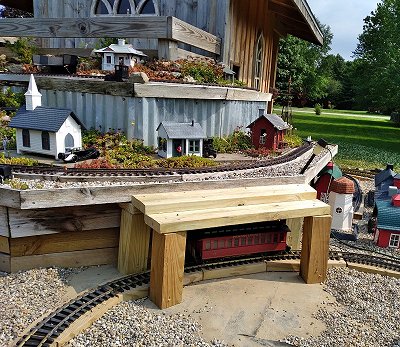
So I used four posts and three pieces of 2"x6," arranging the "roof" of the tunnel so that there would be plenty of clearance over the track itself (below right).
There's a lot of toenailing you can't see. I wouldn't use it as a step on purpose, but it would probably hold my weight if it came to that.
Again, the posts were all left over from building the platforms, so the only cost was for the 2"x6"s and the screws.
Little Boxes
Speaking of wooden boxes, the next step was to box in the open sides of the tunnels.  The "boxes" aren't pretty, but they don't have to be since they will be covered with "scenery" eventually. The "boxes" aren't pretty, but they don't have to be since they will be covered with "scenery" eventually.
I had pressure-treated lumber I could have used for these, but I chose ground-rated just in case. I had to rebuild a badly-designed tunnel on my first "permanent" railroad, and that was a prospect I don't relish again.
Portal Test
I want to be able to run 1:20.3, 1:22.5, 1:24, 1:29, and 1:32 trains on any part of my railroad. As it turns out, I needed a pretty big tunnel portal to fit the highest ones through.
It also turns out that a lot of companies want a fortune for these. The Noch rigid foam portals go from $70-$100 online. A very elaborate plastic POLA portal, complete with retaining walls, sells for $150+. Since I needed 4 of these, I didn't think either of those was the solution. (That said, the POLA product would make a good starting point for the gates of Mordor, if you wanted to model that.)
Someone on eBay is selling home-made wooden portals in the $50 range, but I don't trust anything made of real wood outside unless I built it myself and know exactly what went into it.
As it turns out, a few stores have a stock of I.S.L.E. Laboratory foam portals. I.S.L.E is the "Mountains in Minutes" folks, in case you have experience with their indoor scale products.
Like the Noch portals, these are rigid foam, which I planned to paint and seal before I installed, but unlike the Noch portals, they look like portals that are actually used in my area. Also, they are 1/3 to 1/4 of the price.
Their #161 product replicates a wood portal, the sort of thing that would look at home on a 19th-century western-themed railroad or in a mine entrance.
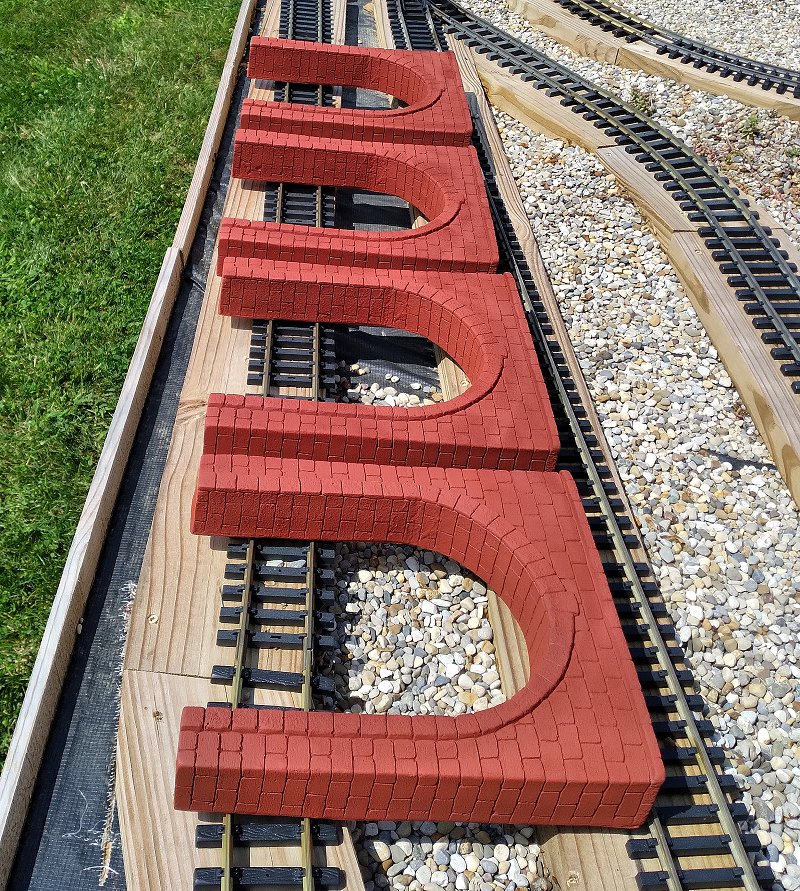
 Because I'm centering my timeframe in the 1930 range (plus or minus 20 years), I tried the #160 product, which replicates a brick-and-stone portal. I ordered 2 to see if they would work where I needed them, and - to my frank surprise - they did. (They came from Only Trains, with whom I have no relationship except as a delighted customer, in case you wondered.) Because I'm centering my timeframe in the 1930 range (plus or minus 20 years), I tried the #160 product, which replicates a brick-and-stone portal. I ordered 2 to see if they would work where I needed them, and - to my frank surprise - they did. (They came from Only Trains, with whom I have no relationship except as a delighted customer, in case you wondered.)
I don't know if these are still being manufactured - every source I've seen seems to have "new old stock." So your mileage may vary.
Before these are installed, they would be painted brick red, weathered and sealed. They will also sit about 1.5" higher than you see in the photo, and the "ground" will rise to fill the gap.
All of which left the question of how I would trim around these to make them look like they are really going into a mountain and not just glommed onto the end of a wooden box.
Portal Painting
"Rust primer" is a great way to get brick color on things, and my "go to" when painting "brick" plastic buildings. (I use two coats for extra protection against UV, and it has protected several buildings for years of exposure.)
But spray paint on foam is problematic, to put it nicely. Years ago, I damaged a foam-based project by using it. I certainly didn't want to melt my tunnel portals - they were hard enough to come by. There are two issues, the propellant and the solvent. According to the I.S.L.E. sheet, I shouldn't use an oil-based paint, even with a paint brush, because the foam could be damaged. But in my limited experience, the propellant from spray cans is the bigger issue.
At the urging of a crafting friend, Maria Cudequest, I watched a video with a fellow using spray paint on foams by going very lightly from a distance, so the propellant didn't really hit the foam. He was especially careful to keep the paint from saturating at any point on the object he was painting. If it didn't look dry immediately after he sprayed, it was too thick.
 So I got out some "rust primer" spray cans I bought for a project back in 2015 and figured out which cans were still good. This comes under the "Don't Try This at Home" category of approaches, or at least the "Test first on a hidden surface" category. So I got out some "rust primer" spray cans I bought for a project back in 2015 and figured out which cans were still good. This comes under the "Don't Try This at Home" category of approaches, or at least the "Test first on a hidden surface" category.
I "sacrificed" one whole can just getting light, but "safe" coats on all four portals. Then I got out a partial can and used it up adding a little more. By now there were probably ten or fifteen different "coats" of paint. Though each coat was very light, I began to feel that - as they built up - they were providing the protection that the foam needed from further coats of paint and - eventually - from the weather.
The third can was left for last because it was closer to a brick color than the other cans. I used it to make certain the gaps between the "bricks" had at least some protection (and weren't orange any more).
Then I tried to even out the color overall. As it turned out, different parts of each portal took the color a little differently because of minute texture differences. Fine, it probably looks more realistic that way anyway.
By now, the portals all felt damp, as if they were not drying out completely between coats. So I left them in the sun on a hot afternoon, and it seemed to dry them out. Hopefully, it also stopped any residual chemical reaction between the propellant, the solvent, and the foam.
All that said, looking at the photo above makes me think about the possibility of using these to make a (relatively low) viaduct. Not going there at the moment, and these might be unavailable if I ever want to consider it later, but it IS a thought. . . .
Subsequently, I masked two of the portals and used a can of flat "sandstone" color (also left over from another project) to paint the "stones." Your mileage may vary, but the sandstone color was closer to the color of the limestone chunks I woud be using to build up the "hills" over the tunnels.
The photo below left shows the portals with masking tape covering the parts I wanted to stay red. Because the paint didn't go on in a smooth coat, there was a sort of grainy top layer that kept the tape from adhering quite as well as I would have liked. At the same time, I didn't want it to adhere so well that it took the red paint on when I removed it.
The photo above right shows the mask portals after I hit them twice with the sandstone color.
 The photo to the right shows those portals after I removed the masking tape. If you look closely, you can see where the tape had pulled away under the keystone and some of the sandstone paint got through. The photo to the right shows those portals after I removed the masking tape. If you look closely, you can see where the tape had pulled away under the keystone and some of the sandstone paint got through.
Since the overspray is underneath the arch, no one would notice, but I was considering blackening that surface a little anyway to imply that steam engines had been there.
I was very happy that the tape didn't pull off the red paint I had worked so hard to put on.
 Dirtscaping Prep Dirtscaping Prep
In preparation for dirtscaping, I protected the wooden tunnel boxes by staple-gunning vinyl sheeting over them.
The structures are built with ground-ready pressure-treated lumber, so they should be able to survive in contact with damp soil indefinitely. But they're not exactly waterproof, and I don't want plant roots growing through.
Plus, I had the pleasure of replacing a tunnel that failed on my other railroad, and I have no particular desire to repeat that experience.
 The same day, I started hauling in rocks from a nearby property owned by a person who has done landscaping for us. The same day, I started hauling in rocks from a nearby property owned by a person who has done landscaping for us.
Our bedrock is sedimentary limestone, and when anyone digs a hole of any size, you get these big chunks that centuries of frost heave have broken into strange shapes. As further examples, the little pile of rocks on the far side of the track came from our vegetable garden. The larger rock there was buried in our lawn and I dug it out when it started catching my mower blade.
You can build a fairly stable "wall" or "hill" just by interlocking the odd pieces. But it helps to have a bunch of pieces to choose from when arranging what is essentially a rock garden.
If you can't get rocks, you should know that folks all over the world have had success making their own "rocky hillsides" using poured concrete veneer as shown in this article. That's just one of many alternatives you might consider.
More to Come
 These big rocks are heavy. I'm not worried about them collapsing the platforms, since my "deck" structure would hold a piano, but these stones are awkward to move into place. These big rocks are heavy. I'm not worried about them collapsing the platforms, since my "deck" structure would hold a piano, but these stones are awkward to move into place.
The photo to the right shows a few of them getting "started." Hopefully I'll have more dirtscaping, tree planting, etc., done soon.
Keep in Touch
If you're headed toward or past Springfield, Ohio, please let me know, and I'll see if we can work out a quick visit.
Finally, please let us know about your ongoing projects. Ask questions, send corrections, suggest article ideas, send photos, whatever you think will help you or your fellow railroaders. In the meantime, enjoy your trains, and especially enjoy any time you have with your family in the coming weeks,
Paul Race
FamilyGardenTrains.com
 Proceed to "Tunnel Framing on the New Boston and Donnels Creek, Part 2" - Adding rocks, dirt, and plants to the new tunnel structures. Because I wanted to transplant dwarf and miniature trees to the new "mountains," I had to move a substantial amount of rocks and dirt. But I feel the result will be well worth it, once the groundcovers fill in. Proceed to "Tunnel Framing on the New Boston and Donnels Creek, Part 2" - Adding rocks, dirt, and plants to the new tunnel structures. Because I wanted to transplant dwarf and miniature trees to the new "mountains," I had to move a substantial amount of rocks and dirt. But I feel the result will be well worth it, once the groundcovers fill in.
Click on the photo to see our status as of late July, 2021.
 Return to "New Right-of-Ways on the New Boston and Donnels Creek RR" - Adding a loop based on 10'-diameter curves. Includes cutting and installing 2x6 roadbed, bridging the waterfall, and cutting a third passage through the train shed, as well as installing roadbed for two smaller loops. Return to "New Right-of-Ways on the New Boston and Donnels Creek RR" - Adding a loop based on 10'-diameter curves. Includes cutting and installing 2x6 roadbed, bridging the waterfall, and cutting a third passage through the train shed, as well as installing roadbed for two smaller loops.
Click on the picture to see our status as of late March, 2021.
 Return to "Creating a Railroad Timetable" - No train station would be complete without a timetable showing arrivals and departures (as well as expected arrivals and departures). We made one with a big piece of underlayment, framed it with scrap lumber, cut lettering for it with a craftcutter, and lined it with striping tape. This one is hinged to a shallow shelving unit that is holding the dvds we sometimes watch while working on projects in our workshop. Return to "Creating a Railroad Timetable" - No train station would be complete without a timetable showing arrivals and departures (as well as expected arrivals and departures). We made one with a big piece of underlayment, framed it with scrap lumber, cut lettering for it with a craftcutter, and lined it with striping tape. This one is hinged to a shallow shelving unit that is holding the dvds we sometimes watch while working on projects in our workshop.
Click on the picture to see our status as of January, 2021.
 Return to "Christmas Preparations and Operations 2020" - A series of families were going to visit during the holiday season (masked and distanced, of course), so we just had to do a little Christmas decorating, and get as many trains running as possible for the kids. This included laying temporary ROWs on the new platform and setting up two Lionel RTP trains for kids to run. Return to "Christmas Preparations and Operations 2020" - A series of families were going to visit during the holiday season (masked and distanced, of course), so we just had to do a little Christmas decorating, and get as many trains running as possible for the kids. This included laying temporary ROWs on the new platform and setting up two Lionel RTP trains for kids to run.
 Return to "Garage to Train Station, Part 2" - continuing to fix up one end of my garage to resemble a Victorian train station interior. I used a digital projector to outline vintage coach details for my windowframes. Then I painted the backgrounds, attached the windowframes, and installed them on the wall. A repro Regulator clock and other details are added. Return to "Garage to Train Station, Part 2" - continuing to fix up one end of my garage to resemble a Victorian train station interior. I used a digital projector to outline vintage coach details for my windowframes. Then I painted the backgrounds, attached the windowframes, and installed them on the wall. A repro Regulator clock and other details are added.
Click on the picture to see our status as of late December, 2020.
 Return to "Garage to Train Station, Part 1" - fixing up one end of my garage to resemble a Victorian train station interior. The initial steps included demolition, patching the ceiling and walls, moving electrical outlets, adding wainscotting and baseboard, and planning for windowframes with painted backgrounds. Return to "Garage to Train Station, Part 1" - fixing up one end of my garage to resemble a Victorian train station interior. The initial steps included demolition, patching the ceiling and walls, moving electrical outlets, adding wainscotting and baseboard, and planning for windowframes with painted backgrounds.
Click on the picture to see our status as of early December, 2020.
 Return to "Westward Expansion, 2020, Part 3" - Thanks to a spate of unusually warm weather in early November, I was able to get the new platform finished, lined with vinyl, and bordered with trim boards to keep the dirt and gravel in place. Return to "Westward Expansion, 2020, Part 3" - Thanks to a spate of unusually warm weather in early November, I was able to get the new platform finished, lined with vinyl, and bordered with trim boards to keep the dirt and gravel in place.
The next "permanent" improvements will wait for now. In the meantime, we will set out buildings and a temporary loop or to entertain visitors between now and Christmas.
Click on the picture to see our status as of mid-November, 2020.
 Return to "Westward Expansion, 2020, Part 2" - We had to be careful leveling the last joists so the frame, decking, and right-of-way would be as level as possible. Fortunately we were able to get enough lumber to get a good start on the frame. Return to "Westward Expansion, 2020, Part 2" - We had to be careful leveling the last joists so the frame, decking, and right-of-way would be as level as possible. Fortunately we were able to get enough lumber to get a good start on the frame.
We also added one last tweak to the frame design to make it easier to extend this platform to its originally planned size, if and when we get a chance to do so.
 Return to "Westward Expansion, 2020, Part 1" - With a lumber shortage and warm weather running out, we revised our plans for the next addition, bought what decent lumber we could find, dug holes, installed posts, and attached joists. Return to "Westward Expansion, 2020, Part 1" - With a lumber shortage and warm weather running out, we revised our plans for the next addition, bought what decent lumber we could find, dug holes, installed posts, and attached joists.
We were hoping to get the lumber we need to finish the platform before cold weather set in. Click on the link to see our status as of late September, 2020.
 Return to "Train Storage Solutions, 2020" - Using periods of cold weather to get things sorted in the garage, including shelf building and tips for schlepping trains from storage to the tracks. Return to "Train Storage Solutions, 2020" - Using periods of cold weather to get things sorted in the garage, including shelf building and tips for schlepping trains from storage to the tracks.
Click on the following link to see our status as of late January, 2020.
https://familygardentrains.com/newbost/20_1_19_shelves/shelves.htm
 Return to "Expansion Planning, 2020" - Three years after starting a garden railroad in our new home, we are trying to figure out the best way to finish the last loop of our raised platform railroad. How to make room for 10'-diameter curves and more towns and industries, but still keeping things manageable requires some thinking and rethinking. Return to "Expansion Planning, 2020" - Three years after starting a garden railroad in our new home, we are trying to figure out the best way to finish the last loop of our raised platform railroad. How to make room for 10'-diameter curves and more towns and industries, but still keeping things manageable requires some thinking and rethinking.
Click on the photo to see the options we were reviewing for the next and last expansion.
 Return to "Winter Preparation, 2019" - After the big open railroad event, we try to prepare the railroad for the cold months, including populating the railroad with North States bird feeders so it doesn't look empty, adding an air pump and bubblers to the pond, and more. Return to "Winter Preparation, 2019" - After the big open railroad event, we try to prepare the railroad for the cold months, including populating the railroad with North States bird feeders so it doesn't look empty, adding an air pump and bubblers to the pond, and more.
Click on the following link to see our status as of early December, 2019.
https://familygardentrains.com/newbost/19_11_24_winter_prep/19_11_24_winter_prep.htm
 Return to "Christmas Train Day, 2019" - Three years after starting a garden railroad in our new home, we host another Christmas-themed open railroad, giving many families a jump start on Christmas celebrations and sharing the experience of running trains with lots of kids. Return to "Christmas Train Day, 2019" - Three years after starting a garden railroad in our new home, we host another Christmas-themed open railroad, giving many families a jump start on Christmas celebrations and sharing the experience of running trains with lots of kids.
Click on the photo to see a brief record of our busiest weekend in November, 2019.
 Return to "Preparing for Christmas Train Day 2019" - Wrapping up construction projects for 2019 and getting ready for our annual Christmas-themed open railroad. Includes new lighting and other features, providing a temporary home for a Hogwarts Express train, weather issues, and more. Click to go to article. Return to "Preparing for Christmas Train Day 2019" - Wrapping up construction projects for 2019 and getting ready for our annual Christmas-themed open railroad. Includes new lighting and other features, providing a temporary home for a Hogwarts Express train, weather issues, and more. Click to go to article.
Click on the following link to see our progress of mid-November, 2019.
 Return to Decking the NEW New Boston and Donnels Creek Part 2 - Getting the next part of the railroad ready to install trains. Includes installing 2"x6" decking, vinyl sheeting, edges to hold back the gravel, and corrugated steel panels. It's not done, but it will give us another place to set up trains for our next Christmas-themed open railroad. Return to Decking the NEW New Boston and Donnels Creek Part 2 - Getting the next part of the railroad ready to install trains. Includes installing 2"x6" decking, vinyl sheeting, edges to hold back the gravel, and corrugated steel panels. It's not done, but it will give us another place to set up trains for our next Christmas-themed open railroad.
Click on the photo to see our status as of late October, 2019.
 Return to "Framing the NEW New Boston and Donnels Creek RR - Part 7" - Installing posts, joists, framing, and decking for the eastern expansion of the NEW New Boston and Donnels Creek. Although this installation was complicated by having to fit into an existing framework, the methods used could work for any raised-platform railroad. Return to "Framing the NEW New Boston and Donnels Creek RR - Part 7" - Installing posts, joists, framing, and decking for the eastern expansion of the NEW New Boston and Donnels Creek. Although this installation was complicated by having to fit into an existing framework, the methods used could work for any raised-platform railroad.
Click on the following link to see our progress of early October, 2019.
 Return to "Planning the NEW New Boston and Donnels Creek RR - Part 5" - Once the major components of the water feature were installed and tested, we decided to add one more bit of railroad proper before our "Christmas Train Day," this November. The addition, about 5'x11', will allow us to put a small train and some scenery closer to eye level for youngsters. Eventually it will be part of the larger plan that will allow us to run our bigger cars and locomotives. Return to "Planning the NEW New Boston and Donnels Creek RR - Part 5" - Once the major components of the water feature were installed and tested, we decided to add one more bit of railroad proper before our "Christmas Train Day," this November. The addition, about 5'x11', will allow us to put a small train and some scenery closer to eye level for youngsters. Eventually it will be part of the larger plan that will allow us to run our bigger cars and locomotives.
Click on the photo to see our plans for the next addition, as of late September, 2019.
 Return to Waterscaping Part 4. - Installing the last connecting pool, so the whole planned waterfall is complete except for dirtscaping and planting. Return to Waterscaping Part 4. - Installing the last connecting pool, so the whole planned waterfall is complete except for dirtscaping and planting.
The process included checking the pump, extending the hoses, rescuing toads, building the platform, trimming the platform, testing the pool's location, etc.
Click the photo to go to the article.
 Return to "Waterscaping, Part 3" - After seven months of crazy long work hours, I finally got some free time to continue working on the railroad. Weather permitting, I often worked all the live-long day. This article describes installing two posts that will eventually support the last connecting pool, then digging the big hole for the in-ground pond, complicated by a three-month drought that turned the ground to concrete. Return to "Waterscaping, Part 3" - After seven months of crazy long work hours, I finally got some free time to continue working on the railroad. Weather permitting, I often worked all the live-long day. This article describes installing two posts that will eventually support the last connecting pool, then digging the big hole for the in-ground pond, complicated by a three-month drought that turned the ground to concrete.
Click on the photo to see our progress as of mid-September, 2019.
 Return to Christmas Train Day, 2018 - After two years without our traditional Christmas Train Day (something we did from 2008 through 2015), we were anxious to get started again, even without a huge right of way to show off. The kids' trains, the extra Thomas railroad, the popcorn popper and two Bachmann Christmas trains got a big workout. And the visiting kids all loved it! Return to Christmas Train Day, 2018 - After two years without our traditional Christmas Train Day (something we did from 2008 through 2015), we were anxious to get started again, even without a huge right of way to show off. The kids' trains, the extra Thomas railroad, the popcorn popper and two Bachmann Christmas trains got a big workout. And the visiting kids all loved it!
Click on the photo to see a lot of last-minute preparations and some photos of the November 10, 2018 event itself.
 Return to "Adding a Train Shed Part 6" - Installing the board and batten siding on our train shed, installing the windows, installing the trim, testing the "tunnel entrances," and more. Return to "Adding a Train Shed Part 6" - Installing the board and batten siding on our train shed, installing the windows, installing the trim, testing the "tunnel entrances," and more.
By the way, going over lumber receipts in early 2019, I couldn't believe I was still siding the train shed in late October, and managed to have an open railroad in mid-November. It is a little crazy how fast things can go together if you have a deadline and a lot of gift cards.
Click on the photo to see our progress as of late October, 2018.
 Return to "Adding a Train Shed Part 5" - Planning the doors, walls, and windows of our garden train shed. Return to "Adding a Train Shed Part 5" - Planning the doors, walls, and windows of our garden train shed.
Includes choosing the siding and windows, installing the door, painting the windowframes, and adding crosspieces to support the vertical siding boards.
 Return to "Adding a Train Shed Part 4" - Choosing and installing underlayment and drip edge to protect the sheathing until I can get the final roof installed. Return to "Adding a Train Shed Part 4" - Choosing and installing underlayment and drip edge to protect the sheathing until I can get the final roof installed.
Now the roof is waterproof enough to get us through the next couple of months at least, maybe more.
 Return to "Adding a Train Shed Part 3" - Adding fascia, sheathing, and end trim to the in-progress train shed. Return to "Adding a Train Shed Part 3" - Adding fascia, sheathing, and end trim to the in-progress train shed.
I thought about bringing in helpers for this part, but a reader commented on how helpful it was to see how one person could do this sort of thing by himself, so I just kept plugging away.
Click on the photo to see our progress as of September 13, 2018
 Return to "Waterscaping Part 2" - Getting this year's waterscaping project done (for now at least). Installing and dirtscaping the third level of the waterfall. Installing pump and filter, adding an extra container and modifying the ones we already had installed to keep the water running smoothly. And lots of other tweaking. Includes tips about introducing fish and plants, as well as other information about water features in general that you may find helpful. Return to "Waterscaping Part 2" - Getting this year's waterscaping project done (for now at least). Installing and dirtscaping the third level of the waterfall. Installing pump and filter, adding an extra container and modifying the ones we already had installed to keep the water running smoothly. And lots of other tweaking. Includes tips about introducing fish and plants, as well as other information about water features in general that you may find helpful.
Click on the photo to see our status as of August 5, 2018.
 Return to "Adding a Train Shed Part 2" - Adding rafters to the frame of the in-progress train shed. Now it's starting to look like it might actually be a structure and not just a crazy collection of posts. Return to "Adding a Train Shed Part 2" - Adding rafters to the frame of the in-progress train shed. Now it's starting to look like it might actually be a structure and not just a crazy collection of posts.
The way we got the rafters and ridge board up wouldn't work for everybody, but it worked for us, and hopefully will help other folks to "think outside the box" - literally in this case.
Click on the photo to see our progress as of July 14, 2018.
 Return to "Adding a Train Shed Part 1" - What started out as a simple addition of a deck to stand on when putting trains on the track got a little more ambitious when I realized that JUST installing the deck this year would require more work next year. So we framed out what we planned to be a train shed attached to the railroad. If it ever gets finished, I can easily put trains on the track at a moment's notice instead of schlepping them out from the garage. Return to "Adding a Train Shed Part 1" - What started out as a simple addition of a deck to stand on when putting trains on the track got a little more ambitious when I realized that JUST installing the deck this year would require more work next year. So we framed out what we planned to be a train shed attached to the railroad. If it ever gets finished, I can easily put trains on the track at a moment's notice instead of schlepping them out from the garage.
Click on the photo to see our status as of July 9, 2018.
 Return to "Waterscaping the NEW New Boston and Donnels Creek Part 1," our article on getting the top two layers of the waterfall on solid footing and getting the third layer framed. After we finish decking and dirtscaping the third layer, we will probably add a washbasin or something for the water to flow into, then add a pump to get the waterfall flowing. No big pond until next year at least - too many other projects. Return to "Waterscaping the NEW New Boston and Donnels Creek Part 1," our article on getting the top two layers of the waterfall on solid footing and getting the third layer framed. After we finish decking and dirtscaping the third layer, we will probably add a washbasin or something for the water to flow into, then add a pump to get the waterfall flowing. No big pond until next year at least - too many other projects.
Click on the photo to see our progress as of June 13, 2018.
 Return to "Dirtscaping the NEW New Boston and Donnels Creek RR, Part 2. - Adding barriers to keep the rocks, dirt, and plants where they're supposed to go, placing platforms and running wiring for buildings, adding rocks, dirt, and plants to the upper level of the railroad. Return to "Dirtscaping the NEW New Boston and Donnels Creek RR, Part 2. - Adding barriers to keep the rocks, dirt, and plants where they're supposed to go, placing platforms and running wiring for buildings, adding rocks, dirt, and plants to the upper level of the railroad.
Click on the photo to see our status as of June 1, 2018.
 Return to "Adding Raised Roadbed to the NEW New Boston and Donnels Creek, Part 2" - Trimming the corners off the roadbed on the upper layer and cutting the pieces that will support the curves on the middle layer. We need to get the upper two tiers of the pond installed before we totally complete this step, so the article doesn't quite show the finished product. You'll see it later as part of other articles. Return to "Adding Raised Roadbed to the NEW New Boston and Donnels Creek, Part 2" - Trimming the corners off the roadbed on the upper layer and cutting the pieces that will support the curves on the middle layer. We need to get the upper two tiers of the pond installed before we totally complete this step, so the article doesn't quite show the finished product. You'll see it later as part of other articles.
 Return to "Adding Raised Roadbed to the NEW New Boston and Donnels Creek RR, Part 1" - Sorting out our priorities for the spring and summer of 2018. There a lot of little chores we really should get done before we start on the next big addition. Click to see our plans as of February 27, 2018. Return to "Adding Raised Roadbed to the NEW New Boston and Donnels Creek RR, Part 1" - Sorting out our priorities for the spring and summer of 2018. There a lot of little chores we really should get done before we start on the next big addition. Click to see our plans as of February 27, 2018.
Click on the photo to see our status as of February 20, 2018
 Return to "2018: Springing into Spring on the NEW New Boston & Donnels Creek RR." - Sorting out our priorities for the spring and summer of 2018. There a lot of little chores we really should get done before we start on the next big addition. Click to see our plans as of February 27, 2018. Return to "2018: Springing into Spring on the NEW New Boston & Donnels Creek RR." - Sorting out our priorities for the spring and summer of 2018. There a lot of little chores we really should get done before we start on the next big addition. Click to see our plans as of February 27, 2018.
Click on the photo to see our status as of February 20, 2018
 Return to "Dirtscaping the NEW New Boston and Donnels Creek RR, Part 1. - Putting edging around the existing "layers" of the new railroad, and beginning to add gravel and rocks. There were a few test runs, but we got stopped early by bad weather before we could dump the rest of the rocks, gravel, and dirt, much less plant the plants we hoped to get in before snowfall. Return to "Dirtscaping the NEW New Boston and Donnels Creek RR, Part 1. - Putting edging around the existing "layers" of the new railroad, and beginning to add gravel and rocks. There were a few test runs, but we got stopped early by bad weather before we could dump the rest of the rocks, gravel, and dirt, much less plant the plants we hoped to get in before snowfall.
Click on the photo to see our status as of November 21, 2017
 Return to "Decking the NEW New Boston and Donnels Creek RR - Decking the 'middle layer' of our proposed three-tier outdoor railroad. Prepping more track, laying out track and decking to make certain we have measurements correct, installing most of the remaining decking for this layer. Return to "Decking the NEW New Boston and Donnels Creek RR - Decking the 'middle layer' of our proposed three-tier outdoor railroad. Prepping more track, laying out track and decking to make certain we have measurements correct, installing most of the remaining decking for this layer.
Click on the photo to see our status as of October 25, 2017
 Return to "Framing the NEW New Boston and Donnels Creek RR, Part 6" - Modifying and finishing the framing on the second layer, cantilevering, using R3 track versus all other pre-curved track formats, finalizing the track plan, why painting the track makes old and new track blend better, and more. This will be the last bit of "framing" in 2017, and it worked out well, considering. Return to "Framing the NEW New Boston and Donnels Creek RR, Part 6" - Modifying and finishing the framing on the second layer, cantilevering, using R3 track versus all other pre-curved track formats, finalizing the track plan, why painting the track makes old and new track blend better, and more. This will be the last bit of "framing" in 2017, and it worked out well, considering.
Click on the photo to see our status as of October 15, 2017
 Return to "Framing the NEW New Boston and Donnels Creek RR, Part 5" - Spreading the billboard-sourced vinyl underlayment on the top layer. Prepping used Aristo track for (hopefully) many more years of service. Laying the first loop of track, attaching power wires with spade terminals, and testing conductivity with a Bachmann streetcar. Return to "Framing the NEW New Boston and Donnels Creek RR, Part 5" - Spreading the billboard-sourced vinyl underlayment on the top layer. Prepping used Aristo track for (hopefully) many more years of service. Laying the first loop of track, attaching power wires with spade terminals, and testing conductivity with a Bachmann streetcar.
Click on the photo to see our status as of October, 10, 2017
 Return to "Framing the NEW New Boston and Donnels Creek RR, Part 4" - Planning and running the decking for the top layer, testing the track plan, checking clearances, prepping used track with new railjoiners, examining the vinyl I ordered to go over the decking, and more. Return to "Framing the NEW New Boston and Donnels Creek RR, Part 4" - Planning and running the decking for the top layer, testing the track plan, checking clearances, prepping used track with new railjoiners, examining the vinyl I ordered to go over the decking, and more.
Click on the photo to see our status as of September 26, 2017
 Return to "Framing the NEW New Boston and Donnels Creek RR, Part 3" -
Getting the frame finished on the top layer, ordering other things I'd need eventually, deciding on materials for the decking on the top layer (at least). Return to "Framing the NEW New Boston and Donnels Creek RR, Part 3" -
Getting the frame finished on the top layer, ordering other things I'd need eventually, deciding on materials for the decking on the top layer (at least).
Click on the photo to see our status as of September 17, 2017
 Return to "Framing the NEW New Boston and Donnels Creek RR, Part 2" -
Once I had the overall frame relatively solid, I hooked up the underground power lines to two GFI plugs that should be in easy reach once everything is finished. I also decided to frame out the top railroad layer while I could still access the center of the railroad easily. Because I was running out of vertical space, I reconfigured that layer. Then after I got the "core" pieces on, I changed my plan again. But the whole thing is getting easier and easier to visualize, and is getting closer to complete with every board I cut and fasten on. Return to "Framing the NEW New Boston and Donnels Creek RR, Part 2" -
Once I had the overall frame relatively solid, I hooked up the underground power lines to two GFI plugs that should be in easy reach once everything is finished. I also decided to frame out the top railroad layer while I could still access the center of the railroad easily. Because I was running out of vertical space, I reconfigured that layer. Then after I got the "core" pieces on, I changed my plan again. But the whole thing is getting easier and easier to visualize, and is getting closer to complete with every board I cut and fasten on.
Click on the photo to see our status as of September 7, 2017
 Return to "Framing the NEW New Boston and Donnels Creek RR, Part 1" -
Once I started dropping posts in the holes and screwing things together, I didn't want to stop before I had the basic frame built (for one thing, the wood warps less once it's fastened in place). Now the folks driving down the street past our house (we're on a corner lot) probably wonder if I'm building an elaborate chicken coop, but that's fine with me. I still need to make a few more lumber runs and do a lot more cutting and sawing, but having the basic frame in place should make the next bits a lot easier. Return to "Framing the NEW New Boston and Donnels Creek RR, Part 1" -
Once I started dropping posts in the holes and screwing things together, I didn't want to stop before I had the basic frame built (for one thing, the wood warps less once it's fastened in place). Now the folks driving down the street past our house (we're on a corner lot) probably wonder if I'm building an elaborate chicken coop, but that's fine with me. I still need to make a few more lumber runs and do a lot more cutting and sawing, but having the basic frame in place should make the next bits a lot easier.
Click on the photo to see our status as of August 10, 2017
 Return to "Breaking Ground on the NEW New Boston and Donnels Creek" -
Okay, in case you wondered if we'd ever get started on the thing, we broke ground in July, using a manual post-hole digger. Well two manual post-hole diggers. But by the end of this article, we're ready for the posts to start going in. Return to "Breaking Ground on the NEW New Boston and Donnels Creek" -
Okay, in case you wondered if we'd ever get started on the thing, we broke ground in July, using a manual post-hole digger. Well two manual post-hole diggers. But by the end of this article, we're ready for the posts to start going in.
Click on the photo to see our status as of the end of July, 2017
 Return to "Planning the NEW New Boston and Donnels Creek, Part 4" -
Well, the rented post-hole digger fell through, so we dug our vegetable garden with a manual post-hole digger (the scissors kind). In addition, I stake out where the railroad was going to be. Twice. And tweaked the plans again. Sorry about the redo's, but sometimes just walking around the yard trying to visualize things makes me reconsider something that seemed "settled" only a few days before. Return to "Planning the NEW New Boston and Donnels Creek, Part 4" -
Well, the rented post-hole digger fell through, so we dug our vegetable garden with a manual post-hole digger (the scissors kind). In addition, I stake out where the railroad was going to be. Twice. And tweaked the plans again. Sorry about the redo's, but sometimes just walking around the yard trying to visualize things makes me reconsider something that seemed "settled" only a few days before.
Click on the photo to see what we were considering as of late May, 2017
 Return to "Planning the NEW New Boston and Donnels Creek, Part 3" -
We have still not broken ground. In part because we plan to rent a post-hole digger and dig the post holes for our raised vegetable garden and the first phase of the garden railroad at the same time, and we don't have enough lumber on hand yet. (If we didn't break it down into multiple trips, we'd be blowing out the shocks on our minivan.) In the meantime, we used a line level to see if the slope of the back yard was as bad as we thought it was (it's worse), and we did other site preparation, including planting a whole bunch of spruce tree seedlings to eventually give us some privacy in our side and back yard. Plus, I'm still wavering a little on the "where-to-start-first" issue. Return to "Planning the NEW New Boston and Donnels Creek, Part 3" -
We have still not broken ground. In part because we plan to rent a post-hole digger and dig the post holes for our raised vegetable garden and the first phase of the garden railroad at the same time, and we don't have enough lumber on hand yet. (If we didn't break it down into multiple trips, we'd be blowing out the shocks on our minivan.) In the meantime, we used a line level to see if the slope of the back yard was as bad as we thought it was (it's worse), and we did other site preparation, including planting a whole bunch of spruce tree seedlings to eventually give us some privacy in our side and back yard. Plus, I'm still wavering a little on the "where-to-start-first" issue.
Click on the photo to see what we were considering as of late April, 2017
 Return to "Planning the NEW New Boston and Donnels Creek, Part 2" -
More plans. We've moved on from the 2"x6" roadbed-on-posts to a sort of "train-table-outside" plan. Our goals include low-maintenance, high interest, and high reliability. We're also trying to get around having a thousand dollars' worth of dirt hauled into the back yard. If you want to get some idea of what our planning process looks like, reading these through in sequence may help. Or it may drive you crazy. Return to "Planning the NEW New Boston and Donnels Creek, Part 2" -
More plans. We've moved on from the 2"x6" roadbed-on-posts to a sort of "train-table-outside" plan. Our goals include low-maintenance, high interest, and high reliability. We're also trying to get around having a thousand dollars' worth of dirt hauled into the back yard. If you want to get some idea of what our planning process looks like, reading these through in sequence may help. Or it may drive you crazy.
Click on the photo to see what we were considering in early April, 2017
 Return to "Planning the NEW New Boston and Donnels Creek, Part 1" -
If you're subscribed to our newsletter, you know that we moved just after Thanksgiving in 2016, leaving behind most of the track, a few of the bird feeders, and one Bachmann train set for the new owners. We also left behind a high-maintenance garden that we do not intend to replicate at the new place. This is the first chapter of a new chapter in our lives, which we hope will include a lot of "lessons learned." But first, some serious landscaping had to take place. Return to "Planning the NEW New Boston and Donnels Creek, Part 1" -
If you're subscribed to our newsletter, you know that we moved just after Thanksgiving in 2016, leaving behind most of the track, a few of the bird feeders, and one Bachmann train set for the new owners. We also left behind a high-maintenance garden that we do not intend to replicate at the new place. This is the first chapter of a new chapter in our lives, which we hope will include a lot of "lessons learned." But first, some serious landscaping had to take place.
Click on the photo to see what we were considering in March, 2017
 Return to the New Boston and Donnels Creek RR Page - This is the page describing Paul Race's progress and frequent rework on his own garden railroad, started on a shoe-string budget in 1998, later expanded, and later refurbished several times as issues arose. Issues that Paul hopes to avoid by building the next iteration above ground. Return to the New Boston and Donnels Creek RR Page - This is the page describing Paul Race's progress and frequent rework on his own garden railroad, started on a shoe-string budget in 1998, later expanded, and later refurbished several times as issues arose. Issues that Paul hopes to avoid by building the next iteration above ground.
Click on the photo to see the home page of Paul's railroad.
 Return to Family Garden Trains' Home Page - The home page with links to all the other stuff, including design guidelines, construction techniques, structure tips, free graphics, and more. Return to Family Garden Trains' Home Page - The home page with links to all the other stuff, including design guidelines, construction techniques, structure tips, free graphics, and more.
To read more, or to look at recommended Garden Railroading and Big Indoor Train products, please click on the index pages below.
|